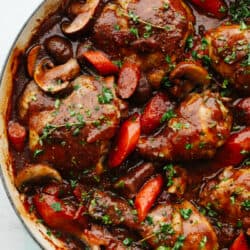
This amazing coq au vin is dripping with flavor! Soaked in the most amazing flavors, this chicken comes out juicy, tender, and full of the BEST taste!
If you love drumsticks and chicken thighs as much as I do then you are going to LOVE this recipe. In fact, you will want to try this Air Fryer Chicken Thighs recipe, these Baked Chicken Thighs, and this Chicken Adobo too!

What IS Coq au Vin?
Before you start cooking up this amazingly delicious chicken, let me tell you about what it is! Coq au Vin is a dish that started in France. It is a French chicken stew with drumsticks and chicken thighs. They are braised in a delicious wine sauce and then baked to perfection! And, to top it off, this dish is also filled with bacon, mushrooms, and carrots. It’s a recipe that once you’ve tried, you will go back to over and over again!
I know that the name sounds fancy. And while it also looks fancy, anyone can make it! It’s super easy and only takes about an hour to make. And that includes baking time! This dish makes a lot but I always like to serve it with some rolls, a side salad, and an easy dessert just to finish off the meal! This dish will for sure impress any guest and they will leave your house asking for the recipe! Go ahead and try it! It’s SOO GOOD!
Ingredients in Coq au Vin
While there are a bunch of ingredients in this meal, they are all pretty simple! And once you taste them all together, you are going to love the result! See the recipe card below for a list of exact ingredient measurements.
- Bacon: I used bacon in this recipe but you could totally use pancetta instead!
- Drumsticks and chicken thighs: Using dark meat is a key to getting that juicy and tender texture!
- Onion: The onion flavor isn’t strong but adds SO much to the taste!
- Carrots: Make sure to peel your carrots and cut them up into even 1 inch pieces.
- Garlic cloves: If you don’t have any fresh garlic cloves on hand then you can go ahead and use the minced garlic from your fridge! ½ tsp equals about 1 clove of garlic.
- Tomato paste: Tomato paste is used to make the sauce thicker and add flavor.
- Chicken broth: I used chicken broth but you can use beef broth if you have that instead.
- Red wine: You can use any red wine of your choice! If you aren’t sure which kind to use then try Pinot Noir.
- Flour: All purpose flour works fine in this recipe!
- Mushrooms: Slice up your mushrooms so that they are the same size. This will help them cook evenly.
Let’s Start Cooking!
Taking an hour out of your day to make this for dinner is going to be SO worth it! This coq au vin is unique and delicious!!
- Preheat oven and cook bacon until it crumbles: Preheat oven to 350 degrees. In a large dutch oven or cast iron pan add the bacon and cook and crumble until crisp. Remove with a slotted spoon.
- Sear the chicken: Add the chicken and sear on each side for 2-3 minutes until golden brown. Remove and set aside on a plate.
- Add the vegetables: Add the onion, carrots and garlic and sauté until almost tender 3-4 minutes.
- Make the sauce and braise: Add in the tomato paste, chicken broth and wine. Bring to a boil and then add the chicken back to the pan. Cover the pan and place in the oven to let braise for 30 minutes.
- Take out the chicken: Remove the pan from the oven and set on the stove. Carefully remove the lid and take out the chicken and set it aside.
- Thicken the sauce: Take ½ cup of the sauce and whisk it with the flour. Put it back in with the vegetables with the mushrooms and bacon and cook until the sauce has thickened and mushrooms are tender.
- Simmer: Add the chicken back to the pot and let it simmer until heated throughout.

Cooking Tips
Coq au vin is up at the top of my list for the best chicken stew! Its flavors are so deep and delicious. It’s a dish that your entire family is going to love!
- The sauce will thicken: Your sauce will thicken as it cools. So if its not exactly as thick as you want when you take it off of the stove them don’t worry! By the time you serve it, it will be perfect!
- Trim the fat: sometimes chicken thighs have some extra fat on them. Trim off all of the fat before you cook them so that they are ready to eat when you are all done!

How to Store Leftovers
This coq au vin is one of those recipes that I like just as much, if not more, the next day! Here is how you can store it to eat it for later!
- Refrigerator: Once the coq au vin has cooled then place it into an airtight container. Put it in your fridge and you can store it there for up to 5 days!
- Freezer: Store it in an airtight container or bag that is labeled with the date. It will last iin your freezer for up to 3 months!
- Reheating: If it’s frozen, place it in the fridge to thaw overnight. Once it’s thawed, then you can just reheat it on the stovetop! Bring it to a boil, then simmer it on the stove for 5 minutes. Continue to cook until it is heated through.

More French Recipes to Try

Desserts
French Silk Pie Bars

Bread
French Baguette

Desserts
Homemade Butter Cookies

Desserts
Apple Galette
Coq au Vin
Ingredients
- 6 slices bacon or pancetta sliced
- 3 drumsticks
- 3 bone in chicken thighs
- 1 onion quarter
- 4 large carrots peeled and cut into 1 inch pieces
- 3 cloves garlic minced
- 2 Tablespoons tomato paste
- 2 cups chicken broth
- 1 1/2 cups red wine of choice
- 3 tablespoons flour
- 6 ounces mushrooms sliced
Instructions
-
Preheat oven to 350 degrees. In a large dutch oven or cast iron pan add the bacon and cook and crumble until crisp. Remove with a slotted spoon.
-
Add the chicken and sear on each side for 2-3 minutes until golden brown. Remove and set aside on a plate.
-
Add the onion, carrots, and garlic and sauté until almost tender 3-4 minutes.
-
Add in the tomato paste, chicken broth, and wine. Bring to a boil and then add the chicken back to the pan. Cover the pan and place in the oven to let braise for 30 minutes.
-
Remove the pan from the oven and set it on the stove. Carefully remove the lid and take out the chicken and set it aside.
-
Take ½ cup of the sauce and whisk it with the flour. Put it back in with the vegetables with the mushrooms and bacon and cook until the sauce has thickened and mushrooms are tender.
-
Add the chicken back to the pot and let it simmer until heated throughout.
Nutrition
from The Recipe Critic https://ift.tt/3qdQRHX
https://ift.tt/3qgSaG1