Turkey gravy is rich, thick, and creamy! This gravy takes less than 15 minutes to make! Once you drizzle it all over your turkey and potatoes, well, you will use this recipe for every holiday season!
Are you ready for your holiday dinner?! If you love sides during your holiday meal then try this Green Bean Casserole, Sweet Potatoes, or this easy Stuffing to add to your meal.

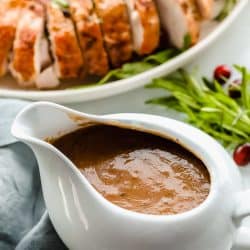
Turkey Gravy
You can’t go wrong when making homemade gravy for your holidays! This is an easy-to-make turkey gravy that will add to any Thanksgiving or Christmas dinner. I love the flavors this turkey gravy brings! It is thick, rich, and smooth and I have a hard time not drizzling it all over my plate. It blends so well with turkey, potatoes, and all other side dishes you have on your dinner table. Try it on this Roasted Honey Cinnamon Butter Sweet Potatoes, this Green Bean Casserole, and this Roasted Autumn Vegetable Stuffing!
I feel like gravy is one of those staple side dishes that no one talks about but everyone expects. Can you imagine being served turkey and potatoes with no gravy?? That’s why you need this recipe on hand! It is so simple to make and uses all of the juices from your turkey anyways. So don’t let your guests (or yourself!) down by not having gravy at your holiday get-together!
What You Need to Make Turkey Gravy
Just a few simple ingredients that will help make your turkey dinner above the rest! Plus, it is so simple to whisk together in one pan! See the recipe card below for a list of exact ingredient measurements.
- Pan drippings from turkey: This has all the flavoring you need to make your turkey gravy perfection!
- Chicken broth: The chicken broth makes it so that you have MORE gravy and makes it rich, creamy and silky smooth.
- Flour: I used all purpose flour for this recipe! This is what will thicken it up!
- Salt and pepper: Add these seasonings to taste!

Let’s Make Some Gravy!
Making your turkey gravy couldn’t be easier. Just a couple of ingredients and a few steps to follow before you are drizzling this gravy on top of everything!
- Making a roux: In a saucepan or roasting pan allow the drippings to deglaze over medium high heat. Whisk in 1 cup chicken broth and skim large pieces of fat.
- Making the turkey gravy: Whisk in flour and continue to simmer until lumps have dissolved and gravy has thickened. Add an additional ½ cup- 1 cup chicken broth to get desired thickness. Salt and Pepper to taste.

How to Thicken Gravy
Some like a thinner gravy and others like it hearty and thick! Either way tastes amazing! When thickening the gravy, I prefer to use flour over cornstarch to thicken gravy but both will do the trick! To thicken up your gravy, you will play with the amount of drippings vs four (or cornstarch). Once you make this recipe if it’s too runny then go ahead and create your slurry with either flour or cornstarch. Once you have made that then add it to the broth to make thicker turkey gravy.

How to Make Gravy WITHOUT Turkey Drippings
If you don’t have a turkey to use for the flavoring, then you can still make this gravy! Instead of the drippings then you can use turkey stock or broth for flavoring. Add in your choice of thickening agent (cornstarch or flour). Then, continue to follow the instruction for making gravy just leaving out the drippings. Your gravy will taste just as good!

Tips for Making Turkey Gravy
This turkey gravy is straightforward and easy to make! You will love all the flavoring it has to offer this holiday season. Here are some tips to help you make this turkey gravy turn out perfectly!
- Hot drippings: Make sure that your turkey drippings are still hot when adding them to the gravy. If they have already cooled then warm them back up on the stove. Don’t let them burn!
- What is a roux? A roux is a mixture that you make outside of the drippings. Once you add it to them, you stir until everything thickens! A roux is equal parts fat to flour.
- Cornstrarch or flour? Substitute cornstarch for your flour if you prefer a different thickening agent. Mix equal parts cornstarch and water or broth.
- Thick or thin: Thicken or thin out your gravy by adding more or less flour or cornstarch to your gravy.
- Smooth gravy: For a smoother gravy strain the pan drippings before adding them to the gravy. This will leave out the thicker chunks of drippings. Whisking your gravy is a key instruction so you get a smooth textured gravy. If it is lumpy pour it through a sieve before serving.
- Serve it warm: Serve your turkey gravy warm. If is begins to cool slightly, simply warm up in the microwave for 15 to 20 seconds at a time until it is warm through.

How to Store Leftovers
Thanksgiving leftovers are the BEST! Gravy always goes fast at our house so we rarely have leftovers. But if I do, this is how I store them!
- Refrigerator: Once it is completely cooled, place in an airtight container or ziplock baggie. This will store in the refrigerator for 1 to 2 days.
- Reheating: When you are ready to reheat it then pour it back into a saucepan and add a 1 to 2 tablespoons of chicken broth or water if you want to thin it If not, just heat it on low heat gently, stirring it occasionally until it is warmed through. This will take about 10 to 15 minutes.
Make it a Holiday Meal!

Side Dishes
Roasted Brown Butter Honey Garlic Carrots
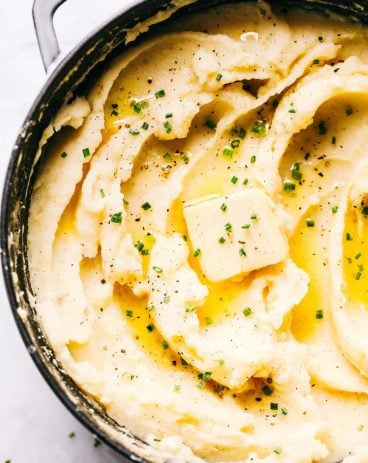
Side Dishes
Dad’s Famous Mashed Potatoes


Bread
Lion House Rolls
Easy Turkey Gravy
Ingredients
- Pan Drippings from 12-14 pound turkey
- 1 1/2-2 cups chicken broth
- 1/4 cup flour
- salt and pepper to taste
Instructions
-
In a saucepan or roasting pan allow the drippings to deglaze over medium-high heat. Whisk in 1 cup chicken broth and skim large pieces of fat.
-
Whisk in flour and continue to simmer until lumps have dissolved and gravy has thickened. Add an additional ½ cup- 1 cup chicken broth to get the desired thickness. Salt and Pepper to taste.
Notes
Nutrition
from The Recipe Critic https://ift.tt/2OUBO3a
https://ift.tt/2VOXI9l