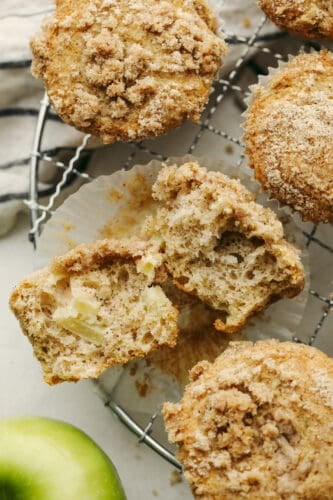
These crumbly apple streusel muffins are sure to become your new favorite treat. They are perfectly spiced with cinnamon and nutmeg, and bursting with fall flavor in each bite!
Apples are a must when making any fall dessert. They are so soft and juicy when baked, and their tart flavor pairs perfectly with warm spices! Apple galette, tart, and cobbler are more rustic desserts to try out this fall!

Cinnamon Apple Streusel Muffin Recipe
As much as I love some pumpkin, I think apple recipes are highly underrated for fall. Apple is king in my book. The way the tart, sweet flavor of apple blends with cinnamon and nutmeg is so delicious. It’s a classic pairing! Then, put it in muffin form and you have a seriously tasty treat on your hands. My caramel apple cupcakes have been a favorite at our house recently, but I think these apple streusel muffins are just as good, if not better! Topping the muffins with streusel makes them taste like little pastries. It’s all the buttery goodness that you need in your life right now. They are absolute perfection!
Take them to a potluck. Serve them at a birthday party. Have them with coffee. These tasty muffins will shine no matter the occasion! When I pull these out of my oven, 1- the smell is to die for, and 2- it is beyond difficult not to gobble one up in all of its steamy, warm goodness. Whether you choose to eat them as-is or with a little cinnamon honey butter inside, you’re going to love how perfectly sweet and moist these are. They’re the perfect dessert or breakfast, honestly, and I haven’t been able to get enough! These apple streusel muffins are soft, sweet, and ready to please. Just the kind of thing your family will go crazy over!
Ingredients for Apple Streusel Muffins
Don’t let the hefty ingredient list fool you, these are all things you have in your pantry right now! The key here is just to use the freshest apples possible. Looking for measurements? You can find them in the recipe card below!
Muffin Base
- Eggs: Eggs are used as a binding agent and to add moisture.
- Sour Cream: This is the secret ingredient for getting your muffins as moist as possible! It bumps up the fat content in your batter. It also adds a hint of a tangy flavor which I find to be delicious!
- Butter: I use unsalted, melted butter in this recipe. Because of the added fat content, it helps to keep your muffins moist. It also adds a tasty rich flavor!
- Granulated Sugar: This is what’s going to make your muffins perfectly sweet. It melts down to create the perfect texture during the baking process!
- All-Purpose Flour: Not only is it what I typically have on hand, but all-purpose flour also makes your muffins light and airy! This is because it doesn’t have a high protein content.
- Baking Powder and Baking Soda: Using both baking powder and baking soda is a must! They keep your muffins from becoming dense.
- Salt: Add salt to enhance flavor!
- Cinnamon: This is what’s going to give your muffins their perfect fall flavor! It’s the perfect addition of warm spice.
- Nutmeg: Also a necessity! Nutmeg is warm, sweet, and woody.
- Apples: You can use just about any apple variety here. I like using Granny Smith for their tart flavor! No matter the apple you choose, just make sure they are fresh, peeled and diced! See more tips on choosing apples below.
Streusel Topping
- All-Purpose Flour: For the best light and crumbly structure!
- Granulated Sugar: This will add the perfect sweetness to your streusel.
- Brown Sugar: For a little extra depth and rich sweetness!
- Cinnamon: You can never have enough cinnamon in fall desserts! Pop some into your streusel for added tastiness.
- Cold Butter: Using diced cold butter is super important here! The low temperatures will make your topping nice and crumbly.
How to Make Apple Cinnamon Streusel Muffins
Making homemade muffins is much easier than you’d think! They come together in just a few simple steps. In no time, your kitchen will be filled with the amazing smells of apple and autumn spice!
- Preheat Oven and Prep Pan: Let’s make some muffins! To begin, preheat your oven to 350° Fahrenheit. Line a baking pan with cupcake liners. Set aside.
- Prepare Streusel: Now on to the streusel. Start by mixing the flour, sugar, brown sugar, and cinnamon together. Then, cut in the butter using a pastry cutter or a fork until you have pea sized clumps remaining
- Mix Wet Ingredients and Sugar: In a large bowl, whisk together the eggs, sour cream, melted butter and sugar.
- Mix Dry Ingredients: In another bowl, whisk together the flour, baking powder, baking soda, salt, cinnamon and nutmeg.
- Combine Wet and Dry Ingredients: Next, add the dry ingredients to the wet ingredients and mix until just combined. Stir in the apples.
- Fill Liners and Top With Streusel: Use a large cookie scoop to fill the baking cups 2/3 of the way full. Sprinkle the streusel over the tops of the muffins.
- Bake and Serve: Bake for 20-25 minutes, until they turn golden brown and set in the center. Allow the muffins to cool before serving.

Tips for Making the Best Streusel Muffins
Hardly anything says fall quite like spiced apples. These muffins are perfect for a cool crisp fall morning or for serving as a dessert. Here are a few tips to help you make the best apple streusel muffins! They’ll be a hit.
- Vegetable Oil: Using vegetable oil instead of butter in this recipe will give your muffins a more tender crumb. It also adds moisture. If you’d like to substitute the oil for butter, you may, but know that the crumb will change the texture.
- Diced Apples: You can dice your apples large or small for this recipe, but I like a smaller dice so the apple gets more evenly distributed throughout the batter.
- Apple Varieties: There are several different types of apples that hold up well to baking. Granny Smith apples are nice and tart and hold their shape, while Honeycrisp are sweeter, larger and hold their shape just as well. Braeburn or Pink Lady apples are bursting with flavor and a popular choice!
- Don’t Overfill: Only fill your muffin tin 2/3 of the way full. If you overfill them, they may spill over the sides and stick to the pan.

Storing Apple Muffins
These muffins do very well at room temperature and can be stored for up to 5 days. I would avoid storing them in the fridge as that can make the streusel topping become wet and sticky.
- In the Refrigerator: Store in an airtight container in the refrigerator for up to 5 days. Let come to room temperature before serving.
- In the Freezer: You can store your muffins in freezer bags for up to 3 months. Let them thaw overnight in the fridge before eating.
- Reheating: To reheat, wrap your muffin in a paper towel and pop it in the microwave for 10-15 second intervals. Serve when warmed through.

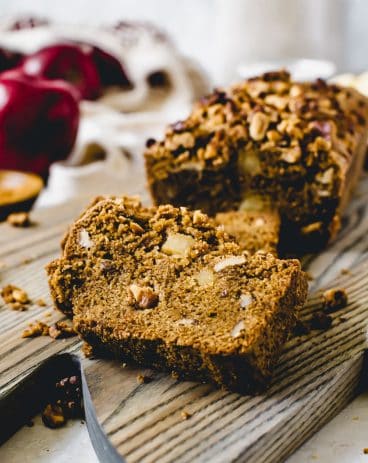
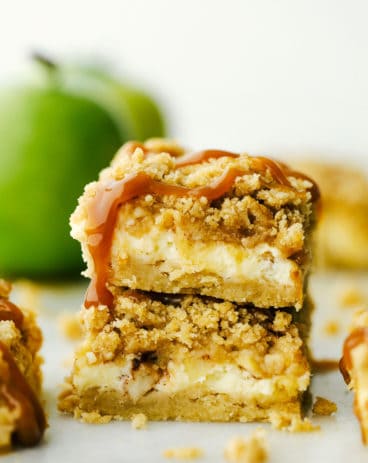
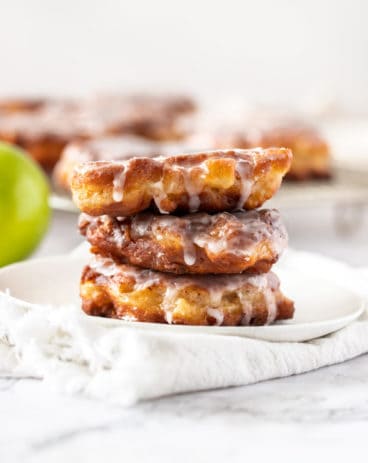
More Tasty Apple Desserts
Side Dishes
Cinnamon Apple Bread

Desserts
Caramel Apple Pie
Desserts
Caramel Apple Cheesecake Bars
Breakfast
Homemade Apple Fritters

Apple Streusel Muffins
Ingredients
- 2 large Eggs
- 1 Cup Sour Cream
- ½ Cup Unsalted butter melted
- 1 Cup Granulated Sugar
- 2 Cups All Purpose Flour
- 1 Teaspoon Baking Powder
- ½ Teaspoon Baking Soda
- ½ Teaspoon Salt
- 1 Teaspoon Cinnamon
- ¼ Teaspoon Nutmeg
- 1 ½ Cup Apples Peeled and Diced
Streusel
- ½ Cup All Purpose Flour
- ¼ Cup Granulated Sugar
- ¼ Cup Brown Sugar
- 1 Teaspoon Cinnamon
- 6 Tablespoons Cold Butter diced
Instructions
-
Preheat the oven to 350° and line a baking pan with cupcake liners. Set aside.
-
Prepare the streusel by mixing the flour, sugar, brown sugar, and cinnamon together. Cut in the butter using a pastry cutter or a fork until you have pea-sized lumps remaining
-
In a large bowl whisk together the eggs, sour cream, melted butter, and sugar.
-
In another bowl whisk together the flour, baking powder, baking soda, salt, cinnamon, and nutmeg.
-
Add the dry ingredients to the wet ingredients and mix until just combined. Stir in the apples. Use a large cookie scoop to fill the baking cups 2/3 of the way full. Sprinkle the streusel over the tops of the muffins.
-
Bake for 20-25 minutes, until starting to turn golden brown and set in the center. Allow the muffins to cool before serving.
Nutrition
from The Recipe Critic https://ift.tt/3nKcDSq
https://ift.tt/3tUpCSw