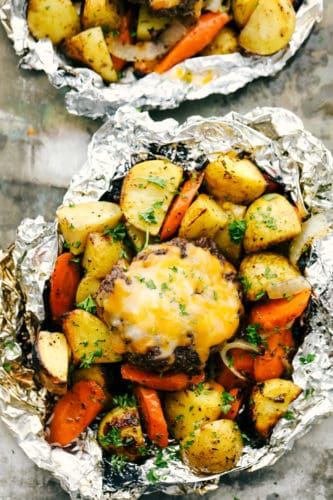
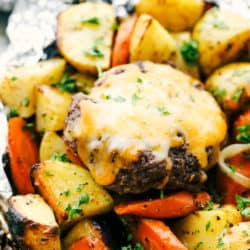
These delicious filled hobo dinners are perfect for cooking a mixture of carrots, potatoes and your meat all in a foil packet. It is fun to make and an easy dinner option for the summertime!
Foil packets are a MUST try this summer! Switch up the ingredients and create this Grilled Honey Barbecue Chicken Foil Packets, Butter Garlic Herb Salmon Foil Packets or Butter Garlic Herb Streak Foil Packet.

Best Hobo Dinner Foil Packets
Hobo dinners are a huge hit in our house! Totally kid friendly and loved by all. They are so simple to make and come together so quickly and effortlessly. Making and creating your own foil packet is just a highlight of dinner. Feel in control of what you are adding to your packet and create the best dinner for the night. Each hobo packet is made individually and can be varied according to the person or make all of them the same. Kids love this and parents do too!
Make life easy with this dinner packet by simplifying dinner and creating a flavorful packet that everyone will love. The vegetables cook up so tender and soft while the hamburger is juicy and the cheese melts perfectly over top. It is the perfect combination all together! Have a fun night of creating your own packet and watching it cook right on the grill. It is one of our favorite family dinners in the summertime and the kids rave about it every time!
What is a Foil Packet?
There are lots of variations of foil packets but my mom introduced us to foil packets when we were young. It is definitely a delicious, quick and easy meal that is great for camping, grilling and even cooking in the oven. The foil packet is a square of aluminum foil with fresh vegetables and a meat inside that is wrapped in foil. It all cooks together over a hot fire, grill or oven. It doesn’t take long and your meal is ready all cooked together. The best thing is, you have a plate as well made right out of the foil!
Easy Hobo Dinner Ingredients:
These ingredients are basic and can be easily stored in the pantry for easy access when ready to make your foil dinner. The flavors all come together creating one of the best hobo dinners ever. The vegetables come out tender and flavorful and the hamburger patty is perfectly juicy and cooked through. It is the perfect foil packet!
- Ground Beef: Lean ground beef is best for taste and healthiness. It is formed into a hamburger patty and set right on top of the vegetables.
- Garlic Powder, Onion Powder, Salt and Pepper: This combination of seasonings add the perfect touch to the hamburger patty and adds so much flavor.
- Baby Potatoes: Cut the potatoes in quarters. Try to cut them evenly to help cook together.
- Large Carrots: Peel the carrots then slice them into thin slices to help cook them quickly.
- Onion: Cut into slices and add in with the vegetable mixture. This can be optional if your kids are not fans of onions.
- Olive Oil: Drizzle over the vegetables to help cook the vegetables and make the soft on the inside with a crisp outside.
- Italian Seasoning: This is a blend of basil, marjoram, oregano, rosemary, sage and thyme mixed together.
Making a Foil Packet:
Create the best foil packet by following these simple steps. I like to use a large piece of heavy duty aluminum foil. Even doubling the aluminum foil is a great way to make sure the foil packet doesn’t break when cooking. Custom make your foil packet just the way you like it!
- Prepare Foil: Cut four sheets of heavy duty aluminum foil.
- Make a Patty: Combine ground beef, garlic powder, onion powder, and salt and pepper. Shape into four patties and place in the center of the aluminum foil.
- Toss Vegetables: In a medium sized bowl toss potatoes, carrots, onion olive oil and Italian seasoning. Divide evenly between the four packets. Fold the foil over and seal each packet.
- Grill Foil Packets: Place the packets on the grill or over the coals of a fire. Cook for about 45-60 minutes or until the potatoes are tender.
The Recipe Critic Pro Tip:
Flipping the packets can be done. This will help avoid the inside of the hobo dinner from burning. Just know that it may not look as pretty when opening your dinner packet.

Putting a Foil Packet Together:
These are simple dinners that come together so quickly. They are great to make ahead of time or the night of. Kids love to make and create their own dinners and they all turn out perfectly cooked. It is best to use heavy duty aluminum foil for these packets. It will hold up better as well as not fall apart. Make your packet big or little depending on how hungry you are. Just know the cooking variations will vary depending on the size of the packet ingredients.
- Aluminum Foil: I like to double the foil if it is a bigger packet especially for my husband. Then I will rip a large sheet of foil. I like to spray my foil with cooking spray so the vegetables don’t stick to the sides. Add the hobo dinner ingredients in the middle of the foil and tightly wrap the edges together so the ingredients won’t fall out but also leave a dome shape to the foil where the vegetables and meat are at.
- Vegetables: Place directly in the middle of the foil and lay them flat so they can cook evenly.
- Meat: Add the hamburger patty right on top of the vegetables and add a slice of cheese if you would prefer.
How Do You Cook a Hobo Dinner?
The great thing about a hobo dinner is it is customizable. Each dinner can be made differently or all the same. You can cook them all at once or one at a time. These are so simple to make and come together quickly and effortlessly. Choose from cooking on a grill, a fire when camping or even bake it in the oven. All these options are perfect for making the best hobo dinner!
Your cooking times may vary depending on how much or little you have in your packets.
- Hobo Dinner in the Oven: Foil packets are easy to make and cook in the oven. Preheat the oven to 375 degrees Fahrenheit. Place the hobo dinner foil packets right on a cookie sheet and cook for 40 to 45 minutes long.
- Foil Dinner Over the Fire/Camping: This is perfect to take on a camping trip. Prepare the hobo ingredients beforehand or make them while up at camp. This is an easy dinner to have while enjoying the great outdoors. Create your foil packets and add them to the fire right over the coals. Avoid flames for they will burn through the packet. This will take 30 to 45 minutes depending on the size of the packet.
- Foil Packet on the Grill: Simply follow the instructions below in the recipe card for best results. This is one of my favorite ways of cooking a hobo dinner foil packet and makes out dinner outside even easier. We even use the foil packet as our plate to make clean up even easier!

Cooking Hamburger Meat:
It is best to use a meat thermometer to know when the hamburger patty reaches 160 degrees Fahrenheit. Simply stick your meat thermometer through the foil packets creating a small hole to check the temperature of meat. Once the hamburger reaches 160 degrees Fahrenheit it is safe to take your foil packet off the grill, out of the oven or fire.

Variations of Hobo Dinners:
Create the most flavorful packet just the way you like it with variations that will help you enjoy your dinner even more. Want more vegetables or double the hamburger, you got it! These are easy hobo dinners that will make the perfect dinner for all family members.
- Size of Foil Packets: Some packets may be larger than others and that is okay. They will take a little longer to cook but still be just as delicious. If you are adding more than one hamburger patty, be sure to place them side by side and not stacked on top of one another. Always place the meat on top of the vegetables the best that you can even if there is not a lot of vegetables.
- Vegetables: Use fresh vegetables and even add in mushrooms, green and red peppers or Brussel sprouts. These all cook and blend well together.
- Beef: Not everyone is a beef lover. Try ground turkey or even substitute it for chicken. Just make sure the cooking times and temperatures are still met for a safe and healthy dinner.
- Add On: Cream of mushroom soup is always a great add in or a slice of cheese to go over top the hamburger patty.

Making Ahead and Storing Foil Packets:
These are prefect for camping, grilling or adding to the oven. Make these ahead of time by cutting and preparing the meats and vegetables then assembling later or assemble ahead of time and store in the refrigerator when ready to cook. These are made to be simple and mess free!

More Foil Packets to Try this Summer:
- Cajun Shrimp and Sausage Vegetable Foil Packets
- Chicken Fajita Foil Packets
- Parmesan Garlic Potato Foil Packets
- Foil Pack Honey Garlic Chicken
- Grilled Honey Barbecue Chicken Foil Packets
Hobo Dinner Foil Packets
Ingredients
- 1 pound lean ground beef
- 1/2 teaspoon garlic powder
- 1/2 teaspoon onion powder
- salt and pepper
- 1 pound baby potatoes cut in half
- 3 large carrots sliced into one inch cubes
- 1/2 onion sliced
- 2 tablespoons olive oil
- 1 Tablespoon Italian seasoning
Instructions
-
Cut four sheets of heavy duty aluminum foil. Combine ground beef, garlic powder, onion powder, and salt and pepper. Shape into four patties and place in the center of the aluminum foil.
-
In a medium sized bowl toss potatoes, carrots, onion olive oil and Italian seasoning. Divide evenly between the four packets. Fold the foil over and seal each packet.
-
Place the packets on the grill or over the coals of a fire. Cook for about 45-60 minutes or until the potatoes are tender.
Nutrition
from The Recipe Critic https://ift.tt/2BAYGA4
https://ift.tt/2AK5IlF