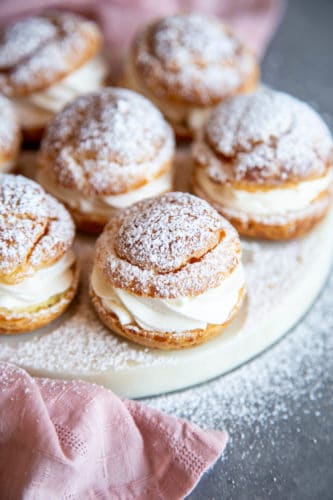
Cream puffs filled with simple vanilla whipped cream and covered in a dusting of powdered sugar are a classic dessert. But once you’ve mastered the recipe for the cream puff shell, it can be customized with all sorts of delicious filling to your heart’s desire!
Experience France without traveling by making this Easy Beignets Recipe, or this elegant yet easy Creme Brulee, or a savory French Onion Soup.

Cream Puff Recipe
Cream puff is made with a French pastry dough, called choux pastry or pate a choux. To make choux pastry, you actually cook the flour in water and butter to form a paste, then beat in the eggs at the end. When baked, the dough expands in the oven creating a hollow shell, to be filled with all sorts of delicious fillings.
In this recipe, I used milk instead of water for more richness along with some salt and sugar for flavor. But most of the flavor in cream puffs will come from the filling, which you can customize to your liking. Once you’ve mastered making the cream puff shells, the sky’s the limit!

Cream Puff Ingredients:
Cream puff starts with 6 simple ingredients:
- Milk – traditional choux pastry is made with just water but I used milk for more richness and flavor.
- Unsalted butter – butter adds more flavor to the cream puff shell.
- Salt – for flavor.
- Sugar – traditional choux pastry doesn’t include sugar but I like mine a little bit on the sweeter side. Reduce, omit or increase to your taste.
- Flour – all purpose flour is cooked with all of the above ingredients.
- Egg – gets beaten into the cooked dough.
Making Cream Puff From Scratch:
- First, heat the milk, butter, salt and sugar in a saucepan over medium heat until simmering but not boiling.
- Take the saucepan off the heat and mix in the flour to form a paste. Put the saucepan back on medium heat and cook the flour mixture, stirring constantly, until the dough forms and pulls away from the sides and bottom of the pan.
- Transfer the cooked dough to a stand mixer bowl and beat with the paddle attachment to cool it down. Add 1 egg at a time and continue beating until each is completely incorporated before adding another.
- Transfer the dough into a piping bag and pipe 12 equal portions, about 1 ½” – 2” in diameter, on a lined baking sheet. Dip your fingers in water and smooth out each mound of dough so there are no peaks and spikes.
- Gently apply an egg wash and bake for about 22 – 25 minutes at 375°F. Turn off the oven and crack the door open, allowing the cream puffs to cool inside the oven for at least 15 minutes before removing them.

Cream Puff Filling:
Traditionally, cream puffs are filled with pastry cream, but for this recipe I opt to use a simple homemade whipped cream as filling to keep things simple. Split the shells open, fill with cream, replace the top and dust them with powdered sugar, and they are ready for the dessert bar.
To customize your cream puffs, you can add different flavor to your whipped cream using extracts or fill them with:
- Homemade ice cream like this Brownie Batter Ice Cream or this Golden Oreo Ice Cream.
- A cheesecake filling from this Cheesecake Stuffed Strawberries recipe.
- Homemade or canned pie fillings then topped it with whipped cream.
- Instant puddings, you can get them in all sorts of flavor.

Storing Homemade Cream Puffs:
Cream puffs are best served fresh, especially when filled with cream filling. However, you can store leftovers in an airtight container in the refrigerator for up to 3 days. They can be served cold or just let them come to room temperature before serving.
The cream puff shells without filling can be stored at room temperature for 2 – 3 days if you plan to make them ahead of time or keep them frozen up to 2 weeks. Thaw the shells before adding filling or you can toast them in the oven at a lower temperature around 300°F – 325°F for 5 minutes to crisp them up before adding filling.

More French and French Inspired Recipes:
- Perfect Crepes
- Easy Hollandaise Sauce
- Slow Cooker Beef Bourguignon
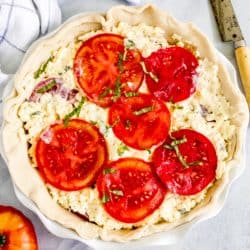
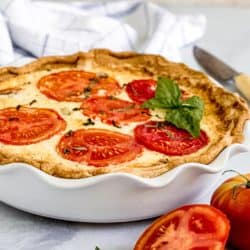
- Easy Ham and Broccoli Quiche
- Almond Croissants


Cream Puffs
Ingredients
Cream puff shell
- ½ cup milk
- 2 oz unsalted butter
- 1 tablespoon granulated sugar
- ¼ teaspoon kosher salt
- ½ cup all-purpose flour
- 2 large eggs
Filling
- 1 cup heavy whipping cream
- ¼ cup granulated sugar
- 1 teaspoon vanilla extract
Egg wash
- 1 large egg
- 1 tablespoon water
Instructions
-
Heat the milk, butter, salt and sugar in a saucepan over medium heat until simmering but not boiling, about 3 minutes.
-
Take the saucepan off the heat and mix in the flour to form a paste. Put the saucepan back on medium heat and cook the flour mixture, stirring constantly, until the dough forms and pulls away from the sides and bottom of the pan, about 2 minutes.
-
Transfer the cooked dough to a stand mixer bowl and beat with the paddle attachment to cool it down. Add 1 egg at a time and continue beating until each egg is completely incorporated before adding another.
-
Transfer the dough into a piping bag fitted with a large round tip and pipe 12 equal portions, about 1 ½” - 2” in diameter, on a lined baking sheet. Dip your fingers in water and smooth out each mound of dough so there are no peaks and spikes.
-
Preheat the oven to 375°F.
-
Beat an egg with a tablespoon of water to make egg wash. Gently apply the egg wash on top of the dough using a pastry brush.
-
Bake for about 22 - 25 minutes until the shells are puffed and golden. Observe through the oven door but do not open the oven during baking. Turn off the oven and crack the door open, allowing the cream puffs to cool inside the oven for at least 15 minutes before removing them and let them cool completely on a wire rack.
Whipping Cream:
-
To make the whipped cream, add heavy whipping cream, sugar and vanilla to a stand mixer bowl and beat with the balloon whip until stiff peaks form. Store in the refrigerator until ready to use.
-
When the cream puff shells are completely cool, split them open and fill with whipped cream, replace the top of dust with powdered sugar before serving.
Notes
- This recipe makes a dozen small cream puffs but it can be doubled or tripled easily to make more.
- Because the cream puffs are baked at a high oven temperature, use a light color baking sheet or an air insulated baking sheet to decrease the chances of the bottoms burning.
Nutrition
from The Recipe Critic https://ift.tt/3gpC7Ou
https://ift.tt/31gf562