Amazing and flavorful beef that slow cooks to tender melt in your mouth perfection! This will be one of the best meals that you will make!
When I started to do some research on a Korean Beef recipe, I found that the recipes are pretty similar to this Korean Ground Beef and Rice Bowls, Slow Cooker Mongolian Beef or Korean Ground Beef Stir Fry. What they have in common is unbelievably flavorful beef that is quick and easy to make and enjoy!

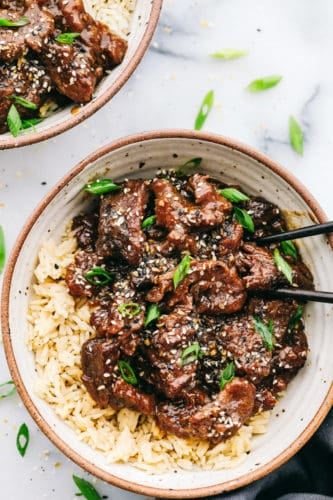
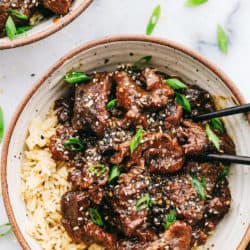
Slow Cooker Korean Beef
Slow Cooker Korean Beef first posted when my youngest sister had just left for college in Korea. We had a fun little going away party for her where I served this Korean beef and it was amazing! The flavors were out of this world and it was a huge hit at the party. As soon as it came out of the slow cooker we couldn’t stop eating it. The flavor is absolute perfection.
Cooking the flank steak low and slow made it so tender. The sweet and spicy sauce soaked into the meat and made every bite explode with flavor! This recipe instantly became a favorite here on the blog and in my family. It was definitely one of the best things that I have ever had! No wonder it quickly became so popular!
Ingredients for Korean Beef:
The ingredients in this slow cooker beef come together so well and you are going to love the flavor of this beef. It thickens up as it cooks and coats the chicken perfectly. Top with some sesame seeds and green onions and you will have a meal that you will make again and again!
- Flank Steak: Cut in thin slices against the grain to make it tender and juicy.
- Cornstarch: To thicken the sauce.
- Sesame Oil: Great Asian flavor and it will help other flavors soak into the beef.
- Garlic Cloves: Minced, these will give right flavor to the sauce.
- Soy Sauce: Adds a rich sweet and savory flavor.
- Beef broth: Liquid to cook the beef and adds a bit of flavor.
- Brown Sugar: Sweetness to balance out the other savory and spicy notes.
- Onion chopped: Adds moisture and deep flavor.
- Red pepper flakes: Add at the end of the cook time for a less spicy version. The red pepper spice will get stronger as it cooks.
- Garnish: Sesame seeds and green onions
How to Slow Cook Korean Beef:
This melt in your mouth tender beef takes only minutes to get started in a slow cooker. Simply cut your steak into strips, fill your crock pot with all the ingredients, and sit back and enjoy the delicious smell of dinner cooking!
- Prepare flank steak: Cut flank steak into thin strips. In a ziplock bag add flank steak pieces and cornstarch. Shake to coat.
- Combine ingredients in slow cooker: Add sesame oil, minced garlic, soy sauce, beef broth, brown sugar, onion, and red pepper flakes to the slow cooker. Stir ingredients. Add coated flank steak and stir again until coated in the sauce.
- Cook for high 2-3 hours or on low 4-5 hours until cooked throughout and tender.
- Serve: Plate flank steak over rice and garnish with green onions.

Tips for the Most Tender Beef:
I love cooking beef in the slow cooker because it cooks the meat so well. It is one of my favorite ways to cook it. The juicy beef gets so tender it falls apart in your mouth. That’s great news for a meat that can sometimes turn tough and dry when it cooks! Here are my expert tips to make this the best Korean beef you have ever made!
- Slicing flank steak: The easiest way to slice your beef is to cut it when it is very cold. Cut against the grain.
- Variations: Add broccoli in at the end of the cook time for a nice crunch. Or add it in about halfway through cook time for softer brocccoli.
- Serving ideas: Serving with rice is a classic favorite. However, if you are watching your carbs you may want to try cauliflower rice or zucchini noodles instead. Add a colorful Asian Salad for a complete meal.
Storing Slow Cooker Beef:
After buying flank steak at the store you can refrigerate it for 3-5 days. If you are not ready to cook this delicious recipe right away you will want to freeze it until you are ready to cook it. Before freezing it, place extra airtight wrap around the store bought packaging to reduce freezer burn. The uncooked meat can stay frozen for 6-12 months.
Once you have cooked your perfect slow cooker beef, you will not want to miss the delicious leftovers! Eat them within 4 days if you are storing it in the refrigerator or 3 months if you decide to freeze your leftovers.

More Amazing Slow Cooker Beef Recipes:
- Slow Cooker Beef Bourguignon
- Best Ever Slow Cooker Beef Stew
- Slow Cooker Cashew Beef and Broccoli Stir Fry
- Korean Ground Beef Stir Fry
- Slow Cooker Barbacoa Beef
Slow Cooker Korean Beef
Ingredients
- 1 ½ pounds Flank Steak
- ¼ cups cornstarch
- 2 tablespoons Sesame Oil
- ½ teaspoons mince Garlic Cloves
- 1/2 cups Soy Sauce
- 1/2 cup beef broth
- ¾ cups Brown Sugar
- 1/4 cup onion chopped
- 1/4 teaspoon red pepper flakes
- sesame seeds and green onions for garnish
Instructions
-
Cut flank steak into thin strips. In a ziplock bag add flank steak pieces and cornstarch. Shake to coat.
-
Add sesame oil, minced garlic, soy sauce, beef broth, brown sugar, onion, and red pepper flakes to the slow cooker. Stir ingredients. Add coated flank steak and stir again until coated in the sauce.
-
Cook for high 2-3 hours or on low 4-5 hours until cooked throughout and tender. Can serve over rice and garnish with green onions.
Notes
Nutrition
from The Recipe Critic https://ift.tt/30p2fmV
https://ift.tt/2XHIipV