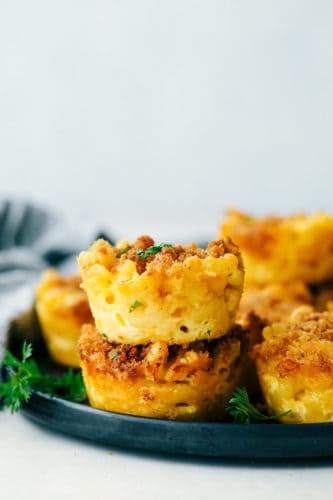
शुक्रवार, 7 अगस्त 2020

Mac and Cheese Cups

Mac and Cheese cups are a great twist on a classic side and are made of soft pasta coated in creamy, cheesy sauce and baked to perfection in a muffin pan to make serving a breeze.  These are a huge hit and everyone will rave about them!
Try Baked Macaroni and Cheese for a pan-sized version of this crowd pleasing meal.  It bakes up just as quick and easy as the cups, delivers the same amazing flavors, and is great indulgent and comforting meal.
Mac and cheese cups stacked on a plate.

Mac and Cheese Cups

Mac and Cheese Cups are great for entertaining friends and family or for a fun lunch at home.  They are the ultimate comfort food and are packed with all the great flavors that make mac and cheese a family favorite.  The soft pasta on the inside is coated in creamy cheese, while the outside has the perfect crispy topping.  These are so addictive and even picky eaters will love them!  It’s like getting the corner piece every time!

Mac and Cheese cups are not only quick and easy to serve fresh, but they are also very simple to make ahead and transport to an event.  These are stress free and simple for guests to pick up and enjoy!  They are always a huge hit and are the first tray to be empty from any gathering because they are so kid friendly and popular.  Everyone will go crazy over these delicious mac and cheese cups!

Ingredients in Macaroni and Cheese Cups:

Pantry staple ingredients come together easily to make this effortless side dish.  The mixture of cheddar and mozzarella cheese melts together perfectly and fills each bite with irresistible flavor and texture.  Just one will not be enough!

  • Elbow macaroni: Uncooked elbow macaroni is perfect for these cups.
  • Butter: Use either salted or unsalted. Just adjust the additional salt accordingly.
  • Egg: Beaten egg holds each cup together.
  • Shredded sharp Cheddar cheese: Half goes into the pasta mixture and half is sprinkled on top of each cup.
  • Shredded mozzarella cheese: Soft, moist cheese that is creamy with milky flavor.
  • Milk: Makes the cheese sauce creamy.
  • Seasoned dry bread crumbs: Adds crunch as it bakes with the oil.
  • Olive oil: Moistens the bread crumbs and gives the topping a light, crispy texture.
  • Salt: To taste!

How to Make Baked Macaroni Cups:

This Mac and Cheese Cups recipe is just as easy as the homemade baked mac and cheese we have all made for years.  Simply add the pasta mixture to a greased muffin tin, sprinkle with cheese and the most amazing bread crumb topping, then let it bake to perfection.

  1. Prep: Preheat the oven to 350 degrees. Then, grease a muffin tin with nonstick cooking spray.  Next, bring a large pot of water to a boil.
  2. Cook Pasta: Now, add the macaroni to the boiling water, and cook for 8 minutes until al dente. Drain and return to the pan.
  3. Mix together past and sauce: Stir in the butter and egg until the pasta is evenly coated. Before mixing, reserve 1/2 cup sharp cheddar cheese.  Then stir the remaining cheddar cheese, mozzarella cheese and milk into the pasta. Carefully spoon even amounts into the muffin tin. Sprinkle the reserved cheese on top.
  4. Prepare topping: In a small bowl combine the bread crumbs, olive oil, and salt, then sprinkle the mixture on top.
  5. Bake: Place in preheated oven for 30 minutes or until it is golden brown. Lastly, remove from oven and let cool for 5 minutes.
Steps to make mac and cheese cups.

Variations of Muffin Cups:

The best part about these mac and cheese cups is how versatile they are. Try this Ranch Bacon Mac and Cheese Cups for another favorite variation. These cheese cups are easy to adapt which creates unique treats that are custom to your family!

  • Mix ins: Add healthy veggies like broccoli or even some proteins like chicken, crumbled bacon, or ham to make these a tiny version of a complete meal.
  • Mini Muffins: Use a mini muffin pan to make bite size gems that are both savory and impressive.  Serve them as an appetizer or snack.
  • Easy removal:  Use cupcake liners for an even easier removal option.  For best results, let them cool for about 10 minutes before removing them from the muffin tin.
Finished mac and cheese cups in a muffin tray.

Storing Cheese Cups:

Macaroni and cheese cups are great to make ahead because they are so quick easy to reheat for a quick side or a warm lunch.  If you plan to use them within a week, wrap tightly and refrigerate for up to 5 days.  Or freeze to use again within 2 months.  When you are ready to use them, simply microwave and use immediately, or thaw in the refrigerator and use within 3 days.

Close up on a mac and cheese muffin.

More Macaroni and Cheese Recipes:

Print

Mac and Cheese Cups

Mac and Cheese cups are a great twist on a classic side and are made of soft pasta coated in creamy, cheesy sauce and baked to perfection in a muffin pan to make serving a breeze.  These are a huge hit and everyone will rave about them!
Course Appetizer, Dinner, Main Course, Side Dish, Snack
Cuisine American
Keyword mac and cheese cups, macaroni and cheese, macaroni and cheese cups
Prep Time 15 minutes
Cook Time 30 minutes
Total Time 45 minutes
Servings 15 Mac and Cheese Cups
Calories 105kcal
Author Alyssa Rivers

Ingredients

  • 2 cups uncooked elbow macaroni
  • 1 tablespoon butter
  • 1 egg beaten
  • 1 1/2 cups shredded sharp Cheddar cheese
  • 1 1/2 cups shredded mozzarella cheese
  • 1 cup milk
  • 1/2 cup seasoned dry bread crumbs
  • 2 teaspoons olive oil
  • 1/2 teaspoon salt

Instructions

  • Preheat the oven to 350 degrees. Grease a muffin tin with nonstick cooking spray. Bring a large pot of water to a boil. Add the macaroni and cook for 8 minutes until al dente. Drain and return to the pan. Stir in the butter and egg until the pasta is evenly coated.
  • Reserve 1/2 cup sharp cheddar cheese and stir the cheddar cheese, mozzarella cheese and milk into the pasta. Spoon evenly into the muffin tin. Sprinkle the reserved cheese on top.
  • In a small bowl combine the bread crumbs, olive oil, and salt. Sprinkle on the top.
  • Bake for 30 minutes in the preheated oven or until it is golden brown. Remove from oven and let cool for 5 minutes.

Notes

Updated on August 6, 2020
Originally Posted on August 11, 2012

Nutrition

Calories: 105kcal | Carbohydrates: 1g | Protein: 6g | Fat: 8g | Saturated Fat: 5g | Cholesterol: 35mg | Sodium: 236mg | Potassium: 45mg | Sugar: 1g | Vitamin A: 254IU | Calcium: 158mg | Iron: 1mg


from The Recipe Critic https://ift.tt/3if84JD
https://ift.tt/2C9dZRk

गुरुवार, 6 अगस्त 2020

Perfect Chocolate Chip Zucchini Bread

Perfect Chocolate Chip Zucchini Bread is soft and sweet and incredibly easy to make from scratch at home.  It’s the best zucchini bread and tastes amazing with coffee for a satisfying breakfast or as delicious afternoon snack!

If your garden is overflowing with fresh zucchini try some of my other quick and easy zucchini recipes too.  Bake Chocolate Zucchini Bread or Chocolate Chip Zucchini Muffins for more chocolate zucchini treats your family will love!

Sliced Zucchini Bread on a cooling rack.

Perfect Chocolate Chip Zucchini Bread

This Chocolate Chip Zucchini bread recipe is so delicious it is impossible to stop eating.  It can be enjoyed any time of the day and is tempting to keep going back to again and again!  It is moist and sweet enough to be a dessert, but its packed with healthy zucchini and hearty ingredients that make it a filling bread.  In fact, it’s a great way to sneak in vegetables because this light and tasty treat is bursting with semi-sweet chocolate flavor in every bite.  This bread is just what the name says, perfect!

Versatile would be an understatement with this quick and easy to make zucchini bread, because it can be whipped together and ready for the oven in almost no time, it’s easy to double, and saves well for months of enjoyment!  Either serve it fresh from the oven or store it for on-the-go zucchini filled breakfasts even after summer ends.  This is a must try, super adaptable recipe your family will love!

Chocolate Chip Zucchini Bread Ingredients:

This quick bread recipe is made up of basic and familiar ingredients.  They come together so easily to make the BEST homemade zucchini bread.

  • All-purpose flour: Thickens the bread.
  • Cinnamon: Adds the perfect warm spice.
  • Salt: To taste, but just a pinch should be plenty.
  • Baking Soda: Causes the bread to rise.
  • Canola Oil: Keeps the bread moist as it bakes.
  • Sugar: Adds sweetness!
  • Brown Sugar: Rich molasses sugar adds both moistness and sweetness.
  • Eggs:  Binding agent that holds the bread together.
  • Vanilla: Brings out all the flavors and adds its own rich taste.
  • Sour Cream: Combine with the egg mixture to make the moistest bread.
  • Zucchini: Grated and strained and dried as much as possible.
  • Semi-Sweet Chocolate Chips: Just the right chocolate flavor that’s not too sweet.

How to Make Quick Bread:

Simple and easy to make chocolate chip zucchini bread can be whipped together easily.  A stress-free breakfast, snack, or dinner is ready after a few minutes of prep and an hour of baking.  The hardest part is waiting for it to cook because this bread smells absolutely AMAZING as it bakes!

  1. Prep: First, preheat your oven to 350 degrees. Then, butter and flour a large 9″ bread pan and set aside.
  2. Whisk dry ingredients: Whisk together flour, cinnamon, baking soda, and salt in a small bowl until combined. Set aside.
  3. Beat sugars, oil, and eggs: In a stand mixer or using a hand mixer, beat together sugars, oil, and eggs for about 1-2 minutes until slightly fluffy. Add vanilla and sour cream.
  4. Combine ingredients: Next, fold in the grated zucchini and chocolate chips.  Then, add the remaining dry flour ingredients. Finally, stir to combine and pour into prepared 9″ bread pan.
  5. Bake: Place in preheated oven for 50-60 minutes. After 45 minutes mine was done. However, oven temperatures vary, so just make sure a toothpick entered in the center comes clean.
  6. Serve: Let cool for about 5-10 minutes and remove from pan. Delicious served a little warm, even with a little butter on top. 🙂

Steps to make chocolate chip zucchini bread.

Tips for Easy Zucchini Bread:

A made-from-scratch loaf of moist bread is easier than you think! If you are wondering how to make it happen, here are some tips to remember as you are working on this recipe that will give you the best results every time!

  • Peel: Grate your zucchini with or without the peel, either way works great. Finely shred the zucchini for best results.
  • Shortcut: Use a food processor for quicker prep time instead of using a grater.  It will be done with just a few pulses!
  • Remove excess moisture: Zucchini is usually very moist. Dry it as much as possible before mixing it in with your other ingredients. To do this simply blot between paper towels.
  • Don’t over-mix: Over-mixing will cause a the texture of your bread to be too dense instead of a light and soft texture.
  • Storing: Store in an airtight container at room temperature for 1-2 days. To enjoy these for longer place them in the fridge for up to a week or the freezer for 3 months.
  • Re-heating: Thaw for 3-4 hours and room temperature, or if you’re in a rush, microwave for 20 seconds.

Variations of Chocolate Chip Zucchini Bread:

Chocolate Chip Zucchini Bread can be enjoyed fresh from the oven or stored and heated in just seconds for a delicious on-the-go breakfast.  Versatile and easy to customize, this recipe makes the best zucchini bread and it will be a new favorite instantly!

  • Frosting or Glaze: Drizzle a sweet frosting or glaze to the top of your bread to make an out of this world treat that is a great healthier dessert.
  • Swirl: A smooth layer of cream cheese throughout the bread will make layers of soft and creamy flavor. To create the swirl, you will simply layer half the batter, then the cream cheese mixture and the other half of the batter.  The mixture comes together quickly by combining 8 ounces of cream cheese with an egg, ¼ cup sugar, and ¼ cup flour. Also try this Swirled Banana Cream Cheese Bread for incredible flavor.
  • Fruit: To make your bread even more moist add in up to a cup of mashed bananas for more depth of flavor and incredibly soft texture. Or try adding strawberries for an amazing chocolate and strawberry combination.
  • Crunch: Add peanuts, walnuts or pecans for a bit of crunch and nutty flavor.
  • Presentation: Bake in a loaf pan to slice or in a muffin tray to create hit muffins that are easy to store and enjoy one at a time.
  • Spice: To transition this bread between seasons add a pinch of Homemade Pumpkin Spice for a warm fall/winter flavor or a squeeze of lemon juice for a brighter flavor.
  • Serve: Spread Homemade Plant Butter, whipped cream, or nutella all over this warm freshly made bread for flavor you won’t be able to live without.

Sliced chocolate chip zucchini bread.

More Yummy Zucchini Recipes:

Print

Chocolate Chip Zucchini Bread

Perfect Chocolate Chip Zucchini Bread is soft and sweet and incredibly easy to make from scratch at home.  It's the best zucchini bread and tastes amazing with coffee for a satisfying breakfast or as delicious afternoon snack!
Course Appetizer, Bread, Side Dish, Snack
Cuisine American
Keyword chocolate chip zucchini bread, zucchini bread
Prep Time 10 minutes
Cook Time 1 hour
Total Time 1 hour 10 minutes
Servings 12 Slices
Calories 215kcal
Author Alyssa Rivers

Ingredients

  • 1 Cup All Purpose flour
  • 1 teaspoon cinnamon
  • 1/4 teaspoon salt
  • 3/4 teaspoon baking soda
  • 1/4 Cup canola oil
  • 1/2 Cup sugar
  • 1/4 Cup brown sugar
  • 2 eggs
  • 1 teaspoon vanilla
  • 1/4 Cup sour cream
  • 1 and 1/2 Cups zucchini grated and strained
  • 3/4 cup semi-sweet chocolate chips

Instructions

  • Preheat oven to 350 degrees. Butter and flour a large 9" bread pan and set aside. Whisk together flour, cinnamon, baking soda, and salt in a small bowl until combined. Set aside.
  • In a stand mixer or using a hand mixer, beat together sugars, oil, and eggs for about 1-2 minutes until slightly fluffy. Add vanilla and sour cream.
  • Fold in the grated zucchini and chocolate chips. Add the remaining dry flour ingredients. Stir to combine and pour into prepared 9" bread pan. Bake for 50-60 minutes. I set a time for 45 minutes and mine was done at that time. Oven temperatures vary, so just make sure a toothpick entered in the center comes clean.
  • Let cool for about 5-10 minutes and remove from pan. Delicious served a little warm, even with a little butter on top. 🙂

Nutrition

Calories: 215kcal | Carbohydrates: 27g | Protein: 3g | Fat: 11g | Saturated Fat: 4g | Cholesterol: 30mg | Sodium: 134mg | Potassium: 98mg | Fiber: 1g | Sugar: 17g | Vitamin A: 75IU | Calcium: 23mg | Iron: 1mg

Sliced Chocolate Chip Zucchini Bread on a cooling rack.


from The Recipe Critic https://ift.tt/2XA17ej
https://ift.tt/31pdQ4L

बुधवार, 5 अगस्त 2020

Easy Egg Muffins

Egg Muffins are one of the most versatile breakfast recipes. You can never go wrong, and you can create a number of variations. Super easy and a big batch can be ready in 30 minutes!

If you love make ahead breakfast recipes, try our freezer friendly potato veggie frittata, chocolate chip zucchini muffins, easy granola bars and breakfast burritos.

Closeup of baked egg muffins

Easy Baked Egg Muffins

Whether you have a big family to feed or its just the two of you, these egg muffins can forever come to your rescue. They are a great make-ahead breakfast that can be prepped quickly. You can make these ahead with lots of different variations, so a repeat breakfast during the week doesn’t feel boring or freeze them for later! They are so fun to eat because you can just grab and go. And nutritious, healthy and super tasty. It doesn’t get better than this!

These muffins are absolutely delicious! And they can really feed a hungry crowd! Plus everyone can pick their favourite toppings and make their own favourite egg muffins. Which for me is a win-win!

Toppings:

Start with prepping all your ingredients. This is probably the most time consuming part of the recipe, but if you buy pre-cut veggies at the supermarket, this becomes easy peasy. Or better still, get the family together to help you. These are just some ideas. Feel free to go wild and pick what you like!

Here are a bunch of add-ins to choose from:

  • Tomatoes
  • Mushrooms
  • Jalapenos
  • Bell Peppers
  • Spinach
  • Bacon
  • Ham
  • Zucchini
  • Basil
  • Cheeses Like Cheddar, Feta Or Goats Cheese

Make the egg mixture next. I like to whisk together eggs, cream, finely chopped onions, salt and pepper. This forms the base and goes with anything you decide to add in your egg muffins.

Egg mixture for egg muffins

Assemble:

  1. Assembling these is really easy. Take a 6 hole or 12 hole muffin tray and spray it generously with oil or butter, add your toppings and fill it up with the egg mixture.
  2. Bake for 20-25 minutes and this is ready!
  3. You can choose to line the tray with paper liners, but if you spray the tin generously, the muffins just come out easily.
  4. In the pictures, you’ll see that I’ve used mushrooms, spinach and cherry tomatoes and bell peppers for three different combinations. And feta of course!

Egg muffin mixture ready to be baked

Storing Eggs Muffins:

  • Storage: Store these in an airtight container in the fridge for up to 4 days, or wrap them individually and freeze in a ziplock bag for up to 3 months
  • Reheat: To reheat, microwave for 30 secs to a minute till the center is warmed through.

Baked egg muffins in the muffin tray

More Favorite Breakfast Recipes:

Closeup of baked egg muffins
Print

Easy Egg Muffins

Egg Muffins are one of the most versatile breakfast recipes. You can never go wrong, and you can create a number of variations. Super easy and a big batch can be ready in 30 minutes!
Course Breakfast
Cuisine American
Keyword easy egg muffins, egg muffins, egg muffins recipe
Prep Time 15 minutes
Cook Time 20 minutes
Total Time 35 minutes
Servings 6 people
Calories 251kcal
Author Richa Gupta

Ingredients

  • 12 Eggs
  • 4 tablespoons Cream
  • 1 Onion finely chopped
  • 1 1/4 teaspoon Salt
  • 1 teaspoon ground Black Pepper
  • 1/2 cup sliced Mushrooms
  • 1/2 cup Bell Pepper diced
  • 1/2 cup Cherry Tomatoes
  • 1/2 cup Spinach chopped
  • 1/2 cup crumbled Feta
  • 2 tablespoons Oil for brushing or spraying

Instructions

  • Preheat oven to 350 degrees
  • Whisk together eggs, cream, onions, salt and pepper in a pourable jar
  • Generously spray or brush a 12 hole standard sized muffin tin with oil or butter
  • Divide the toppings between the muffin holes. You can choose to divide them whichever way you like. Divide the egg mixture equally in the muffin tin
  • Bake for 20-25 minutes till a toothpick inserted in the center comes clean. Serve immediately or freeze!

Notes

  • Storage: Store these in an airtight container in the fridge for up to 4 days, or wrap them individually and freeze in a ziplock bag for up to 3 months
  • Reheat: To reheat, microwave for 30 secs to a minute till the center is warmed through

Nutrition

Calories: 251kcal | Carbohydrates: 5g | Protein: 14g | Fat: 20g | Saturated Fat: 8g | Cholesterol: 352mg | Sodium: 758mg | Potassium: 256mg | Fiber: 1g | Sugar: 3g | Vitamin A: 1359IU | Vitamin C: 21mg | Calcium: 124mg | Iron: 2mg


from The Recipe Critic https://ift.tt/2PsaQ20
https://ift.tt/39VhDe3

मंगलवार, 4 अगस्त 2020

Slow Cooker Korean Beef

Amazing and flavorful beef that slow cooks to tender melt in your mouth perfection! This will be one of the best meals that you will make!

When I started to do some research on a Korean Beef recipe, I found that the recipes are pretty similar to this Korean Ground Beef and Rice BowlsSlow Cooker Mongolian Beef or Korean Ground Beef Stir Fry.  What they have in common is unbelievably flavorful beef that is quick and easy to make and enjoy!

Korean beef over rice in a bowl with two black chopsticks.

Slow Cooker Korean Beef

Slow Cooker Korean Beef first posted when my youngest sister had just left for college in Korea. We had a fun little going away party for her where I served this Korean beef and it was amazing! The flavors were out of this world and it was a huge hit at the party.  As soon as it came out of the slow cooker we couldn’t stop eating it. The flavor is absolute perfection.

Cooking the flank steak low and slow made it so tender.  The sweet and spicy sauce soaked into the meat and made every bite explode with flavor!  This recipe instantly became a favorite here on the blog and in my family. It was definitely one of the best things that I have ever had!  No wonder it quickly became so popular!

Ingredients for Korean Beef:

The ingredients in this slow cooker beef come together so well and you are going to love the flavor of this beef. It thickens up as it cooks and coats the chicken perfectly. Top with some sesame seeds and green onions and you will have a meal that you will make again and again!

  • Flank Steak: Cut in thin slices against the grain to make it tender and juicy.
  • Cornstarch: To thicken the sauce.
  • Sesame Oil: Great Asian flavor and it will help other flavors soak into the beef.
  • Garlic Cloves: Minced, these will give right flavor to the sauce.
  • Soy Sauce: Adds a rich sweet and savory flavor.
  • Beef broth: Liquid to cook the beef and adds a bit of flavor.
  • Brown Sugar: Sweetness to balance out the other savory and spicy notes.
  • Onion chopped: Adds moisture and deep flavor.
  • Red pepper flakes: Add at the end of the cook time for a less spicy version. The red pepper spice will get stronger as it cooks.
  • Garnish: Sesame seeds and green onions

How to Slow Cook Korean Beef:

This melt in your mouth tender beef takes only minutes to get started in a slow cooker.  Simply cut your steak into strips, fill your crock pot with all the ingredients, and sit back and enjoy the delicious smell of dinner cooking!

  1. Prepare flank steak: Cut flank steak into thin strips. In a ziplock bag add flank steak pieces and cornstarch. Shake to coat.
  2. Combine ingredients in slow cooker: Add sesame oil, minced garlic, soy sauce, beef broth, brown sugar, onion, and red pepper flakes to the slow cooker. Stir ingredients. Add coated flank steak and stir again until coated in the sauce.
  3. Cook for high 2-3 hours or on low 4-5 hours until cooked throughout and tender.
  4. Serve: Plate flank steak over rice and garnish with green onions.

Korean beef meat in the slow cooker being stirred with a wooden spoon.

Tips for the Most Tender Beef:

I love cooking beef in the slow cooker because it cooks the meat so well. It is one of my favorite ways to cook it.  The juicy beef gets so tender it falls apart in your mouth. That’s great news for a meat that can sometimes turn tough and dry when it cooks!  Here are my expert tips to make this the best Korean beef you have ever made!

  • Slicing flank steak: The easiest way to slice your beef is to cut it when it is very cold.  Cut against the grain.
  • Variations: Add broccoli in at the end of the cook time for a nice crunch.  Or add it in about halfway through cook time for softer brocccoli.
  • Serving ideas: Serving with rice is a classic favorite.  However, if you are watching your carbs you may want to try cauliflower rice or zucchini noodles instead.  Add a colorful Asian Salad for a complete meal.

Storing Slow Cooker Beef:

After buying flank steak at the store you can refrigerate it for 3-5 days.  If you are not ready to cook this delicious recipe right away you will want to freeze it until you are ready to cook it.  Before freezing it, place extra airtight wrap around the store bought packaging to reduce freezer burn.  The uncooked meat can stay frozen for 6-12 months.

Once you have cooked your perfect slow cooker beef, you will not want to miss the delicious leftovers!  Eat them within 4 days if you are storing it in the refrigerator or 3 months if you decide to freeze your leftovers.

Korean beef in a bowl with black chopsticks.

 More Amazing Slow Cooker Beef Recipes:

Print

Slow Cooker Korean Beef

Amazing and flavorful beef that slow cooks to tender melt in your mouth perfection! This will be one of the best meals that you will make!
Course Dinner, Main Course
Cuisine American, Asian American
Keyword korean beef, slow cooker korean beef
Prep Time 10 minutes
Cook Time 4 hours
Total Time 4 hours 10 minutes
Servings 6 Servings
Calories 338kcal
Author Alyssa Rivers

Ingredients

  • 1 ½ pounds Flank Steak
  • ¼ cups cornstarch
  • 2 tablespoons Sesame Oil
  • ½ teaspoons mince Garlic Cloves
  • 1/2 cups Soy Sauce
  • 1/2 cup beef broth
  • ¾ cups Brown Sugar
  • 1/4 cup onion chopped
  • 1/4 teaspoon red pepper flakes
  • sesame seeds and green onions for garnish

Instructions

  • Cut flank steak into thin strips. In a ziplock bag add flank steak pieces and cornstarch. Shake to coat.
  • Add sesame oil, minced garlic, soy sauce, beef broth, brown sugar, onion, and red pepper flakes to the slow cooker. Stir ingredients. Add coated flank steak and stir again until coated in the sauce.
  • Cook for high 2-3 hours or on low 4-5 hours until cooked throughout and tender. Can serve over rice and garnish with green onions.

Notes

Updated on August 5, 2020
Originally Posted on October 19, 2015

Nutrition

Calories: 338kcal | Carbohydrates: 34g | Protein: 27g | Fat: 10g | Saturated Fat: 3g | Cholesterol: 68mg | Sodium: 1224mg | Potassium: 485mg | Fiber: 1g | Sugar: 27g | Vitamin A: 25IU | Vitamin C: 1mg | Calcium: 51mg | Iron: 2mg


from The Recipe Critic https://ift.tt/30p2fmV
https://ift.tt/2XHIipV