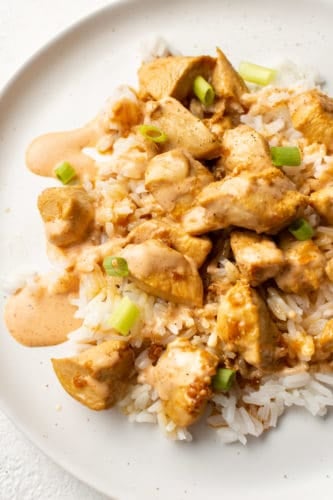
Hibachi Chicken is a Japanese favorite with tender chicken breast coated in soy sauce and butter. It’s amazing served with rice and yum yum sauce!
You may also like Awesome Chicken Katsu, Sticky Asian Glazed Chicken, or these Asian Turkey Lettuce Wraps.

Hibachi Chicken
Natasha here from Salt & Lavender! I have a weakness for sauces, and the combination of the soy sauce & butter sauce on the chicken and the yum yum sauce it’s served with is heavenly. This easy Japanese chicken recipe comes together quickly, and it’s something a little different that you can try for dinner without having to put in too much time/effort!
The key to this recipe is to not overcook the chicken. I highly recommend getting an instant read meat thermometer to ensure the chicken is just done (165F is the safe internal temperature). If the chicken breasts you buy are particularly large, you may want to cook the chicken in two batches so the pan isn’t over-crowded. The chicken should brown (it needs a little space) vs. steam (when it’s all clustered together).

What is Hibachi Chicken?
“Hibachi” refers to the cooking method – it’s a type of grill that’s found in Japanese restaurants (a metal cooking plate where food is cooked over a very high heat). It’s similar to teppanyaki. For the at-home version of this recipe, we simply use a hot skillet. Hibachi chicken is quickly seared and then finished in the butter and soy sauce.
What is Yum Yum Sauce?
Yum yum sauce is found at Japanese steakhouses and commonly served with Hibachi Chicken. It’s quick and easy to make at home with simple ingredients. You can use Japanese mayo or regular mayo if that’s what you’ve got on hand.

Ingredients for Hibachi Chicken:
- Chicken breasts: cut them up small so they cook quickly. You can use chicken thighs if you prefer, just be sure they’re cooked to 165F.
- Sesame oil: for searing the chicken, adding flavor, and ensuring the butter doesn’t burn. Be sure to not use toasted sesame oil. You can swap with olive oil if needed.
- Butter: one of the main flavor components of the sauce.
- Garlic: for extra flavor.
- Soy sauce: rich savory flavor (use low sodium or else the sauce may be too salty).
- Lemon juice: adds adds a bit of brightness/acidity to finish the chicken with.
How to Make Hibachi Chicken Recipe:
-
Make the Yum Yum Sauce: Add the sauce ingredients to a bowl and stir until combined. Set aside until needed. You can make the sauce up to a few days ahead if needed (store in the fridge).
-
Prep the Chicken: Cut up the chicken and season it with salt & pepper.
-
Sear the Chicken: Add the oil and 1 tablespoon of butter to a large skillet over medium-high heat. Let the pan heat up for a few minutes. Cook the chicken for 5 minutes, turning once halfway (I use cooking tongs to make this easy), or until it’s just cooked through. Don’t overcook, and avoid crowding the pan (you want the chicken to get a little brown on the outside).
-
Finish the Chicken: Add in the rest of the butter, the garlic, and the soy sauce. Let it bubble for about a minute.
-
Garnish and Serve: Squeeze some lemon juice over top (up to 1/2 a lemon is good). Serve with rice, yum yum sauce, and optional chopped scallions. You could also serve it with a side salad like this Asian Kale Ginger Peanut Salad.

More Asian-Inspired Recipes You’ll Love:
- Korean Ground Beef and Rice Bowls
- Pineapple Chicken
- Grilled Flank Steak with Asian-Inspired Marinade
- Asian Glazed Salmon

Hibachi Chicken
Ingredients
- 3 chicken breasts (cut into 1" pieces)
- 2 tablespoons sesame oil or olive oil
- 2 tablespoons butter (divided)
- 2 cloves garlic (minced)
- 3 tablespoons low-sodium soy sauce
- Lemon juice (to taste)
- Cooked rice (for serving)
- Chopped scallions (optional, for garnish)
Yum Yum Sauce:
- 3/4 cup mayo (use Japanese mayo if possible)
- 1 heaping tablespoon ketchup
- 1 teaspoon granulated sugar
- 1 teaspoon smoked or regular paprika
- 2 teaspoons rice vinegar
- 1 teaspoon garlic powder
- 1/4 teaspoon onion powder
- Salt & pepper (to taste)
Instructions
-
Add the yum yum sauce ingredients to a bowl and stir until well combined. Set aside.
-
Cut up the chicken and season it with salt & pepper.
-
Add the oil and 1 tablespoon of butter to a large skillet over medium-high heat. Let the pan heat up for a few minutes. Cook the chicken for 5 minutes, turning once halfway (I use cooking tongs to make this easy), or until it's just cooked through. Don't overcook, and avoid crowding the pan (you want the chicken to get a little brown on the outside).
-
Add in the rest of the butter, the garlic, and the soy sauce. Let it bubble for about a minute.
-
Squeeze some lemon juice over top (up to 1/2 a lemon is good). Serve with rice, yum yum sauce, and optional chopped scallions.
Notes
- Feel free to taste the yum yum sauce and adjust ingredient quantities to your liking. If you want to add some heat, add in a dash of hot sauce.
- If you want to drizzle the yum yum sauce over the dish like I did, you may need to thin it out with a little water. You could serve it in a little bowl for dipping if you prefer.
- Make your usual amount of rice for 4 people (I suggest making 1 cup uncooked rice, up to 1.5 cups uncooked rice for hungry people).
Nutrition
from The Recipe Critic https://ift.tt/3id1GCE
https://ift.tt/3fGcS9k