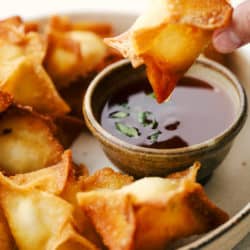
Crispy, fried to perfection pastry wraps around savory smooth cream cheese filling for a homemade version of everyone’s favorite restaurant style Cream Cheese Wonton.
Serve these fantastic starters before any meal. Make it a complete Chinese night with some of these favorites. Baked Sweet and Sour Chicken, Skinny Slow Cooker Kung Pao Chicken, or Firecracker chicken.

Cream Cheese Wontons
The hardest part of these is yummy mouth popping appetizers is going to be shaping them. Super simple, few ingredients, yet amazingly delicious. A new favorite for the whole family to love. You’ll get asked to make these over and over. And because you make them at home, you can eat as many as you want,for half the price. Making it a perfect addition for any party.
These hot crispy outsides, and warm oozy tasty insides, are a perfect marriage of American and Chinese cuisine. Cream Cheese Wontons, which are also sometimes called Ragoons, are a staple in most American Chinese establishments and now they can be in your own home as well.
Wonton Ingredients:
- Cream Cheese: You can use low fat cream cheese, soften in the microwave on high for about 20 sec.
- Green Onion: Finely chop the onions to avoid large chunks
- Garlic Powder: Adds a nice subtle savoriness
- Salt: Helps to cut the sweetness of the cream cheese
- Wonton Wrappers: Look for these in your grocery store often near the produce in the refrigerator section or an Asian specialty store.
- Oil: Peanut oil is the best oil for frying.
How to Make Cream Cheese Wontons:
- Beat: In a small bowl bet the cream cheese, finely chopped onion, garlic powder and salt till nice and creamy.
- Fill: With a wonton wrapper on a non slick surface wet the edges all the way around. Add a teaspoon of the filling.
- Fold: Pinch tightly each corner bring them together to create a star.
- Fry: Add enough oil so it’s about 1/2 an inch deep to a medium sized pan. Heat on medium high, add the wontons and cook on each side for 2-3 min or until golden brown.

Tips and Variations:
- Wonton Wrappers: Wrappers can dry out quickly so cover the ones you are not using with a damp paper towel, or plastic to keep them moist while you work. Work in small batches if that helps.
- Folding: There is no wrong way to fold a wonton. Search ideas on the internet or create your own fold. The key is to make sure they are sealed so the creamy goodness doesn’t leak during frying.
- Sealing: If you struggle to keep them sealed try using a well beaten egg mixed with a Tablespoon of water.
- Just Damp: Over wetting the wrappers will cause them to be soggy and not seal at all. A little bit goes a long way.
- Placing: Put made wontons on parchment paper while finishing the others to prevent them from sticking to other surfaces.
- Fillings: You can get creative with the insides. Try adding sriracha or hot sauce to spice it up a bit. Leave out the onions and garlic and in drained crushed pineapple and or coconut for a sweeter side. Add bacon and chives or strawberries and powdered sugar. The possibilities are as endless as your imagination.
- Sauce: These can be served with your favorite sweet and sour sauce, Thai sweet chili sauce, or any of your other favorite sauces.
- Bake: These can be baked instead of fried, it won’t be exactly the same but still very tasty. Bake at 325 for 8-10 minutes until golden brown.
Storing Cream Cheese Wontons:
- Refrigerator: Cooked wontons can be refrigerated in single layers separated by paper towel in a sealed container for up to 2 days. Reheat on a baking tray in the oven at 325 for 5-8 minutes.
- Freeze: Uncooked Wontons can be made ahead of time and frozen till needed.
- Make Cream Cheese Wontons according to directions.
- Place in single layer on a baking tray lined with parchment paper and freeze for 1 hour.
- Place frozen wontons in a gallon freezer bag.
- Fry straight from the freezer just add a few more minutes to frying time.
- Freeze: Cooked Wontons: Freeze the same way you would uncooked wontons and warm up the same as well. Perfect for a quick appetizer on the fly.

More Amazing Asian Appetizers:
- Asian Turkey Lettuce Wraps
- Amazing Chicken Potstickers
- Egg Rolls- Super Crispy
- Easy Teriyaki Meatballs
- Copycat Bang Bang Shrimp
Cream Cheese Wontons
Ingredients
- 8 ounce cream cheese softened
- 2 Tablespoons green onion finely chopped
- 1/2 teaspoon garlic powder
- 1/4 teaspoon salt
- wonton wrappers
- oil for frying
Instructions
-
In a small bowl add the cream cheese, green onions, garlic powder and salt and beat until creamy.
-
Lay a wonton wrapper on a non stick surface. With your finger wet the edges of the wonton wrapper. Add about a teaspoon of the cream cheese filling and bring up each corner creating a star and seal tightly.
-
In a medium sized saucepan add 1/2 inch of oil along the sides. Heat to medium high heat. Add the wontons to the hot oil and fry until golden brown and crispy 2-3 minutes. Remove with a slotted spoon and set on a paper towel lined plate. Serve with sweet and sour sauce if desired.
Nutrition
from The Recipe Critic https://ift.tt/322ukRG
https://ift.tt/331oxLK