सोमवार, 14 सितंबर 2020

Coffee Cake

Coffee cake slices on a wooden board

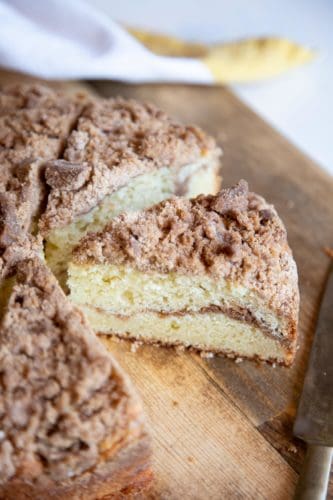
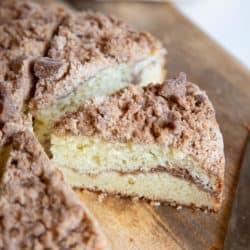
This classic Coffee Cake is super easy to whip up and makes a great companion to your morning routine. It will soon become your favorite sweet brunch dish to serve for any celebrations you’re hosting or just any time the mood strikes.

If you love coffee cake everything, you will for sure love these Coffee Cake Muffins, or these Coffee Cake Scones, or this Skinny Blueberry Coffee Cake.

Cross section of a coffee cake

Coffee Cake Recipe

When I first discovered coffee cake, I was surprised to find out it doesn’t actually have any coffee in it. But instead it’s a soft, moist and delicious cake laced with cinnamon streusel in the middle and on top. The sweet cinnamon compliments breakfast wonderfully and gives an extra sweet treat in the morning!

Making the Streusel:

  1. Mix Together: The cinnamon streusel is made with a mixture of flour, sugar, just a tiny pinch of salt, lots of cinnamon and butter. You can use a pastry blender to cut the cold butter into the flour mixture, or simply use your fingers if you don’t have a pastry blender.
  2. Butter Tip: You want to work the butter into the mixture such that it becomes crumbly like wet sand, but work quickly so you don’t melt the butter. Keep the streusel in the freezer until you are ready to use it. If you don’t have space in the freezer, keep it in the refrigerator.
  3. Keep it Cold: Keeping the streusel cold is important so it becomes crumbles once baked instead of melting into the cake completely.

Making the cinnamon streusel in a bowl

Making the Cake Batter:

  1. Beat Wet Ingredients: This cake batter is very simple, just beat together the wet ingredients which include sour cream, melted butter, eggs, and vanilla extract. I use sour cream in this recipe, but you can replace it with yogurt or buttermilk if you wish.
  2. Sift Together: You’ll need a separate mixing bowl to sift together the dry ingredients, then fold the flour mixture into the wet ingredients until just combined. Don’t overmix the batter to avoid drying out the cake.

Coffee cake batter in a mixing bowl

Assemble for Baking:

To get the classic layer of cinnamon streusel in the middle of your cake, you’ll need to do a little bit of assembling before baking.

  1. Get your cake pan ready before assembling the cake. I’m using an 8” cake pan here. Brush it with melted butter and line with parchment paper as shown.
  2. Add half the cake batter to the prepared pan, spread it into a flat layer.
  3. Add half the streusel on top, you may need to break up some of the larger clumps to spread it evenly over the cake batter.
  4. Dollop the remaining cake batter on top of the streusel layer.
  5. Use your fingers to nudge it into an even layer.
  6. Sprinkle the rest of the streusel on top.

Now your cake is ready for the oven. This recipe bakes in 45 minutes at 350°F using an 8” round cake pan.

You can use whatever size pan you have but if your pan is larger, your cake will bake faster, so check the doneness using a toothpick inserted in the middle of the cake. If the toothpick comes out clean, your cake is done.

A collage of how to assemble coffee cake

Storing Leftover Cake:

This coffee cake can be kept at room temperature in an airtight container for up to 3 days. You can also keep it refrigerated for up to a week.

Coffee cake slices on a wooden board

More Amazing Breakfast Cake Recipes:

A slice of half eaten coffee cake

Coffee cake slices on a wooden board
Print

Coffee Cake

This classic Coffee Cake is super easy to whip up and makes a great companion to your morning coffee. It will soon become your favorite sweet brunch dish to serve for any celebrations you’re hosting or just any time the mood strikes.
Course Breakfast, brunch, Cake, Dessert
Cuisine American
Keyword coffee cake, coffee cake recipe, coffee cake recipes
Prep Time 20 minutes
Cook Time 45 minutes
Total Time 1 hour 5 minutes
Servings 10 slices
Calories 388kcal
Author Trang Doan

Ingredients

Coffee Cake

  • 1 ⅓ cup all-purpose flour
  • cup granulated sugar
  • ½ teaspoon kosher salt
  • ½ teaspoon baking soda
  • ¾ teaspoon baking powder
  • 1 cup sour cream room temperature
  • 2 large egg room temperature
  • 4 oz unsalted butter melted & cooled
  • 1 teaspoon pure vanilla extract

Streusel

  • ¾ cup all-purpose flour
  • ¼ cup dark brown sugar packed
  • ¼ cup granulated sugar
  • A pinch of kosher salt
  • 1 ½ teaspoon cinnamon
  • 3 oz unsalted butter cold & cubed

Instructions

  • Make the streusel by combining flour, brown sugar and granulated sugar, just a pinch of salt, and cinnamon in a small bowl, mix together thoroughly with a whisk.
  • Cut the cold butter into small cubes and add to the dry mixture. Use a pastry blender to cut the butter into the dry mixture or pinch it together with your fingers until the texture is of wet sand. Cover and freeze until ready to use.
  • Preheat the oven to 350°F.
  • Melt the butter in a microwave-safe bowl for about 30 seconds.
  • Use the melted butter to brush an 8” cake pan, line the pan with two pieces of long parchment paper and a piece of round parchment paper to cover the bottom of the pan, let the excess hang over the sides for handles. Then brush the parchment paper with melted butter as well.
  • Set the baking pan aside and allow the rest of the melted butter to cool.
  • In a medium mixing bowl, add sour cream, eggs, the cool butter, and vanilla extract, beat with a whisk until smooth.
  • In another mixing bowl, sift together the flour, baking soda, and baking powder. Add salt and sugar and whisk to distribute evenly. Then add the flour mixture to the wet ingredients. Fold with a spatula until just combined.
  • Add half the cake batter to the prepared pan, and use a spatula to spread it into a flat layer. Sprinkle half of the streusel over the top, about 1 cup. Then add the rest of the cake batter over the streusel layer in dollops and gently nudge it into a flat layer with your fingers. Sprinkle the rest of the streusel on top evenly.
  • Bake for about 45 minutes until an inserted toothpick comes out clean.
  • Let cool on a wire rack completely before unmolding the cake. To remove the cake from the pan, take a butter knife to gently loosen the side then lift the cake out of the pan using the parchment paper “handles”.

Notes

  • You can bake this coffee cake in a 9” cake pan or a 8” square baking pan but bake time will be shorter.
  • Using a springform pan will make unmolding the cake easier. But be sure to place the springform pan on a baking sheet when baking since the springform pan may leak a little bit.
  • You can substitute sour cream with plain yogurt or buttermilk.

Nutrition

Calories: 388kcal | Carbohydrates: 45g | Protein: 4g | Fat: 22g | Saturated Fat: 13g | Cholesterol: 87mg | Sodium: 207mg | Potassium: 110mg | Fiber: 1g | Sugar: 24g | Vitamin A: 687IU | Vitamin C: 1mg | Calcium: 59mg | Iron: 1mg


from The Recipe Critic https://ift.tt/3ivbAjR
https://ift.tt/33tX59p

रविवार, 13 सितंबर 2020

Cheesy Stuffed Tomatoes with Sausage

Cheesy Stuffed Tomatoes with Sausage are tomatoes stuffed with a hearty sausage and rice filling and topped with gooey cheese. These are a perfect way to use those sweet sun ripened tomatoes from the garden or the vine ripened tomatoes from the store.

Looking for more tasty ways to use up those garden tomatoes? Try these fresh ideas: Parmesan Garlic Roasted Tomatoes, Chilled Cucumber Tomato Salad, and don’t forget to try this Classic Fried Green Tomatoes before they all ripen.

Cheesy Stuffed Tomatoes with Sausage are tomatoes stuffed with a hearty sausage and rice filling and topped with gooey cheese.

Amazing Cheesy Stuffed Tomatoes with Sausage:

This is such a fun meal to serve because you get to eat the vehicle it comes in! It’s super easy and quick to throw together, yet it is sophisticated enough to serve at a nice get together with friends or family. It’s light and hearty at the same time, making it a perfect main dish. Serve with a nice salad and some crusty bread for a satisfying dinner or even brunch.

There’s just something about cooking tomatoes that brings out their plump juicy sweetness that makes them irresistible. Paired with the seasonings, rice, cheese and sausage it’s a perfect combination of little bit sweet and savory. It’s a comforting meal that mimics the flavors of pizza, but a much healthier version. It’s a unique main dish that will soon become a favorite.

Cheesy Stuffed Tomatoes with Sausage Ingredients:

The savory perfectly spiced filling balances out the tang and acidity of the tomatoes. It’s a surprisingly light and delicious meal, your loved ones will want more of.

  • Tomatoes: Use large tomatoes all the same size
  • Salt and Pepper: Just to taste
  • Ground Sausage: 
  • Rice: Use long grain rice for great texture
  • Colby Jack Cheese: You can use pre-shredded cheese for quicker prep
  • Parmesan Cheese: This also comes pre-shredded for easy prep.
  • Basil: Fresh basil is divine if you do use dried only use 1 Tablespoon.
  • Italian seasoning: Adds just enough spice for amazing flavor.

How to make Stuffed Tomatoes:

  1. Prep Tomatoes: Preheat oven to 425 degrees. Cut off the tops of the tomatoes and scoop out the insides being sure to leave a good edge all the way around. Place the tomatoes in a baking dish.
  2. Cook: In a medium skillet over medium high heat cook and crumble the sausage. Drain the grease and add to a bowl with the rice, one cup of the Colby jack cheese, Parmesan cheese, basil and Italian seasoning, stir to combine.
  3. Fill:  Stuff each tomato with the mixture. Top them with the remaining Colby Jack cheese and bake 15-20 min.

Cutting the tomatoes, making the filling and stuffing the tomatoes.

Tips and Variations for Great Stuffed Tomatoes with Sausage:

  • Tomatoes: Pick tomatoes that are firm so they don’t fall apart when you scoop out the insides. Beefsteak tomatoes are a favorite. Make sure they are the same size so ensure even cooking.
  • Scoop: Use a melon baller or a grapefruit spoon to make getting the insides out easier. You want the shell intact as much as possible.
  • Fill and Bake: If you have extra filling bake it in pan with the tomatoes, don’t over fill them. And don’t over cook the tomatoes, they’ll split. Fill the tomatoes but don’t overstuff. Excess filling can be baked in the pan next to the tomatoes if desired.
  • Sausage: You can use a spicy sausage if you like a little more heat. Turkey or Chicken Sausage, ground beef or ground chicken can also be substituted.
  • Cheese: You can mix up the cheese, try a sharp cheddar, Monterey jack,  Gouda, or pepper jack for some kick.
  • Rice: Try using brown rice or quinoa instead of white rice for a heartier meal. Try orzo pasta for different texture and taste.

Cheesy Stuffed Tomatoes with Sausage are tomatoes stuffed with a hearty sausage and rice filling and topped with gooey cheese.

Saving and Making Ahead these Amazing Stuffed Tomatoes:

  • Make Ahead: Make the filling ahead of time and refrigerate till ready to stuff. You can even freeze the filling to use at a later time. Stuff the tomatoes right before your ready to bake, so they don’t get too soft.
  • Storage: These scrumptious vitals are best served right out of the oven but they are almost better the next day as the flavors have had time to meld together. Keep leftovers in an airtight container in the fridge for up to 4 days.
  • Reheat:  Microwave until heated through, or place under the broiler or toaster oven for about 5 min.

Cheesy Stuffed Tomatoes with Sausage are tomatoes stuffed with a hearty sausage and rice filling and topped with gooey cheese.

More Tasty Stuffed Recipes:

It’s so fun to stuff already tasty foods with even more flavorful mixtures. Here are some yummy ones to try.

Print

Cheesy Stuffed Tomatoes with Sausage

Cheesy Stuffed Tomatoes with Sausage are tomatoes stuffed with a hearty sausage and rice filling and topped with gooey cheese. These are a perfect way to use those sweet sun ripened tomatoes from the garden or the vine ripened tomatoes from the store.
Course Dinner, Main Course
Cuisine American, Italian, Italian American
Keyword stuffed tomatoes, tomatoes with sausage
Prep Time 5 minutes
Cook Time 15 minutes
Total Time 20 minutes
Servings 4 Tomatoes
Calories 609kcal
Author Alyssa Rivers

Ingredients

  • 4 large tomatoes
  • salt and pepper
  • 1/2 pound ground sausage
  • 1 cup white rice cooked
  • 1 1/2 cup Colby Jack cheese shredded and divided
  • 1/2 cup parmesan cheese shredded
  • 2 Tablespoons basil chopped
  • 1 teaspoon Italian seasoning

Instructions

  • Preheat oven to 425 degrees. Start by cutting off the tops of the tomatoes. Cut around the edge of the tomatoes and scoop out the insides and place in a baking dish.
  • In a medium sized skillet cook and crumble the sausage. Remove grease and add to a medium sized bowl with the rice, one cup colby jack cheese, parmesan cheese, basil and Italian seasoning.
  • Use the mixture and stuff each tomato. Top with remaining cheese. Bake for 15-20 minutes.

Nutrition

Calories: 609kcal | Carbohydrates: 44g | Protein: 29g | Fat: 35g | Saturated Fat: 17g | Cholesterol: 96mg | Sodium: 868mg | Potassium: 560mg | Fiber: 2g | Sugar: 4g | Vitamin A: 1710IU | Vitamin C: 17mg | Calcium: 525mg | Iron: 2mg


from The Recipe Critic https://ift.tt/32orIOf
https://ift.tt/3mgYtF0

Slow Cooker Kalua Pulled Pork

This Slow Cooker Kalua Pulled Pork is tender, smokey and melt in your mouth perfection. Get that authentic Hawaiian Luau pork flavor at home with this super simple, 3 ingredient masterpiece.

Palm trees or no palm trees, you can be transported to your own little paradise with this moist delicious pork. Serve with Grilled Coconut Lime Pineapple, and either Hawaiian Fried Rice or Hawaiian Macaroni Salad, for a complete island experience.

Slow Cooker Kalua Pulled Pork, tender smokey and moist, served on a bun.

Slow Cooker Kalua Pulled Pork

With only 3 ingredients this is probably one of the easiest meals to make. When you taste this explosion of flavor and smokey goodness, you won’t believe it only has 3 ingredients. This is also known as Kalua pig or Luau Pork, but it’s all the same amazingly deliciousness.  This will be such a huge hit you’ll want to keep this in your rotation of family favorites.

Slow Cooker Kalua Pulled Pork is the easy quick version of a Hawaiian staple for Lauas. In Hawaii a large pit is dug, wood is placed in the bottom and set on fire and rocks are put on top and around to hold in the heat. A whole pig is then salted and spiced and wrapped in damp leaves and placed on top of the slow burning fire and covered with dirt and left to roast all day. This method is not really realistic for all of us, but this slow cooker version is.  Besides bringing forth the same super delicate and juicy pork, the only other thing these two methods have in common is the time. You’ll want to plan ahead because to get that divine tenderness you’ll want to cook at least 16 hours.

Kalua Pulled Pork Ingredients:

Although there are only 3 ingredients, using the right ingredients will ensure that authentic Hawaiian Pork flavor.

  • Pork Butt Roast: Also called a Pork Shoulder roast you can get one with the bone or with out. Either works.
  • Course Hawaiian Salt: Look for this in your specialty stores like Cost Plus World Market, Trader Joes, or you can order it from Amazon. You can also use the widely available Himalayan Salt if you can’t find it Hawaiian Salt.
  • Liquid Smoke: If you are in a pinch Worcestershire Sauce can be used as a substitute but you have quite that smokey flavor, but still oh so tender.

How to Make Slow Cooker Kalua Pulled Pork:

Super simple to make, but definitely need to plan ahead as this should be started the night before you’d like to indulge.

  1. Season: Place the pork in your slow cooker. Generously rub (yes rub it in the meat, think massaging meat) in the liquid smoke and salt. Add more if you have a bigger roast, less if it’s smaller, but be sure to season well.
  2. Cook: Cook on low for 16-20 hours. Yes you read that right.
  3. Shred: Remove the pork to a cutting board or bowl and shred. Remove the liquid from the slow cooker and separate the fat from the broth. Add in both the broth and pork back to the cooker to keep warm before serving.

Making Slow Cooker Kalua Pulled pork by rubbing salt and liquid smoke into meat.

Tips for Great Kalua Pulled Pork:

This is a really hard recipe to mess up but here are some tips to make sure it stands out above the rest.

  • Pork:  Pay attention to the size of your roast. If you get a roast larger than 6 pounds (8-12 pounds) you’ll want to increase both the salt and the liquid smoke. Too little can leave your pork tasteless. The amazing flavor comes from the salt and liquid smoke. For a larger roast increase the salt and liquid smoke by 1-2 teaspoons.
  • Rinse and Trim: Rinse and pat your roast dry to ensure the flavor “sticks” to it. Trim your roast of large chunks of fat, and place fat side up in the slow cooker, the fat will baste the rest of the roast as it cooks.
  • Pierce: Poke the roast with a fork all over before rubbing in the salt and liquid smoke to increase the flavor inside and out.
  • Liquid Smoke: It is recommended by some Islanders to use Hickory Liquid Smoke for an authentic flavor, but Mesquite is just as good, it’s mostly about personal preference.
  • Time:  I know I’ve said it before, but truly the longer you can cook it the better. This will work if you start in the morning and let it cook all day, it just may not be quite as tender. But still amazing.

How to Serve and Store your Kalua Pulled Pork:

Pork Roasts usually produce a lot of meat, so there are endless possibilities. It’s also super easy to store and save for a rainy day.

  • Serve: This juicy flavorful pork is great as a stand alone or serve over rice or noodles. Use in your favorite Mexican dish such as quesadillas, tacos, burritos or even on top of nachos. Make pulled pork sandwiches topped with coleslaw.  Use on a flatbread with your favorite toppings.
  • Store: Bring leftovers to room temperature and store in an airtight container with the juices in the fridge for up to 5 days.
  • Freeze: Freeze leftovers in a freezer safe container or freezer ziploc bag sealed tightly for up to 3-5 months.
  • Reheat: Thaw frozen leftovers in the fridge over night. Reheat all leftovers on the stop top in it’s liquid. Do not microwave. It’ll over cook the meat making it rubbery and possibly dry.

Slow Cooker Kalua Pulled Pork tender and juicy shredded on a plate.

More Tempting Slow Cooker Pork Recipes:

Nothing is better than setting and forgetting dinner in the morning and coming home from a busy day to a meal almost done.

Print

Slow Cooker Kalua Pulled Pork

This Slow Cooker Kalua Pulled Pork is tender, smokey and melt in your mouth perfection. Get that authentic Hawaiian Luau pork flavor at home with this super simple, 3 ingredient masterpiece.
Course Dinner, Main Course
Cuisine American
Keyword kalua pork, pulled pork, Pulled Pork Recipes, slow cooker kalua pulled pork
Prep Time 5 minutes
Cook Time 16 hours
Total Time 16 hours 5 minutes
Servings 8 People
Calories 449kcal
Author Alyssa Rivers

Ingredients

  • 6 pound Pork Butt Roast
  • 3 Tbsp Coarse Hawaiian sea salt or regular sea salt works great
  • 3 Tbsp Liquid Smoke
  • Buns for Sandwiches

Instructions

  • In a slow cooker add the pork. Sprinkle salt on top of pork and pour the liquid smoke on top.
  • Cook on low for 16-20 hours. Turn the roast halfway through.
  • Once it is complete remove the roast and shred with a fork.

Notes

Updated on September 12, 2020
Originally Posted on May 22, 2013

Nutrition

Calories: 449kcal | Protein: 76g | Fat: 14g | Saturated Fat: 4g | Cholesterol: 214mg | Sodium: 2795mg | Potassium: 1272mg | Calcium: 19mg | Iron: 2mg


from The Recipe Critic https://ift.tt/2GVZtOR
https://ift.tt/35xYvCO

शनिवार, 12 सितंबर 2020

Fried Pickles Recipe

Fried Pickles are tangy dill pickles dipped in a smooth flavorful batter and fried till crispy golden brown. A sure fire winner for any appetizer or snack time!

Serve these little golden nuggets before any meal, such as this Philly Cheese Steak Sloppy Joe, Copycat Chick-Fil-A Sandwich, or this The Best Burger (And Secret Sauce Recipe.) which you can double as a dipping sauce.

Fried pickles on a black plate with dipping sauce.

Homemade Fried Pickles

Fried pickles are so easy and taste SO GOOD, you’ll want to make these everyday. The lightness of the coating crisps up perfectly as it surrounds tangy zippy dill pickles. They are a favorite among just about everyone. They’ll go quickly so stock up on your jars of pickles. You’ll be getting lots of demands for these.

These crispy little devils will take you back to those summer nights at the County Fair, or that time your were blown away when you had them at your favorite restaurant. Either way the indulgent combination of texture and flavor will make you want more. Whether you’ve never had them or your itching to go down memory lane these quick mouth popping appetizers will have you shouting for joy. They are just that good, and that easy and that quick!

Deep Fried Pickle Ingredients:

  • Oil: You can vegetable, or canola oil, but Peanut oil is best.
  • Dill pickle Slices: Buy a jar of pre-sliced pickles for quick prep.
  • Flour: Try using self- rising flour for a lighter consistency.
  • Cornstarch: Makes the outsides crispy good.
  • Paprika: For a smokey flavor try smoked paprika.
  • Onion Powder: Adds flavor.
  • Garlic Powder: Important for that punch.
  • Milk: Try using buttermilk for a thicker coating.
  • Fry Sauce:  My famous fry sauce is easy to make or store bought, either will do.

How do you Make Fried Pickles From Scratch?

These fried pickles are easy to make and so fun to have with family and friends.

  1. Heat: In a medium sauce pan heat 1/2 inch of oil on medium high heat.
  2. Drain: Strain the pickles then pat dry with paper towels.
  3. Whisk: In a medium bowl whisk all the dry ingredients together. Slowly add in the milk stirring till no lumps remain.
  4. Dip: Dredge each pickle in the batter and  add to the hot oil.
  5. Fry: Fry for 2-3 minutes or till golden and crispy. Remove with a slotted spoon and put on a paper towel. Serve immediately.

The process of frying pickles in four photos.

Tips and Variations for the Perfect Crispy Fried Pickle:

This recipe is like a blank slate, it’s so easy to change up and mix up you’ll be making these over and over again to see how many ways you can try them.

  • Pickles: You can use any type of pickle, rounds, slices, halves, sandwich slices etc. Try using pickle spears for that fry look. You can cut your own, remember to keep them the same size and no bigger than 1/4 of an inch, they’ll be too big. You can use sweet pickles too, however, it just won’t have the salty tang of the dill.
  • Dry: The most important step is to dry your pickles completely. This allows the batter to stick better and there will be less spattering when frying them.
  • Air Fry: Yes you can use an Air Fryer for these. Preheat to 425, place in a single layer and cook for 7-10 minutes. Flip and cook an additional 7-10 minutes till golden and crispy.
  • Fry: Keep your oil temperature the same, use a thermometer to know when it gets to temp and then allow for the oil to return to the right temperature between batches. If the oil is too cool, you’ll end up with soggy batter instead of crispy golden nuggets.
  • Batter: You can use any variety of spices you’d like in your batter, try adding heat with some cayenne pepper or chili powder. Use Italian seasoning or BBQ seasoning to add variety. You can use a ranch powder or your favorite spice combination to spice it up.
  • Sauce: Fry sauce is typically served with fried pickles, but we also love using Ranch. Try Blue Cheese, a Chipotle Sauce or your favorite Hot sauce. Possibilities are endless.

How to Store Leftovers and Reheat:

Fried pickles were invented in the Deep South in the 1960’s, so they have been around for awhile. If you want to keep your leftovers around use these tips:

  • Fridge: Before storing make sure as much oil is drained as possible. Store in an airtight container or tightly covered on top of and separated by paper towels to help them from getting soggy.  Make sure they are completely cooled before putting in the fridge for up to 3 days.
  • Reheat: The best way to bring back that nice crispy texture is warm them up in your oven. Place on a cookie sheet and broil for 1-2 minutes. Watch closely so they don’t burn.

Fried pickle being dipped in a sauce dip with other fried pickles on the side.

More Amazing Appetizers:

Print

Fried Pickles Recipe

Fried Pickles are tangy dill pickles dipped in a smooth flavorful batter and fried till crispy golden brown. A sure fire winner for any appetizer or snack time!
Course Appetizer, Side Dish, Snack
Cuisine American
Keyword fried pickles, fried pickles recipe
Prep Time 5 minutes
Cook Time 10 minutes
Total Time 15 minutes
Servings 6 People
Calories 119kcal
Author Alyssa Rivers

Ingredients

  • oil for frying
  • 1 16 ounce jar dill pickle slices
  • 1 cup flour
  • 2 Tablespoons cornstarch
  • 1 teaspoon paprika
  • 1/2 teaspoon onion powder
  • 1/2 teaspoon garlic powder
  • 1 1/4 cup milk
  • Fry sauce for dipping optional

Instructions

  • In a medium saucepan add the oil 1/2 inch up the sides and heat to medium high heat. Drain the pickles and pat dry with a paper towel.
  • In a medium size bowl whisk the flour, cornstarch, paprika, onion powder, and garlic powder. Pour in the milk and stir until lumps are out of the batter and smooth.
  • Dip each pickle into the batter and add to the hot oil. Fry for 2-3 minutes or until golden and crispy. Remove with a slotted spoon and put on a paper towel. Serve with favorite dipping sauce.

Nutrition

Calories: 119kcal | Carbohydrates: 21g | Protein: 4g | Fat: 2g | Saturated Fat: 1g | Cholesterol: 5mg | Sodium: 23mg | Potassium: 97mg | Fiber: 1g | Sugar: 3g | Vitamin A: 247IU | Calcium: 61mg | Iron: 1mg


from The Recipe Critic https://ift.tt/32kCHZc
https://ift.tt/3bT4Eus