Perfectly fluffy and tender on the inside, crispy on the outside, these Air Fryer Sweet Potatoes are going to rock your world! They are so creamy inside it’s amazing. Just add your favorite topping and you’ll have a new favorite way to eat these delicious sweet potatoes.
Baking sweet potatoes just got easier with the use of an Air Fryer. Sweet potatoes come out perfectly and will be a great addition to any meal.
Cooking them in the Air Fryer allows the skin to get nice and crispy which is so good. You don’t have to peel them either. It’s so quick and easy. You can use this method of cooking to prep your sweet potatoes for just about any recipe you need.
Easy Sweet Potato Ingredients
Not very many ingredients for this flavorful side. It makes it an easy side dish to make with any meal.
Sweet Potatoes: As many as will fit in your Air Fryer
Olive Oil: just enough to rub them down.
Salt: To taste!
Making Sweet Potatoes in an Air Fryer
These are so easy, it doesn’t take much effort to serve up a healthy side dish.
Scrub: Wash and dry the sweet potatoes
Pierce: Using a fork pierce the potatoes a few times.
Rub: Place in the fryer basket and rub with olive oil
Bake: Cook the sweet potatoes at 400 for 30-40 min till fork tender.
Healthy Sweet Potatoes
Sweet potatoes are not only yummy they are good for you too!
Vitamins: Sweet potatoes are rich in vitamin C and vitamin B6. these are important for your brain and nervous system. They also have potassium and magnesium which have been shown to improve heart health and regulate blood pressure.
Benefits: Sweet potatoes are rich in dietary fiber, which can aid weight loss. This makes you feel fuller for longer so you less and you don’t overeat as well. . Fiber also promotes good gut bacteria.
Tips and Storing
These are really easy and hard to mess up!
Potatoes: Make sure your potatoes are uniform in size so they all cook at the same rate.
Prep: Clean thoroughly and pat dry before poking or puting the oil on.
Toppings: Sweet potatoes can go with so many things. Sweet and savory. Try topping with chili, chipotle butter, mash up and place in a burrito with black beans and salsa, guacamole, marshmallows and so much more. Let your taste buds experiment.
Storing: Leftover potatoes can be stored in airtight container or wrapped tightly and kept in the fridge for 3-4 days. They can also be frozen for up to 3 months.
More Amazing Sweet Potato Recipes
Sweet potatoes are so versatile, you can do so many things with these healthy tasty spuds.
Perfectly fluffy and tender on the inside, crispy on the outside, these Air Fryer Sweet Potatoes are going to rock your world! They are so creamy inside it's amazing. Just add your favorite topping and you'll have a new favorite way to eat these delicious sweet potatoes.
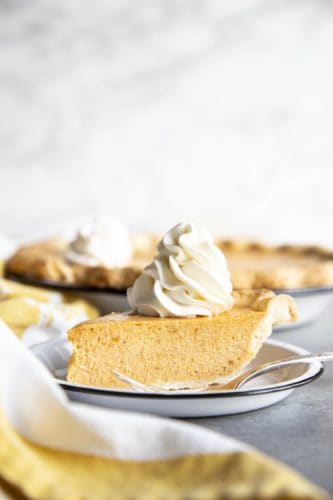
This Sweet Potato Pie is unlike any others you’ve eaten. The filling is made with cream cheese for a cheesecake like creaminess and texture you won’t be able to resist.
Sweet potato pie is a traditional Southern dessert, and usually served during the holidays like Thanksgiving and Christmas. But between you and me, I will gladly eat this pie all year round. It is creamy with a cheesecake like quality and decadence. The filling is spiced with cinnamon, nutmeg and ginger for that holiday vibe. And let’s not forget about the buttery pie crust that encases this creamy filling.
For this particular recipe, you will need to par-bake the pie crust before adding the filling so it doesn’t get soggy since our pie filling is liquidy. I would par-bake both homemade and store bought pie crust, whichever one you decide to use.
How to Prepare the Pie Crust
The pie crust is made up of 5 ingredients if you want to count water, and is very simple to make. But you do have the option to use store bought pie crust to save some time.
Flour: A MUST obviously!
Sugar: Little more than a typical pie crust recipe because I like mine sweet.
Salt: To enhance the flavor.
Butter: For the best tasting pie crust. You could use shortening or a mixture of butter or shortening.
Water: Just enough for the dough to bind.
Ingredients for Southern Sweet Potato Pie
The ingredients for the sweet potato pie filling are also quite simple.
Sweet potatoes: This is the star of the recipe. The recipe calls for 15 oz by weight, so you can purchase about 1 pound of potato or 1 can of sweet potato. However, I highly recommend roasting your own sweet potato for that caramelized flavor from roasting.
Cream cheese: The key to making a cheesecake like sweet potato pie.
Condensed milk: Use sweetened condensed milk for the sugar and added creaminess.
Eggs: This is a custard base pie filling, so we use egg to thicken.
Vanilla extract: For flavoring!
Spices: I used a mixture of cinnamon, nutmeg and ginger for a traditional holiday vibe. Feel free to substitute or add other spices that you love.
How to Make the Best Sweet Potato Pie
The recipe calls for roasting the sweet potato while par-baking the pie crust. But it will take longer for the potatoes to cook, 45 minutes to 1 hour depending on the size of your potatoes. If you want to cut down on waiting time while making the pie, you can roast the sweet potatoes ahead of time.
Once you have roasted and cooled the potatoes, making the pie filling is super easy. You don’t even need a stand mixer for this part.
First, peel the potatoes and mash them in a bowl with a potato masher until creamy.
Whisk together softened cream cheese and condensed milk, then the eggs, one at a time. Then beat in the mashed sweet potato, vanilla and spices until smooth.
Pour the filling into the par-baked pie crust.
Bake until the middle is still slightly jiggly, 35 – 40 minutes.
If you have excess batter, fill small ramekins and bake the ramekins along with the pie. Small ramekins filled half way will complete baking around 15 – 20 minutes.
Be patient and wait for the pie to cool completely, then chill it in the fridge, preferable overnight, before slicing to ensure the filling is set completely. Serve with plenty of whipped cream.
Storing Sweet Potato Pie
Be sure to store leftover pie in the refrigerator, it will last 3 to 4 days.
This Sweet Potato Pie is unlike any others you’ve eaten. The filling is made with cream cheese for a cheesecake like creaminess and texture you won’t be able to resist.
CourseDessert
CuisineAmerican
Keywordsweet potato pie, sweet potato pie recipe
Prep Time30minutes
Cook Time1hour40minutes
Resting Time2hours
Total Time4hours10minutes
Servings8Slices
Calories552kcal
AuthorTrang Doan
Ingredients
Pie Crust
1 and ½cupall-purpose flour
2rounded tablespoongranulated sugar
¼rounded teaspoonkosher salt
5ounceunsalted buttercold & cubed
2 to 3tablespooncold water
Sweet Potato Pie Filling
8ouncescream cheesemicrowave 30 seconds to soften
114 ounce cancondensed milk
3largeeggs
15ouncessweet potatoroasted & mashed, about 2 medium
1teaspoonpure vanilla extract
1teaspooncinnamon
½teaspoonnutmeg
½teaspoonginger
Instructions
Making the Pie Crust
Add flour, sugar and salt in a small mixing bowl and mix thoroughly with a whisk. Transfer flour mixture to a food processor fitted with the dough blade. Add cubed cold butter to the flour mixture, pulse several times until butter is about pea and bean size. Variations in size are okay.
Turn the food processor to “on” position and drizzle cold water over the dough mixture through the water hole, as soon as the dough starts to pull together turn the food processor off. You may need to stop the food processor in between and get a spatula to mix up the flour at the bottom.
Turn the dough out on the counter or cutting board, and shape into a disk. Wrap in plastic and rest in the refrigerator for at least an hour.
Take the disk of pie dough out of the fridge and roll into a circle about 2” larger than your pie dish. Use extra flour to keep the dough from sticking to the counter and roller.
Carefully place the dough over the pie dish, lightly press the dough into the bottom and side of the pie dish, let the excess dough hang over the side. Trim the excess dough leaving just enough to fold under and create a fluted edge.
Cover the pie dish with plastic wrap and keep refrigerated, or freeze (preferred), for 15 - 30 minutes.
Preheat the oven to 425°F.
Remove pie crust from the freezer and use a fork to poke steam vents on the bottom of the pie dough and on the sides.
Place a large piece of parchment paper over the frozen pie dough, place pie weights on top or pour dry beans on top to fill the whole pie crust. Make sure the parchment is large enough to cover the edges of the crust entirely.
Pierce the sweet potatoes with the tip of a paring knife and wrap them in foil, place them next to the pie dish on the baking sheet.
Place the baking sheet with the pie crust and the sweet potatoes into the oven.
Bake pie crust for 25 minutes with pie weights or beans, then carefully remove the parchment paper along with the pie weights and bake for another 5 minutes.
Remove the pie crust from the oven and let it cool on a wire rack.
Baking Sweet Potoates
Meanwhile, continue to bake the sweet potatoes for another 15 - 30 minutes until cooked through. Check the potatoes by piercing it with a paring knife or fork in the thickest part of the potato, if the knife or fork goes through easily, it is done.
Remove the sweet potatoes from the oven and allow to cool to the touch on a wire rack.
Once the potatoes are cool enough to peel, preheat the oven to 350°F and make the pie filling.
Making the Pie Filling
Peel the potatoes and mash it in a bowl with a potato masher.
In a larger bowl, whisk together softened cream cheese and condensed milk. Beat in the eggs, one at a time until smooth. Add mashed sweet potato, vanilla and spices and beat until smooth.
Place the pie dish with the par-baked crust on a baking sheet, pour filling into the crust. Cover the edge with a pie shield or thin strips of foil.
Bake for 35 - 40 minutes until the middle is still slightly jiggly.
Remove from the oven and allow to cool to room temperature. Refrigerate until the filling is completely set, preferably overnight, before slicing.
Notes
If you have excess batter, fill small ramekins and bake the ramekins along with the pie. Small ramekins filled half way will complete baking around 15 - 20 minutes.
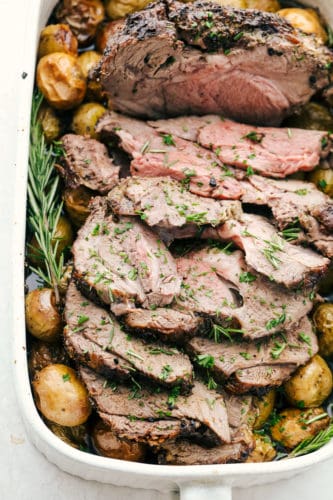
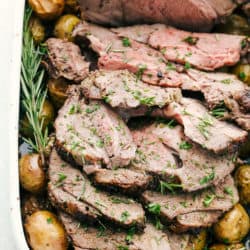
Savory Garlic Herb Crusted Roast Lamb is tender and succulent, perfect for any special occasion. The meat is tender and juicy and the crust gives it such a beautiful flavor. Perfection on a platter!
Most people think Easter when having lamb, but it’s super easy and is perfect for any Holiday meal. Cooking the Lamb on a bed of potatoes does two things here. First it provides the air to actually circulate better around the roast cooking it more evenly. Secondly it gives you a flavorful perfect side dish. Who could ask for more?1
Cooking lamb may seem intimidating, but it’s no different than cooking any kind of meat. Lamb also seems to be reserved for special occasions but you can have it anytime. There are no rules when it comes to when to eat and when not to eat lamb. So if your craving it, don’t wait! Grab this recipe and cook some up tonight!
Ingredients for Roast Boneless Leg of Lamb
These ingredients are not much different then cooking a beef roast. It’s just so simple, but so delicious!
Baby Potatoes Use red or yellow for perfect flavor and roasting
Olive Oil: Mild flavor
Roast Rack of Lamb!
Prep: Preheat the oven to 400 degrees. In a small bowl mix the butter, garlic, thyme, oregano, rosemary and salt and pepper.
Layer: In a roasting dish, place the potatoes and toss with olive oil and salt and pepper. Place the lamb on top of the potatoes.
Rub: Rub all the butter on the outside of the lamb
Roast: Place in the oven and roast till internal temp reaches 145 degrees. About 1-1/12 hours depending on the size of your roast.
The Perfect Temperature
The internal temps of lamb are the same as beef. The official done temp is 145 degrees, this will result in a medium well done roast. If you’d prefer your lamb a different doneness here is a reference chart.
Rare: 115 to 120°F
Medium-rare: 120 to 125°F
Medium: 130 to 135°F
Medium-well: 140 to 145°F
Well-done: 150 to 155°F
Tips for the Perfect Crusted Lamb
Lamb: A lamb roast is the same thing as a boneless leg of lamb. So if all you can find is boneless leg of lamb, it’s the same. This recipe will work for both bone-in and boneless leg of lamb. It’s up to you.
Bring it to Room Temp: This is super important to ensure even cooking. Especially if you have a bone-in leg of lamb. The bone will be cold, keeping the meat from cooking at an even rate, over doing the outside or under doing the inside.
Rest: Make sure you allow your meat to rest. This allows the meat to reabsorb redistribute the juices for more tender juicier roast. Keep in mind that as it rests it will continue to cook a bit.
Flavor:Lamb is the perfect meat to load on the seasonings. Don’t be shy. Add more or different seasonings to your liking.
Taste: If some of your loved ones feel like lamb can taste “gamey” be sure to trim as much as the fat as possible. The “gamey” flavor is carried in the fat.
Storing the Crown Roast of Lamb
Serve: A great thing about roasted meat is it can sit at room temperature for up to 2 hours before it needs to be stored. This allows time to visit before you have to put it away.
Store: Cooled lamb can be kept in the refrigerator for up to 4 days in an airtight container.
Freeze: Cool the lamb completely so no moisture collects which will form ice crystals. Store in the freezer for up to 2 months in a freezer safe container or bag.
More “Crusted” Recipes to Try
Anything with the description “crusted” in it is automatically going to taste amazing, you just know it!
Savory Garlic Herb Crusted Roast Lamb is tender and succulent, perfect for any special occasion. The meat is tender and juicy and the crust gives it such a beautiful flavor. Perfection on a platter!
CourseDinner, Main Course
CuisineAmerican
Keywordlamb, roast lamb
Prep Time10minutes
Cook Time1hour30minutes
Total Time1hour40minutes
Servings10People
Calories727kcal
AuthorAlyssa Rivers
Ingredients
5-6poundslamb roastI used a boneless lamb roast
1cupbuttered softened
5clovesgarlic minced
1Tablespoonthyme finely chopped
1Tablespoonoregano finely chopped
1Tablespoonrosemary finely chopped
1Tablespoonsalt
1teaspoonpepper
2poundsbaby potatoes
1Tablespoonolive oil
Salt and pepper
Instructions
Preheat oven to 400 degrees. In a small bowl mix butter, garlic, thyme, oregano, rosemary, salt and pepper. Rub all of the butter on the outside of your lamb.
In a roasting dish add the potatoes and toss with olive oil and salt and pepper. Lay the lamb roast on top of the potatoes.
Roast in the oven until the internal temperature reaches 145 degrees. About 1 1/2-2 hours. Remove the twine and serve.
Replace the can and make your own tender savory Perfect Instant Pot Black Beans! These are no soak, which makes them much quicker and you don’t have to worry about starting them the night before.
This really takes no effort at all. The instant pot does all the work and the result is worth it. These taste so much better than the canned version and give an extra fresh flair to what ever you use them in. It’s always a good thing when you know exactly what’s in your food and nothing gets better than doing something yourself.
The instant pot really is the awesome! Life is busy and it’s hard to take the time to cook your own beans when you have to presoak them. But with the Instant Pot you don’t have to presoak. You can put them in dry and they come out tender, tasty and have the best texture.
Black Bean Ingredients
Two simple ingredients, but so much better than the can! These are so good, and you can customize the flavor to your liking. The instant pot makes cooking beans so easy, you’ll love it!
Black Beans: Dried black beans, not from a can.
Vegetable Stock or Water: The Vegetable Stock will add flavor, so if you don’t want extra added flavor use water.
Optional Seasonings: Add these or other spices if you have a recipe in mind. Salt, Garlic, Cumin, Paprika and Cilantro.
Making Perfect Black Beans
Just a couple of steps to make perfect beans!
Rinse: Rinse the dry beans and pick out any bad ones.
Instant Pot: Place the beans in the pot, add the liquid if desire the optional spices.
Cook: Pressure cook on manual for 25 min. Let it naturally release for 15 min, then quick release the rest of the pressure. Stir and serve.
Good to Know Conversions
You will want to know this when you use your beans in a recipe that calls for canned beans.
Taste: Homemade beans offer far more flavor than canned beans and you can season them to your needs and taste
Save Money: Dried beans are less expensive than canned beans, and everyone likes to save money. Dried beans also store longer than canned beans.
Less waste: Because you make your own you will also have less waste, no cans to throw away or recycle.
Easy: Because you use the Instant Pot, it’s hands off and super easy. No babysitting the pot!
Nutrition: Last but not least they are good for you! Black beans are rich in fiber and plant-based protein, and a fantastic source of folate, thiamin (vitamin B1), phosphorus, manganese and magnesium.
Tips For The Perfect Instant Pot Black Beans
Firmness: If you find that the beans are too hard or too soft you can adjust the firmness by adjusting your cooking time.
Liquid: Use water, chicken, or beef broth instead of veggie if you desire
To Spice or Not to Spice: If you don’t plan to use these in a specific recipe you can leave the seasonings out and use water to cook them in. You can also change up the spices to fit your ingredient needs.
How to Store Black Beans
Fridge: Keep these ready to use in the fridge for 4-5 days.
Freeze: Cool completely then store in freezer safe containers or bags in individual portions till ready to use. Thaw in the fridge, microwave or pot.
Recipes To Use These Perfect Beans
You can use these beans in so many recipes, here are just a few!
Replace the can and make your own tender savory Perfect Instant Pot Black Beans! These are no soak, which makes them much quicker and you don't have to worry about starting them the night before.
CourseSide Dish
CuisineAmerican
Keywordblack beans, instant pot black beans
Servings8People
Calories172kcal
AuthorAlyssa Rivers
Ingredients
2cupsdry/raw black beans
3cupsvegetable stockor water
optional seasonings:
1/2teaspoonsalt
1teaspoongarlic
1teaspooncumin
1/2teaspoonpaprika
chopped cilantro
Instructions
In a colander rinse the beans. Add to your instant pot. Pour in vegetable broth and any optional seasonings. Cover and seal with the lid. Turn the steam release valve to the sealing position.
Turn on high pressure and cook for 25 minutes. Let the steam release naturally for 15 minutes. Quick release any remaining pressure and serve.