गुरुवार, 19 नवंबर 2020

Cranberry Apple Crisp

We are excited to partner with Reynolds Wrap® for this sponsored recipe. 

This Cranberry Apple Crisp have a sweet and tart fruit flavoring with a soft, buttery oat crumble on top for the perfect combination. This is a sweet and savory dessert that will be a family favorite during the holidays!

Reynolds Wrap® has helped me in the kitchen on a daily basis and this dessert is just what it needs when baking. Try this Easy Grilled Pizza, Grilled Citrus Salmon, with Pineapple Salsa or Garlic Ranch Chicken Skewers for a complete meal.

Cranberry apple crisp in a white casserole dish with cranberries and Reynolds wrap on the side.

Apple Cranberry Crisp

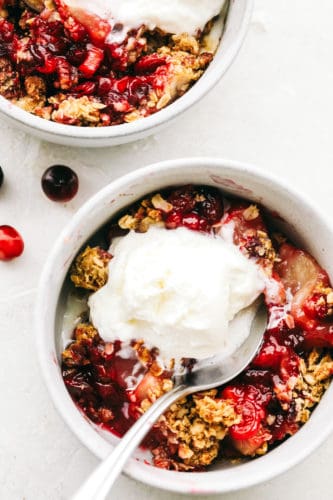
You can’t go wrong with this cranberry apple crisp. The blend of two sweet fruits with a sweet and tart flavor that is the perfect combination among the oats. My favorite part is the subtle hint of pecans that are in the oats. It gives a nice, soft and crunchy topping. Add a scoop of vanilla ice cream overtop and your dessert is pure heaven!

The balance in this fruit crisp has all that you need to satisfy all your taste buds. From a warm fruit filling that is combined with sweet and tart, then a hint of crunch and a cold, creamy ice cream scoop on top to blend it all together. This is an easy dessert to make and with the help of Reynolds Wrap® an even easier one to clean up. This crisp is going to be a favorite during the holidays!

Pulling Reynolds Wrap out of the roll making it long.

What is the Difference Between Crisp, Cobbler, and a Crumble?

Crisps are desserts made with a streusel topping. Whereas a crumble is baked with chopped fruit on the inside and topped with mixture of rolled oats and brown sugar. Cobbler is also a fruit dessert baked with a biscuit-style topping that fully covers the top of the dessert. It is known as a cobbler because of the top of the crust is not smooth and flat like a pie but “cobbled” and coarse.

How to Use Reynolds Wrap®

Using Reynolds Wrap has been so helpful and makes cleanup much easier for baking, cooking, or grilling your favorite meals.

  • Measure: I like to pull out the Reynolds Wrap® as long as the pan and add a bit more to make sure the sides are covered as well.
  • Cut: Simply hold down the Reynolds Wrap® box while pulling the non-stick wrap away from the box. Using the perforated box gently pulls it away leaving a nice straight line.
  • Press Sides: Gently press in the sides and around the casserole dish or glass dish until the non-stick foil is flat and covering the pan.

Reynolds Wrap in a baking dish.

Best Apple Cranberry Crisp Ingredients

Simple ingredients for a simple dessert! It is that easy to mix together and create a holiday favorite.

  • Reynolds Wrap®Non-Stick Foil: You can find this at your local grocery store
  • Cranberries: Fresh cranberries are best! These will be a little tart but the combination will be perfect!
  • Apples: Granny Smith apples work well. Peel, slice and cut them into equal sizes.
  • Sugar: This will help sweeten the crisp and give the fruit a balance.
  • Flour: Helps with baking and thickens the sauce.

Crisp Topping

The favorite part of this topping is the pecans. If you need to leave them out that is fine, but if you can leave them in the crisp topping you will be surprised at the flavor and texture that they bring to the overall dessert.

  • Old Fashioned Oats: These will bake up to be a soft, crunchy texture.
  • Brown Sugar: Adds sweetness to the oats mixture.
  • Cinnamon: Just a hint of spice and warmth.
  • Flour: Helps separate the oats mixture when baking.
  • Pecans: You are welcome to leave them out but they are a delicious add in!
  • Butter: Keeps it all together and gives the oats a nice brown topping while baking.

Let’s Make the Fruit Filling!

Reynolds Wrap® makes this baked good an easy one with easy cleanup, it prevents over browning and locks in all the flavor. This is a MUST when baking!

  1. Prepare Pan: Preheat oven to 350 degrees Fahrenheit and line a 9×13 inch pan with Reynolds Wrap® Non Stick Foil. 
  2. Mix Together: In a medium sized bowl add the cranberries, apples, sugar, and flour.  Mix until coated. 
  3. Fill the Pan: Spread evenly in the bottom of your 9×13 inch pan.

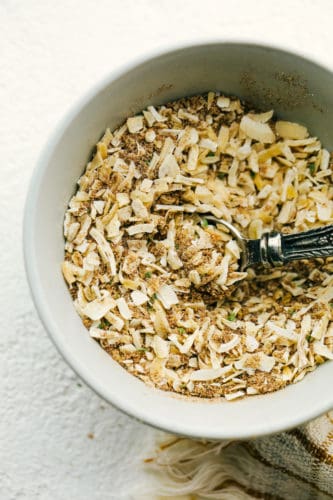
How to Make a Crisp Oat Topping

  1. Combine: In a medium sized bowl combine oats, sugar, cinnamon, flour, pecans, and butter. 
  2. Add Topping: Sprinkle topping evenly on top of the cranberry-apple mixture. 
  3. Bake: Bake for 50-60 minutes or until golden brown and bubbly.

The process shots of making cranberry apple crisp in three photos.

Tips for Making the Perfect Crisp Dessert

You can’t go wrong with this holiday dessert. It is simple to combine and will disappear even faster than you made it.

  • What are the best apples for an apple crisp? It is best to bake with apples that have a firm flesh and won’t break down when baking. Granny Smith apples, Pink Lady, Honey Crisp or Jonagold are all great baking apples.
  • White Sugar: You will want to keep the brown sugar for the topping. I do not recommend using white sugar for the topping since it is not as sweet and has the texture needed for the topping.
  • How do you keep fruit crisp from going soggy? Adding the flour will help but also baking it using Reynolds Wrap® can help prevent any sogginess.
  • Substitute Butter: Butter is also a MUST in this recipe. It melts down and keeps everything together perfectly.

How To Serve Cranberry Apple Crisp

This apple cranberry crisp can be served either cold, room temperature, or warm. Our family loves it right out of the oven. Let it cool for a few minutes, add a scoop of cold vanilla ice cream or a dollop of cool whip. This decedent dessert will be the ultimate

Cranberry apple crisp in a baking pan with a wooden spoon taking out a scoop.

How to Store Apple Cranberry Crisp

  • Can the crisp be made ahead? Yes! Make this dessert crisp ahead of time. Bake the crisp according to the recipe, allow it to completely cool then cover and refrigerate for 1 to 2 days ahead of time.
  • Refrigerate: Any leftovers can be placed in an Reynolds Wrap® and refrigerated over night.
  • Can Cranberry Apple Crisp be frozen?  For Sure! It will freeze well. Simply bake it and let cool completely. Once cooled store in Reynolds Wrap® and place in the freezer. I like to use my freezer meals within a month but they will last about 3 months total in the freezer with no problems! When ready to warm up place in the oven at 350 degrees Fahrenheit and cook for 30 minutes or until it is warmed up.
  • How long does crisp last? Keep it stored in an airtight container in the refrigerator for 2 to 3 days long. The fruit filling may begin to separate, become soggy and runny while in the refrigerator. Once it is warmed back up it will look and taste good as new!
  • Warming Up: When ready to reheat the crisp, place in the oven at 350 degrees Fahrenheit for 15 to 20 minutes or until it is heated through.

Cranberry apple crisp in two bowls with a scoop of vanilla ice cream over top.

More Crisp Dessert Ideas to Try!

Print

Cranberry Apple Crisp

This Cranberry Apple Crisp have a sweet and tart fruit flavoring with a soft, buttery oat crumble overtop for the perfect combination. This is a sweet and savory dessert that will be a family favorite during the holidays! 
Course Dessert
Cuisine American
Keyword cranberry apple crisp
Servings 8 People
Calories 413kcal
Author Alyssa Rivers

Ingredients

  • Reynolds Non Stick Aluminum Foil
  • 12 ounces fresh cranberries
  • 3 cups Granny Smith apples peeled and chopped
  • 1 cup sugar
  • 3 Tablespoons flour

Crisp Topping:

  • 1 and 1/2 cups old fashioned oats
  • 1/2 cup brown sugar
  • 1 teaspoon cinnamon
  • 1/2 cup flour
  • 1/4 cup pecans chopped
  • 1/2 cup butter melted

Instructions

  • Preheat oven to 350 degrees and line a 9x13 inch pan with Reynolds Non Stick Aluminum Foil. In a medium sized bowl add the cranberries, apples, sugar, and flour. Mix until coated. Spread evenly in the bottom of your 9x13 inch pan.

To make the crisp topping:

  • In a medium sized bowl combine oats, sugar, cinnamon, flour, pecans, and butter. Sprinkle topping evenly on top of the cranberry apple mixture. Bake for 50-60 minutes or until golden brown and bubbly.

Nutrition

Calories: 413kcal | Carbohydrates: 69g | Protein: 4g | Fat: 15g | Saturated Fat: 8g | Cholesterol: 31mg | Sodium: 108mg | Potassium: 181mg | Fiber: 5g | Sugar: 45g | Vitamin A: 405IU | Vitamin C: 8mg | Calcium: 34mg | Iron: 1mg


Cranberry apple crisp in two bowls with a scoop of vanilla ice cream overtop.


from The Recipe Critic https://ift.tt/3kEFJNS
https://ift.tt/35KJgGf

बुधवार, 18 नवंबर 2020

Homemade Corn Tortillas

Homemade Corn Tortillas only have three ingredients and are a cinch to make! These guys are crispy on the edges, soft on the inside, and full of corn flavor.

Pair these Homemade corn tortillas with Slow Cooker Barbaboa Beef, Kalua Pulled Pork, or this Slow Cooker Honey Lime Chicken.

Corn tortillas stacked on each other.

Corn Tortillas Recipe

You know what the best thing about eating at a really great Mexican restaurant is? Ok, besides the queso, obviously. Homemade corn tortillas! Seriously, there is nothing like a freshly made corn tortilla that’s charred and crisp, but soft and pliable at the same time. We love to serve them of course with tacos, but they’re also great with enchiladas or served alongside a hearty tex-mex soup as well.

One might think homemade tortillas are difficult to make, but I’m happy to report they are super easy to whip up. Technically only need one ingredient and about 30 minutes of your time to make them from start to finish. Let’s get started!

Corn tortilla mix in a glass bowl.

Ingredients in Homemade Tortillas

  • Masa Harina: The key to authentic corn tortillas is masa harina. Masa carina at its simplest explanation is corn flour. The corn granules are dried, and then soaked in lime water which helps to soften the kernels and give them additional starch. While we’re using masa harina today to make corn tortillas, you can also make tamales, arepas, or empanadas as well.
  • Today we used white corn masa, but yellow corn masa works as well. They both taste the same, so really, it’s whatever color your prefer.
  • Salt: Like any flour, masa harina has no seasoning, so you’ll have to add a little bit of kosher salt. I find a 1/4 teaspoon is enough.
  • Water: You want to make sure your water is very warm, and almost hot. This will help to combine the ingredients a little bit easier.

Dough to make corn tortillas.

How to Make Easy Corn Tortillas

  1. Mix the dough: Add the masa harina to a large bowl. Add salt. Whisk to combine. Slowly add the water while stirring with a spatula or wooden spoon. Once the water is almost all the way mixed in, start to use your hands to form the dough.
  2. Gently knead the dough until you can form it into a ball.
  3. Let it rest: Place the dough ball back into the bowl and cover with plastic wrap. Let the dough sit for 5-10 minutes.
  4. Form into balls: Use your hands to form the dough into scant 1/4 cup balls. Make sure the balls don’t have any cracks.
  5. Form into tortillas: The easiest way to make corn tortillas is to use a tortillas press. We love this basic one. Place a piece of plastic wrap on the bottom of the tortilla wrap. Put the ball of dough on the press. Put another piece of plastic on top of the dough. Press down. That’s it! Your tortilla is done.
  6. Cook! When all the tortillas are made, heat a large griddle to a medium heat. Add the tortillas. Cook until golden brown, about 2-3 minutes. Flip and do the same.

Cooking corn tortillas.

Do I Need a Tortilla Press?

No! It just makes the process MUCH easier. You can also put the dough balls between two pieces of plastic wrap and roll them out with a heavy rolling pin. Both methods work great!

Can I Make Corn Tortillas in Advance?

Yes, these corn tortillas will keep for up to three days at room temperature. Store in a plastic baggie or airtight container.

Corn tortillas layered on top of each other on a baking sheet.

Substitutions and Tips and Tricks for Recipe Success

  • Water: Make sure to use hot water. This will help the dough to come together quicker.
  • Frying Tortillas: If you want them to be more like a tostada, fry the tortillas in oil.
  • Plastic Wrap: Don’t forget to use plastic! If you don’t use plastic wrap in the tortilla press, the dough will stick.
  • Seasoning: After you whisk the flour and salt together, give it a taste. Season to taste with a little more salt if needed.

Stack of corn tortillas with a towel. What To Serve With Corn Tortillas

Print

Homemade Corn Tortillas

Homemade Corn Tortillas only have three ingredients and are a cinch to make! These guys are crispy on the edges, soft on the inside, and full of corn flavor.
Course Main Course
Cuisine Mexican
Keyword corn tortillas, homemade tortillas
Prep Time 15 minutes
Cook Time 5 minutes
Rest Time 10 minutes
Total Time 30 minutes
Servings 9 tortillas
Calories 92kcal
Author Nicole Leggio
Cost $7

Equipment

  • Tortilla press
  • Mixing Bowl

Ingredients

  • 2 cups masa harina
  • 1/4 tsp kosher salt
  • 1 1/2 cups warm water (plus more if needed)

Instructions

  • Add the masa harina to a large bowl. Add salt. Whisk to combine. Slowly add the water while stirring with a spatula or wooden spoon. Once the water is almost all the way mixed in, start to use your hands to form the dough. Gently knead the dough until you can form it into a ball. Place the dough ball back into the bowl and cover with plastic wrap. Let the dough sit for 5-10 minutes.
  • Use your hands to form the dough into scant 1/4 cup balls. Make sure the balls don't have any cracks.
  • The easiest way to make corn tortillas is to use a tortillas press. Place a piece of plastic wrap on the bottom of the tortilla wrap. Put the ball of dough on the press. Put another piece of plastic on top of the dough. Press down. Repeat with remaining balls.
  • When all the tortillas are made, heat a large griddle to a medium heat. Add the tortillas. Cook until golden brown, about 2-3 minutes per side.

Nutrition

Calories: 92kcal | Carbohydrates: 19g | Protein: 2g | Fat: 1g | Saturated Fat: 1g | Sodium: 66mg | Potassium: 67mg | Fiber: 2g | Vitamin A: 54IU | Calcium: 34mg | Iron: 2mg


from The Recipe Critic https://ift.tt/3lJ1dum
https://ift.tt/2UAejy0

मंगलवार, 17 नवंबर 2020

Vanilla Fudge

Vanilla Fudge is rich, indulgent and absolutely amazing! This is going to such a nice addition to your holiday sweet treats.

Vanilla is a classic flavor that is up there as one of the topped ranked favorites. It can be a nice change from chocolate. Try Delicious Vanilla Cupcakes, Vanilla Soft Serve Frozen Yogurt, and White Hot Chocolate.

Rich, indulgent Vanilla Fudge

Homemade Vanilla Fudge

This is the perfect solution for when you need something sweet, rich, and indulgent but you don’t want chocolate. Or maybe someone doesn’t like chocolate all together. Decadent and divine, this Vanilla Fudge will satisfy.

It’s a fairly simple, straight forward recipe and so easy to customize. You can really have fun with this recipe and create your own fun fudge. Smooth creamy and a wonderful delicate flavor. Divine!

White Chocolate Fudge Ingredients

A few ingredients make this indulgent dessert.

  • White Chocolate Chips: These can be found with the chocolate chips
  • Marshmallow Cream: Look for this in the baking section of your local store
  • Vanilla: It wouldn’t be Vanilla with this classic flavor
  • Sugar: White Sugar
  • Evaporated Milk: Adds the creaminess
  • Butter: Adds richness and flavor

Making Sweet and Tasty Fudge!

This is pretty simple but it takes time, and it’s worth it.

  1. Prep: Line a 8×8 pan with parchment paper or aluminum foil set aside.
  2. Place: In a medium bowl place the white chocolate chips, marshmallow cream and vanilla and set aside.
  3. Boil: In a medium saucepan add the sugar, evaporated milk and butter. Bring to a boil on medium heat and let it boil for 10 min, stirring occasionally.
  4. Pour: Pour the hot mix over the white chocolate chips, marshmallow cream, butter and vanilla.
  5. Mix: Whip in your mixing bowl until fully incorporated
  6. Set: Pour into the pan and let cool, place in fridge for a few hours till set.  Cut and enjoy.

Making the decadent Vanilla Fudge

Tips for Melt in Your Mouth Vanilla Fudge

  • Creaminess: Fudge gets it’s creaminess from small sugar crystals that form as you mix it while it cools. But be sure to allow it to cool slightly before you mix it. It should be about 230 degrees before you start to mix it. Otherwise large sugar crystals will form and result in grainy fudge.
  • Beat it:  For best results mix till almost set then pour into the pan.
  • Why does mine look darker? Don’t fret if your vanilla fudge isn’t white but more of a tan. This could be because of two things. The caramelization of the butter, sugar and evaporated milk. And if you used a dark vanilla extract. Both are totally normal and won’t change the flavor.
  • Store it: Fudge can be kept at room temperature or in the fridge. After about a week the fudge can begin to dry out and become crumbly. Make sure to wrap tightly and store in air tight container to help it not dry out.

Variations of White Vanilla Fudge

This is a beautiful recipe to customize to your needs or tastes. You can get really creative with it.

  • Nuts: Add cashews, almonds, walnuts, pecans or a mixture of all of the above if you love nuts.
  • Color:  Add food coloring to change the color to match your festivities from holidays to baby showers.
  • Dried Fruit: Add dried cherries or cranberries for a nice tart tang to your fudge
  • Candy: Crush candy canes (there are so many flavors now) you can really have fun with this one.
  • Cookies:  Stir in your favorite crushed cookies, from Oreos to Ginger Snaps, the possibilities are endless.
  • Flavorings: Change up the flavorings for a different flavor, try butter rum, lemon, almond or coconut.

Rich indulgent Vanilla Fudge

More Indulgent Fudge to Try

Fudge is great treat to make and take as gifts.

Print

Vanilla Fudge

Vanilla Fudge is rich, indulgent and absolutely amazing! This is going to such a nice addition to your holiday sweet treats.
Course Dessert
Cuisine American
Keyword Fudge Recipe, vanilla fudge
Prep Time 10 minutes
Cook Time 10 minutes
Total Time 20 minutes
Servings 16 Pieces
Calories 335kcal
Author Alyssa Rivers

Ingredients

  • 16 ounce bag white chocolate chips
  • 1/2 cup marshmallow cream
  • 1 teaspoon vanilla
  • 2 cups sugar
  • 1 cup evaporated milk
  • 1/2 cup butter

Instructions

  • Line a 8x8 inch pan with parchment paper or aluminum foil and set aside. In a medium sized mixing bowl add the white chocolate chips, marshmallow cream, and vanilla.
  • In a medium sized saucepan add the sugar, evaporated milk and butter. Bring to a boil on medium high heat and let it boil for 10 minutes. I kept stirring mine occasionally with a wire whisk.
  • Remove from heat and pour the hot mixture over the white chocolate chips, marshmallow cream and vanilla. Stir with a spoon to incorporate. Then with an electric mixer, mix till almost set.
  • Pour into your prepared 8x8 inch pan. Place into the fridge for a couple of hours to set. Cut into 2 inch squares.

Nutrition

Calories: 335kcal | Carbohydrates: 47g | Protein: 3g | Fat: 16g | Saturated Fat: 10g | Cholesterol: 26mg | Sodium: 93mg | Potassium: 130mg | Fiber: 1g | Sugar: 46g | Vitamin A: 224IU | Vitamin C: 1mg | Calcium: 100mg | Iron: 1mg


from The Recipe Critic https://ift.tt/2UxwkNh
https://ift.tt/3ny27ds

सोमवार, 16 नवंबर 2020

Homemade Onion Soup Mix

Homemade Onion Soup Mix is super easy, perfectly seasoned and tastes better than store bought mix. Making your own mix puts the mind at ease, you know exactly what’s in it, it’s cheaper and tastes amazing. It’s so simple you can whip it up whenever you need it.

Making your own mixes is inexpensive and better for you and your family. Try Homemade Ranch Mix, Fajita Seasoning and Taco Seasonings instead of buying them next time. You won’t believe how easy and how much better it tastes!

Perfect balance of seasonings for homemade onion soup mix.

Dry Onion Soup Mix

Once you make this super easy mix you’ll wonder why you ever bought it in the first place. Perfectly balanced, nice big onion flakes and exquisite flavor. These will make every recipe you use it in taste that much better.

This mix can replace your Lipton style onion soup mix for everything you’d use it for. Mix this up for your favorite dip or add it to a recipe for intense flavor. Anyway you use it, you’ll be glad you made your own. You’ll know exactly what you’re putting in it, which is a healthy bonus.

Beefy Onion Soup Mix Ingredients

Simple ingredients for superb tastes!

  • Dried Onion: I prefer the chopped dried onion, more flavor and texture.
  • Beef Bouillon: If you only have cubes, crush them into granules.
  • Onion Powder: Gives that extra punch of onion.
  • Dried Parsley: Flavor and color
  • Paprika: Adds a nice mild flavor.
  • Salt and Pepper: Add to taste.

Making Homemade Onion Soup Mix

So, easy there’s only one instruction! Mix all of the ingredients together and store in an airtight container. It is simple to make and comes together quickly. Use this on all the recipes that call for onion soup mix.

How to Use Onion Soup Mix

Use this exactly the same way you would any other onion soup mix, but with more flavor and zing as a result of making it yourself.

  • Recipe as it is: This makes the equivalent amount found in a packet, approximately 1/4 cup.
  • Make More: Double, triple or quadruple the recipe and store the rest in a sealed container or jar in a cool dark place for up to 6 months.
  • Dip: Mix 1/4 cup of the mix with 2 cups of sour cream for a sublime dip
  • Soup: Whisk with 4 cups of water, bring to boil and then let simmer for 10 min, stirring often.
  • Add it in: Onion Soup mix makes so much taste better, mix it in with rice when you cook it, season potatoes before roasting, add it to your marinades for beef, chicken or pork. And don’t forget adding it your favorite meatloaf recipe, it’ll be divine.

Tips for Easy Onion Soup Mix

  • Bulk:  If you can buy your spices in bulk for even cheaper mix. Stores with bulk sections often have a spice section. Also consider buying bulk spices at places such as Costco or Sam’s Club.
  • Variations:  There are a ton of different ways to make Onion Soup mix. Add or delete spices according to your need and taste. But obviously keep the onions.
  • Onions: Speaking of onions if you can find the chopped onion flakes to use, you can use dried minced onion instead.

Bowl of spices for homemade onion soup mix.

What to Use Onion Soup Mix in

So many ways to use this amazing seasoning!

Print

Homemade Onion Soup Mix

Homemade Onion Soup Mix is super easy, perfectly seasoned and tastes better than store bought mix. Making your own mix puts the mind at ease, you know exactly what's in it, it's cheaper and tastes amazing. It's so simple you can whip it up whenever you need it.
Course Seasoning
Cuisine American
Keyword homemade onion soup mix, onion soup mix
Prep Time 5 minutes
Total Time 5 minutes
Servings 1 Tablespoon
Calories 9kcal
Author Alyssa Rivers

Ingredients

  • 4 Tablespoons Chopped Dried Onion
  • 2 Tablespoons Beef Bullion Granules
  • 1 teaspoon onion powder
  • 1/2 teaspoon dried parsley
  • 1/4 teaspoon paprika
  • 1/8 teaspoon salt
  • 1/8 teaspoon pepper

Instructions

Notes

Mix equals one envelope of store bought seasoning. To use as a dip, mix with 2 cups sour cream.

Nutrition

Calories: 9kcal | Carbohydrates: 2g | Protein: 1g | Fat: 1g | Saturated Fat: 1g | Sodium: 293mg | Fiber: 1g | Sugar: 1g | Vitamin A: 246IU


from The Recipe Critic https://ift.tt/35zW8ig
https://ift.tt/3nzOv1D

रविवार, 15 नवंबर 2020

Sticky Buns- A Family Favorite Recipe!

Sticky Buns are the most gooey, caramel infused, morsels of breakfast yumminess EVER! Super simple and quick to throw together these are going to become a go to for your holiday breakfasts.
Serve these with a side of Perfectly Scrambled Eggs and Baked Bacon, or a tasty Breakfast Sausage Avocado Burrito. Breakfast is served! Delish!
Sticky, sweet, gooey and delicious Sticky Buns.

Amazing Sticky Buns

I look forward to Christmas every year just for these these Sticky Buns. They have been a family tradition ever since I can remember. My mother in law introduced me to them and then I instantly was hooked! You really can’t stop eating them!
This is a recipe everyone must have! I can’t even describe how good the glaze is over these. An ooey gooey caramel like finger licking good glaze! How is that for a description? The best part about these Sticky Buns is that you can take them out and put them together in about 5 minutes the night before! Then you put them in the oven while opening presents. Then you have warm gooey gooey rolls that fill the house with the most amazing smell.
 TRUST me on this one! You have got to make them! They will become a family favorite at your house too!

What’s In A Name?

These tasty little vittles are known by many names; Butterscotch Rolls, Overnight Caramel Rolls, Butterscotch Bubble Bread, Overnight Sweet Rolls, Butterscotch Pull Aparts, and Monkey Bread. Whatever the name the recipe is generally the same and the tasty is always amazing. I don’t think there is a wrong way to name them, but I do highly recommend that you make them and eat them!

Easy Sticky Bun Ingredients

Just six ingredients in these fabulous buns! No one can resist these delicate rolls covered in a sticky sweet nutty sauce, they are so amazing. You and your loved ones are going to love them.

  • Chopped Pecans: These are optional, but I love the crunch they add.
  • Frozen Rolls: I used Rhodes Rolls, but if you have a favorite brand of frozen rolls, they’ll work just fine.
  • Cook and Serve Butterscotch pudding: This has to be Cook and Serve Pudding, NOT INSTANT 3.5 oz box, small.
  • Cinnamon: Adds a bit of spice.
  • Brown Sugar: Together with the butter and pudding creates a magical sauce.
  • Butter: Unsalted or salted works.

Making Homemade Sticky Bun Magic

They are super easy and quick to throw together too! Using frozen dough is the big secret. This makes it so effortless. You are going to love everything about these.

  1. Place: In a well greased bundt pan place the chopped nuts, if using. Then evenly distribute 20 frozen rolls.
  2. Sprinkle: Pour the pudding mix powder over the rolls. Sprinkle with cinnamon.
  3. Melt: In a microwave bowl melt the butter and mix in the brown sugar. Drizzle over the rolls.
  4. Cover:  Cover and let raise in a cool place overnight.
  5. Bake: In the morning bake at 350 degrees for 25 min. Let cool in the pan for 5 min then turn out onto a plate or platter and serve.
Frozen bread rolls in bundt pan, with dry pudding, and butter mixture being poured over the top.

Tips and Variations

  • Nuts: Using pecans is optional, but if you like crunch use them, you can substitute walnuts for the pecans too.
  • Browning vs Burning: These need the full 25 min to make sure all the rolls get done. You do not want undone rolls. Place a sheet of aluminum foil over the top after the first 10 min of cooking. This will prevent the tops from burning but allow the bottom to cook long enough.
  • Dripping: If you’re worried about caramel dripping over the sides, place the bundt pan on a cookie sheet to cook.
  • Pan: This recipe can be made in a 9×13 pan if you don’t have a bundt pan. Grease a 9×13 and place the nuts. Place the rolls in single file on top. Pour the pudding, cinnamon and the butter mixture on top and raise. Cook at 350 for 25 min.
  • Storing: These will keep covered tightly at room temperature for up to 3 days. Rewarm in the microwave, I do not recommend freezing.
Sticky buns with caramel sauce ready to eat.

More Scrumptious Overnight Breakfasts

It’s always nice to wake up knowing an amazing breakfast is waiting for you!

Print

Sticky Buns

The most amazing gooey gooey sticky buns that you take out the night before and are ready for an amazing breakfast!
Course Dessert
Cuisine American
Keyword sticky bun recipes, sticky buns
Prep Time 5 minutes
Cook Time 25 minutes
Total Time 30 minutes
Servings 10 Buns
Calories 470kcal
Author Alyssa Rivers

Ingredients

  • 1/2 cup chopped pecans optional
  • 20 frozen Rhodes Rolls
  • 1 3.5 ounce package Regular Butterscotch pudding has to be cook and serve (Not Instant)
  • 1 teaspoon cinnamon
  • 1/2 cup brown sugar
  • 1/2 cup butter

Instructions

  • Grease a bunt pan. Add chopped nuts if using. Place the 20 rhodes rolls in pan.
  • Sprinkle 1/2 package Jello Butterscotch cook and serve on top. Sprinkle the cinnamon on top.
  • Melt the butter and mix with the brown sugar. Drizzle over rolls.
  • Cover with a damp cloth and raise overnight. Bake at 350 for 25 minutes. Cook for about 10 minutes and then cover with aluminum foil. The top browns fast! The aluminum foil will help them to cook throughout and not brown the top quite as fast. But cook for the whole time or else the rolls on the bottom will be doughy!

Notes

Updated on November 15, 2020
Originally Posted on July 4, 2012

Nutrition

Calories: 470kcal | Carbohydrates: 76g | Protein: 11g | Fat: 14g | Saturated Fat: 6g | Cholesterol: 24mg | Sodium: 669mg | Potassium: 15mg | Fiber: 2g | Sugar: 19g | Vitamin A: 284IU | Calcium: 27mg | Iron: 21mg


from The Recipe Critic https://ift.tt/35uOm9g
https://ift.tt/2JZOR2P