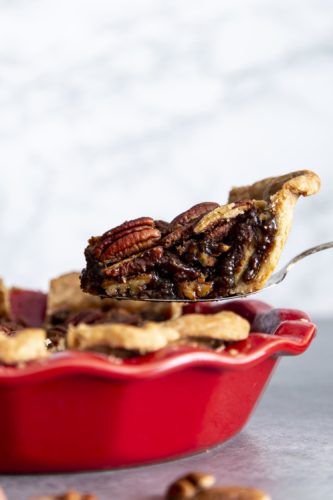
Amazing Decadent Pecan Pie is a rich, chewy, nutty, sweet, traditional holiday staple. For many the holidays aren’t the holidays without this brilliant dessert on the table. This homemade delight is surprisingly super simple. You are going to love it!
This holiday season spread your table with this amazing Pecan Pie along with Grandma’s Famous Pumpkin Pie, Perfect Apple Pie and an Easy Cherry Pie for a dessert table to drool over!

Pecan Pie Recipe
Pecan Pie got its start deep in the heart of Texas where it is now the State’s official Pie! It started showing up in Texas cookbooks first in the 1870’s and 1880’s. In the 1930’s Corn syrup companies widely popularized the pie publishing it on the back of their bottles, using corn syrup in the recipe. It was best known as a southern dish in the 1940’s and 50’s and now variations are all over the United States and this delectable dish graces tables everywhere.
No matter where it came from, this pie so scrumptious. It’s a family favorite for Thanksgiving and Christmas. But don’t wait till the holidays to whip this up. It’s so easy and so delicious make it any time you wish!
Ingredients for Homemade Pecan Pie
Pie Crust:
- Flour: All purpose flour is best, so it holds its structure
- Sugar: Helps as a binder and browning
- Salt: Gives it flavor
- Butter: Butter gives it that flakey goodness
- Cold Water: To add moisture
Pecan Pie Filling:
- Pecan Halves: You’ll divide these
- Butter: Adds richness Melt the butter then let it cool.
- Eggs: This is the binder and give the pie lift
- Vanilla: Flavor
- Corn Syrup: It wouldn’t be pecan pie without it
- Molasses: Adds a deep rich flavor
- Brown Sugar: Can’t use all corn syrup, and dark or light do the trick
- Flour: Helps it not be super runny
- Salt: Balances the sweet.
- Cinnamon: Adds a bit of magic to the flavor

Let’s Bake a Pie!
Pie Crust
- Whisk: In a small bowl mix the flour, sugar, and salt with a whisk
- Food Processor: Place the flour mixture in the food processor and add cold cubed butter. Pulse several times till mixture is pea or bean sized.
- Water: Turn the processor on and drizzle the cold water over the dough mixture through the water hole. Add enough water for the dough to pull together. Stop and scrape the bottom to make sure the flour is all incorporated.
- Refrigerate: Turn the dough out onto the counter and form into a disk. Wrap in plastic wrap and place in the fridge for at least an hour.
- Roll: Remove from fridge and roll into a circle about 2 inches larger than your pie dish. Use extra flour to keep dough from sticking to the counter and roller.
- Form: Place the dough over the pie dish, and lightly press the dough into the bottom and side of the pie dish. Trim excess dough leaving just enough to fold under and create a fluted edge.
- Cover: Cover and refrigerate for another 15-30 min or you can freeze for later.
- Parchment: Using a fork poke steam holes in the bottom of the pie dough and on the sides.Place a large piece of parchment over the dough and place pie weights or dry beans on top to fill the whole pie crust. Make sure the parchment is large enough to cover the edges of the crust entirely.
- Blind Bake: Place the pie dish on a large baking sheet and bake at 425 for 25 min. Carefully remove the pie and remove the parchment and pie weights. Then bake for another 5 min. Place on a cooling rack to cool.
Pie Filling
- Beat: In a medium mixing bowl blend the melted butter, eggs, light corn syrup, molasses and vanilla, beat till smooth.
- Whisk: In a separate bowl whisk the sugar, flour, salt and cinnamon then add to the wet ingredients and beat till completely incorporated.
- Add: Place 2 cups of chopped pecans into the cooked pie crust.
- Pour: Pour the filling over the pecans in the pie crust, allowing it settle and fill all the spaces. Arrange the 1/2 cup of un chopped pecans on top in desired pattern.
- Place: Place the piece on a baking sheet and cover the edge with a pie shield or thin strips of foil.
- Bake: Bake at 350 degrees for 60-70 minutes till the middle is just slightly jiggly. Cool completely.

Suggestions for an Amazing Pecan Pie
Not that this pecan pie needs much help but here are a few tips.
- Time Saver: Need to save yourself some time use a pre made pie crust. You can also purchase pre chopped pecans for even faster prep.
- Nuts: Use chopped pecans in the filling and top with whole halves to add texture
- Too Sweet: This is supposed to be a sweet pie, but I get it, it can be too sweet sometimes. Balance that sweetness by adding semi-sweet chocolate chunks or chocolate chips to the bottom of the pie crust before adding the filling. You can also add flakey sea salt to the top once cooked for a sweet and salty taste. Also try toasting the pecans that will end up in the filing, but not the ones that will be on top, as they’ll toast as it cooks.

Make it Ahead And Store It!
I love this pecan pie recipe because you make it ahead of time and check it off your to do list early. Like really early!
- A few days: You bake this pie and store it at room temperature for up to 3 days before using.
- A Couple of Months: Bake and cool completely and then freeze the pie for up to 2 months. Thaw in the fridge overnight and bring to room temp. before serving.
- A few more days: It can also be stored in the fridge loosely covered for 4-5 days. Allow to come to room temp before serving.

More Pie To Try!
Because pie is just plain awesomeness in a flakey crust!
- Homemade Peach Pie
- Sweet Potato Pie
- Banoffee Pie
- Amazing Strawberry Peanut Butter Pie
- Easy Lemon Pudding Pie
Pecan Pie
Ingredients
Pie Crust
- 1 and 1/2 cup all-purpose flour
- 2 rounded tablespoon granulated sugar
- 1/4 rounded teaspoon kosher salt
- 5 ounces unsalted butter cold & cubed
- 2 - 4 tablespoon cold water
Pecan Pie Filling
- 2 and ½ cup pecan halves divided
- 2 ounces unsalted butter melted and cooled
- 3 large eggs
- 1 teaspoon pure vanilla extract
- 1 cup light corn syrup
- ⅓ cup molasses unsulphured
- ⅓ dark brown sugar or light brown
- 1 tablespoon flour
- ½ rounded teaspoon kosher salt
- 1 ½ teaspoon cinnamon
Instructions
Make pie crust
-
Add flour, sugar and salt in a small mixing bowl and mix thoroughly with a whisk. Transfer flour mixture to a food processor fitted with the dough blade. Add cubed cold butter to the flour mixture, pulse several times until butter is about pea and bean size. Variations in size are okay.
-
Turn the food processor to “on” position and drizzle cold water over the dough mixture through the water hole, as soon as the dough starts to pull together turn the food processor off. You may need to stop the food processor in between and get a spatula to mix up the flour at the bottom.
-
Turn the dough out on the counter or cutting board, and shape into a disk. Wrap in plastic and rest in the refrigerator for at least an hour.
-
Take the disk of pie dough out of the fridge and roll into a circle about 2” larger than your pie dish. Use extra flour to keep the dough from sticking to the counter and roller.
-
Carefully place the dough over the pie dish, lightly press the dough into the bottom and side of the pie dish, let the excess dough hang over the side. Trim the excess dough leaving just enough to fold under and create a fluted edge.
-
Cover the pie dish with plastic wrap and keep refrigerated, or freeze (preferred), for 15 - 30 minutes.
-
Preheat the oven to 425°F.
-
Remove pie crust from the freezer and use a fork to poke steam vents on the bottom of the pie dough and on the sides.
-
Place a large piece of parchment paper over the frozen pie dough, place pie weights on top or pour dry beans on top to fill the whole pie crust. Make sure the parchment is large enough to cover the edges of the crust entirely.
-
Place the pie dish on a large baking sheet. Bake pie crust for 25 minutes with pie weights or beans, then carefully remove the parchment paper along with the pie weights and bake for another 5 minutes.
-
Remove the pie crust from the oven and place it on a wire rack to cool slightly. Reduce the oven temperature to 350°F.
Make the pie filling
-
Add cooled melted butter, eggs, light corn syrup, molasses, and vanilla extract to a medium mixing bowl and beat until smooth. Whisk together sugar, flour, salt and cinnamon in a small bowl and add it to the liquid mixture, beat again until completely incorporated.
-
Add 2 cups of roughly chopped pecans to the slightly cooled pie crust, reserving about ½ cup of whole pecan halves to create a pattern on top.
-
Pour the filling over the chopped pecans, allowing it to settle and fill all the spaces in between the pecans. Arrange the reserved pecans on the surface in a desired pattern.
-
Place the pie dish on a baking sheet and cover the edge with a pie shield or thin strips of foil. Bake for 60 - 70 minutes until the middle is just slightly jiggly.
-
Remove from the oven and allow to cool completely before serving.
Nutrition

from The Recipe Critic https://ift.tt/3nMbLtm
https://ift.tt/3lSpfTP