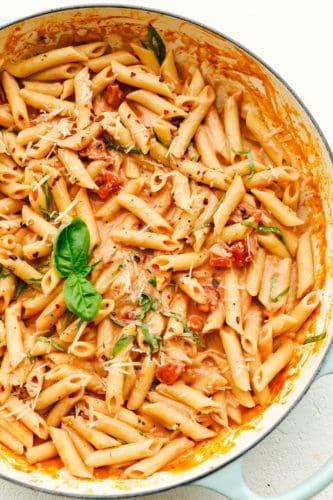
Penne alla Vodka is creamy, full of flavor and absolutely divine! This simple yet elegant dish is exploding with a creamy rich tomato sauce, and tender pasta. Perfect dinner anytime of the week!
So simple to make and comes together in one dish! Serve this with The Best Homemade Garlic Bread and My Favorite Caesar Salad for a complete out of this world meal.

Best Penne alla Vodka
A grown up pasta that can be made for the whole family. It’s a creamy dreamy dish that everyone loves. The vodka creates a unique flavor that’s just hard to replicate any other way. When it first burst onto menus it was deemed super fancy and reserved for those special occasions. Now you can have a special occasion any night of the week with this super easy simple recipe.
See below for ways to sub out the vodka if you prefer. It won’t be exactly the same but it will still be amazing for sure. Celebrate everyday with this restaurant worthy meal at home. You’ll love it!
Penne alla Vodka Ingredients
Serve for special occasions, or just because it’s Tuesday. It’ll be the right dish for everything!
- Penne Pasta: Cook al dente according to directions on package
- Olive Oil: For sauteing
- Onion: Chopped
- Garlic: Minced or crushed will release the most flavor
- Vodka: Use something you’d drink. If want to substitute it out, see below.
- Tomato Sauce: A large 15 oz can
- Diced Tomatoes Splurge for good quality tomatoes for intense flavor
- Heavy Cream: I do not recommend subbing half and half or milk for the cream.
- Salt and pepper:To taste
- Optional Toppings: Basil, Parmesan Cheese, Red Pepper Flakes: Not necessary but definitely worth having.
Making This Amazing Pasta!
- Cook: Cook the pasta according to the package directions for al dente.
- Saute: In a large saucepan add the olive oil, onion, and garlic and saute till tender.
- Add: Pour in the vodka and let it simmer till reduced.
- Pour: Pour in the tomato sauce, diced tomatoes and heavy cream.
- Simmer: Let it simmer till it starts to thicken, between the two simmer times should at least equal half an hour.
- Pasta: Add the pasta to the sauce and stir till coated. Salt and pepper to taste. Add optional toppings, highly recommended.

Why Vodka in the Sauce?
So you may interested to know a few things about this decadent sauce:
- Where did it come from: No one exactly knows where Penne alla Vodka came from. And no one seems to want to claim it. Some say it’s Italian, some say it’s more Italian-American, and others still claim that it was invented by vodka manufacturers. What we do know is that erupted on to the culinary scene in the late ’70’s and early 80’s and has only grown in popularity since.
- So what does the Vodka do anyway: On its own vodka doesn’t have a strong flavor, so you may be wondering why it would have an entire sauce devoted to it. Vodka brings out flavor compounds in the tomatoes that are only soluble in alcohol. So vodka pulls out additional flavors and concentrates from the sauce without adding flavor on it’s own.
- End Results using Vodka: Vodka does alter the flavor of the sauce in a pleasing way. It adds a touch of heat and a bit of a sharp bite that help balance out the sweetness of the tomatoes and the cream. Is it absolutely necessary? No, but vodka sauce just wouldn’t be, well, vodka sauce without it
- Substitutions for the Vodka: You can technically add a different alcohol (keep it to about 2% ABV) for the Vodka but watch the flavor. Once the alcohol cooks off you’ll be left with the flavor of the spirits, which may not work so well. If you’re serving it to kids or want alcohol free sauce. Use water and a squeeze of lemon instead. You can also use water and splash of white vinegar.
Tips for the Perfect Penne alla Vodka
- Noodles: Cook the noodles so they are just underdone, definitely al dente, so they don’t get mushy but hold up in the sauce.
- Pasta: Although this calls for Penne, you don’t have to use penne pasta. Rigatoni, cavatappi, ziti, fusilli or even fettucini all work.
- Cooking Time: Make sure to simmer the sauce once you’ve added the vodka for at least 1/2 an hour total time to make sure the alcohol cooks off, otherwise you’ll be able to taste it.
- Intensify tomato flavor: Want to amp up the tomato flavor substitute out the tomato sauce for 1/2 cup of tomato paste. YUM!
- Add ins: Make this your own unique pasta and add in Sausage, chicken, bacon, zucchini, peppers, mushrooms or olives for diversity.

More Pasta Dishes to Love
Everyone loves pasta and it’s so easy to cook and has so many variations to try.
- Pasta Skillet with Pumpkin and Sausage
- Creamy Shrimp and Mushroom Pasta
- Quick and Easy 5 minute Sun Dried Tomato Pesto Pasta
- Easy Pasta Carbonara
- Asiago Garlic Alfredo Pasta

Penne alla Vodka
Ingredients
- 1 pound penne pasta
- 1 tablespoon olive oil
- 1 small onion diced
- 3 cloves garlic diced
- 1/2 cup vodka*
- 1 15 ounce can tomato sauce
- 1 15 ounce can diced tomatoes, drained
- 1 cup heavy cream
- salt and pepper
Optional Toppings
- chopped basil
- parmesan cheese
- red pepper flakes
Instructions
-
Cook the pasta according to package directions and drain.
-
In a large sauce pan add the olive oil, onion and garlic. Sauté until tender. Pour in the vodka and and let it simmer until reduced.
-
Pour in the tomato sauce, diced tomatoes, and heavy cream. Let it simmer until it starts to thicken. Add the pasta to the sauce and stir until coated. Salt and pepper and add optional toppings.
Nutrition

from The Recipe Critic https://ift.tt/2IZNNvF
https://ift.tt/2J2lg8N