मंगलवार, 24 नवंबर 2020

The Absolute BEST Slow Cooker Turkey Breast

Slow Cooker Turkey Breast is the perfect way to get tender juicy turkey with a fraction of the prep, but all the flavor. Let the slow cooker do ALL the work!

Using the slow cooker for your turkey frees up the stove and oven for all the amazing sides. Combine this succulent Turkey with Roasted Autumn Vegetable Stuffing, Famous Mashed Potatoes, The Best Sweet Potato Casserole, The World’s Best Green Bean Casserole and some Parker House Rolls and you’ve got Thanksgiving, or any special occasion covered.

Turkey cut up on a white plate.

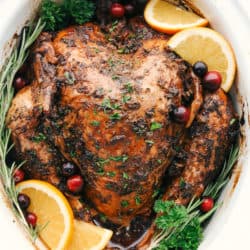
Turkey Breast in the Slow Cooker

I always make my turkeys in the oven. Why have I never made them in the slow cooker before? I love my slow cooker! It took me a total of 5 minutes to throw this into the slow cooker. In just a few hours, I had the most delicious, moist, and tender turkey that I have ever had in my life!

I have always wanted to try making turkey in the slow cooker. This was the perfect opportunity! It was a smaller turkey and just right for our family. This was the most moist and tender turkey I have had. Which makes sense because it seals in the moisture and cooks in the juices all day. I couldn’t believe how delicious this turned out! And the sauce that it cooked in all day gave it the perfect flavor. This will not just be a seasonal meal made at our house. We will be making this year round!

Turkey Breast Ingredients

This will take 5 min to put together and then let the slow cooker do the rest. Super simple and tastes amazing!

  • Turkey Breast: 5-6 pounds, make sure it fits in your slow cooker.
  • Orange Juice: Adds a nice zing
  • Whole Cranberry Sauce: Cranberries were made for turkey
  • Onion Soup Mix: One of the best flavors you can add to anything
  • Salt and Pepper: Add to taste

Turkey in a slow cooker.

Making Slow Cooker Turkey Breast

Sometimes you just don’t want or need to cook an entire turkey. Maybe it’s just a smaller crowd this year, or maybe your family made the turkey this year but you still want leftovers. Slow cooker Turkey Breast is the perfect way to satisfy your turkey cravings, whatever they maybe.

  1. Prep: Either use a slow cooker liner or spray your cooker with cooking spray. Make sure your Turkey Breast is thawed and place inside.
  2. Mix: In a separate bowl mix the cranberry sauce, onion soup, orange juice together and pour over the top. Sprinkle with salt and pepper.
  3. Cook: Cove and cook on low for about 8-9 hours or until a meat thermometer reads 165 degrees F. Remove and cover with foil and let it rest for at least 5-15 minute.

Preparing a turkey in the slow cooker.

Tips for Tender Turkey Breast

I love the flavor this imparts, it’s perfect, but you can always use a few tips right?!

  • Turkey: Can’t stress enough to make sure your turkey fits in the crock pot.
  • Bone-In: Having a bone in and skin on turkey imparts more flavor and moisture into your turkey. You can remove the skin before carving.
  • Rest:  Allowing the turkey to rest before carving gives the juices time to distribute evenly through the meat. It sounds weird but it’s totally true. Let it rest before cutting.
  • Veggies: You can add carrots, celery, onion chunked to the bottom of your slow cooker before you add the turkey if you’d like.
  • Crisp it: If you want a classic crispy top, place under the broiler for 5-8 minutes, basting as necessary.
  • How much to buy: Aim for buying 3/4 of a pound of turkey per a person. If you want leftovers, plan on a 1lb per person.
  • Thaw: Be sure to thoroughly thaw your turkey breast in the fridge for at least 24 hours. Do not thaw at room temperature.
  • Gravy: Make gravy to go with it!

Leftovers

  • Fridge: If you have any leftovers store them in the fridge in a tightly sealed container or even a freezer bag for up to 4-5 days.
  • Freeze in a freezer safe container or bag for up to 3 months,
  • Bone: Save and freeze the bone to throw in soup another time.

Turkey in a slow cooker.

More Turkey Loving Recipes

Print

Slow Cooker Turkey Breast

Amazing juicy and perfectly tender turkey breast that slow cooks all day in the crockpot!
Course Dinner, Main Course
Cuisine American
Keyword slow cooker turkey breast, turkey breast
Prep Time 10 minutes
Cook Time 8 hours
Total Time 8 hours 10 minutes
Servings 6 Servings
Calories 575kcal
Author Alyssa Rivers

Ingredients

  • 1 5 to 6 pound turkey breast make sure it will fit into your slow cooker
  • 1/2 cup orange juice
  • 1 14 ounce can whole cranberry sauce
  • 1 package Onion Soup Mix
  • salt and pepper to taste

Instructions

  • Line your slow cooker with a liner or spray with cooking spray. I like using a liner so that the clean up is easy. Place the thawed turkey into the crockpot.
  • Mix together the cranberry sauce, onion soup mix, and orange juice. Pour over the top of the turkey. Sprinkle the top with salt and pepper. I love using the Lawry's coarse seasoned pepper.
  • Cover and cook on low for about 8-9 hours or until your thermometer reads 180. Carefully remove your turkey and place it on a plate. Let it rest for 5 minutes before carving and enjoy!

Notes

I did not crisp the skin after it was done in the slow cooker.  If you want a crispy skin, then broil the turkey for 5 minutes.

Nutrition

Calories: 575kcal | Carbohydrates: 30g | Protein: 98g | Fat: 8g | Saturated Fat: 1g | Cholesterol: 245mg | Sodium: 969mg | Potassium: 1157mg | Fiber: 1g | Sugar: 29g | Vitamin A: 162IU | Vitamin C: 12mg | Calcium: 69mg | Iron: 3mg


Collage of slow cooker turkey breast photos.


from The Recipe Critic https://ift.tt/37aIKkq
https://ift.tt/360tPd2

Cranberry Orange Scones

Bakery Style Cranberry Orange Scones! These scones are perfectly soft and fluffy on the inside and crisp and crunchy on the outside. They are bursting with cranberry and orange flavor and make the perfect Fall breakfast!

Looking for more Scone Recipes? Try my Summer Berry Scones or my Glazed Orange Scones!

Cranberry orange scones on a white plate.

Cranberry and Orange Scones

These Cranberry Orange Scones are the perfect breakfast for Fall. I love the combination of the dried cranberries and orange zest. They give these scones so much flavor!

The scones are perfectly soft and moist on the inside with the crunchy crumbly edges we all love in a scone.

Before the scones are baked they get brushed with some of the reserved milk and orange juice mixture. They then get sprinkled with sugar then baked! It’s that extra touch that makes them feel like bakery style scones!

Key Ingredients

  • Flour: We used all purpose flour in this recipe.
  • Baking powder: This gives the scones the lift they need.
  • Sugar: Just a little bit of granulated sugar (only 2 tablespoons is added making this a guilt free scone!)
  • Butter: Cold cubed unsalted butter is used to make these orange scones extra flakey and buttery.
  • Orange juice and orange zest: Give these scones so much flavor!
  • Dried cranberries: I prefer using the dried cranberries over fresh or frozen. We soak the cranberries in a bit of brandy to plump them back up.

Cranberry orange scones having glaze drizzled overtop of them.

How to Make the Best  Cranberry Orange Scones

  • Preheat oven: To 425 degrees and line a baking sheet with parchment paper.
  • Rehydrate cranberries: Add cranberries and brandy to a small bowl. Cover with plastic wrap and microwave for 1 minute. Leave the plastic wrap on and allow the cranberries to cool before removing the plastic wrap. I let mine cool while I am working on the rest of the steps.
  • Make buttermilk: Combine milk and orange juice and stir to combine. Let sit for 5 minutes. Reserve 2 tablespoons of the mixture for brushing on top of the scones.
  • Make scone batter: Add flour, sugar, baking powder, salt, butter and orange zest to a food processor fitted with the blade attachment. Pulse until the mixture resembles pea sized crumbs. Add in the remaining milk mixture (everything but the 2 tbsp that is reserved) and pulse for 10 seconds or until the mixture comes together. Make sure not to over mix. Fold in cranberries by hand using a rubber spatula.
  • Cut into triangles: Transfer dough to a well floured surface. Form the dough into a large 8 inch disc. Cut the dough into 8 wedges and transfer to the prepared pan.
  • Bake: For 15 minutes or until golden brown. When the scones are slightly cool drizzle with glaze and serve!
  • Orange Glaze: Combine all of the ingredients in a small bowl and whisk until smooth.

Cranberry orange scones getting brushed on.

Can I Use Other Types of Cranberries?

Yes! Fresh or frozen (no need to thaw) cranberries can be used.

Tips for Making Amazing Cranberry Orange Scones

  • It’s very important that this scone dough remain cold or else the butter will start to get warm and melt. That means the scones won’t be as soft and flakey so make sure to keep the batter cold. 
  • Don’t overwork the batter. Just like when making any baked good the more you mix it the tougher the end result will be. Remember less is more!

Cranberry orange scones cut up into triangles.

More Orange Flavored Recipes to try!

Print

Cranberry Orange Scones

Bakery Style Cranberry Orange Scones! These scones are perfectly soft and fluffy on the inside and crisp and crunchy on the outside. They are bursting with cranberry and orange flavor and make the perfect Fall breakfast!
Course Breakfast
Cuisine American
Keyword Cranberry Orange Scones
Prep Time 15 minutes
Cook Time 15 minutes
Total Time 30 minutes
Servings 8 Scones
Calories 334kcal
Author Kelley Simmons

Ingredients

  • 2 cups all purpose flour
  • 1 whole orange zest
  • 2 and 1/2 Tablespoon fresh squeezed orange juice
  • 1/2 cup unsalted butter, cold and cubed
  • 1/2 cup dried cranberries
  • 2 Tablespoon granulated sugar
  • 2 Tablespoon brandy
  • 1/2 cup milk
  • 1 tsp granulated sugar, for sprinkling on top

Orange Glaze

  • 2 Tablespoon fresh squeezed orange juice
  • 1 cup powdered sugar
  • 1/2 teaspoon orange zest

Instructions

  • Preheat oven to 425 degrees. Line a baking sheet with parchment paper.
  • Add cranberries and brandy to a small bowl. Cover with plastic wrap and microwave for 1 minute. Leave the plastic wrap on and allow the cranberries to cool before removing the plastic wrap. I let mine cool while I am working on the rest of the steps.
  • Next combine milk and orange juice and stir to combine. Let sit for 5 minutes. Reserve 2 tablespoons of the mixture for brushing on top of the scones.
  • Add flour, sugar, baking powder, salt, butter and orange zest to a food processor fitted with the blade attachment. Pulse until the mixture resembles pea sized crumbs.
  • Add in the remaining milk mixture (everything but the 2 Tablespoon that is reserved) and pulse for 10 seconds or until the mixture comes together. Make sure not to over mix.
  • Fold in cranberries by hand using a rubber spatula.
  • Transfer dough to a well floured surface. Form the dough into a large 8 inch disc. Cut the dough into 8 wedges and transfer to the prepared pan.
  • Bake for 15 minutes or until golden brown.
  • When the scones are slightly cool drizzle with glaze and serve!

Orange Glaze

  • Combine all of the ingredients in a small bowl and whisk until smooth.

Nutrition

Calories: 334kcal | Carbohydrates: 51g | Protein: 4g | Fat: 12g | Saturated Fat: 8g | Cholesterol: 32mg | Sodium: 9mg | Potassium: 85mg | Fiber: 1g | Sugar: 25g | Vitamin A: 397IU | Vitamin C: 7mg | Calcium: 27mg | Iron: 1mg


from The Recipe Critic https://ift.tt/3pWRRxt
https://ift.tt/2KwkHo5

Cream of Mushroom Soup Recipe

Cream of Mushroom Soup is a dreamy creamy soup full of delicately flavored sautéed mushrooms and herbs. If you love the taste of cream of mushroom soup, but can stand the canned version, this is for you! This is a fancy, thick, rich, restaurant worthy soup you can whip up at home in no time.

It’s a mushroom lovers soup dream come true. Serve this scrumptious soup with a side of Homemade Parker House Rolls, and some vegetables that are either Stir Fried or Air Fried for a complete yummy meal.

Creamy dreamy homemade Cream of Mushroom Soup

Creamy Mushroom Soup

Soup on a cold night, just warms the soul and this soup is no different. With buttery sauteed mushrooms and onions, then simmered in a perfectly seasoned cream sauce, it’s a mega power comfort food in a bowl. Grab a crusty loaf of bread and salad and dinner is made!

With easy to find, pantry staples, this soup is easy to make and so flavorful. The mushrooms have a great earthy savory flavor that just hits the spot. If you love mushrooms, you are going go insane over this indulgent dish.

Mushroom Soup Ingredients

  • Butter: For sauteing the onion and mushrooms, add loads of flavor
  • Onion: Dice the onion for best texture
  • Baby Bella Mushrooms: Sliced
  • Flour: For thickening
  • Italian Seasoning: One of my go to blends, amazing flavors all in one spice
  • Fresh Thyme: Adds an extra punch of flavor
  • Garlic: Garlic and mushrooms are made to go together.
  • Salt and Pepper: Add to taste but don’t under season
  • Chicken Broth: Creates a mild broth
  • Heavy Cream:  The creaminess is divine

How to Make Cream of Mushroom Soup

This is a fairly straight-forward simple recipe to make!

  1. Saute: In a large pot add the butter, onion and mushrooms. Saute over medium heat till tender
  2. Season: Add in the flour, Italian Seasoning, thyme garlic and salt and pepper and stir until coated.
  3. Simmer: Add in the chicken broth and simmer over medium high heat for 5-7 min. Add in the heavy cream and let simmer for 3-5 min. more.

Sauteing and making Cream of Mushroom Soup

Tips for the Best Cream of Mushroom Soup

This is quick and easy but there are a few tips to make it even better.

  • Mushrooms: I used baby bella mushrooms but you can also use cremini or white button mushrooms. Or a mixture of mushrooms works and adds a blend of flavors
  • Slicing:  Buy pre sliced mushrooms to save time. But if you have time slice your own. This helps make sure the mushrooms are the same thickness and will cook at the same rate. You may have to trim the pre-sliced mushrooms if some are too big.
  • Cream: Heavy cream adds incredible richness, but you can substitute half and half and have excellent results.
  • Saute: Don’t under saute the mushrooms. You want a deep color on the mushrooms, and caramelization. This creates the best flavor.
  • Blend it: If you want a smooth creamy soup, once it’s simmered use an immersion blender or place in batches in your blender leaving the small opening on  top open and covering with a paper towel and blend to desired texture.

Storing any Leftovers

If there are any leftovers, they make great lunches and other meals!

  • Fridge: Store in an airtight container in the fridge for up to 4 to 5 days.
  • Ideas: Reheat the soup either on the stove top or the microwave. It’s perfect served over rice or pasta or blended and stirred into casseroles for an easy meal.
  • Freeze: Cream based do not usually freeze well. They can become grainy. If you want to freeze it, freeze it before adding the cream.


Dreamy Cream of Mushroom Soup.

More Mushroom Recipes to Love

Mushrooms are a polarizing vegetable. You either love them or you don’t. If you love them, here are some amazing recipes to try!

Print

Cream of Mushroom Soup

Cream of Mushroom Soup is a dreamy creamy soup full of delicately flavored sauteed mushrooms and herbs. If you love the taste of cream of mushroom soup, but can stand the canned version, this is for you! This is a fancy, thick, rich, restaurant worthy soup you can whip up at home in no time. 
Course Soup
Cuisine American
Keyword cream of mushroom soup, creamy mushroom soup
Prep Time 5 minutes
Cook Time 15 minutes
Total Time 20 minutes
Servings 4 People
Calories 308kcal
Author Alyssa Rivers

Ingredients

  • 1 tablespoon butter
  • 1 small onion diced
  • 1 pound baby Bella mushrooms sliced
  • 1/4 cup flour
  • 1 teaspoon Italian seasoning
  • 1 teaspoon fresh thyme
  • 3 garlic cloves diced
  • salt and pepper
  • 4 cups chicken broth
  • 1 cup heavy cream

Instructions

  • In a large pot add the butter, onion and mushrooms. Sauté over medium high until tender. Add in the flour, Italian seasoning, thyme, garlic and salt, pepper and stir until coated.
  • Add in the chicken broth and simmer over medium high heat for 5-7 minutes. Add in the heavy cream and let simmer for 3-5 more minutes.

Notes

Can also use a blender or immersion blender for a smooth and creamy soup.

Nutrition

Calories: 308kcal | Carbohydrates: 16g | Protein: 6g | Fat: 26g | Saturated Fat: 16g | Cholesterol: 89mg | Sodium: 916mg | Potassium: 775mg | Fiber: 1g | Sugar: 3g | Vitamin A: 986IU | Vitamin C: 20mg | Calcium: 89mg | Iron: 2mg


from The Recipe Critic https://ift.tt/3fuiMf6
https://ift.tt/39bGYSK

सोमवार, 23 नवंबर 2020

French Silk Pie

A flakey crust is filled with a decadent, dreamy, creamy, chocolate filling and topped with pillows of cream for this irresistible French Silk Pie. The filling is so smooth and rich, and then encased in a buttery crust. It’s a crowd pleaser where ever you serve it!

Add this show-stopper dessert to others like Better Than Anything Cake, Lemon Tart with a Buttery Shortbread Crust and Easy Tiramisu  as one that will disappear fast!

Creamy dreamy French Silk Pie

Homemade French Silk Pie

This pie truly is a chocolate lovers dream pie. The rich chocolaty filling can be adjusted to your level of chocolateness. And because we heat the eggs, you don’t have to worry about eating raw egg. You can just enjoy the velvety smoothness without a care in the world.

Serve this at any holiday or special occasion and watch your friends and family turn you into a hero. Everyone loves a good dessert made with love…and chocolate….and cream!

Baking the Crust

  • Flour: All purpose flour is best, so it holds its structure
  • Sugar: Helps as a binder and browning
  • Salt: Gives it flavor
  • Butter: Butter gives it that flakey goodness
  • Cold Water: To add moisture

Ingredients for Creamy Dreamy Mousse Filling

  • Heavy Cream: Don’t substitute
  • Powdered Sugar: Using powdered sugar gives sweetness without graininess.
  • Unsweetened Baking Chocolate: Or unsweetened chocolate bar
  • Bittersweet Baking Chocolate: Or chocolate bar
  • Eggs: Creates the binder and light fluffiness
  • Sugar: Gives the sweet to the bitter
  • Butter: soften the butter to room temp
  • Vanilla: Divided

Whipped Cream Ingredients 

  • Heavy Cream: You’ll want it to whip up nice and high
  • Powdered Sugar: Dissolves easily
  • Vanilla: Add the sweet flavor
  • Garnish: Chocolate curls

Pie Crust in a pie plate ready for baking.

Making the Best French Silk Pie Crust

  1. Whisk: In a small bowl mix the flour, sugar, and salt with a whisk
  2. Food Processor: Place the flour mixture in the food processor and add cold cubed butter. Pulse several times till mixture is pea or bean sized.
  3. Water: Turn the processor on and drizzle the cold water over the dough mixture through the water hole. Add enough water for the dough to pull together. Stop and scrape the bottom to make sure the flour is all incorporated.
  4. Refrigerate: Turn the dough out onto the counter and form into a disk. Wrap in plastic wrap and place in the fridge for at least an hour.
  5. Roll: Remove from fridge and roll into a circle about 2 inches larger than your pie dish. Use extra flour to keep dough from sticking to the counter and roller.
  6. Form: Place the dough over the pie dish, and lightly press the dough into the bottom and side of the pie dish. Trim excess dough leaving just enough to fold under and create a fluted edge.
  7. Cover: Cover and refrigerate for another 15-30 min or you can freeze for later.
  8. Parchment: Using a fork poke steam holes in the bottom of the pie dough and on the sides.Place a large piece of parchment over the dough and place pie weights or dry beans on top to fill the whole pie crust. Make sure the parchment is large enough to cover the edges of the crust entirely.
  9. Blind Bake:  Place the pie dish on a large baking sheet and bake at 425 for 25 min. Carefully remove the pie and remove the parchment and pie weights. Then bake for another 5 min. Place on a cooling rack to cool.

Mousse Filling

  1. Melt: In a double boiler melt the chocolate and set aside to cool.
  2. Heat: In another or double boiler or in a small saucepan set over low heat, heat the eggs and 1/2 cup sugar till mixture reaches 160 degrees F. Whisk constantly so the eggs don’t cook, about 7-10 min.
  3. Remove: Remove from heat and add it to the melted chocolate whisk until completely mixed.
  4. Beat: In a stand mixer add the heavy cream and 1 tablespoon of powdered sugar, beat on medium speed. Stream in 1/2 teaspoon of vanilla and continue to beat till stiff peaks form. Scoop into a small bowl and refrigerate till needed.
  5. Fluffy: In the same mixing bowl add the softened butter and the remaining 1/2 sugar and beat till light and fluffy, about 2-3 minutes. Ad the cooled chocolate and egg mixture, beat till completely smooth, another 2-3 minutes.
  6. Fold: Fold in the whipped cream and spread the mixture evenly into the completely cooled pie shell. Chill for at least 2 hours before serving.

Whipped Cream Topping

Add whipping cream and powdered sugar in a stand mixer and beat on medium speed. Stream in the vanilla and beat until stiff peaks form. Spread on top of pie and add garnishing as desired.

Whipping and mixing creamy mousse filling.

Making French Silk Heavenly

There are a few tips for this decadent French silk pie!

  • Chocolate: This recipe creates a decadent rich chocolate flavor,if you’d like a lighter chocolate taste switch out the unsweetened for bittersweet and then switch the bittersweet for semi-sweet. I do not recommend using chocolate chips. Use a fine baking bar such as Bakers or Ghirardelli or another quality chocolate bar. You won’t regret it.
  • Cream: Because you need to really whip the cream and create perfect fluffiness, I don’t recommend using substitutions for the Heavy Cream.
  • Pie Crust: You can use a premade pie crust to speed the process. Bake as directed on package. You can also make an chocolate cookie crust if you desire as well.
  • Eggs: Because we bring the eggs up to a safe 160 degrees, you don’t have to worry about eating raw eggs! So serve to anyone and everyone. Be sure heat it slowly however so it doesn’t cook.
  • Just Beat it: To get a heavenly smooth silky texture to your chocolate filling you need to beat it more than you think you do. Beating the process for a long time ensures that the sugar dissolves and butter and eggs become light and fluffy.

French Silk pie with whipped topping and chocolate sprinkles.

Storing and Freezing Your Pie

You’ll love the fact that you can make it ahead of time and freeze it for later too.

  • Make ahead:This definitely takes time to make, but it’s so worth it and what makes it better is you can make it ahead of time. Make and refrigerate up to 2 days ahead of time. Just don’t put the whipped topping on top till ready to serve.
  • Freezing: Make the pie as directed but don’t put the whipped topping on, refrigerate for 2 hours. Cover completely with plastic wrap, then cover with foil, and freeze up to 2 months. Thaw in the fridge overnight. Make whipped topping and garnish as desired.

Slice of french silk pie on a plate.

More Chocolate Desserts to Conquer

Because chocolate is always the right answer to what’s for dessert.

Print

French Silk Pie

A flakey crust is filled with a decadent, dreamy, creamy, chocolate filling and topped with pillows of cream for this irresistible French Silk Pie. The filling is so smooth and rich, and then encased in a buttery crust. It's a crowd pleaser where ever you serve it!
Course Dessert
Cuisine American
Keyword french silk pie, french silk pie recipe
Prep Time 40 minutes
Cook Time 35 minutes
Total Time 1 hour 15 minutes
Servings 8 People
Calories 717kcal
Author Alyssa Rivers

Ingredients

Pie Crust

  • 1 and 1/2 cup all-purpose flour
  • 2 rounded tablespoon granulated sugar
  • 1/4 rounded teaspoon kosher salt
  • 5 ounce unsalted butter cold & cubed
  • 2 - 4 tablespoon cold water

Chocolate Mousse Filling

  • ¾ cup heavy whipping cream
  • 1 tablespoon powdered sugar
  • 3 ounce unsweetened baking chocolate
  • 3 ounce bittersweet baking chocolate
  • 3 large eggs
  • 1 cup granulated sugar divided
  • 12 tablespoon unsalted butter softened to room temperature
  • 1 and ½ teaspoons pure vanilla extract divided

Whipped cream topping

  • ¾ cup heavy whipping cream
  • 2 tablespoon powdered sugar
  • ½ teaspoon vanilla extract

Garnish

  • Chocolate curls shaved chocolate, cocoa powder, chocolate sprinkles

Instructions

Make the pie crust

  • Add flour, sugar and salt in a small mixing bowl and mix thoroughly with a whisk. Transfer flour mixture to a food processor fitted with the dough blade. Add cubed cold butter to the flour mixture, pulse several times until butter is about pea and bean size. Variations in size are okay.
  • Turn the food processor to “on” position and drizzle cold water over the dough mixture through the water hole, as soon as the dough starts to pull together turn the food processor off. You may need to stop the food processor in between and get a spatula to mix up the flour at the bottom.
  • Turn the dough out on the counter or cutting board, and shape into a disk. Wrap in plastic and rest in the refrigerator for at least an hour.
  • Take the disk of pie dough out of the fridge and roll into a circle about 2” larger than your pie dish. Use extra flour to keep the dough from sticking to the counter and roller.
  • Carefully place the dough over the pie dish, lightly press the dough into the bottom and side of the pie dish, let the excess dough hang over the side. Trim the excess dough leaving just enough to fold under and create a fluted edge.
  • Cover the pie dish with plastic wrap and keep refrigerated, or freeze (preferred), for 15 - 30 minutes.
  • Preheat the oven to 425°F.
  • Remove pie crust from the freezer and use a fork to poke steam vents on the bottom of the pie dough and on the sides.
  • Place a large piece of parchment paper over the frozen pie dough, place pie weights on top or pour dry beans on top to fill the whole pie crust. Make sure the parchment is large enough to cover the edges of the crust entirely.
  • Place the pie dish on a large baking sheet. Bake pie crust for 25 minutes with pie weights or beans, then carefully remove the parchment paper along with the pie weights and bake for another 7 - 10 minutes until the crust is golden.
  • Remove the pie crust from the oven and let it cool completely on a wire rack.

Make the filling

  • Melt the chocolate in a double boiler or in a heatproof bowl set over a steaming pot of water. Set aside to cool.
  • Heat the eggs and ½ cup of granulated sugar in a double boiler or in a small saucepan set over low heat until the mixture reaches 160°F, whisking constantly so the eggs don’t cook. This will take about 7 - 10 minutes. Take it off the heat and add it to the slightly cool melted chocolate and whisk until thoroughly incorporated. Set aside to cool.
  • Add ¾ cup of heavy whipping cream and 1 tablespoon of powdered sugar to a stand mixer bowl, beat on medium speed. Stream in ½ teaspoon of vanilla and continue beating until stiff peaks. Scoop it into a small bowl and refrigerate until needed.
  • In the same mixing bowl, add the softened butter and the remaining ½ cup of granulated sugar and beat until light and fluffy, about 2 - 3 minutes. Add the cooled chocolate and egg mixture, beat another 2 - 3 minutes until completely smooth.
  • Fold in the whipped cream and spread the mixture evenly into the completely cooled pie shell. Chill for at least 2 hours before serving.

Make the whipped cream topping

  • Add ¾ cup of heaving whipping cream and 2 tablespoons of powdered sugar to a stand mixer bowl, beat on medium speed. Stream in ½ teaspoon of vanilla and continue beating until stiff peaks. Spread the whipped cream on top of the pie and add garnishing as desired.

Notes

Unsweetened baking chocolate is used for a darker chocolate flavor.
For a sweeter chocolate filling, you can use all bittersweet baking chocolate instead, or even semisweet baking chocolate.
Use baking bars or baking wafers or your favorite eating chocolate, don’t use chocolate chips.
After removing the pie weights and before putting the pie crust back into the oven, if you notice that that edge is already getting too brown, put a pie shield or a few strips of foil around the edge to prevent burning.

Nutrition

Calories: 717kcal | Carbohydrates: 54g | Protein: 7g | Fat: 55g | Saturated Fat: 34g | Cholesterol: 206mg | Sodium: 49mg | Potassium: 175mg | Fiber: 2g | Sugar: 31g | Vitamin A: 1713IU | Vitamin C: 1mg | Calcium: 62mg | Iron: 3mg


Collage of the steps to make French silk pie.


from The Recipe Critic https://ift.tt/3pTQsb2
https://ift.tt/2J0iPU6