शनिवार, 28 नवंबर 2020

Linzer Cookies

Linzer cookies are a combination of buttery orange infused shortbread and jam, as pleasing to look at as they are to eat. These festive treats are perfect for any holiday or special occasion.

These are perfect for the sharing during a cookie exchange! Serve along with other festive cookies such as Grinch Cookies, Perfect Gingerbread Cookies and Best Ever Molasses Cookies for a delicious cookie smorgasbord.

Cookies stack on top of each other on a white plate.

Linzer Cookie Recipe

These elegant cookies are so joyful just to look at, with their top centers cut out in a fun shape to show through the colorful jam. The dusting of powdered sugar adds the perfect touch creating a fancy touch to these morsels of joy.

Perfect for gift giving, cookie exchanges, parties or just because, these will be the star of the table. The buttery shortbread has just enough zest and cinnamon to add flavor coupled with a tart filling is a match made in heaven.

What is a Linzer Cookie?

The linzer cookie is smaller twist and version of a Linzertorte, which is said to have originated in Linz Austria in the early 1700s. The torte traditionally was made of flour, ground nuts, sugar, egg yolks, citrus zest and spices. It was filled with preserves and topped with a lattice crust. The cookie is made with the same ingredients but presented in cookie form with the jam sandwiched between and dusted with powdered sugar. So divine!

Shortbread Linzer Ingredients

  • Butter: Make sure this is at room temperature.
  • Sugar: granulated
  • Orange Zest: brightens the cookie dough flavor
  • Egg Yolk: binder for the dough
  • Vanilla: sweetness
  • Flour: All purpose
  • Almond Flour: You can find this with regular flour in the baking section or your local grocery store.
  • Salt: Creates balance to the sweetness
  • Cinnamon: Just enough spice

Don’t Forget the Jam!

The jam is the best part of the filling for these Linzer Cookies. You will love the burst of flavor that comes in each bite of cookie!

  • Jam: Use your favorite jam, strawberry, raspberry, lemon or other.
  • Powdered sugar: This is for sifting over the cookies.

Making Raspberry Linzer Cookies

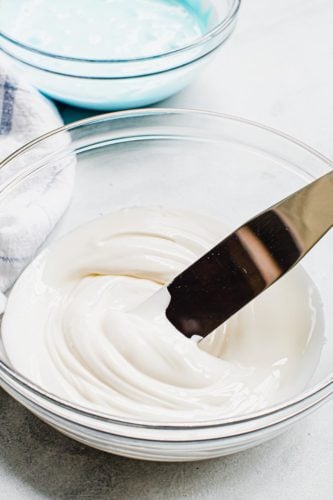
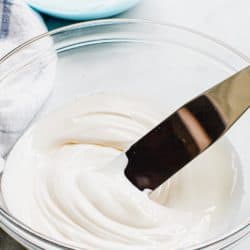
  1. Beat: Add sugar and orange zest to stand mixer bowl, use a hand whisk or your fingers to rub the mixture together to release the citrus oil. Add softened butter and beat with the paddle attachment until fluffy. Add egg yolk and vanilla extract, and beat until combined.
  2. Whisk: In a small bowl whisk both flours, salt, and cinnamon then add to the butter mixture and beat till combined.
  3. Refrigerate: Place the dough onto a piece of plastic wrap and pat into a disc and wrap well and refrigerate for at least 1 hour till firm.
  4. Roll it Out: On a lightly floured countertop, roll the dough to 1/4″ thick and cut with 2″ cookie cutter. Use a smaller cookie cutter to make a cutout in the center for half of the cookie dough. Gather the scraps and roll it back out again. Continue cutting until all is gone.
  5. Refrigerate:  Place cookie dough on a parchment lined baking sheet about 1″ apart, refrigerate while waiting for oven to preheat to 350 degrees F.
  6. Bake: Bake for 10-12 min till edges are just beginning to brown. Let them cool on the baking sheet for 5-10 min before moving to a cooling rack to cool completely.
  7. Assemble: Place the cookies with the center cutouts on a separate baking sheet and sift powdered sugar over the top. Place the whole cookies on another baking sheet with the bottom side up. Spoon 1 teaspoonful of jam filling on top, use a butter knife to spread it slightly. Place sugar dusted cookies on top of the jam to complete assembly.

The process of making Linzer Cookies.

Tips for the Most Stately Linzer Cookies

These aren’t overly complicated but there are a few things to ensure perfection.

  • Rolling: Roll the dough out thinly, if it’s too thick you’ll lose the shape in the oven and they can become dry and hefty.
  • Making Rolling Easier:  If you find rolling out refrigerated dough hard to do, try rolling it out first then refrigerating it covered on parchment lined baking sheet.
  • Losing it’s Shape: To avoid the cookies losing their shape in the oven, keep them thin and be sure to refrigerate them after you’ve cut them out so the butter can harden up again. This will reduce any spreading.
  • Powdered Topping: If you find the powdered sugar has dissolved into your cookies, dust them again before sandwiching them together. If you want to give another dusting before serving, do it. Use a spoon or knife to dab the jam to help the sugar dissolve into the jam.
  • Store: These will keep for a 3-4 days in an airtight container, or freeze for up to 3 months.

Linzer Cookies stacked and laid out in the photo.

Best Linzer Cookie Variations

  • Jam: Feel free to use what ever kind of jam you like for a filling. I like tart jams as they have a nice zing with the shortbread like cookie. You can also make a nice curd to go in the center. Lemon is a common flavor. And don’t forget chocolate! Chocolate ganache inside would be perfect too!
  • Cutting out: You can use what ever shape of cutters you like, round, square, shaped, the possibilities are endless. You just to need to make sure you have a cutter that is smaller to create the window in the top of the cookie for the filling to shine peek through
  • Cookie Dough: Add 1/2 cup of cocoa powder and an extra egg yolk for a chocolaty version. Substitute lemon zest for the orange, or trade out hazelnut flour for the almond flour. Add more cinnamon, or trade out cardamom or nutmeg for a different flavor.

A stack of Linzer Cookies with a bite out of it.

More Cookies to Love

Cookies are the best handheld dessert!

Print

Linzer Cookies

Linzer cookies are a combination of buttery orange infused shortbread and jam, as pleasing to look at as they are to eat. These festive treats are perfect for any holiday or special occasion.
Course Dessert
Cuisine American, Italian
Keyword linzer cookies
Prep Time 15 minutes
Cook Time 12 minutes
Total Time 27 minutes
Servings 15 Cookies
Calories 166kcal
Author Alyssa Rivers

Ingredients

Cookie

  • 4 ounces unsalted butter room temperature
  • ½ cup granulated sugar
  • 1 teaspoon orange zest or lemon zest
  • 1 large egg yolk room temperature
  • ½ teaspoon vanilla extract
  • 1 cups all-purpose flour
  • ¾ cup almond flour
  • ¼ teaspoon kosher salt
  • ¼ teaspoons cinnamon

Jam filling

  • 15 teaspoon jam strawberry, raspberry or your choice
  • Powdered sugar for finishing

Instructions

Make cookie dough

  • Add sugar and orange zest to a stand mixer bowl, use a hand whisk or your fingers to rub the mixture together to release the citrus oil. Add softened butter and beat with the paddle attachment until fluffy. Add egg yolk and vanilla extract, and beat until combined.
  • In a small mixing bowl, whisk together all-purpose flour, almond flour, salt, and cinnamon. Add flour mixture to the butter mixture and mix until just combined.
  • Scrape the dough out of the bowl onto a piece of plastic wrap, pat into a flat disc or rectangle, wrap well and refrigerate for at least 1 hour until firm.
  • On a lightly floured countertop, roll the dough to ¼” thick and cut with a 2” cookie cutter. Use a smaller cookie cutter to make a cutout in the center for half of the cookie dough. Gather the scraps and roll it back out again, continue cutting until all is gone. Place cookie dough on a parchment lined baking sheet about 1” apart. Refrigerate while waiting for the oven to preheat.
  • Preheat the oven to 350°F.
  • Bake for 10 - 12 minutes until the edges are just beginning to brown. Let them cool on the baking sheet for 5 - 10 minutes before moving them to a wire rack to cool completely.

Assemble cookies

  • Place the cookies with the center cutouts on a separate baking sheet and sift powdered sugar over the top.
  • Place the whole cookies on another baking sheet with the bottom side up, spoon 1 teaspoonful of jam filling on top, use a butter knife to spread it slightly. Place sugar-dusted cookies on top of the jam to complete assembly.

Nutrition

Calories: 166kcal | Carbohydrates: 19g | Protein: 2g | Fat: 9g | Saturated Fat: 4g | Cholesterol: 29mg | Sodium: 43mg | Potassium: 14mg | Fiber: 1g | Sugar: 10g | Vitamin A: 206IU | Vitamin C: 1mg | Calcium: 18mg | Iron: 1mg


Linzer Cookies in a collage.


from The Recipe Critic https://ift.tt/37dJEfT
https://ift.tt/2Jr7Wuo

Slow Cooker Cinnamon Almonds

Slow Cooker Cinnamon Almonds are a crunchy, sweet treat made perfectly delicious in the crockpot! These tasty vittles are perfect for snacking, gift giving, and holiday parties. Watch these cinnamon almonds disappear where ever you take them.
Almonds are so yummy, I love using them in my baking. Try them in this Insanely Good Homemade Granola, Almond Roca Cookie Bars or this Almond Joy Poke Cake.

Crunchy sweet cinnamon almonds cooked in the slowcooker.

Cinnamon Almonds

Do you know those delicious cinnamon almonds at the mall? Well these are SO much better! And you can make them for about the same price you pay for one of those tiny bags. I LOVED the way this made my house smell! It seriously makes me want to make a batch daily. The brown sugar and cinnamon mixture gives an AMAZING flavor and the perfect crunchiness…. I almost think that the ones at the mall are a little too crunchy. And how perfect are these for gifts for the holidays? I feel like I have to spread the deliciousness of these and give them to all my friends and family!

These are super easy to throw together and let the slow cooker work it’s magic. You do have to stir the almonds every 20 min or so, so don’t set it and forget it. But it’ll be so worth it as you eat these cinnamony little devils. Be careful not to eat them all in one sitting, it’ll be tempting. Trust me.

Cinnamon and Sugar Almond Ingredients

Simple ingredients come together to make a easy treat! These are a MUST make!

  • Sugar: White sugar
  • Brown Sugar: Helps with caramelization and deep rich flavor.
  • Salt: Balances out the sweet.
  • Almonds: Raw unsalted plain almonds.
  • Cinnamon: The star in the spice combo
  • Egg White: Helps the cinnamon and sugar stick and creates crunch
  • Vanilla:  Flavor enhancer
  • Water: Creates the caramelization at the end.

How to Make Cinnamon and Sugared Almonds

Despite it being the slow cooker you don’t want to necessarily walk away! It will need stirring.

  1. Mix: In a large bowl mix together the cinnamon, sugars and salt
  2. Whisk: In a separate bowl whisk the vanilla and egg white together till good and frothy.
  3. Stir: Pour the almonds into the egg white mixture and stir to coat thoroughly.
  4. Coat: Dump the cinnamon and sugar mixture over the almonds and stir to coat.
  5. Slow Cook: Spray your crockpot with cooking spray. Place the almonds inside and stir again to make sure all the almonds are covered. Cook on low for 3-4 hours stirring every 20 minutes
  6. Water:  Drizzle the water over the almonds and stir. Cook for another 30 min.
  7. Cool: Prepare a cookie sheet with parchment or wax paper. Pour the almonds on the cookie sheet and spread out evenly. Allow to cool completely before storing.

The process of mixing the cinnamon sugar, egg whites, and almonds for a sweet treat.

Why Egg Whites and Water Work

You might be wondering why you need egg whites and water for roasted almonds.

  • Egg Whites: The egg white acts as a binder for the flavor to the nuts. It also acts similar to merguine when it hits the heat, creating a fine crunchy coating. It helps prevent an oily vibe from the nuts as well.
  • Water: The water creates another binder as well as a sticky shiny coating at the end. You can actually leave out the water if you desire. They’ll still be crunchy, but the coating will be more powdery then sticky.

Cinnamon and Sugar Almonds in the crockpot.

Putting water in the almonds towards the end of cooking.

Tips and Variations

  • Nuts: You can substitute out the almonds and use pecans, cashews, walnuts or other nut of choice.
  • Add ins: Try adding in flaked coconut, sprinkles, crushed candy cane or anything else that tickles your fancy. Add these right after you’ve removed them from the slow cooker so they’re still warm and it’ll stick.
  • Cooling:  The longer you let the almonds cool before bagging or storing the crunchier they’ll stay. Don’t bag or store while warm, they’ll sweat ruining the crunchy cinnamon coating
  • Stir: Remember you need to stir these every 20-30 minutes. Keep covered during cooking process
  • Leftovers: Chop up leftovers for granola, yogurt, and dessert topping. YUM!

Close up of cooling cinnamon slow cooker almonds.

Storing and Gifting!

These are so easy to store and keep, if you can! They are so fun to snack on and munch on while wrapping gifts or enjoying family and friends over. This year give the gift of almonds to all your friends, family and neighbors. It is the perfect treat to share and easy to drop off on a doorstep or add to a gift basket. So many options for these easy cinnamon almonds.

  • Giving: Pick up some fun gift giving bags to use for gifting for family and friends. About 1 to 2 cups per bag will make everyone holidays better!
  • Storing: It is best to keep them in an air tight bin or bag that is stored in a cool, dry place.

Slow Cooker Cinnamon and Sugar Almonds in a cup.

More Slow Cooker Recipes to Try

From dessert to main dishes you can do so much in a slow cooker.

Save

Print

Slow Cooker Cinnamon Almonds

Slow Cooker Cinnamon Almonds are a crunchy, sweet treat made perfectly delicious in the crockpot! These tasty vittles are perfect for snacking, gift giving, and holiday parties. Watch these cinnamon almonds disappear where ever you take them.
Course Appetizer, Dessert, Snack
Cuisine American
Keyword cinnamon almonds, slow cooker cinnamon almonds
Prep Time 15 minutes
Cook Time 4 hours
Total Time 4 hours 15 minutes
Servings 12 Servings
Calories 353kcal
Author Alyssa Rivers

Ingredients

  • 1 Cup Sugar
  • 1 Cup Brown Sugar
  • 3 Tablespoon Cinnamon
  • 1/8 teaspoon Salt
  • 1 Egg White
  • 2 teaspoon vanilla
  • 3 Cups Almonds
  • 1/8 Cup Water

Instructions

  • Mix together in a large bowl sugars, cinnamon, and salt.
  • In another bowl with a whisk, mix together the egg white and vanilla until it is frothy. Add the almonds and coat thoroughly. This will help the mixture stick to the almonds during the cooking process.
  • Prepare your slow cooker by spraying it with cooking spray. I used a 4 quart. Add the cinnamon almond mixture to the almonds and turn it to low. Stir until the cinnamon sugar mixture is coated well on the almonds. Be prepared for your house to smell amazing!
  • You want to cook for about 3-4 hours. Mine took about 3. Stirring every 20 minutes. In the very last hour, add 1/8 cup water and stir well. This will ensure a crunchy coating and help the mixture to harden.
  • Line a baking sheet with parchment paper and spread the almonds onto the sheet to cool. The almonds should be pretty sticky so be sure to separate them the best that you can and let them cool!

Video

Notes

Updated on November 27, 2020
Originally Posted on October 12, 2012

Nutrition

Calories: 353kcal | Carbohydrates: 45g | Protein: 8g | Fat: 18g | Saturated Fat: 1g | Sodium: 30mg | Potassium: 296mg | Fiber: 6g | Sugar: 36g | Vitamin A: 11IU | Vitamin C: 1mg | Calcium: 147mg | Iron: 2mg

Packaged cinnamon and sugar almonds.


from The Recipe Critic https://ift.tt/39laTYD
https://ift.tt/3q1qXoa

शुक्रवार, 27 नवंबर 2020

The Best Royal Icing Recipe

Royal icing in a glass bowl with a spreader.

This classic and simple royal icing recipe is a cookie decorating staple with a smooth consistency that sets quickly without hardening too much. Made with meringue powder it has a delicious taste and a smooth texture that’s perfect for flooding and piping cookies.

Slather this icing over sugar cookies or use it to decorate your gingerbread cookies to perfection. It is simple to make and tastes delicious!

Royal icing in a glass bowl with a spreader.

Royal Icing Recipe

There are some recipes I make so often I have them memorized because they’re either classics or ones I truly can’t live without and this royal icing is one of those recipes. Hello, everyone, this is Aimee Mars and I’m excited to celebrate the holidays with as much food as possible and plan on never running out of cookies to decorate.

I absolutely love this royal icing recipe because it’s easy to make and it makes cooking decorating fun for myself as well as my kids. Whether you plan on making beautifully decorated cookies or just want a fun project for your kids this royal icing recipe is for you. I also have a sugar cookie recipe too and I always use this royal icing.

Ingredients in Easy Royal Icing

There are only 3 main ingredients in this royal icing recipe making it extremely easy to prepare. These are also ingredients you can always have on hand too.

  • Powdered Sugar
  • Meringue Powder
  • Water
  • Food Coloring (optional)

How to Make Royal Icing

  1. Sift the Powdered Sugar: using a sifter or by pouring the powdered sugar through a fine-mesh sieve, sift the powdered sugar.
  2. Beat Ingredients: beat all the ingredients using a handheld mixer or an electric mixer fitted with the paddle attachment. Check the consistency of the icing and add more water or more powdered sugar if needed.

Royal icing in an electric mixing bowl.

Do I have to use Meringue Powder?

No. Traditional royal icing contains raw egg whites, which you can use instead of the meringue powder. Though meringue powder still contains egg whites, it’s a little easier to work with. It also creates the same smooth consistency that hardens easily as using egg whites.

What Should the Consistency for royal icing be?

With just 3 main ingredients, powdered sugar, meringue powder, and water, you can easily manipulate this recipe to get a perfect consistency. Sometimes you need to add water and sometimes you need to add powdered sugar. To know if your royal icing is the perfect consistency use the whisk attachment or a spoon to lift or scoop icing out of the bowl. Let it drip back in and if it melts or mixes evenly back in you have the right consistency. If the mixture is too thick and more water 1 tablespoon at a time. If the icing is too thin add more powdered sugar also at 1 tablespoon a time until the correct consistency is reached.

Can this icing be used for flooding and piping?

Yes. This royal icing recipe is extremely easy and can be used for both piping, which is the outlining of the cookie, and flooding, filling it in. The consistency of the icing is just thin enough to easily spread and just thick enough to outline (pipe) the edge of the cookies.

Should I use gel food coloring or liquid food coloring?

For this recipe, I recommend using gel food coloring because you end up with much more vivid coloring and you don’t need to use as much. The liquid food coloring will still work, however, I recommend decreasing the water by about 1 to 2 tablespoons if you choose to use it.

Can this icing be made ahead of time?

Yes! You can make this icing about 2 days ahead of when you plan on using it. Store it in an air-tight container and keep it in the fridge to keep it fresh. Just before using it stir the mixture.

Can I add flavoring or extracts to this icing?

Yes. If you’d like to add a flavor such as vanilla extract to this royal icing you can. Make sure the flavoring isn’t oil-based though. I recommend using about 2 teaspoons of flavor and then decreasing the water by 1 tablespoon.

Iced sugar cookies using royal icing.

More Delicious Cookie Recipes

Royal icing in a glass bowl with a spreader.
Print

Royal Icing

This classic and simple royal icing recipe is a cookie decorating staple with a smooth consistency that sets quickly without hardening too much. Made with meringue powder it has a delicious taste and a smooth texture that's perfect for flooding and piping cookies.
Course Dessert
Cuisine American
Keyword royal icing
Prep Time 10 minutes
Total Time 10 minutes
Servings 3 cups
Calories 638kcal
Author Aimee Mars

Ingredients

  • 4 cups Powdered Sugar sifted
  • 3 tablespoons Meringue Powder
  • 9 - 10 tablespoons Water at room temperature
  • Gel Food Coloring optional

Instructions

  • Sift the powdered sugar first by measuring it out and pouring it through a sifter or by pouring it into a fine-mesh sieve and shaking it through.
  • Using an electric mixer fitted with the whisk attachment or a handheld mixer beat all of the icing ingredients together on a high speed for about 2 minutes. Check the icing by lifting the whisk to see if the icing drips back down and smooths easily back into the icing in the bowl. If it does the icing is ready. If the icing is too thick add more water 1 tablespoon at a time. If it's too thin add more powdered sugar 1 tablespoon at a time.

Notes

This royal icing sets or hardens on the iced cookies in about 2 hours' time when sitting on the counter. To speed this up place the iced cookies in the refrigerator.
To keep the icing from hardening while you're decorating a bunch of cookies lay a damp paper towel over the top of the bowl until you're ready to use the remainder.

Nutrition

Serving: 1cup | Calories: 638kcal | Carbohydrates: 160g | Protein: 3g | Sodium: 59mg | Potassium: 45mg | Sugar: 157g | Iron: 1mg


Collage of royal icing being made.


from The Recipe Critic https://ift.tt/2V7Llpp
https://ift.tt/3fH5FYc

गुरुवार, 26 नवंबर 2020

Perfect 10 minute Air Fryer Shrimp

This Perfect 10 minute Air Fryer Shrimp is succulent, amazingly seasoned and tender. Get ready because dinner is about to be served!

Serve these Shrimp on a bed of Perfect Instant Pot Rice, or with Easy Fried Rice and some Vegetable Stir Fry for a splendid dinner.

Tender succulent 10 minute Air Fryer Shrimp

Air Fryer Shrimp

Air Frying is taking the cooking world by storm, and there’s good reason too. It’s quick. Easy clean up, and creates amazing dishes that more healthy for you. If you haven’t tried an air fryer, it’s time to get on the bandwagon! And this shrimp recipe is a golden ticket winner when it comes to flavor and ease.

Marinating the shrimp infuses the flavor into the shrimp. Air frying allows the flavor to remain on the shrimp without burning it too, giving it a nice outer coating. The inside is tender and perfectly seasoned. You don’t need to add anything else. It’s absolutely divine.

Easy Air Fryer Shrimp Ingredients

Quick and easy, but oh so yummy! With this super easy, yet glorious dish, shrimp can be served any day of the week. No more is it reserved for weekends or special events.

  • Shrimp: Large or Jumbo Shrimp
  • Salt and Pepper: Just to taste
  • Olive Oil: Adds a nice mild flavor
  • Red Wine Vinegar:  Helps the marinate the flavors into the shrimp
  • Garlic: Minced garlic, can used jarred garlic
  • Italian Seasoning: A perfect blend of spices.
  • Lemon Juice: Lemons and shrimp just go together
  • Soy Sauce: Adds the perfect amount of flavor
  • Dijon Mustard: A nice kick
  • Worcestershire Sauce: Adds a nice umami tang.

Making Perfect Shrimp

Just a nice marinade to seep the flavor into the shrimp.

  1. Season: Salt and Pepper the shrimp to your liking
  2. Mix: In a medium sized bowl combine olive oil, red wine vinegar, garlic, italian seasoning, lemon juice, soy sauce, dijon mustard and worcestershire sauce. whisk to combine.
  3. Marinate: Add in the Shrimp and marinate for at least one hour up to overnight.
  4. Drain: Remove the marinade and place in the air fryer basket
  5. Cook: Fry at 400 degrees for 8 min or till pink and cooked throughout.


Shrimp in marinade.

Tips for the Best Shrimp

A few tips and tricks will help you have those perfect shrimp every time.

  • Frozen: You can definitely use frozen shrimp, make sure they are thawed before you marinate them.
  • Overcrowd: Don’t put too many in the air fryer basket. It needs to be able to circulate the hot air around the shrimp to cook them. If you have to cook in batches.
  • Flip it: You can flip the shrimp half way through although you don’t have too, it’s a preference
  • Tails: Removing the tails is also a preference thing. I left them on.

How do you Know Shrimp is Done?

  • Sight: When shrimp turns to that beautiful pink color all over with red tells and the flesh has a nice opaque whiteness to it. It’s done.
  • Temp: The internal temp of cooked shrimp is 120 degrees F.
  • Over Cook: You don’t want to over cook shrimp. It becomes rubbery so check it before you think it might be done. And remove promptly once it is as it will keep cooking in the fryer if left.
  • Storing: Keep leftovers in an airtight container in the fridge for up to 3 days.
  • Reheat: Reheat leftovers in the air fryer, the microwave will make them soggy.

Shrimp with lemons in air fryer.

More Shrimp Recipes to Love

Shrimp is really an easy dish and you can make it so many different ways!

Print

Air Fryer Shrimp

This Perfect 10 minute Air Fryer Shrimp is succulent, amazingly seasoned and tender. Get ready because dinner is about to be served! 
Course Dinner
Cuisine American, Seafood
Keyword air fryer shrimp, air fryer shrimp recipe
Prep Time 2 minutes
Cook Time 8 minutes
Total Time 10 minutes
Servings 4 People
Calories 372kcal
Author Alyssa Rivers

Ingredients

  • 1 pound large or jump shrimp
  • salt and pepper
  • 1/2 cup olive oil
  • 1/4 cup red wine vinegar
  • 3 garlic cloves minced
  • 1 Tablespoon Italian seasoning
  • 1 Tablespoon lemon juice
  • 2 Tablespoons soy sauce
  • 1 teaspoon dijon mustard
  • 1 Tablespoon Worcestershire sauce

Instructions

  • Salt and pepper the shrimp. In a medium sized bowl combine olive oil, red wine vinegar, garlic, Italian seasoning, lemon juice, soy sauce, Dijon Mustard and Worcestershire sauce. Add the shrimp and let marinate for at least one hour or overnight.
  • Remove the shrimp from the marinade and place in the air fryer basket. Cook at 400 degrees for 8 minutes or until pink and cooked throughout.

Nutrition

Calories: 372kcal | Carbohydrates: 3g | Protein: 24g | Fat: 29g | Saturated Fat: 4g | Cholesterol: 286mg | Sodium: 1442mg | Potassium: 169mg | Fiber: 1g | Sugar: 1g | Vitamin A: 21IU | Vitamin C: 7mg | Calcium: 193mg | Iron: 4mg


from The Recipe Critic https://ift.tt/37q1HzJ
https://ift.tt/2J9eKx2