Orange Pomegranate Salad is a delicious mix of greens with fresh oranges, pomegranates and topped with feta cheese and an amazing orange vinaigrette dressing. If you are looking for an awesome salad that is fresh and full of tempting and unique flavors, then this salad is for you!
When it comes to serving this salad the possibilities are also endless. This will pair beautifully with pork, chicken, beef or seafood. Try it with Cast Iron Skillet Pork Chops, Honey Butter Baked Chicken, Perfect Air Fryer Shrimp or Air Fryer Steak with Garlic Herb Butter.

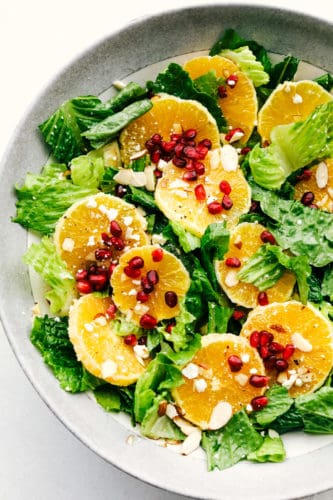
Orange Pomegranate Salad
Summer and salads seem to go together, kind of like winter and soup go together. But just because summer is behind us, for half of the world, doesn’t mean we have to stop eating some of our favorite summer dishes, like salads. This recipe is a perfect example of taking what’s in season and making it fresh, new and absolutely delightful. Winter is peak citrus and pomegranate time and combining the two go hand in hand. The zing from the orange and the sweet of the pomegranates are classic. Top with smooth creamy feta and crunchy almonds for a taste and texture like no other.
The orange in the vinaigrette adds the perfect splash of extra zing to the dish. This is going to be one of those salad recipes that will take most by surprise on how amazing it is. Orange pomegranate salad is definitely unique but the flavor combination works!
What you Need to Make Christmas Salad
This orange pomegranate salad is amazingly fresh, and it will taste best if the ingredients are fresh as well. Buy ingredients close to when you are going to make it so that the lettuce is fresh, the oranges firm and pomegranates dark red. You can save yourself time by buying pre-packaged romaine already cut up and washed. I would however make sure you still rinse your greens to be extra safe. You can also find pomegranate arils in plastic cups in the produce section of the grocery store, if you don’t want to de-seed your own. See below for tips on how to de-seed a pomegranate.
Zesty Dressing Ingredients
This salad dressing is wonderful and unique. It adds a splash of zest to this orange pomegranate salad that is so enticing with your first bite!
- Olive Oil: Use a good Extra Virgin Olive Oil
- Apple Cider Vinegar: This is the best vinegar for dressings
- Orange Juice: Use juice from the orange or made concentrate
- Orange Zest: Wash and rinse your orange well with a vegetable wash
- Salt and Pepper: Sea salt and fresh ground pepper are the best in salads.
Pomegranate Salad Ingredients
I love salad! There are endless possibilities and sometimes when you think outside of the box, the most incredible combinations can occur. This orange pomegranate salad is a perfect example of that. The explosion of flavor in this recipe is beyond good. The oranges give this salad a citrus burst and the pomegranates throughout add a fun and distinctive texture.
- Romaine Lettuce: Washed and dried and chopped
- Oranges: Navel oranges
- Pomegranate: Found in the produce section
- Feta Cheese Crumbles: Perfect addition of texture and flavor
- Sliced Almonds: Adds a nice bit of crunch.
- Sea Salt and Fresh Ground Pepper: To taste.
Making This Spectacular Orange Pomegranate Salad and Dressing
This dressing is divine. You may not want to use it just for this salad. Feel free to use it on any salad your heart desires. It’s zingy, fresh and bright. It will liven up any thing you wish to use it on.
- Whisk: In a container or a blender combine the olive oil, apple cider vinegar, orange juice, orange zest, and salt and pepper. Whisk or emulsify till completely blended.
- Salad: In a medium sized bowl add the romaine lettuce, oranges, pomegranate, feta, and sliced almonds. Toss with the dressing until coated. Add the salt and pepper to taste.

Hints for Using Pomegranates
Pomegranates are a unique fruit, since you actually only eat the seeds. They are extremely healthy and taste so good. But getting your hands on them can be difficult. I love the color, flavor and crunch they add to this orange pomegranate salad. So here is one way to cut and deseed your pomegranates. Remember they can stain so take care about what you wear and use a plastic cutting board, as it can stain wood.
How to De-Seed Pomegranates
Now if you don’t want to deal with taking the time do this or the mess, you can buy the arils already deseeded. Here is a great tip on how to de seed pomegranates in a timely manner. Pomegranates help enhance all fruit salads!
- Cut both ends off of fruit.
- Score the fruit in half all the way around the biggest part of the fruit. Cut into the skin about half an inch all the way around. Using the knife, or your hand pry the two halves apart.
- Over a large bowl, hold one half of the fruit, seed side down in your hand. Using the back of a large spoon whack the pomegranate on the skin side all the way around.
- The seeds will fall through your hands into the bowl. Pry any arils left behind.
- Repeat with the other half.

Add Ins, Tips and Variations
A fresh side salad like this one can always be changed up or added to you see fit. Here are some suggestions of add in and variations to this crisp winter salad.
- Avocado: For extra creaminess and a hint of flavor cut in ripe avocado just before serving.
- Chicken or Fish: Change this from a side dish to a main dish by adding in grilled or baked chicken or fish. Salmon or shrimp would both work with this salad.
- Nuts: Change out the sliced almonds for walnuts or chopped pecans.
- Toast: Toast the sliced almonds, walnuts or pecans before adding them to the salad. Place them in a skillet on the stove over medium high heat. Stir occasionally and watch them closely to turn a nice golden brown. Remove from heat and place on a plate or dish to cool immediately. Leaving them in the pan will continue to cook them which may cause them to burn.
- Red Onions: For a bit of a bite add thinly sliced red onions.
- Lettuce: Feel free to trade out the romaine for arugula or a blend of mixed greens. I would avoid using just iceberg, however, as this will change the flavor and texture of the salad.
The Best Way to Store Salad
- Can I make this ahead? Yes and no. All of the elements can be done ahead of time but you will not want to mix it together till you’re ready to serve. The dressing, oranges, romaine, and pomegranates can all be done ahead of time and stored separately in the fridge till ready to serve.
- How well does this keep? This salad is best fresh and on the day it’s prepared. If you have leftovers store them in an airtight container in the fridge and try to use it the next day. You may want to add fresh lettuce as the dressing can cause it to wilt slightly.
- What do I do with this extra dressing? If you have extra dressing, you can use it as a marinade for chicken or pork. Or make another salad. One can never eat too much salad can they?

More Pomegranate Loving Recipes
Pomegranates are such a fun thing to eat and they are so good for you. It only makes sense to use them in as many ways as possible while they’re in season. Most the time pomegranates are used as a garnish, but in these recipes they are a key ingredient. Get the most from your hard earned arils and make one of these recipes today!
- Winter Cobb Salad
- Apple Pomegranate Almond Salad with a Creamy Lemon Poppy Seed Dressing
- The Best Winter Fruit Salad
- Winter Pomegranate Orange Quinoa Salad with Creamy Lemon Greek Yogurt Dressing
- Sparkling Pomegranate Lemonade

Orange Pomegranate Salad with a Orange Vinaigrette Dressing
Ingredients
Dressing Ingredients:
- 1/4 cup olive oil
- 2 tablespoons apple cider vinegar
- 2 tablespoons orange juice
- 1 tablespoon orange zest
- 1/4 teaspoon salt
- crack of pepper
Salad Ingredients:
- 4 cups fresh romaine lettuce chopped
- 3 oranges sliced
- 1 large pomegranate
- 1/2 cup feta cheese crumbled
- 1/4 cup sliced almonds
- sea salt and fresh ground pepper to taste
Instructions
To make the salad dressing:
-
Whisk together the olive oil, apple cider vinegar, orange juice, orange zest, and salt and pepper.
-
In a medium sized bowl add the romaine lettuce, oranges, pomegranate, feta, and sliced almonds. Toss with the dressing until coated. Add a crack of salt and pepper.
Notes
Nutrition

from The Recipe Critic https://ift.tt/36SyqhH
https://ift.tt/39NjyDr