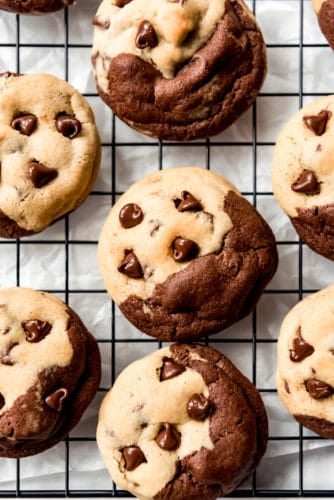
Brookies Cookies are a deliciously fun mashup of two of our favorite desserts: brownies and chocolate chip cookies! Soft and chewy with plenty of chocolate chips, these are always a hit with the family!
When you just can’t decide between making chocolate chip cookies or brownies, the obvious answer is to make both, right? Combined is the best!

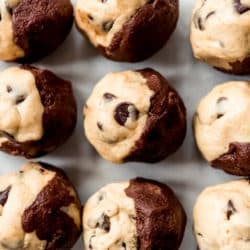
Soft and Chewy Brookies
Baking with my kids and making memories in the kitchen is one of the best parts about my job as a mom and food blogger. And these deliciously rich, chocolate-loaded cookies definitely make for fun memories!
They have the wow factor of two types of cookies dough in contrasting colors with complimentary flavors, and they are so much fun to make! You get the rich, chocolate flavor of brownie cookies snugged up next to buttery, almost toffee flavor of a classic chocolate chip cookie loaded with chocolate chips.
I just took my favorite recipes for each cookie and scaled them back a bit, then tweaked them a little so that they bake evenly instead of one side spreading more than the other. The result makes a wonderful cookie with a regular sized batch!
We loved these so much I’m already thinking about other flavor combinations I could tweak. Like peanut butter & chocolate. Or oatmeal and sugar cookie. Or maybe snickerdoodle and white chocolate macadamia nut!

Best Brookies Cookies Ingredients
We love that we always have everything we need on hand to make these cookies! A well-stocked baking pantry always includes cocoa powder and chocolate chips, right?
- Flour: All-purpose flour provides the bulk of the structure in these cookies. Make sure to measure accurately so both sides bake evenly.
- Sugar: Both brown sugar and granulated sugar are used in these cookies.
- Butter: Salted butter gives these cookies crisp edges and soft centers with buttery flavor. You will need room temperature butter for the chocolate chip side and melted butter for the brownie side of the cookies.
- Eggs: Most of my cookie recipes call for eggs, which act as a binding agent so the cookies are chewy and not crumbly. An extra yolk in the chocolate chip side of these brookies helps even out the consistencies so both sides bake evenly.
- Vanilla Extract: A classic baking ingredient for wonderful depth of flavor!
- Cocoa Powder: I have only tested this recipe using regular, unsweetened cocoa powder, but I’m pretty sure a dark or dutch process cocoa powder would work well here also.
- Baking soda: This leavening ingredient helps the cookies puff and rise slightly so they aren’t completely flat.
- Salt: Be sure not to leave this out or the cookies will taste bland!
- Cornstarch: I will often add a little cornstarch to cookies to make them soft-baked style.
- Chocolate Chips: I used semi-sweet, but milk or dark chocolate chips would be good too! Or go crazy and add some peanut butter chips into the mix!
How to Make Brookies Cookies
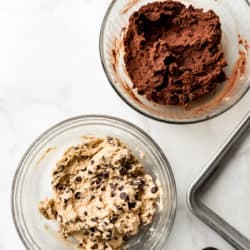
This brookies recipe is made in two bowls: one for each type of dough.
- Prep: Line a couple of baking sheets with parchment paper and preheat the oven to 375 degrees F.
- Brownie Cookie Dough: Melt the butter in the microwave, then add the brown sugar and beat with a hand mixer for 1-2 minutes until light. Add the egg and vanilla and mix again. Then add in the flour, cocoa powder, baking soda, salt, and chocolate chips, mixing just until combined. Stick the bowl in the fridge while preparing the chocolate chip cookie dough.
- Chocolate Chip Cookie Dough: In a separate bowl, combine the butter, granulated sugar, and brown sugar, beating for 1-2 minutes until creamy and smooth. Add the egg, egg yolk, and vanilla and beat for another 2 minutes until light. Add in the flour, baking soda, salt, and chocolate chips, mixing just until combined.
- Scoop and roll: Use a small, tablespoon size cookie scoop to scoop mounds balls of each kind of dough, then combine one of each kind of dough and roll them into a ball to make cookies that have both flavors. Set them on the prepared baking sheet so that one type of dough is visible on each side rather than having one bake on top and one on bottom.
- Bake: Once all of the brookies cookies are formed, bake them in the oven for 9-11 minutes, until they are light brown and set around the edges. I like these just a little underbaked so they stay soft in the centers when they are done cooling. If you want them to look just like the ones in these pictures, be sure to press a few extra chocolate chips into the tops of each cookie as soon as they come out of the oven.

Storing Brookies Cookies
- Storing: These brookies cookies are nice and soft so they keep best in an airtight container on the counter at room temperature and will stay tasting fresh and yummy for 3-5 days. I don’t recommend storing them in the fridge because I feel like they get stale faster that way.
- Freezing: These freeze really well! Just let them cool completely before transferring to a freezer-safe airtight bag. They are good for about 2 months in the freezer. Just thaw and reheat for a few seconds in the microwave before enjoying!

More Favorite Cookie Recipes
Any of these cookie recipes are perfect for when you need a cookie fix!
- Homemade Milano Cookies
- Brown Butter Chocolate Chip Cookies
- White Chocolate Oreo Cookies
- Gooey S’mores Cookies
- Oatmeal Chocolate Chip Cookies

Brookies Cookies
Ingredients
Brownie Cookie Dough
- 1/2 cup salted butter
- 3/4 cup brown sugar
- 1 egg
- 1 teaspoon vanilla extract
- 1 cup all-purpose flour
- 1/3 cup unsweetened cocoa powder
- 1/4 teaspoon baking soda
- 1/4 teaspoon salt
- 1/2 cup chocolate chips
Chocolate Chip Cookie Dough
- 1/2 cup salted butter, room temperature
- 1/2 cup light brown sugar
- 1/4 cup granulated sugar
- 1 teaspoon vanilla extract
- 1 egg
- 1 egg yolk
- 1 and 1/3 cups all-purpose flour
- 2 tablespoons cornstarch
- 1/2 teaspoon baking soda
- 1/2 teaspoon salt
- 1 cup chocolate chips, plus more for the tops of the cookies
Instructions
-
Line a couple of baking sheets with parchment paper and preheat the oven to 375 degrees Fahrenheit.
Brownie Cookie dough
-
Heat the butter in the microwave in a microwave-safe bowl until melted. Add the brown sugar and beat well with a hand mixer for 1-2 minutes until light. Add the egg and vanilla and mix again.
-
Mix in the flour, cocoa powder, baking soda, salt, and chocolate chips until combined. Stick the bowl in the fridge while preparing the chocolate chip cookie dough.
Chocolate Chip Cookie Dough
-
In a separate bowl, combine the softened butter, granulated sugar, and brown sugar. Beat for 1-2 minutes until creamy and smooth.
-
Add the egg, egg yolk, and vanilla and beat for another 2 minutes until light. Add in the flour, baking soda, salt, and chocolate chips, mixing just until combined. There is no need to chill this dough.
Assembly
-
Use a small, tablespoon-size cookie scoop to scoop mounds of each kind of dough, then combine one of each kind and roll them into a ball to make cookies that have both flavors. Space the balls of two-toned cookie dough a few inches apart on the prepared baking sheet so that one type of dough is visible on each side rather than one on top and one on bottom.
-
Once all of the cookies are formed, bake them in the oven for 9-11 minutes, until they are light brown and set around the edges. Press a few extra chocolate chips into the tops of each cookie as soon as they come out of the oven.
Nutrition

from The Recipe Critic https://ift.tt/2VPFo0F
https://ift.tt/2L4InjJ