शुक्रवार, 11 दिसंबर 2020

Raspberry Baked Brie

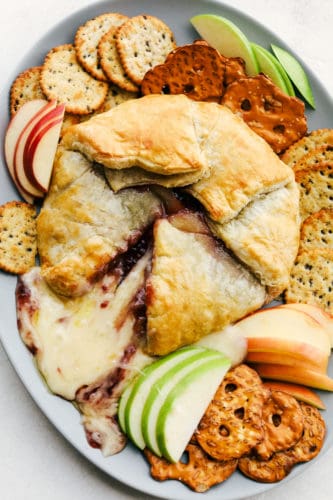
Raspberry Baked Brie is the perfect holiday appetizer with just FOUR ingredients! It is quick and easy to make and a tried and true favorite!

Baked Brie is one of those appetizers that looks and tastes so fancy, but is so easy and quick you almost feel like you cheated. For more brie wonders try Maple Pecan Baked Brie or Cranberry Pecan Brie Bites. They both make amazing mouth watering appetizers.

Baked Brie with Raspberries on a plant with crackers, and sliced apples.

Baked Brie Recipe

This is a delicious holiday appetizer that will make preparing for holiday parties a breeze! Do you ever take notice about which appetizers get scarfed up versus the ones that sit there hardly touched?  Well, this is a recipe that will be get inhaled. It’s so creamy, full of complimentary flavors and it looks like you slaved over it for hours. This is going to be one you’ll want to put in your rotation for sure.

When the brie is baked it gets super soft and melty, but not stringy, almost like a thick sauce. It makes it ideal for dipping, spreading and enjoying. Cooking it in a pastry keeps all that goodness contained till you’re ready to cut into it. Then watch as the marvelousness oozes from the golden flaky crust. It’s absolutely divine.

What type of Appetizer is Brie?

Bakes Brie is the perfect for Christmas and New Year’s Eve! Baked Brie is a classic and often a popular staple at parties and holiday gatherings. Brie is a mild, nutty, buttery cheese with hints of a fruity after tones which makes it ideal to pair with raspberries. You’re going to love this flavor combination and colors of white and red are perfect for the holidays!

Raspberry Brie Ingredients

With just four ingredients you can even assign the task of making the appetizer to your husband or kids. Even though it looks and tastes fancy the ingredients can all be found at your local grocery store. Even Brie is now usually carried at most stores, so you don’t have to drive all over town to find your ingredients.

  • Puff Pastry: You’ll need 1 sheet which is half a box
  • Brie: Buy a wheel of brie, not the wedge
  • Raspberry Preserves: Pick your favorite, or make your own.
  • Egg: This is for an egg wash.

How to Bake Brie

With only 4 ingredients, this is super simple to put together. It is best served warm to get that oozy warm center. Make sure you plan ahead enough to have time to bake it. Trust me it’ll be worth serving warm.

  1. Roll: On a cutting board open the sheet of puff pastry and with a rolling pin roll it out to 1/4 inch thickness.
  2. Place: Place the wheel of brie in the center of the pastry. Spread the raspberry preserves over the top. Leave a thin edge all the way around the cheese.
  3. Fold: Bring up the pastry carefully and completely cover the top of the cheese.
  4. Transfer and Brush: Move the brie to a cookie sheet. Mix the egg with a Tablespoon of water. Brush over the pastry. Wipe any egg wash that drips onto the pan.
  5. Bake: Bake in a 400 degree oven for 35-40 min or until golden brown. Let cool for 5 min before serving.

The process shots of making Baked Brie.

Tips for the Perfect Baked Brie

Baking brie for the first time can seem intimidating but it couldn’t be more simple. No need to stress about this appetizer with these tips.

  • Rolling: Make sure not to roll the pastry too thin or it can split while baking. Also take care to not stretch it too much as you fold it up and over the top.
  • Show: If you want the preserves to show like above, fold over the dough like a galette that just meets in the middle. This is an easy festive way to have a beautiful baked brie.
  • Top it: If you want to have a fully wrapped baked brie fold it over to seal it completely like a present. You can garnish the brie by scoring it with shapes or lines or even with raspberries or extra strips of puff pastry.
  • Wash: When adding the egg wash, wipe away any egg that pools under the brie so it doesn’t cook up like eggs.
  • Patience: Wait five minutes before cutting into the brie or the cheese will all  melt out of the puff pastry quickly. Pictured below is a five minute cool down.
  • Make Ahead: Puff pastry actually cooks up best if the pastry is cold and the oven is hot. Assemble the brie wheel with the pastry then place in the fridge for at least half an hour before baking to get that crisp puffy texture.
  • Garnish: This is beautiful all by itself but you can add a bit of garnish if you desire. Garnish your baked brie with fresh raspberries, chopped pecans or walnuts and a drizzle of honey for a festive look.
  • Leftovers: Leftovers should be tightly wrapped in plastic wrap and be stored in the fridge for up to 3-4 days. Rewarm in the oven at 200 degrees F for about 20 min till the outside is crispy again and the inside warm.
  • Other Fillings: Raspberry isn’t the only jam that pairs well with brie, try fig, apricot, currant, strawberry, peach and even jalapeño jam instead.

To Trim or Not to Trim!

I’ve discovered there are two ways of thinking out there. People are either on team trim the rind or on team not to trim the rind. There are good reasons to do either, and it’s purely a matter of personal preference.

  • Team Trim: When wrapping the brie in pastry you can trim the brie without worry since the pastry will contain the warm melty center. It can also be easier to cut without the rind on as it can be tough and you end up smashing it instead of cutting it
  • Team Not to Trim: You can warm up the brie without a pastry case and the rind will hold it in place. Many enjoy the taste of the rind and prefer to have it on. The rind can also make sure that the melty center doesn’t leak out of your pastry.

The Best Way to Serve Brie Appetizer

Baked brie is a favorite because you can serve it with many different things and it will all taste good. It will go perfectly on a cheese board too. Here are a few suggestions of what to serve it with.

  • Crackers: Most varieties will work
  • Bread: Crostini, bread sticks, baguette’s toasted
  • Baked puff pastry sticks: Yum, more puffed pastry
  • Pretzels
  • Fruit: sliced tart apples, grapes, clementines segments or more berries
  • Cured Meats: prosciutto, salami, sausage, capicola
  • Pita Chips
  • Olives
  • Toasted Nuts: almonds, walnuts, cashews, pistachios

Creamy Baked Brie with Raspberries on a pretzel chip.

More Appetizer Favorites

Everyone loves a great appetizer. They make the party. It’s always fun to bring the showstopper of the table, but it’s even better when it also tastes spectacular as well. They are so fun to make and to eat, that’s probably why so many of us can make an entire meal out of just the appetizer table.

Print

Raspberry Baked Brie

Raspberry Baked Brie is the perfect holiday appetizer with just FOUR ingredients. Perfect for Christmas and New Years Eve!
Course Appetizer
Cuisine American
Keyword baked brie, Baked Brie Recipe, brie, raspberry baked brie
Prep Time 5 minutes
Cook Time 35 minutes
Total Time 40 minutes
Servings 12 People
Calories 207kcal
Author Alyssa Rivers

Ingredients

  • 1 sheet puff pastry 1/2 a box
  • 1 wheel Brie cheese
  • 1/3 cup raspberry preserves
  • 1 egg mixed with one tablespoon of water

Instructions

  • Preheat the oven to 400 degrees.
  • Open the sheet of puff pastry onto a large cutting board.
  • Using a rolling pin, roll the puff pastry to a 1/4" thickness.
  • Place the wheel of brie in the middle of the puff pastry.
  • Add the raspberry preserves on top of the brie.
  • Gently fold over the brie to cover it completely.
  • Move the brie wheel to a baking sheet.
  • Brush on the egg/water mixture.
  • Wipe away any egg collected under the brie on the baking sheet.
  • Bake for 35-40 minutes or until golden brown.
  • Allow to cool for five minutes before serving.

Notes

Updated on December 11, 2020
Originally Posted on December 21, 2017

Nutrition

Calories: 207kcal | Carbohydrates: 16g | Protein: 6g | Fat: 13g | Saturated Fat: 5g | Cholesterol: 32mg | Sodium: 178mg | Potassium: 53mg | Fiber: 1g | Sugar: 5g | Vitamin A: 131IU | Vitamin C: 1mg | Calcium: 41mg | Iron: 1mg


from The Recipe Critic https://ift.tt/33YkfWL
https://ift.tt/2W8xu2w

गुरुवार, 10 दिसंबर 2020

To Die For Homemade Buttermilk Syrup

Rich, creamy, and luscious Buttermilk Syrup is so good, it’s literally to Die for! This will be worth waking up for in the morning!

Serve this up on Belgian Waffles, Grandma’s Perfect Fluffy Pancakes or The Best Ever German Oven Pancakes and a side of fruit and breakfast is done! Trust me you’ll be eating twice as many pancakes or waffles just to soak up this ultimate syrup.

Thick, sweet caramel like homemade buttermilk syrup.

Homemade Buttermilk Syrup

Creamy, buttery, sweet and rich, this Buttermilk Syrup is similar to one I have had from a local restaurant, but better! Now instead of getting dressed up to have this yumminess you can have it in the comfort of your own home, in your pajamas, complete with bed head if you wish! No judgement here! This will take your breakfast to a whole new level without a lot of effort. This is such an easy recipe. Five ingredients is all it takes for your breakfast to become a masterpiece.

Be prepared to make twice as much French Toast or whatever your serving it with, because your loved ones are going to want to eat this up, or maybe just drink it up. Why not  indulge and give give your family something special for breakfast? They are going to love it, you may never buy Maple syrup again.

Buttermilk Syrup Ingredients

This syrup is made from pantry staples and some buttermilk. It only takes 5 ingredients to make this incredible stuff. I love it because I can make it the morning and I always have the ingredients on hand. If you don’t have buttermilk see below and I’ll tell you how you can make your own sour milk to substitute for the buttermilk. That way you’ll never be deprived of this goodness.

  • Butter: This is the basis of the sauce that creates a caramel like flavor
  • Sugar: Combines with the butter for amazing flavor, make sure you use granulated sugar.
  • Buttermilk: Creates the creamy tang of the syrup
  • Vanilla: Flavor enhancer
  • Baking Soda: This is the secret ingredient to make it divine. Trust me! Don’t leave it out.

Making to Die For Syrup

This 5 ingredient syrup is quick to make, which is also a plus in the morning. I don’t have to worry about making it in advance. I’m usually a fly by the seat of my pants in the mornings, so this is perfect. I can whip this up with pancakes and have a decadent breakfast that seems like I slaved over it. Seriously you need to try this today.

  1. Melt: In an oversized saucepan melt the butter over medium high heat.
  2. Whisk:  Whisk in the sugar and buttermilk and bring it to a boil.
  3. Add: Remove from heat stir in the vanilla and baking soda. The syrup will foam so be sure the pan is big enough to compensate for the rise.


Using sugar, milk, and vanilla to make the homemade buttermilk.

The Magic of Buttermilk

Buttermilk is an ingredient I love to cook with. It makes the most excellent biscuits and cakes It’s extremely versatile and can be used in a variety of recipes from dressings to marinades. It has a distinct tangy flavor adding richness to every dish. It’s thick, rich texture adds moisture and volume. It’s definitely an ingredient you’ll want to have around. But sometimes you want something with buttermilk and you don’t have any. I hate that. But there is a quick fix for that. You’ll never be without buttermilk with this quick trick.

  • Substituting for Buttermilk: Mix 1 cup of milk (whole or 2%) with 1 Tablespoon vinegar or lemon juice. Let it sit for about 10 min. Once it starts to curdle stir it up and use it as you would buttermilk. Super simple, right?! This will work for any recipe that calls for buttermilk. Now you’ll always have it when you need it.
  • Why Does it Foam? So this is a bit scientific but hear me out, it’s kind of fascinating. Buttermilk is very acidic, the acid is what makes it taste tangy and bitter. Baking Soda is a base, it’ll neutralize the acid in the buttermilk. Mixing the baking soda into the buttermilk causes a chemical reaction that reduces that bitter tang. As a result carbon dioxide bubbles form and it foams. This is why you need a pot bigger than you think you’ll need. You may notice that in many of your buttermilk recipes you’ll add baking soda to it. This is so it’ll create that wonderful chemical reaction which is what creates your tender biscuits and fluffy pancakes. This is another reason you don’t to over mix buttermilk once you add the soda, it’ll kill the bubbles. So now you know!

Tips and Variations

Buttermilk Syrup can be played with and it’ll still taste amazing. It’s such a fun syrup to use and even more fun to eat. You’ll want to make pancakes or waffles for every meal, just so you can pour this decadent syrup over the top. Your kids will fight over licking the bowl. Serve this syrup and you will be the hero of the morning! It’s just so delicious!

  • Caramel Version:  To get more of a caramel version add two tablespoons of Karo Syrup with the buttermilk and let it cook to a nice golden color. Then you may remove from heat and add the vanilla and baking soda.
  • Spice it up: Add spice to your syrup when you add the buttermilk. For example half of a teaspoon of cinnamon or pumpkin spice. This will give it an original flavor.
  • Flavor: You can use a different flavored extract to give it a unique taste. For example, coconut or almond flavoring works great. So delicious!
  • What Else Can You Serve This On: This is quite an exquisite syrup and it can go on just about anything you want to. Serve it over ice cream, cakes, cinnamon rolls, crepes , etc.
  • Double it: You can make a double batch and save the leftovers, if you have them. It’s a great recipe to double. Just remember you need a larger pot than you think you’ll need because it will foam up. You don’t want it to make a mess all over.

Storing Your Syrup

If you have leftovers this keeps really well in the fridge. Place leftovers in a jar or airtight container. It will keep for up to 2 weeks. You might want to warm it up before serving it. Microwave the syrup in 30 sec intervals to prevent burning.

Creamy rich and decadent buttermilk syrup on pancakes.

More Saucy Recipes to Dress up Your Meals

Adding a sauce to your meal can change the whole taste and texture. It can dress it up and sometimes in those rare instances save a meal that didn’t quite turn out. Pouring some tasty sauce can take your dish from good to divine!

Print

Buttermilk Syrup

Rich, creamy, and luscious Buttermilk Syrup is so good, it's literally to Die for! This will be worth waking up for in the morning! 
Course Breakfast
Cuisine American
Keyword buttermilk syrup, homemade buttermilk syrup, syrup
Prep Time 5 minutes
Cook Time 10 minutes
Total Time 15 minutes
Servings 32 Tablespoons
Calories 52kcal
Author Alyssa Rivers

Ingredients

  • 1/2 cup butter
  • 1 cup sugar
  • 1/2 cup buttermilk
  • 1 teaspoon vanilla
  • 1 teaspoon baking soda

Instructions

  • In large sized saucepan over medium high heat add the butter and melt. Whisk in the sugar and buttermilk and whisk until it starts to boil. Remove from the heat and add vanilla and baking soda. The mixture will foam so make sure to have saucepan big enough.

Nutrition

Calories: 52kcal | Carbohydrates: 6g | Protein: 1g | Fat: 3g | Saturated Fat: 2g | Cholesterol: 8mg | Sodium: 64mg | Potassium: 5mg | Sugar: 6g | Vitamin A: 95IU | Calcium: 5mg


Buttermilk syrup in a jar photo with ingredients.


from The Recipe Critic https://ift.tt/39YJWKG
https://ift.tt/33YE14y

बुधवार, 9 दिसंबर 2020

Almond Cookies

Almond Cookies are  buttery, soft and chewy these cookies are made with almond flour, almond extract, and topped with slices of toasted almond! 

These cookies are quick and easy to make and are perfect for gifting to others or putting onto a dessert platter for the holidays! Serve alongside some Traditional Italian Christmas Cookies, Linzer Cookies, and Homemade Butter Cookies for a festive plate!

Almond cookies on a cookie rack.

Almond Cookies

These almond cookies are always a huge hit around Christmas time! If you’re a fan of almond then these cookies are for you! They’re buttery and soft, while not being overly sweet. And they are a fun and easy cookie recipe to bake up for the family. They’re also a perfect cookie for gifting to others or setting out on a Christmas platter.

Ingredients Needed for Almond Cookies

  • Flour: All purpose flour or unbleached flour will work. 
  • Almond Flour: if you don’t have this on hand you can omit this and use only all purpose flour, using the almond flour does give a warm, nutty flavoring to the cookies. 
  • Baking Powder: rising agent to create a nice light texture. 
  • Salt: balances the sweetness of the cookies. 
  • Butter: use room temperature, unsalted butter. 
  • Egg: one large egg is needed as a binder for the cookie. 
  • Almond Extract: add an extra pop of almond flavor by using almond extract. 
  • Sugar: white granulated sugar. 

Almond Flour vs. Almond Meal

Make sure you are using almond flour and not almond meal! The difference between almond flour and almond meal is that almond flour is a fine powder made from almonds that have been blanched and the skins removed. It looks like a fine white powder. 

Almond meal is made from ground almonds that still have the skins on, creating a coarser texture and it has a darker brown coloring due to the skins from the almonds. 

Almond cookies in a collage.

How to make Almond Cookies

  1. Mix together the dry ingredients in a small bowl. 
  2. Beat the butter in a large mixing bowl until smooth and creamy. 
  3. Add in the egg, almond extract, and sugar. Beat until smooth and creamy. 
  4. Slowly add in the dry ingredients to the wet ingredients, mixing in between. 
  5. Cover and chill the dough. 
  6. Scoop the dough using a small cookie scoop for even sized cookies. Gently press down the cookies and top with sliced almonds. 
  7. Bake and allow to cool on the pan for about 5 minutes before removing to continue cooling on a wire rack. 

Tips for the Best Almond Cookies

  • For more almond flavoring a combination of all purpose flour and almond flour works wonderfully! 
  • Use room temperature butter. This helps to make sure the butter is smooth and creamy throughout the dough. 
  • Chill the dough. Since we’re using room temperature butter, you want to take the time to chill the dough before baking. This helps to make sure the cookies hold their shape and don’t spread too much. 
  • Shape the cookies before baking, after scooping the dough onto the baking sheet, press the cookies down into a disc like shape about 1/2 inch thick. 

Almond cookies on a baking sheet.

More Cookie Recipes

Print

Almond Cookies

Almond Cookies. Buttery, soft and chewy these cookies are made with almond flour, almond extract, and topped with slices of toasted almond! 
Course Dessert
Cuisine American
Keyword almond cookies
Prep Time 5 minutes
Cook Time 12 minutes
Total Time 17 minutes
Servings 18
Calories 182kcal

Ingredients

  • cups all purpose flour
  • ½ cup almond flour
  • ½ tsp salt
  • ½ tsp baking powder
  • 1 cup butter unsalted, softened to room temperature
  • ¾ cup white sugar
  • 1 large egg
  • 1 tsp almond extract

Topping

  • sliced almonds

Instructions

  • Mix together the flour, almond flour, salt and baking powder. Set aside.
  • Using a stand or a hand mixer beat the butter until smooth and creamy. 
  • Add in the egg, almond extract and sugar. Mix until well combined. 
  • Add the dry ingredients into the butter mixture. Mix until combined, scraping the sides of the bowl as needed. 
  • Cover the bowl of dough and place in the refrigerator to chill for 30 minutes. 
  • Preheat oven to 350℉.  Line a large baking sheet with a silicone baking mat or parchment paper. 
  • Using a small cookie scoop spoon out the cookie dough and place on baking sheet, gently press down the dough to flatten to about 1/2 inch thick, and top with sliced almonds. 
  • Bake for 10-12 minutes until just starting to brown along the edges. 
  • Allow cookies to cool on the baking sheet for about 5 minutes then remove to a wire rack to continue cooling. 

Notes

Recipe yields 3 dozen cookies.
Storage: 
  • Cookie dough can be made in advance and stored in the refrigerator for up to 3 days before baking.
  • Store the baked cookies in a sealed container at room temperature for up to 5 days. 
  • You can freeze these cookies. Once the cookies have cooled to room temperature, store in a sealed freezer safe container or bag for 3-4 months. Remove from freezer and thaw at room temperature. 

Nutrition

Serving: 2cookies | Calories: 182kcal | Carbohydrates: 17g | Protein: 2g | Fat: 12g | Saturated Fat: 7g | Cholesterol: 36mg | Sodium: 159mg | Potassium: 32mg | Fiber: 1g | Sugar: 9g | Vitamin A: 328IU | Calcium: 19mg | Iron: 1mg


from The Recipe Critic https://ift.tt/3qEvehz
https://ift.tt/3gqifve

मंगलवार, 8 दिसंबर 2020

Sweet Potato Cake with Marshmallow Frosting

Sweet Potato Cake with Marshmallow Frosting is lightly spiced, perfectly moist and delicious. Top it off with the most amazing thick and creamy marshmallow frosting! This is a wonderful fall favorite.

Cake baked in a 9×13 pan is easy to eat and to serve. Try Carrot Cake Cheesecake Crumble Bars, Honeybun Cake, and The Best Caramel Apple Cheesecake Bars. Sheet cake like this sweet potato cake is fun to make and eat.

Sweet potato cake on a plate with a fork.

Sweet Potato Cake with Marshmallow Frosting

Sweet Potato Cake is really just like a carrot cake but made with shredded sweet potato instead. It’s a tender spicy cake, with a puffy sweet marshmallow frosting. It will all melt in the mouth in total splendor.

This cake actually tastes just like carrot cake and has the same moist texture. If you didn’t tell someone they were eating sweet potato cake, they would probably think it’s carrot, but since it’s fall and sweet potatoes are all over, it’s fun to use sweet potatoes.

Ingredients for the Cake

  • Flour: All purpose flour creates a strong structure
  • Baking Powder and Baking Soda: Raising agent to make it fluffy.
  • Cinnamon, Nutmeg, Cloves: Perfect blend of spices
  • Eggs: Large eggs
  • Sweet Potatoes: Finely shredded
  • Brown Sugar and White Sugar: Both sugars create sweetness and richness
  • Canola Oil: Adds moisture to the cake
  • Vanilla: Flavor intensifier
  • Pecans for Garnish: Optional

Marshmallow Frosting

  • Butter: Bring to room temperature
  • Marshmallow Cream: This can be found in the baking section
  • Salt: Balances out the sweet.
  • Vanilla: Adds flavor
  • Powdered Sugar: Dissolves easier than sugar

 Making the Sweetest Potato Cake 

  1. Combine: In a large bowl combine the flour, baking powder, baking soda, cinnamon, nutmeg and cloves. Set aside.
  2. Mix: In another bowl mix the eggs, shredded potatoes, brown sugar, sugar, oil and vanilla till well blended.
  3. Blend: Add the wet mixture into the dry mixture and mix till just combined. Do not over mix.
  4. Bake: Pour into a greased 9×13  bake at 350 degrees F for 20 minutes or till top springs back and tooth pick inserted in the center comes out clean.

Smooth and Creamy Frosting Instructions

  1. Cream: In a medium bowl combine the butter, marshmallow, salt and vanilla and mix until creamy.
  2. Add: Add one cup of powdered sugar and mix until combined.
  3. Beat: Beat in the remaining cup of powdered sugar and mix until smooth and creamy. It will be thick.
  4. Spread: Carefully spread over completely cooled cake.

Collage of the steps to make sweet potato cake.

Tips and Variations for Sweet Potato Cake

  • Sweet Potatoes: Shred the sweet potatoes with a grater using the small or medium size grate. The big one can leave the potatoes too big to get soft. You can also use a food processor
  • Topping: Drizzle the top with caramel sauce for a sweet twist.
  • Frosting:  Swap out the marshmallow for a cream cheese frosting.
  • Nuts: You can stir in pecans or walnuts into the mix for extra crunch besides using them as a garnish. Sub out the pecans for the walnuts if you desire as well.
  • Rounds: Divide the batter between two round tins and put a layer in between and on top for a round cake version.

A photo of the sweet potato cake from the top of it.

Why are Sweet Potatoes so Good and Good for you?

Sweet potatoes have taken the health industry by storm, and for good reason. They are good for you and so versatile in baking and cooking.

  • Nutrition: Sweet potatoes are nutritional jack pot. High in fiber, vitamin A, C, Manganese and other vitamins and minerals, they boast an impressive resume. They have been touted as helping with gut health, cancer fighting, healthy vision, brain function and immune system. That’s reason enough for me to eat them!
  • Cooking: They can be eaten boiled, baked, steamed, or fried, and that’s just by themselves. Because of their mild flavor they can be added to sweet and savory dishes. From Mexican, Italian, breakfast to hearty meaty dishes, they are perfect.
  •  Variety: Not only do they taste amazing they come in a few varieties. You can find them in white, red, pink, violet, yellow, and purple.

Sweet potato cake on a plate.

More Sweet Potato Recipes to Try

Sweet potatoes are so versatile and so good for you! Make them sweet, or savory, it’s all magical! Give these ideas a try!

Print

Sweet Potato Cake with Marshmallow Frosting

A moist, lightly spiced, cake loaded with shredded sweet potatoes and topped with a thick and creamy marshmallow frosting and chopped pecans.
Course Dessert, Snack
Cuisine American
Keyword potato cake, sweet potato cake
Prep Time 10 minutes
Cook Time 20 minutes
Total Time 30 minutes
Servings 12 Slices
Calories 518kcal
Author Alyssa Rivers

Ingredients

  • 1 and 1/2 cup all-purpose flour
  • 1 teaspoon baking powder
  • 1/4 teaspoon baking soda
  • 1 and 1/4 teaspoon cinnamon
  • 1/2 teaspoon ground nutmeg
  • pinch of ground cloves
  • 2 eggs slightly beaten
  • 2 and 1/2 cup peeled shredded, sweet potatoes*
  • 3/4 cup packed light brown sugar
  • 1/4 cup sugar
  • 1/2 cup canola or vegetable oil
  • 1 teaspoon vanilla
  • chopped pecans for garnish, opt.

Marshmallow Frosting

  • 1/2 cup or 8 Tablespoons unsalted butter, room temperature
  • 1 7 ounce carton marshmallow creme
  • 1/4 teaspoon salt
  • 1 teaspoon vanilla
  • 2 cup powdered sugar

Instructions

  • Preheat oven to 350 degrees. In a large bowl combine the flour, baking powder, baking soda, cinnamon, nutmeg and cloves; set aside.
  • In a medium bowl, combine the eggs, shredded sweet potatoes, brown sugar, sugar, oil and vanilla and mix until well blended. Pour batter into a greased 9x13-inch baking pan and spread out evenly.
  • Add wet ingredients to dry ingredients and stir together until just combined. Do not over mix.
  • Bake for 20 minutes or until top springs back when lightly touched and a toothpick inserted in the center comes out clean. Cool completely and top with Marshmallow Frosting and chopped pecans, if desired.
  • *Note: It's best to grate the sweet potatoes on the medium or small side of the grater. If you use the large side, the sweet potatoes don't get as soft during baking.

For the Frosting:

  • In a medium bowl combine the butter, marshmallow creme, salt and vanilla and mix until creamy. Add one cup of powdered sugar and mix until combined. Add remaining one cup of powdered sugar and mix until smooth and creamy. Frosting will be thick. Carefully spread over cooled cake.

Notes

Updated on December 8, 2020
Originally Posted on October 7, 2016

Nutrition

Calories: 518kcal | Carbohydrates: 84g | Protein: 4g | Fat: 19g | Saturated Fat: 6g | Cholesterol: 48mg | Sodium: 156mg | Potassium: 196mg | Fiber: 2g | Sugar: 59g | Vitamin A: 344IU | Vitamin C: 5mg | Calcium: 61mg | Iron: 2mg


from The Recipe Critic https://ift.tt/2VOSo6O
https://ift.tt/36V5J3I