सोमवार, 18 जनवरी 2021

Instant Pot Creamy Parmesan Chicken and Rice

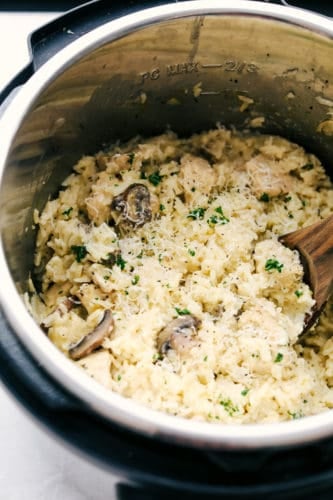
Have one of the most decadent and delectable dinner in no time with this Instant Pot Creamy Parmesan Chicken and Rice. With savory mushrooms, tender rice, and juicy chicken it’s a winner, winner, chicken dinner!

Instant pots are a dream appliance since they are faster, more forgiving and it creates spectacular food. Try these instant pot favorites like this Lemon Garlic Chicken, 10 minute Spaghetti, and Chili.

Instant pot chicken and rice is easy, creamy and so delicious.

Instant Pot Chicken and Rice

Everyone has those days that there is just not enough hours in the day to get everything done. Then when it is dinner time you have no time to cook what you had planned. This is when instant pot creamy parmesan chicken and rice recipe comes to save the day. The cream and parmesan creates such a dreamy creamy texture your whole family is going to love. Tender and juicy bites of chicken provide flavor and protein. And don’t forget the mushrooms, they add a great umami flavor to this delicious instant pot chicken and rice. It is the perfect chicken and rice combination!

Chicken and rice is a great comfort food. With the sensational creaminess and flavor it just fills you up perfectly. Instant pot chicken and rice is just one way to enjoy this comfort food. For more variations of chicken and rice try my casserole, one pan or this fiesta skillet recipe. Serve any of these main dishes with a batch of rolls and a nice green salad. Now you have a complete dinner that everyone will love!

Creamy Parmesan Chicken and Rice Ingredients

Simple ingredients creates this incredible chicken dish. No creamed soups in this instant pot chicken and rice. The pressure cooker does the work infusing the chicken with flavor and creating tender rice. This comes together quickly.

  • Olive Oil: For sautéing
  • Onion: Finely chopped.
  • Chicken: Cut into bite sized pieces.
  • Italian Seasoning: A perfect blend of spices.
  • Salt and Pepper:To taste
  • Chicken Broth: Creates the flavor and cooks the rice.
  • Rice: Rinse your rice. I used jasmine
  • Mushrooms: Sliced or roughly chopped
  • Heavy Whipping Cream: This creates the creaminess of the dish.
  • Shredded Parmesan Cheese: If you have it freshly grated is best.
  • Salt and Pepper: To taste
  • Chopped Parsley and Freshly shredded Parmesan Cheese for Garnish

Making Chicken and Rice in the Instant Pot

Just a little bit of sautéing is all you need to do and then let the instant pot take over with chicken and rice. A quick 8 minutes is all you need once it comes to pressure. Dinner is on the table in no time.

  1. Sauté: Set the instant pot to sauté. Add in olive oil and onion.
  2. Stir: Cook until it is almost tender and then add the chicken. Sprinkle the Italian seasoning and salt and pepper. Continue to sauté until no longer pink.
  3. Combine: Add in the chicken broth, rice, and mushrooms. Cover your instant pot and make sure it is in the sealed position. Cook on manual high for 8 minutes.
  4. Release: Carefully quick release the remaining pressure.
  5. Finish it: Stir in the heavy cream and parmesan cheese. Serve with freshly shredded cheese and chopped parsley for garnish.

Sauteing onions, chicken and making chicken and rice.

Tips for Amazing Instant Pot Chicken and Rice

Creating this instant pot chicken and rice is super simple, anyone can do it. Here are a few tips to make it irresistible.

  • Chicken: You can use chicken breasts or chicken thighs in this dish. Be sure to cut the chicken in the same bite sized pieces. This way the chicken will cook evenly.
  • Mushrooms: If you don’t love mushrooms, you can leave them out all together or sub them out for zucchini, squash or broccoli.
  • Rice: This instant pot chicken and rice recipe is written for white rice. Brown rice will take longer to cook so I don’t recommend it. I used jasmine rice in this recipe and it was delicious. Basmati is another great choice.
  • Creaminess: Instant pot chicken and rice is almost a risotto type consistency and texture.
  • Over cook:  Don’t leave the chicken and rice to naturally release. It will over cook the chicken and create a gluey rice consistency. You want to quick release once the timer goes off.
  • Can I use Whole Chicken? This instant pot recipe is written for chicken already cut up. Using whole chicken would increase the cooking time and over cook the rice.
  • Leftovers:  Keep leftovers in the fridge tightly sealed for up to 3-4 days. Reheat in the microwave till just warmed through.

Are You New to the Instant Pot Family?

If you are new to using the instant pot, welcome to the family! This instant pot chicken and rice is the perfect recipe to break in your new appliance. Here are some tips about your incredible appliance!

  • How it works: Instant pots are a form of pressure cookers. They work by creating heat and trapping it in a tight seal. This allows the temperature to be much higher than boiling point of water and the steam can’t escape. The steam cooks the food much more quickly than the traditional stovetop or oven cooking.
  • Can they explode?  There is that underlying fear the first time you use your instant pot that the pressure is going to build and explode. But unlike the pressure cookers of old, today’s instant pots have built in sensors (about 10 of them) that will turn the cooker off or reduce pressure if they detect anything wrong. You should be safe as long as you use it properly.
  • Why are they so great? Instant pots are kitchen marvels. They are used for rice cooker, vegetable steamer, and roast cooker. If you can cook it in the slow cooker or oven, you can probably cook it in the instant pot in less time. They enhance the flavor of your dish by literally forcing flavor into your dish. And my favorite reason I love instant pots is that when I come home from a long day and realize I didn’t get any chicken out of the freezer for dinner, it doesn’t matter. I can cook the chicken from frozen and in about an hour have tender, juicy chicken ready to eat.
  • Do Read Your Manual! There are dos and don’ts to using an Instant Pot. It’s important to get to know yours, so read the manual carefully and often.

Instant pot Chicken and rice in a bowl.

More Chicken Dinners to Try!

Chicken is a favorite protein to cook with. It’s so versatile, low fat and an incredible source of protein. Chicken and rice is just the beginning of the endless possibilities you can create with chicken. Here is some inspiration to try tonight.

Print

Instant Pot Creamy Parmesan Chicken and Rice

Have the one of the most decadent and delectable dinner in no time with this Instant Pot Creamy Parmesan Chicken and Rice. With savory mushrooms, tender rice, and juicy chicken it's a winner, winner, chicken dinner!
Course Dinner, Main Course
Cuisine American
Keyword chicken and rice, instant pot chicken and rice
Prep Time 10 minutes
Cook Time 20 minutes
Total Time 30 minutes
Servings 6 People
Calories 409kcal
Author Alyssa Rivers

Ingredients

  • 1 Tablespoon Olive Oil
  • 1 small onion diced
  • 1 1/2 pounds chicken cut into one inch cubes
  • 1 Tablespoon Italian seasoning
  • salt and pepper
  • 4 cups chicken broth
  • 1 1/2 cups rice rinsed (I used Jasmine)
  • 1 cup mushrooms sliced
  • 1/2 cup heavy whipping cream
  • 1/4 cup shredded parmesan cheese I prefer freshly shredded
  • salt and pepper to taste
  • chopped parsley and freshly shredded parmesan cheese for garnish

Instructions

  • Set the instant pot to sauté. Add in olive oil and onion. Cook until it is almost tender and then add the chicken. Add the Italian seasoning and salt and pepper. Continue to sauté until no longer pink.
  • Add in the chicken broth, rice, and mushrooms. Cover your instant pot and make sure it is in the sealed position. Cook on manual high for 8 minutes. Carefully quick release the remaining pressure.
  • Stir in the heavy cream and Parmesan Cheese. Serve with freshly shredded cheese and chopped parsley for garnish.

Nutrition

Calories: 409kcal | Carbohydrates: 41g | Protein: 17g | Fat: 20g | Saturated Fat: 8g | Cholesterol: 71mg | Sodium: 690mg | Potassium: 375mg | Fiber: 1g | Sugar: 1g | Vitamin A: 414IU | Vitamin C: 13mg | Calcium: 107mg | Iron: 2mg


from The Recipe Critic https://ift.tt/2XQyp8N
https://ift.tt/3qIJbKX

रविवार, 17 जनवरी 2021

Crispy Air Fryer Egg Rolls

Egg Roll lovers, this Air Fryer Egg Roll Recipe is for you! Crispy, crunchy outside, tender filling inside, without the extra fat of frying or drying out from oven cooking. These are what you have been waiting for!

Air frying egg rolls is going to rock your world and be a total game changer. Try air frying these other delicious egg roll recipes for more appetizer wonders like this Philly Cheesesteak , southwest and this Avocado Egg Rolls.

Air Fryer Egg Rolls on a platter with dipping sauce.

Perfect Air Fryer Egg Rolls

Forget take out! These are so dynamite, you may never need to order out again. Combine these air fryer egg rolls with my other Chinese favorites like this Asian Glazed Chicken, Easy Fried Rice, Cream Cheese Wontons and 20 Minute Garlic Beef and Broccoli for a restaurant quality meal, only better. Now dinner is ready! Your family is going to love these! Serve them as appetizers a light dinner or party side dish and you will win everyone over.

It is a beautiful thing when a recipe and an appliance comes together to create such delicious meal. Using the air fryer creates that intense crispy outside. With tender, perfectly cooked insides. Air fryers are mini convection ovens, using circulating air to cook the food creates the unique method and outcome. It becomes a favorite way to cook for me and if you haven’t gotten on the bandwagon yet, it’s time. They are a healthier and usually faster way to cook your favorites.

Ingredients for Chicken Egg Rolls

Yes, this has a long ingredient list, but you will need it for these egg rolls. They all combine to create that amazing restaurant worthy taste. All of these ingredients can usually be found at your local grocery store in their asian aisle and produce sections.

  • Vegetable Oil: For sautéing
  • Garlic: Minced fresh garlic
  • Ginger: Fresh minced
  • Celery: Chopped
  • Coleslaw Mix: Look for this near the packaged salads
  • Ground Chicken: You can find ground chicken near the ground beef.
  • Oyster Sauce: Adds incredible authentic flavor.
  • Soy Sauce:  Helps create a umami flavor.
  • Toasted Sesame Oil: Adds richness
  • Sriracha: Adds that spicy kick.
  • Green Onions: Thinly sliced
  • Egg Roll Wrappers: You can find these in the produce section with the tofu.
  • Olive Oil Spray: This is just to help crisp the egg rolls.

Making Crispy Egg Rolls

With all those spectacular flavors these actually come together easily. The hardest part might be rolling the egg rolls themselves, but check out the pictures for step by step instructions. It’s actually super easy.

  1. Sauté: Heat oil in a pan and stir fry garlic, ginger, celery till fragrant.
  2. Cook:  Pour in the coleslaw mix and cook till the cabbage is wilted.
  3. Stir Fry: Add the ground chicken, oyster sauce, soy sauce, sesame oil and sriracha. Stir fry the chicken while breaking it up for 3-4 minutes.
  4. Remove: Once the chicken is cooked and there is no liquid left in the pan, stir in the green onions and remove from stove.
  5. Wrap: To wrap the egg rolls, place the egg roll wrapper so that one corner is towards you. Place a tablespoon of filling in the bottom half (towards you) and wrap that corner over the filling. Turn both sides over the wrapper and then continue rolling away from you (like a burrito), till you reach the end. Seal the edges with some water or a beaten egg. Repeat till all the wrappers are made.
  6. Air Fry: Spray the basket of the air fryer with olive oil spray.  Place the egg rolls in the basket and lightly spray the tops of the egg rolls with the olive oil spray.  Cook at 400 degrees for 6 minutes.  Then flip the egg rolls and cook for an additional 6 minutes.


Sauteing vegetables and chicken for egg rolls.

Why Should you Cook Egg Rolls in the Air Fryer?

  • EASY: If for no other reason, you should cook these egg rolls in the air fryer because it’s easy. Besides flipping them halfway through, you don’t have to babysit them. You will be free to do other things, it’s so nice, you can multitask!
  • Less Mess: Usually to get a good crispy outside and that authentic flavor you had to deep fat fry these babies. That usually leads to a hot oily splattered kitchen in the end. It’s a mess. In the air fryer everything is self contained and there is no extra oil.
  • It is Healthier:   If you go to all the trouble of sautéing vegetables and chicken and creating the best filling ever, you should be able to eat as many as you want without the guilt. With air frying you can. No bathing these egg rolls in grease and fat. It’s such a healthier way to cook egg rolls and get all the flavor and texture you adore. So eat them all if you wish. I won’t tell.

Step by step rolling illustrations of rolling egg rolls in egg roll wrappers.

Tips for the Best Air Fryer Chinese Egg Rolls

Air Fryer Egg Rolls are pretty dang amazing and hard to mess up. That being said here are a few tips to help you on the way.

  • Seal it: Make sure you seal up your egg rolls so the filling doesn’t spill out. Use either water or egg wash to dampen the edges so they stick together. I like to use a brush to dampen the edges, that way my fingers don’t get sticky.
  • Don’t Overcrowd: For the air fryer to optimally cook your egg rolls make sure there is space between them. This way the air can circulate around the egg rolls, cooking them evenly. Cook them in batches if you need to and keep them warm in a 200 degree oven on a cookie sheet.
  • Flip and Spray: When you flip your egg rolls half way through, you can spray the other side with olive oil if you think it needs it. It may not.
  • Keep them Damp: To prevent your egg roll wrappers from drying out cover the ones you are not using with a damp paper towel. This will keep them pliable and fresh.

Egg rolls ready to air fry.

What Sauce Should I Use?

We like a good sweet chili sauce with these air fryer egg rolls. You can also use hoisin sauce, soy sauce, sweet and sour or a spicy orange sauce. Pick a favorite or try something new.

Crispy and golden brown air fryer egg rolls.

Make Ahead and Freezing Homemade Air Fryer Egg Rolls

This air fryer egg roll recipe is ideal for making ahead of time and freezing for those times when you need egg rolls fast.

  • Make a double batch of the filling and roll the egg rolls as directed.
  • Place the egg rolls on a cookie sheet to flash freeze for about an hour to an hour and a half. This will prevent the egg rolls from sticking together in the freezer
  • Transfer the egg rolls to a freezer safe ziplock bag or container and store in the freezer for up to 3 months.
  • To cook, remove the egg rolls from the freezer and place in the air fryer, coating the outsides with oil. Cook at 400 degrees and add 1-2 minutes per a side till heated through.

Perfectly cooked and filled cross section of an egg roll.

More Air Frying Loving Recipes to Try

Air frying is just the thing to do these days. It’s healthier, it’s faster, it’s just plain better. Air frying doesn’t heat up your oven but it can still produce exquisite dishes. You’ve got to try these other Air fryer recipes. They are so delicious.

Print

Air Fryer Egg Rolls

Egg Roll lovers, this Crispy Air Fryer Egg Roll Recipe is for you! Crispy, crunchy outside, tender filling inside, without the extra fat of frying or drying out from oven cooking. These are what you have been waiting for!
Course Appetizer, Dinner, Main Course
Cuisine Asian American
Keyword air fryer egg rolls, Chicken Egg Rolls, chinese egg rolls, Egg Rolls
Prep Time 20 minutes
Cook Time 12 minutes
Total Time 32 minutes
Servings 12 Egg Rolls
Calories 97kcal
Author Alyssa Rivers

Ingredients

  • 2 Tablespoon vegetable oil
  • 1/2 Teaspoon minced garlic
  • 1/2 Teaspoon minced ginger
  • 1/2 cup finely chopped celery
  • 2 cups coleslaw mix
  • 1/2 pound ground chicken
  • 3 Tablespoon oyster sauce
  • 1 Tablespoon soy sauce
  • 1 Teaspoon toasted sesame oil
  • 1 Tablespoon sriracha
  • 1/2 cup chopped green onions
  • 12 egg roll wrappers
  • olive oil spray

Instructions

  • Heat oil in a pan and stir fry garlic, ginger, celery till fragrant. Add the coleslaw mix and cook till the cabbage is wilted.
  • Add the ground chicken, oyster sauce, soy sauce, sesame oil and sriracha. Stir fry the chicken while breaking it up for 3-4 minutes. Once the chicken is cooked and there is no liquid left in the pan, stir in the green onions and remove from stove.
  • To wrap the egg rolls, place the egg roll wrapper so that one corner is towards you. Place a tablespoon of filling in the bottom half (towards you) and wrap that corner over the filling. turn both sides over the wrapper and then continue rolling away from you (like a burrito), till you reach the end. Seal the edges with some water or a beaten egg. Repeat till all the wrappers are made.
  • Spray the basket of the air fryer with olive oil spray. Place the egg rolls in the basket and lightly spray the tops of the egg rolls with the olive oil spray. Cook at 400 degrees for 6 minutes. Then flip the egg rolls and cook for an additional 6 minutes.

Nutrition

Calories: 97kcal | Carbohydrates: 9g | Protein: 5g | Fat: 4g | Saturated Fat: 2g | Cholesterol: 17mg | Sodium: 327mg | Potassium: 155mg | Fiber: 1g | Sugar: 1g | Vitamin A: 72IU | Vitamin C: 6mg | Calcium: 18mg | Iron: 1mg

Egg rolls on a plate and one being dipped in sauce.


from The Recipe Critic https://ift.tt/38Q51Wp
https://ift.tt/38QWHpo

शनिवार, 16 जनवरी 2021

Awesome Air Fryer Pizza

Pizza night just got a whole lot better with this Awesome Air Fryer Pizza! Perfectly cooked crust and exquisitely baked toppings, the air fryer does it again!

There are so many recipes used with the air fryer it is hard to choose which one to make each night! Here are a few you have to try The Best Air Fryer Chicken Breasts, Perfect Air Fryer Salmon, Amazing Air Fryer Steak with Garlic Herb Butter and don’t forget the reason these air fryers were invented, Homemade Air Fryer French Fries.

Delicious Air Fryer Cheese Pizza.

The Best Air Fryer Pizza

This air fryer pizza is amazingly delicious and cooks up in no time! The best part is using homemade dough, I love this quick easy dough, that I also use for my famous Stromboli. This method works magic on the pizzas because air frying cooks by circulating hot air to cook the food. It makes it crisp, cooks and browns the outside while leaving the inside soft and tender but cooked through all at the same time. Just like pizza is meant to be!

These make pizza night at our house so much more fun. Everyone gets in on the action, from rolling out the dough to putting the toppings on. It is a family affair that is sure to please everyone. Serve this awesome air fryer pizzas with Caesar Salad and some Homemade Easy Cheesy Garlic Bread and you have a restaurant worthy meal at home. This will be a new tradition in your home in no time!

Why Pizza in an Air Fryer Works So Well

Here is why this will be hands down the best pizza you’ve ever had from home!

  • The forced heated air helps the pizza dough rise quickly creating those big air bubbles that we all have come to equate with amazing crust. The dough becomes light, airy inside but a nice crust outside.
  • Because your air frying the dough, it almost becomes like a savory funnel cake or elephant ear. It’s just heavenly.
  • There is something about air frying pizza that magically transforms cheese into ooey gooey perfection as well.
  • And of course, because this sits on your counter, you can free up your oven for some Cinnamon Roll Dessert Pizza! Or you don’t have to turn on your oven at all and not heat up your kitchen!

Ingredients for Homemade Pizza

This could not get any easier. Keep these pantry staples on hand and you can enjoy pizza whenever the craving strikes. Wholesome and delicious, these air fryer pizzas are one of the best!

  • Cornmeal: Classic coating to prevent sticking.
  • Pizza Dough: Store bought or make your own with this homemade pizza dough or this incredible whole wheat pizza dough.
  • Pizza Sauce: Buy at the store or use this homemade marinara sauce.
  • Pepperoni: Use your favorite brand or even the mini pepperoni’s would be good on here.
  • Mozzarella: Grate your own, don’t buy the pre-shredded it bakes more evenly.
  • Italian Seasoning: Adds an extra punch of Italian flare and flavor.

Making Crispy Air Fryer Pizza

Super simple and quick! These are easy to make and everyone can help when making them. These are a great way to make individual pizzas or share them with each other. Air frying the pizzas makes them fast!

  1. Prep: Sprinkle cornmeal in the bottom of your air fryer basket.
  2. Roll: Roll the pizza dough 1/4 inch thick and place in the basket of the air fryer.
  3. Sauce: Spread the pizza sauce 1 inch from the edge.
  4. Top it: Place pepperoni with a dash of Italian seasoning on top and sprinkle with cheese.
  5. Bake: Cook at 400 degrees for 10-12 minutes.

Making the pizza in an air fryer step by step.

Tips for The Perfect Air Frying Pizza Recipe

  • Cheese on Last: The air fryer uses circulating air, you do not want your toppings to go flying all over the inside of your air fryer. I have found that by anchoring the toppings with the cheese kept them on the pizza where they belong and the cheese got nice and golden.
  • It’s all in how you roll it: If you want a thinner crust pizza, roll your dough out thinner and reduce your time to 8-10 minutes. If you want a thicker crust, leave it thicker and cook for about 3 minutes longer.
  • Crispier: If you like your thin or thick crust crispy, add 2-3 minutes to your cook time. The beautiful thing about an air fryer is you can open it while it’s cooking and peek and see if the air fryer pizza is exactly how you want it.
  • What if I use precooked pizza dough: If you use Boboli, pitas bread, flat bread or even a bagels for your pizza base you can still cook them in the air fryer. All you need to do really is cook the toppings and heat the pizza. Air fry your pizza after you top it at the same temperature but for 4-5 minutes.
  • Can I pre-cook my crust: If you love that really cooked crust, then yes by all means par bake your crust. Put your dough in the air fryer and cook for 4-5 minutes. Add your toppings and cook for another 5 minutes.
  • Toppings: Of course you can use any sauce, toppings and cheeses that you can come up with. I love using BBQ SaucePesto or Alfredo Sauce as a base for some variety. Just remember you will want to use cheese as your glue for your toppings!

Make Ahead and Storing Easy Air Fryer Pizzas

You can make these ahead of time for a homemade take on frozen pizza. These air fryer pizzas are just going to change the way you do pizza nights!

  1. Make the Pizza: Assemble the pizza outside of the air fryer. Complete with sauce and toppings.
  2. Flash Freeze: Place on a cookie tray and partially freeze for an hour.
  3. Individually Wrap: Remove pizza from cookie sheet and wrap individually in plastic wrap.
  4. Freeze: Place in a freezer safe bag or container for up to 3 months.
  5. Remove Plastic: When ready to bake, remove pizza from plastic wrap and place in air fryer.
  6. Air Fryer: Cook the pizza for 12-15 minutes or till cooked as desired.
  7. Storing: To store leftovers, wrap tightly in plastic wrap or aluminum foil. Reheat in the air fryer for 3-5 minutes.

Sliced air fryer pizza, ready to eat.

More Pizza Inspiration Headed Your Way!

Pizza, it’s just awesome stuff. There are so many variations you can make. If love pizza as much as the rest of us, then you have to throw these pizza recipes into your rotation. Most of these you could even try out in the air fryer! If you do, you’ll have to leave a comment and let me know how they turn out!

Print

Air Fryer Pizza

Pizza night just got a whole lot better with this Awesome Air Fryer Pizza! Perfectly cooked crust and exquisitely baked toppings, the air fryer does it again!
Course Dinner, Main Course
Cuisine American, Italian, Italian American
Keyword air fryer pizza
Prep Time 5 minutes
Cook Time 10 minutes
Total Time 15 minutes
Servings 1 Pizza
Calories 183kcal
Author Alyssa Rivers

Ingredients

Instructions

  • Sprinkle cornmeal in the bottom of your air fryer basket. Roll the pizza dough 1/4 inch thick and place in the basket of the air fryer. (see note)
  • Spread the pizza sauce 1 inch from the edge. Place pepperoni on top and sprinkle with cheese.
  • Cook at 400 degrees for 10-12 minutes.

Notes

* If you want your dough thicker or a crispier crust, cook for 3 minutes in the air fryer and then add the toppings.
* Putting the toppings under the cheese prevents the toppings from blowing while cooking.

Nutrition

Calories: 183kcal | Carbohydrates: 5g | Protein: 13g | Fat: 13g | Saturated Fat: 7g | Cholesterol: 44mg | Sodium: 672mg | Potassium: 245mg | Fiber: 1g | Sugar: 3g | Vitamin A: 644IU | Vitamin C: 4mg | Calcium: 283mg | Iron: 1mg

Taking a slice of air fried pizza.


from The Recipe Critic https://ift.tt/2LTC42Y
https://ift.tt/38Nktmg

शुक्रवार, 15 जनवरी 2021

Kale Smoothie

Kale smoothie in a glass surrounded by bananas, kale and pineapple

This Kale Smoothie is bright and refreshing, a perfect way to start your morning or to give yourself an invigorating afternoon pick me up. And I promise you it tastes amazing!

If you are looking for more nutritious and delicious smoothies, try this Creamy Avocolada Smoothie, this Raspberry Peach Smoothie, or this Blackberry Lime Green Smoothie.

Kale smoothie in a glass surrounded by bananas, kale and pineapple

The Best Kale Smoothie Recipe

Smoothies are the perfect light breakfast or snacks to get yourself through winter and into spring. They’re also full of fibers and nutrients to keep you healthy and boost your immune system.

This kale smoothie is made with just 6 simple ingredients. It is extremely easy to make and is just the perfect sip to wake you up and nourish you in the morning. Making this smoothie takes absolutely no time at all. You just need to dump all the ingredients in a blender and blend until smooth. Then pour into a glass and serve immediately.

Healthy Kale Smoothie Ingredients

  • Kale: One whole cup of kale leaves is used in this recipe. You can use chopped kale from a bag or fresh kale from a bunch. If using a bunch of kale, just tear off the leaves and discard the stem.
  • Banana: I love using banana in smoothie to add creaminess and it also sweetens the smoothie naturally. Frozen banana works best in this recipe to also keep it cold.
  • Pineapple: Adds a fresh and tropical flavor. Either refrigerated or frozen pineapple will work but if you like your smoothie extra cold, use frozen pineapple so you don’t have to add ice.
  • Yogurt: I use plain yogurt in this recipe to give it a little bit of protein which will help keep you full longer. You can substitute non dairy yogurt, or milk and milk alternative if you wish.
  • Lemon: Both the lemon juice and lemon zest are used in this recipe to add brightness to the smoothie. The acidity also helps cut the bitterness in the raw kale.
  • Honey: Just two teaspoons of honey is used to sweeten this smoothie. Feel free to adjust the amount of sweetener to your taste.

Kale smoothie ingredients on a marble board next to a kitchen towel

Variations for Green Smoothie Recipes

If you are planning to have a smoothie every morning, you might want to vary up the flavor to keep things interesting. Here are some flavor combinations to get you through the whole week!

Simply Replace the pineapple with…

  • Raspberries, add a handful of sliced almonds and a drop of almond extract to boost the almond flavor further.
  • Strawberries and lemon with orange.
  • Mango and lemon with lime.
  • Apple and add a pinch of cinnamon.
  • Blackberries and add a couple leaves of fresh mint.
  • Peach and add a fresh leaf of basil.

Kale smoothie being poured into a glass

Making Ahead Kale Pineapple Smoothie

The best way to prep ahead of time is to pack the vegetables and fruits used for your smoothie in ziplock bags and freeze them. On the outside of each bag, write the additional ingredients you need to add in to complete your smoothie recipe.

Kale smoothie in a glass surrounded by the ingredients

More Smoothie Recipes

Print

Kale Smoothie

This Kale Smoothie is bright and refreshing, a perfect way to start your morning or to give yourself an invigorating afternoon pick me up. And I promise you it tastes amazing!
Course Beverage, Breakfast, Snack
Cuisine American
Keyword green smoothie, kale smoothie
Prep Time 5 minutes
Total Time 5 minutes
Servings 1 Smoothie
Calories 342kcal
Author Trang Doan

Equipment

  • Blender

Ingredients

  • 1 cup packed kale leaf
  • 1 cup pineapple chopped, frozen preferred
  • 1 medium banana sliced, frozen preferred
  • ½ cup plain yogurt
  • 1 tablespoon lemon juice
  • Zest of half a lemon
  • 2 teaspoon honey

Instructions

  • Add all ingredients to a blender and blend until smooth.
  • Serve immediately.

Notes

It is preferred to use as much frozen ingredients as possible, like frozen banana and frozen pineapple to keep the smoothie cold for serving.
If your fruits are not frozen, you can add ice cubes to make the smoothie slushie and cold but this will dilute the flavor.
Adjust the amount of honey to your liking.

Nutrition

Calories: 342kcal | Carbohydrates: 73g | Protein: 9g | Fat: 5g | Saturated Fat: 3g | Cholesterol: 16mg | Sodium: 85mg | Potassium: 1121mg | Fiber: 5g | Sugar: 48g | Vitamin A: 6986IU | Vitamin C: 178mg | Calcium: 270mg | Iron: 2mg


from The Recipe Critic https://ift.tt/39DyP7Q
https://ift.tt/3swbDRY