मंगलवार, 2 फ़रवरी 2021

Easy Chicken Lettuce Wraps

Overhead picture of chicken lettuce wraps with sweet chilli sauce on the side

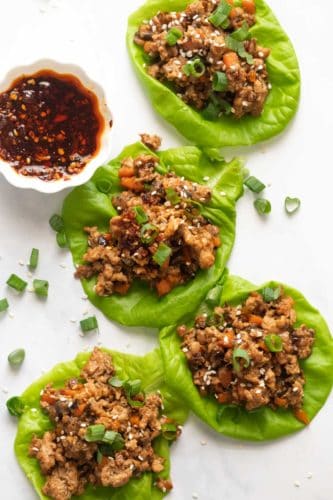
Healthy and easy, these Chicken Lettuce Wraps are so fresh and delicious! They are ready in under 30 minutes with a juicy chicken filling and crispy butterhead lettuce.

If there’s one thing that always a hit at the dinner table, it’s these Chicken Lettuce Wraps. In fact we have lots of lettuce wrap recipes on the site including Shrimp , Tex Mex, Asian and Turkey lettuce wraps that you should try.

Overhead picture of chicken lettuce wraps with sweet chilli sauce on the side

Asian Chicken Lettuce Wraps

If you are looking for a low carb, healthy recipe that always delivers and tastes amazing, these Chicken Lettuce Wraps should be on the top of your list. It’s a great way to get protein in, it fills you up but is low on carbs. So you can eat extras 😉 I won’t tell! The filling is really versatile. You can use it with lettuce and serve it as these Chicken Lettuce Wraps, serve it with rice and turn it into an Asian rice bowl or even stuff it in rice paper for fresh and tasty spring rolls.

I also like to add veggies like carrots, bell peppers and mushrooms but that’s completely option. I have most of these ingredients in my pantry. If you don’t stock hoisin sauce, it’s a sweet, salty sauce with great depth of flavor that adds a lot of umami to Asian food, so it’s a must have and can be used for stir fries, fried rice , etc.

What you need to make Easy Chicken Lettuce Wraps

This is an easy recipe that doesn’t need a ton of ingredients. You’ll need ground or diced chicken. I prefer ground chicken since it cooks up really fast and doesn’t need any extra prep.

In addition to this, you need a few more ingredients:

  • Ginger
  • Garlic
  • Onions
  • Hoisin Sauce
  • Soy sauce
  • Sriracha or any other Hot Sauce
  • Rice Vinegar
  • Toasted Sesame Oil
  • Sugar
  • Salt and Pepper
  • Cornstarch

Filling for chicken lettuce wraps in a cast iron pan with a spatula

Best Lettuce for Lettuce Wraps

The most important ingredients in Lettuce Wraps is Lettuce obviously. You need a variety of lettuce that allows for a filling and can form a cup or wrap. For this particular purpose, I love butterhead lettuce for its wide leaves that really form the perfect base to hold all that filling. You can also use large Romaine Lettuce leaves or even Iceberg Lettuce if you like. Butterhead lettuce also has great flavor which is mild compared to some other varieties of lettuce that can be slightly bitter to taste.

Make sure to wash lettuce well, and then dry it with paper towels to get rid of any extra moisture. Putting together these Chicken Lettuce Wraps is really quick and easy if you have all your prep in place beforehand. You only need a few minutes of cooking time since ground chicken cooks so fast. If you overcook it, it’ll just turn dry. You can make the filling before hand and it even freezes well. Then whenever you are ready to serve, just heat it up, lay out the lettuce, some extra hot sauce and everyone can dive in and make their own wraps! Sooo good!

Closeup of a chicken lettuce wrap topped with spring onions

More Asian Inspired Recipes

Closeup of a chicken lettuce wrap topped with spring onions
Print

Chicken Lettuce Wraps

Super easy, delicious chicken lettuce wraps that take only 30 minutes to put together and are a great healthy, low carb option!
Course Appetizer, Dinner, Main Course
Cuisine Asian American
Keyword asian lettuce wraps, chicken lettuce wraps, lettuce wraps
Prep Time 5 minutes
Cook Time 15 minutes
Total Time 20 minutes
Servings 6 people
Calories 171kcal
Author Richa Gupta

Ingredients

  • 1 pounds ground Chicken
  • 1 Tablespoon Oil
  • 1 teaspoon minced Garlic
  • 1 teaspoon minced Ginger
  • 1/4 cup diced Onion
  • 1/2 cup diced Carrots
  • 1/2 cup diced Red Bell Peppers
  • 12 Butterhead Lettuce Leaves

For the Sauce

  • 2 Tablespoon Hoisin Sauce
  • 1 Tablespoon Soy Sauce
  • 1 teaspoon Sriracha or any other hot sauce
  • 2 teaspoons Rice Vinegar
  • 1 teaspoon toasted Sesame Oil
  • 1 teaspoon Sugar
  • 1 teaspoon Cornstarch
  • 3 Tablespoon Water
  • 1/2 teaspoon White Pepper Powder
  • 1/2 teaspoon Salt
  • diced Spring Onions for garnishing

Instructions

  • Whisk together all the ingredients listed under sauce and set aside
  • Heat oil in a pan and add ginger, garlic and onions. Saute for about two minutes and add the carrots. Cook the carrots for another two minutes.
  • Add bell peppers and cook for another minute on high heat and then add the ground chicken. Brown the chicken on high for 2 minutes. Add the sauce and mix and let this cook for 3-4 minutes till the liquid dries up and the chicken is cooked through
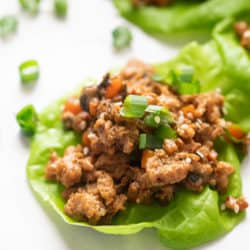
  • Spoon the filling on a lettuce , make a wrap, top it with spring onions and eat immediately!

Nutrition

Calories: 171kcal | Carbohydrates: 7g | Protein: 15g | Fat: 9g | Saturated Fat: 2g | Trans Fat: 1g | Cholesterol: 65mg | Sodium: 522mg | Potassium: 565mg | Fiber: 1g | Sugar: 4g | Vitamin A: 3207IU | Vitamin C: 20mg | Calcium: 29mg | Iron: 1mg


from The Recipe Critic https://ift.tt/3pGUGSH
https://ift.tt/39FRIIw

सोमवार, 1 फ़रवरी 2021

Chocolate Truffles

A white platter with multi-colored chocolate truffles.

Chocolate truffles are the ultimate indulgence. The creamy (almost buttery) chocolate is rolled into balls then coated in a dusting of cocoa powder, nuts, or sprinkles!

Truffles are surprisingly easy to make and perfect for any special occasion. If you love truffle recipes as much as we do, make sure to also check out these White Chocolate and Mint truffles!

A white platter with multi-colored chocolate truffles.

Amazingly Delicious Chocolate Truffles

These chocolate truffles are a deliciously decadent treat and the perfect two-bite indulgence. Even though they’re very easy to make, they make every occasion feel special. They also make great gifts packaged in a pretty box!

What Is a Chocolate Truffle?

Truffles are indulgent treats. They’re made by rolling chocolate ganache into balls then dusting them with cocoa powder or chopped nuts. And don’t worry if chocolate ganache sounds complicated. It’s only a fancy word for chocolate that’s been melted in heavy (whipping) cream.

4 pictures showing how to make chocolate truffles.

How To Make Easy Truffles

Chocolate truffles are the perfect dessert to make for a special occasion (like Valentine’s Day!), yet they’re so simple to make that you can enjoy them all year round. Making homemade chocolate truffles is really easy!

  1. Pour some warm cream over chopped chocolate. Let it sit for 5 minutes.
  2. Now do nothing! It’s important to let the chocolate and cream sit undisturbed for a few minutes.
  3. After 5 minutes, add the vanilla and stir the chocolate then put the bowl into your fridge.
  4. Once the ganache has hardened, scoop it into balls then roll the balls in cocoa powder, nuts, or sprinkles.

A chocolate truffle getting rolled in pink sugar.

Favorite Truffle Toppings

The fun part about making chocolate truffles is choosing what to roll them in. Here are a few of our favorite things to make them look pretty:

  • Cocoa powder: Traditional.
  • Sprinkles: so many color options.
  • Finely chopped nuts: pecans, pistachios, and walnuts are popular.
  • Sanding sugar: makes them sparkly.
  • Edible gold dust: for a glam look.
  • Sweetened coconut: desiccated works best.
  • Crushed dehydrated strawberries: pink and perfect for Valentine’s Day!

Chocolate truffles on a plate.

More Decadent Desserts

A white platter with multi-colored chocolate truffles.
Print

Chocolate Truffles

Chocolate truffles are the ultimate indulgence. The creamy (almost buttery) chocolate is rolled into balls then coated in a dusting of cocoa powder, nuts, or sprinkles.
Course Dessert
Cuisine American
Keyword chocolate truffles, truffles
Prep Time 30 minutes
Cooling Time 2 hours
Total Time 2 hours 30 minutes
Servings 38 Truffles
Calories 75kcal
Author Kristen Stevens

Ingredients

  • 12 ounces dark chocolate
  • 1 cup heavy cream
  • 1 teaspoon vanilla extract (optional)

Options for Rolling the Truffles:

  • cocoa powder
  • finely minced nuts
  • sprinkles

Instructions

  • Chop the chocolate into small pieces and put it into a medium-sized, heat-proof bowl.
  • Warm the cream over medium heat. As soon as it starts to simmer, remove it from the heat and pour it over the chocolate. DO NOT MIX. Let the cream and chocolate sit for 5 minutes.
  • After 5 minutes, add the vanilla (if using) and stir the chocolate.
  • Place the chocolate into the fridge and let it cool for at least 2 hours.
  • Once the chocolate is cool, use a small cookie scoop or tablespoon to scoop it into balls.
  • Place the toppings you choose into shallow bowls. Using your hands, roll the truffles into balls then roll the balls in the toppings so that they are well-coated. (See notes)

Notes

It's easiest (and the least messy) if you roll all the truffles into balls before you roll the balls in the toppings you choose. If you use nuts or sprinkles, roll each truffle a few times in your hand to soften the chocolate before rolling them in the nuts of sprinkles. It will help the toppings stick. This extra step isn't necessary if you use cocoa powder. 

Nutrition

Calories: 75kcal | Carbohydrates: 4g | Protein: 1g | Fat: 6g | Saturated Fat: 4g | Trans Fat: 1g | Cholesterol: 9mg | Sodium: 4mg | Potassium: 69mg | Fiber: 1g | Sugar: 2g | Vitamin A: 96IU | Vitamin C: 1mg | Calcium: 11mg | Iron: 1mg


from The Recipe Critic https://ift.tt/3pH0BHq
https://ift.tt/3j4G8dj

रविवार, 31 जनवरी 2021

Air Fryer Crispy Parmesan Zucchini Chips

Air Fryer Parmesan Zucchini Chips are crunchy, savory bites of heaven! This is hands down one of the best ways to eat zucchini!

Make your night a complete Air Fryer success by serving these zucchini chips with one of my favorite main dishes. Try them with air fryer steak, chicken or salmon.

Air Fryer Zucchini chips in the air fryer.

Air Fryer Zucchini Chips

Zucchini is one of my all time favorite vegetables. It is so versatile and easy to use. There are just so many different ways to cook with it. Like Lasagna, chocolate or blueberry lemon bread and even pizza crust. Zucchini is just so good, but when I just want some fried zucchini the air fryer gives me a quick healthier option. These parmesan air fryer zucchini chips are just so crispy and full of flavor without all the extra fat.

The air fryer cooks food similar to the way a convection oven works. It circulates hot air to cook, bake, and fry your favorite foods to absolute perfection. The zucchini chips are no exception. They are perfectly seasoned and breaded and the air fryer crisps the outsides while keeping the insides delicately tender. These air fryer zucchini chips will be the perfect addition to any meal or serve as a tasty snack or appetizer.

Ingredients for Parmesan Zucchini Chips

Quick and easy these air fryer parmesan zucchini chips take simple ingredients and minimal oil. If you are not growing your own zucchini, look for firm, dark bright green zucchini that is uniform in size. Air frying makes them insanely delicious!

  • Zucchini: I used 2 medium sized zucchini
  • Salt and Pepper: Just to taste
  • Flour: All purpose flour is what I used here.
  • Eggs: You’ll need 3 large eggs
  • Panko: I prefer the texture of panko to bread crumbs for these air fryer chips.
  • Parmesan cheese: Use finely grated parmesan for best results.
  • Italian Seasoning: Adds flavoring and a bit of color.

Let’s Make Crispy Zucchini Chips in an Air Fryer

These are extremely easy. If you want to keep your fingers clean use tongs to dredge the zucchini in the flour and a fork for the egg mixture, and a spoon for the bread crumbs. It is a bit of a process, but so worth it!

  1. Season: Salt and pepper the sliced zucchini.
  2. 3 Bowls:  Put the flour in a small bowl. Whisk the eggs in a small bowl, and combine the Panko, parmesan cheese, and Italian seasoning in another small bowl.
  3. Dredge: Dip the zucchini in the flour, then the egg, then lastly in the Panko mixture.
  4. Fry: Add the zucchini in an even layer in the air fryer basket. Cook at 400 degrees for 5 minutes, flip, and spray with olive oil. Continue cooking for 5 minutes or until done.

Dredging, and seasoning zucchini chips for the air fryer.

Tips for the Best Air Fryer Zucchini Chips

Whether you grow your own, are the recipient of your neighbors garden or buy it at the store, you are going to want to keep a bunch of these around especially for this air fryer recipe. It’s just that delicious!

  • Slices: Keep your slices as even as possible, for even baking. The thinner you slice your zucchini the crispier it will be all over.
  • Size: Zucchini comes in all sizes, especially home grown. If your zucchini is large increase the cooking time by 2-3 minutes to make sure it gets cooked through. Check it often and adjust accordingly. If you like a bit thicker slice you’ll also need to increase the time.
  • Don’t overcrowd:  You will need to cook these in batches, you do not want to overlap the parmesan zucchini chips. They will not crisp up evenly
  • Pat Dry: After you season the zucchini with salt and pepper, let them sit for a minute or two and then pat them dry with a paper towel. The salt will draw out moisture in the zucchini, and you don’t want it to be soggy.
  • Parmesan: The grated parmesan worked better for adhering to the zucchini than the shredded.
  • Separate: If I am doing lots of batches I divide the flour and panko mixture in half. Once the bowl I’m using gets clumpy I’ll add in the fresh flour and panko mixture to their bowls. This helps keep the coating even throughout the air fryer zucchini chips.

A plate for perfectly air fried zucchini chips with ketchup.

Variations, Sauces and Storing Zucchini Chips

These air fryer zucchini chips are so good you’re going to want to make them over and over again. The wonderful thing is they are customizable and you can change it up if you’d like to.

  • Spices: There are different spices you can use for the air fried parmesan chips. Make them spicy with a taco seasoning, or add some ranch dressing mix to give them a bit of zip. Mix in chipotle chili powder, garlic powder, and onion powder for a nice bit of kick. You can use your imagination when it comes to the spices.
  • Sauces: Air fryer parmesan zucchini chips were made to dip. Although they are extremely good on their own, a good sauce never hurts. Try fry sauce, yum yum sauce, ranch dressing, or marinara sauce.
  • Leftovers: These are best eaten right after they are made. If you do have leftovers, store them in an airtight container in the fridge. When ready to eat reheat in the air fryer for 2-3 minutes to crisp them up again.

Dipping an air fried zucchini chip in ketchup.

More Air Fryer Vegetables

We all know we should eat more vegetables. And it can be hard sometimes to get enough, but air frying your vegetables changes everything. Now instead of persuading and begging your kids to eat their vegetables, they’ll be asking you to make these air fryer recipes. This is going to make meal time so much better.

Print

Air Fryer Parmesan Zucchini Chips

Air Fryer Parmesan Zucchini Chips are crunchy, savory bites of heaven! This is hands down one of the best ways to eat zucchini!
Course Appetizer, Side Dish, Snack
Cuisine American
Keyword air fryer zucchini chips, zucchini chips
Prep Time 5 minutes
Cook Time 10 minutes
Total Time 15 minutes
Servings 4 People
Calories 271kcal
Author Alyssa Rivers

Ingredients

  • 2 medium sized zucchini sliced
  • salt and pepper
  • 1 cup flour
  • 3 large eggs
  • 1 cup Panko
  • 1/4 cup parmesan cheese
  • 1 Tablespoon Italian seasoning

Instructions

  • Salt and pepper the sliced zucchini. Put the flour in a small bowl. Whisk the eggs in a small bowl, and combine the Panko, parmesan cheese, and Italian seasoning in another small bowl.
  • Dip the zucchini in the flour, then the egg, then lastly in the Panko mixture.
  • Add the zucchini in an even layer in the air fryer basket. Cook at 400 degrees for 5 minutes, flip, and spray with olive oil. Continue cooking for 5 minutes or until done.

Nutrition

Calories: 271kcal | Carbohydrates: 39g | Protein: 13g | Fat: 7g | Saturated Fat: 3g | Trans Fat: 1g | Cholesterol: 144mg | Sodium: 272mg | Potassium: 392mg | Fiber: 3g | Sugar: 4g | Vitamin A: 469IU | Vitamin C: 18mg | Calcium: 163mg | Iron: 4mg


from The Recipe Critic https://ift.tt/3r8JGOA
https://ift.tt/3pzy3j3

Air Fryer Tater Tots

Air Fryer Tater Tots are just about the greatest thing to happen to potatoes ever! Crispy golden on the outside and tender on the inside, these are insanely delicious!

Tater tots are the perfect side dish to these air fryer Chicken, Shrimp and Salmon recipes. Air frying is insanely delicious with so many recipes to try!

Perfect air fryer tater tots on a plate with ketchup.

The Best Air Fryer Tater Tots

Tater tots from a fast food restaurant are simply the best. And I have never been able to replicate that incredible crunch and hot delicate insides at home until now. These air fryer tater tots are just as good if not better than your favorite place to get them. Air fryer tots taste like they have been fried, but the beauty is they haven’t. They are golden, super crispy and perfectly tender on the inside. It is amazing! I could never get this result from baking and frying left them greasy and heavy.

Air Fryer tots are the perfect side to your favorite sandwich, burger or even this to die for egg salad. The air fryer keeps the mess contained. No hot oil to clean up or splatters all over your kitchen. It’s completely hands off too. With this air fryer recipe you can set it and walk away to finish whatever it is that needs to be done. Just a shake half way through is all you need to do. These air fryer tots are going to become a new family favorite guaranteed.

Where did Tater Tots Come From?

So where did these amazing little tots come from anyway? In 1953 the two founders of the Ore-Ida company wanted to come up with a solution for the bits of potato that were left over after making their frozen fries. According to history they chopped up the slivers, added flour and seasoning, then pushed the mash through holes and sliced off pieces of the extruded mixture.  And the infamous tater tot was born. They took to the grocery store shelves by 1956 and have become a staple in American cuisine. From school lunches, fast food restaurants and now to your very own kitchen, the world loves tater tots. Restaurants and chefs have been creative in coming up with all sorts of things to use tater tots for. From tater tot breakfasts, casseroles and even tater tot nachos, they have definitely become a favorite.

Air Fryer Tater Tot Ingredients

These couldn’t be more simple. Grab your favorite brand of frozen tater tots and some seasoning and your good to go! Make sure you buy several bags however, you’ll be making these air fryer tots a lot!

  • Tater Tots: 16 oz bag is all you need
  • Seasoned Salt: This is optional but we love it!
  • Oil Spray: I use olive oil, but avocado oil will work too.

Spraying olive oil on frozen tater tots in the air fryer.

Let’s Make Air Fryer Tots in the Air Fryer

Your biggest hurdle here will be NOT over filling your air fryer. It’ll be tempting because you’ll want to do as many as possible. Resist though. Cooking them in the air fryer makes it quick, so you can do multiple batches.

  1. Prepare: Place frozen tater tots in the basket of your air fryer. Sprinkle with seasoning salt. Spray with olive oil.
  2. Air Fry: Cook at 400 degrees for 10 minutes, then open the basket and shake the tots. Continue to cook for 5-8 minutes or until crisp.

Seasoning frozen tater tots in the air fryer.

Tips For Tots

Air fryer tater tots are so customizable and easy to do. You can have a side dish in no time and since everyone loves tater tots, you’ll have a happy family too!

  • Preheat: For the crispiest tater tots, preheat your air fryer. If you want even crispier tots, add a minute or two to your cooking time.
  • Toss:  Be sure to gently toss or flip your tater tots half way through for even cooking. Move the inside to outside and vice versa.
  • Sizes: In the world of tater tots, they do come in different sizes. You’ll want to check your tots half way through and adjust the time as needed.
  • Salt: Adding salt or seasoned salt greatly enhances the flavor of the air fryer tots, so I recommend not skipping this step, if you can.
  • Serve Immediately: Air Fryer tots are best served as soon as they are done. Just like at a restaurant, they are best fresh.
  • Storing: If you do have leftovers, keep in an airtight container in the fridge for 2-3 days.  I do not recommend a bag, it will make them even soggier.
  • Reheat: To reheat your tots, place them in the air fryer at 400 degrees for 2-3 minutes.
  • Seasonings: Add different spices and seasonings for different flavors. Try chili powder, garlic powder, onion powder or cajun spice. Toss in a bit of ranch dressing mix for a bit of a tang. Or taco seasoning for a bit of spice.

Crispy golden air fried tater tots.

Sauces for your Air Fryer Tots

Air Fryer tater tots are so good, you can probably just pop them in your mouth as about as fast as you can cook therm. But if you like to dunk your heavenly air fryer tots, try these sauces for a nice a kick. And of course there is always the standard ketchup you can use.

  • Fry Sauce: This amazing sauce was solely invented to go with french fries. It’s a grown up version of ketchup and it is divine. In my home it has replaced ketchup and mayo on hamburgers even. It’s so good!
  • Yum Yum Sauce: This popular sauce is light, sweet and tangy! An excellent choice.
  • Cheese Sauce: Cover the golden fries in a rich thick cheesy sauce that’s going to knock your socks off.
  • Ranch Dressing:  As my kids would say, everything’s better with ranch dressing!
  • Make your Own Sauce: Mix your favorite spices with a bit of mayo and ketchup to create a unique sauce of your own. Add chipotle chili powder, garlic powder, and onion powder with mayo and ketchup for a spicy western sauce that’s awesome. There are lots of possibilities.

Golden and crispy tater tots in the air fryer with a side of ketchup.

More Amazing Air Fryer Recipes

Air frying works similarly to a convection oven. It uses circulating hot air to create unbelievable crusts and perfectly tender cooked insides. It’s so easy to use and if you think you could cook it in the air fryer, chances are you probably can. It uses little to no oil creating healthier versions of your favorites. It’s usually cooks your food faster and easier, with little to no mess. It frees up your oven for other dishes and it’s hands off so it you are free to get done what needs to be done. Try these delish air fryer recipes and be prepared to be impressed.

Print

Air Fryer Tater Tots

Air Fryer Tater Tots are just about the greatest thing to happen to potatoes ever! Crispy golden on the outside and tender on the inside, these are insanely delicious!
Course Side Dish
Cuisine American
Keyword air fryer tater tots, tater tots
Prep Time 5 minutes
Cook Time 15 minutes
Total Time 20 minutes
Servings 4 People
Calories 201kcal
Author Alyssa Rivers

Ingredients

  • 16 ounce frozen tater tots
  • 1 teaspoon seasoning salt optional
  • olive oil spray

Instructions

  • Place frozen tater tots in the basket of your air fryer. Sprinkle with seasoning salt. Spray with olive oil.
  • Cook at 400 degrees for 10 minutes, then open the basket and shake the tots. Continue to cook for 5-8 minutes or until crisp.

Nutrition

Calories: 201kcal | Carbohydrates: 29g | Protein: 2g | Fat: 9g | Saturated Fat: 2g | Sodium: 1067mg | Potassium: 301mg | Fiber: 2g | Sugar: 1g | Vitamin A: 5IU | Vitamin C: 9mg | Calcium: 15mg | Iron: 1mg


from The Recipe Critic https://ift.tt/2MGsu3K
https://ift.tt/39ygkmJ