शनिवार, 12 जून 2021

Very Berry Cheesecake Salad

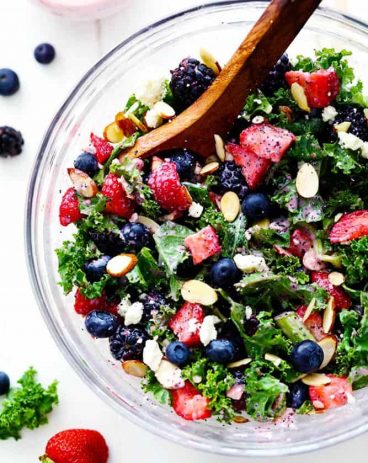
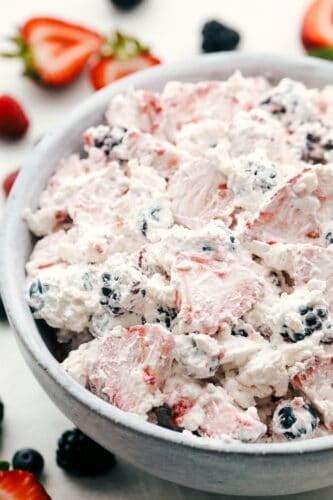
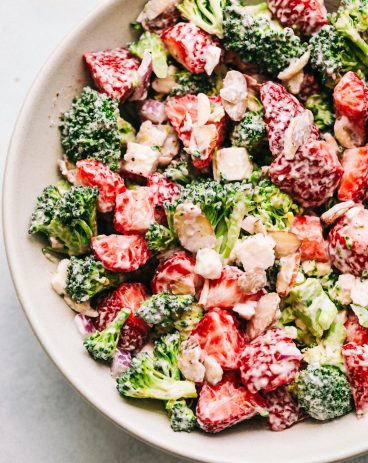
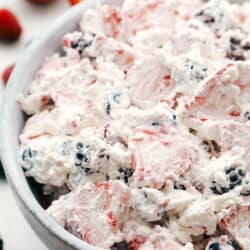
Berry Cheesecake Salad has only the freshest berries combined with a creamy cheesecake fluff. This is so amazing and will be the hit of any gathering!

Cheesecake and berries makes a perfect combination! Here are more berry cheesecake recipes that are a MUST make, like these Bars, Brownies or Cheesecake.

Berry cheesecake salad in a white bowl.

Berry Cheesecake Salad

I am loving the fresh and delicious berries that are starting to pop up in the stores right now. I love fresh fruit! We eat so much fruit around here it is crazy. I am always trying to think of yummy ways to use up our fruit. This is probably hands down my family’s all-time favorite fruit salad. It is a little bit sweet, a little bit creamy, and a whole lot of scrumptious. With berries and cream cheese, it’s sure to be a winner!

Yes, I know, you are looking at the ingredients and thinking it’s a dessert, not a salad. It’s a salad or dessert. I’ll let you decide. I will tell you though, I took this to a large gathering and it was scraped clean in a matter of minutes. The berries are so refreshing and the cream cheese fluff is light and a little bit sweet. Everyone is going to love this incredible side dish, you will not have to worry about leftovers, which is a good thing. This salad only stores well for about 2 days. Make this for your next potluck or BBQ and watch the rave reviews come in. This is so GOOD!

What You Need For Berry Cheesecake

Super easy and fast, it’s perfect for when you need a dynamite salad fast!

  • Cream cheese: Leaving the cream cheese on the counter for an hour will help softened it when blending it together.
  • Sugar: This adds in the sweetness! It will alter your taste but using less sugar or substituting it for a lower calorie sugar works too.
  • Cool Whip: This is found in the freezer isle near the ice cream. Make sure to let it thaw before using in the cheesecake salad.
  • Strawberries: Slice the strawberries into fourths or long ways for bite sized spoonfuls.
  • Blackberries, Blueberries and Raspberries: Fresh, washed, and ripe are the best for this salad.

How to Make Cheesecake Salad with Berries

Super creamy and fresh, this is an absolute summer must make!

  1. Creamy filling: In a large bowl, beat together cream cheese and sugar until smooth and creamy. Fold in the thawed cool whip.
  2. Fold and serve; Add strawberries, blueberries, blackberries, blueberries, and raspberries. Fold carefully into the cream cheese mixture. Serve immediately.
Cream cheese and whipped topping being mixed then adding it to the berries.

Very Berry Creamy Cheesecake Salad Tips and Variations

This salad is almost a dessert, but no one will care, it is just too good!

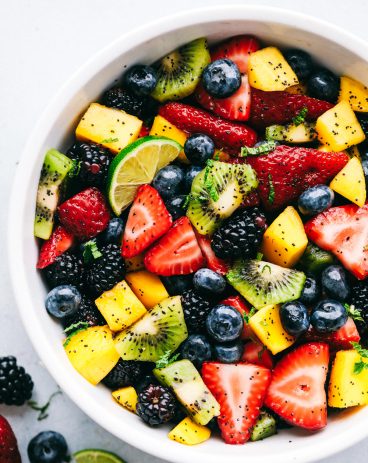
  • Fruit: Look for the ripest, freshest berries you can find. They should be firm, but not underripe, vibrant colors, and free from blemishes. Slice the strawberries till they are bite-size for easy eating. The berries you will not need to cut.
  • Frozen Fruit: I do not like to use frozen fruit, because the berries release too much liquid and your salad may become a mushy mess. To help alleviate that you can rinse the frozen fruit, once it’s thawed, with water till it runs clear. The fruit will still not be as plump and firm, but it will still taste delicious.
  • Cream Cheese: To ensure everything mixes in smoothly, make sure your cream cheese is really soft, and then beat it really well. It makes the berries easier to mix in as well.
  • Cool whip topping: A great substitute for cool whip would be 2 cups of vanilla yogurt.
  • Sugar: If you are worried about the sugar dissolving use powdered sugar instead of granulated. It will give you a smoother consistency. I kind of like the little bit of crunch regular sugar gives.
  • Flavors: You can add a bit of flavor to your salad by adding ½ tsp of vanilla, or almond extract. Or add lemon or lime zest for a bit of zing.
  • Stir in: Add broken-up chocolate-covered graham crackers, cookies, or even chopped snickers for more of a dessert than a salad.

What to serve with Berry Salad

You are going to love how light and refreshing this salad is, and the fact that it’s a bit sweet means it will go perfectly with a meaty, savory main dish. Perfect for your next Potluck or BBQ, this salad brings both color and flavor to the table. I will warn you it is addicting, so you may want to double the recipe so you have enough.

Scooping the berry cheesecake with a spoon.
Print

Very Berry Cheesecake Salad

Fresh berries combine with a creamy cheesecake fluff. This is so amazing and will be the hit of any gathering!
Course Appetizer, Dessert, Salad, Side Dish
Cuisine American
Keyword berry cheesecake salad, cheesecake salad, very berry cheesecake salad
Prep Time 15 minutes
Total Time 15 minutes
Servings 8 people
Calories 193kcal
Author Alyssa Rivers

Ingredients

  • 1 (8 ounces) cream cheese softened
  • 1/2 cup sugar
  • 8 ounces cool whip thawed*
  • 6 cups berries I used:
  • 3 cups strawberries sliced
  • 1 cup blackberries
  • 1 cup blueberries
  • 1 cup raspberries

Instructions

  • In a large bowl, beat together cream cheese and sugar until smooth and creamy. Fold in the thawed cool whip.
  • Add strawberries, blueberries, blackberries, blueberries, and raspberries. Fold carefully into the cream cheese mixture. Serve immediately.

Video

Notes

Updated on June 11, 2021
Originally Posted on July 9, 2019

Nutrition

Calories: 193kcal | Carbohydrates: 44g | Protein: 2g | Fat: 3g | Saturated Fat: 1g | Cholesterol: 5mg | Sodium: 23mg | Potassium: 242mg | Fiber: 7g | Sugar: 33g | Vitamin A: 160IU | Vitamin C: 44.1mg | Calcium: 58mg | Iron: 0.7mg


from The Recipe Critic https://ift.tt/2JLzZ4D
https://ift.tt/2TVc4YV

शुक्रवार, 11 जून 2021

Lemon Pepper Chicken Wings

Lemon Pepper Chicken Wings are buttery, zesty, and will WOW at your next family get-together! They are super easy to make and pack delicious flavor in every juicy bite!

These wings work great as both an appetizer and a meal. Serve them up with my insanely delicious Air Fryer, Buffalo, and Chili Lime for a summer barbecue that will be one to remember!

Lemon Pepper Wings with lemon garnish on plate.

Easy Lemon Pepper Wings Recipe

Now that summer is here and family gatherings are starting to happen again, it is time to impress your guests with these DELICIOUS Lemon Pepper Wings that rival anything you can get from a restaurant! You won’t want to order takeout again! These wings have the most amazing tangy, buttery glaze and crispy skin that my family can’t get enough of. You only need a few simple ingredients, and they are super easy to make. Whether it is for game day, a cookout, or just an easy dinner, these wings are sure to be a winner!

Cooking these Lemon Pepper Wings in the oven creates the most perfect golden brown, tender wings. Plus, you use half the oil that you would cooking them in a fryer! Not to mention avoid the mess and hassle that comes with cooking wings in oil. While they are in the oven, you can whip up some of my Homemade Ranch for a perfectly tangy match made in heaven!

Lemon Pepper Wings Ingredients

All you need are a few fresh, delicious ingredients to make your Lemon Pepper Chicken Wings!

  • Chicken Wings: It is easiest to buy wings that are already separated into flats and drumettes. Be sure to pat your chicken completely dry with a paper towel before cooking or else they will be soggy instead of crispy!
  • Baking Powder: This is the secret ingredient for obtaining that perfect crispy skin when baking wings instead of frying. Be sure to thoroughly coat each piece in powder. Also, make sure you are using baking powder and not baking soda or it will ruin your batch.
  • Lemon Pepper Sauce: Making fresh lemon pepper sauce is the key to perfect, zesty wings. You can find what you will need to put the sauce together below.
  • Butter: Adding butter to your sauce makes your wings rich and tasty.

What You’ll Need for Your Sauce

Making your Lemon Pepper Sauce is super easy but will taste like you got it from a restaurant!

  • Lemon Pepper Seasoning: Making homemade Lemon Pepper Seasoning adds a delicious touch to your wings. Plus, you can customize your own blend to taste!
  • Lemon juice: You can use either fresh squeezed or bottled lemon juice.
  • Honey: This gives the wings just the right amount of sweetness and perfect texture.
Chicken wings in a glass bowl being tossed in sauce.

Making Your Wings

While these do have a longer baking time, they are hands-off once in the oven and all you have to do is turn them at the halfway mark. You could even use that time to whip up some of my Amazing Air Fryer French Fries as a quick and delicious side!

  1. Prep: Preheat oven to 400 degrees. Line a baking sheet with parchment paper and lightly spray with cooking spray. Add the wings to a medium-sized bowl or ziplock bag and toss with the baking powder.
  2. Bake: Place the wings on an even layer on the baking sheet. Bake for 45-50 minutes turning once until crispy.
  3. To Make The Lemon Pepper Sauce: In a small bowl mix the butter, lemon pepper seasoning, lemon juice and honey. Pour on top of the cooked wings and toss to coat.
Lemon Pepper Wings being tossed in bowl.

Tips to Perfect Your Lemon Pepper Chicken Wings

Following these simple tips will help you make the most amazing wings at home!

  • Baking Rack: Use a baking rack when cooking to ensure that the heat will circulate properly and crisp your wings all the way around.
  • Frozen Wings: Never use frozen chicken wings- you’ll end up with a burnt outer layer and undercooked inside. Always thaw wings before cooking.
  • Space Wings Out: When placing wings on your baking sheet, make sure they are not too close together or else you won’t have proper air flow to cook them thoroughly.
Lemon Pepper Wings on a baking rack with lemon garnish

What to Serve With Your Lemon Pepper Wings

My personal favorite to complete the meal is to serve wings with fresh air fryer fries or potato wedges! You can also serve your wings up with veggies like carrots or celery. This is a great contrast to the zesty flavor of the wings. You could also just keep it simple and have some homemade ranch or blue cheese dressing ready for dipping!

Storing and Reheating Your Lemon Pepper Wings

Your wings will keep in the fridge for 3-4 days in an airtight container. To keep them crispy on the outside and juicy on the inside, I recommend reheating your wings in the oven at 350 degrees Fahrenheit for 10-15 minutes. If you think your wings may be getting dry, you can spritz them with water before cooking. You can also reheat your wings in a frying pan or in the microwave or air fryer for a quick snack for the kids!

Holding a Lemon Pepper Chicken Wing
Print

Lemon Pepper Chicken Wings

Lemon Pepper Chicken Wings are buttery, zesty, and will WOW at your next family get-together! They are super easy to make and pack delicious flavor in every juicy bite!
Course Appetizer, Dinner, Main Course
Cuisine American
Keyword chicken wings, lemon chicken wings, lemon pepper chicken wings
Prep Time 10 minutes
Cook Time 45 minutes
Total Time 55 minutes
Servings 6 people
Calories 530kcal
Author Alyssa Rivers

Ingredients

  • 4 pounds chicken wings
  • 2 Tablespoons baking powder

Lemon Pepper Sauce:

  • 1/2 cup butter melted
  • 2 1/2 Tablespoons Lemon Pepper Seasoning
  • 1/2 Tablespoon lemon juice
  • 2 Tablespoons Honey

Instructions

  • Preheat oven to 400 degrees. Line a baking sheet with parchment paper and lightly spray with cooking spray. Add the wings to a medium sized bowl or ziplock bag and toss with the baking powder.
  • Place them on an evenly layer on the baking sheet. Bake for 45-50 minutes turning once until crispy.

To Make the Lemon Pepper Sauce:

  • In a small bowl mix the butter, lemon pepper, lemon juice and honey. Pour on top of the cooked wings and toss to coat.

Nutrition

Calories: 530kcal | Carbohydrates: 9g | Protein: 30g | Fat: 42g | Saturated Fat: 17g | Polyunsaturated Fat: 6g | Monounsaturated Fat: 14g | Trans Fat: 1g | Cholesterol: 166mg | Sodium: 259mg | Potassium: 701mg | Fiber: 1g | Sugar: 6g | Vitamin A: 727IU | Vitamin C: 2mg | Calcium: 209mg | Iron: 2mg


from The Recipe Critic https://ift.tt/3vfKItq
https://ift.tt/3zk8LuI

Lemon Pepper Seasoning

Lemon Pepper Seasoning is a little bit zingy and a little bit peppery, and a whole lot delightful! Making your own lemon pepper is super easy and absolutely delicious.

Making your own seasonings at home is a no-brainer, it’s fast, cheap, and better for you. Try some of my other favorite seasonings to make, Italian, Taco, and Ranch Seasonings.

Lemon pepper in a glass jar with a wooden spoon.

Homemade Lemon Pepper Seasoning

Making your own seasonings has become something I love to do. From when I first tried it and realized how easy it was to do and then how much money I could save I have tried to make as many of my own seasonings as possible. From Fajita seasoning to my own Everything But the Bagel, it is easy and tastes amazing. This lemon pepper seasoning is no exception. You are going to love the intense lemon flavor and the nice bite of pepper that comes from this homemade seasoning.

I have actually had a hard time finding lemon pepper before and so this is a sure fire way to never be out of it again. Full of zesty lemon, pungent pepper, and then rounded out with garlic and onion powder, this is a win, win seasoning. Lemon pepper goes with so many things too. You can use it in so many ways. Another thing I love about making my own spices is I can customize for my families liking. More lemon, less pepper or vice versa, it really is the way to go! You have to try it!

What is in Lemon Pepper Season

Simple ingredients combine for out of this world flavor in this lemon pepper seasoning. With pantry staple ingredients you can make this season quickly!

  • Dried lemon peel: You can make your own and I’ll tell you how below.
  • Coarse black pepper: If you can use a pepper grinder to get the right consistency for your pepper.
  • Salt: Regular table salt or a coarser salt can be used.
  • Onion powder: A great flavor enhancer.
  • Garlic powder: Adds a wonderful taste that compliments the lemon.

How To Make Lemon Pepper

Super simple and absolutely divine! Combine lemon peel, black pepper, salt, onion and garlic powder. Use seasoning as needed on chicken, steak, seafood and fish.

Ingredients in lemon pepper in a bowl.

Homemade Dried Lemon Peel

This is super easy, and can even be made the same day as the seasoning if needed. Buying dried lemon peel can be more expensive than it’s worth, and can easily be made from lemons you have or already used.

  • Lemons: For drying lemons, I like to use organic lemons that haven’t been sprayed with chemicals if I can find them. If I can’t I thoroughly wash them and dry them.
  • Peel: There are two ways you can do this. You can use a sharp knife and carefully peel the lemon making sure to leave the white part or pith attached to the lemon. You do not want the pith in your peel. It will make it taste bitter. Or you can zest your lemon using a zester or a fine cheese grater.
  • Longer Method: Simply place your peels or zest on a plate spreading out as much as possible. Leave in a well-ventilated room where it can be placed in the sun and gets warm. It should take a few days for the lemon peel to dry out completely. The zest will be quicker, so check often.
  • Quick method: Spead the zest or peel on a parchment-lined baking sheet. Place in an oven that has been preheated to 180 degrees. It will take 25- 30 minutes to dry out. Once cooled it can be stored in an airtight container till ready for use. For the peel, you can grind it in a spice grinder when ready to use.
  • Dry: Make sure the peels or zest are completely dry so it will not mold.

How to Use and Store Lemon Pepper

This is a wonderful flavored spice that enhances your cooking in so many ways.

  • Add: Lemon pepper goes beautifully with just about any kind of meat. Add it Chicken, Steak, and Fish when you need a little something special.
  • Sprinkle: Enhance your popcorn, vegetables, and potatoes by sprinkling some over the top, or mixing it with melted butter and topping them.
  • Use: Create amazing pasta, soups, and potato dishes by adding this secret ingredient.
  • Dressings and Marinades: Add it to vinegar and oil for a homemade lemon pepper dressing. Swap it out for regular pepper in a marinade to add a whole new kind of wow!
  • Variations of Lemon Pepper: Mix and delete spices and herbs as desired. Omit salt if trying to go salt-free.
  • Store: Lemon pepper does best when kept in a tightly sealed jar away from heat or light. It should stay dry and cool. It will keep for up to 6 months.
Spooning out a Tablespoon of lemon pepper.
Print

Lemon Pepper Seasoning

Lemon Pepper Seasoning is a little bit zingy and a little bit peppery, and a whole lot delightful! Making your own lemon pepper is super easy and absolutely delicious.
Course Seasoning
Cuisine American
Keyword lemon pepper, lemon pepper seasoning
Prep Time 5 minutes
Total Time 5 minutes
Servings 1 serving
Calories 53kcal
Author Alyssa Rivers

Ingredients

  • 1/4 cup dried lemon peel
  • 1 Tablespoon coarse black pepper
  • 1 Tablespoon salt
  • 1 teaspoon onion powder
  • 1 teaspoon garlic powder

Instructions

  • Combine lemon peel, black pepper, salt, onion and garlic powder. Use seasoning as needed.

Nutrition

Calories: 53kcal | Carbohydrates: 14g | Protein: 2g | Fat: 1g | Saturated Fat: 1g | Polyunsaturated Fat: 1g | Monounsaturated Fat: 1g | Sodium: 6983mg | Potassium: 228mg | Fiber: 6g | Sugar: 1g | Vitamin A: 67IU | Vitamin C: 31mg | Calcium: 91mg | Iron: 1mg


from The Recipe Critic https://ift.tt/3grOniI
https://ift.tt/3cRnHaf

गुरुवार, 10 जून 2021

Homemade Blueberry Syrup

Homemade Blueberry Syrup will be the best addition to your breakfast lineup. It is sweet, decadent, and you will want to put it on everything!

It takes less than 10 minutes and only a few pantry staple ingredients to whip up! Serve this up on Buttermilk, Cornbread, or Waffles for a breakfast that is sure to be a hit with the family!

Blueberries being whisked in a bowl

Blueberry Syrup Recipe

It’s time to level up your pancake game! This Homemade Blueberry Syrup is fresh, delicious, free of artificial sweeteners and SO versatile! It only takes minutes to put together and will taste better than anything you can find at the store! Top pancakes, waffles, crepes, or other baked goods with this syrup for extra sweet and fruity flavor. You can even add this syrup to our Homemade Lemonade to create the perfect summer drink!

This Blueberry Syrup has become a HUGE HIT in my family and my kids love putting it on everything. You can switch out the blueberries in this recipe for raspberries or strawberries to create a variety of syrups for a breakfast à la IHOP! The possibilities are endless and I know you’re going to love having this syrup on hand in your kitchen!

Easy Homemade Blueberry Syrup Ingredients

The best part about this Homemade Blueberry Syrup is that it only requires 4 simple ingredients to make! Make this syrup in no time!

  • Sugar: This will melt down to create the perfect syrupy texture and counteract overly tart fruit flavors.
  • Cornstarch: Creates thickness for perfectly rich syrup.
  • Lemon Juice: You can use either fresh squeezed or bottled lemon juice.
  • Fresh Blueberries: Fresh blueberries work best to create the perfect flavor and texture, but you can also use frozen blueberries as a substitute!

How to Make Blueberry Syrup from Scratch

The steps for making this syrup are so easy, even the youngest cooks in your house will be able to help! Mix this syrup up in minutes along with this pantry staple pancake mix to pair with for a perfect combination breakfast!

  1. Whisk: In a medium saucepan, add your sugar, cornstarch, water, and lemon juice and whisk together.
  2. Boil: Over medium-high heat, bring the mixture to a boil and add in your blueberries.
  3. Simmer: Simmer for 4-5 minutes until the blueberries burst and the syrup begins to thicken.
  4. Serve: Remove from heat and serve.
Boiling and simmering the blueberry syrup.

The Best Blueberry Syrup Tips

Here are some tips to help you perfect your blueberry syrup! And if you are a big fan of blueberries like me, you have got to try our amazing Blueberry Banana Bread and Blueberry Pie Muffin Bread with Lemon Glaze!

  • Blueberries: Ripe blueberries will be large and plump and slightly gray on the outside. Make sure they are dark blue all around the berry- any signs of red could mean they are not ripe yet and will be too tart.
  • Temperature: Make sure not to cook your mixture on too high of heat. Simmering allows it to keep moisture while creating the perfect syrupy texture.
  • Texture: If you do not want fruit pieces in your syrup, you can use a sieve or strainer to make it thinner.
  • Fruit Substitutions: If you want to make your syrup with bigger fruits like strawberries, crush the fruit or put it through a food processor before adding it to your sugar and water mixture.
Blueberry syrup in a measuring cup.

What to Serve with Homemade Blueberry Syrup

Blueberry Syrup with breakfast foods is a classic. Try serving it over my German pancakes! You can also add it on top of cheesecake and cheesecake bars for some extra decadence. Blueberry Syrup is sooo good for so many different things- in drinks, as a salad dressing, or even to drizzle on mini fruit pizzas! It is a delicious staple that you’re going to LOVE!

Storing Your Homemade Syrup

You can store your Homemade Blueberry Syrup in an airtight container in the refrigerator. It should stay fresh for about one week. You can also freeze your syrup to make it last for months! Allow one inch of space in your container when freezing as the syrup will expand. When you’re ready to use it, let it thaw in the fridge for a few hours before consumption.

  • Refrigerator: Store in the refrigerator for about 7 to 10 days in an airtight container or jar.
  • Freezer: This will freeze for 3 months in an airtight bag or jar. When reheating, slowly warm up, stirring occasionally.
Blueberry syrup being poured over pancakes.
Print

Homemade Blueberry Syrup

Homemade Blueberry Syrup will be the best addition to your breakfast lineup. It is sweet, decadent, and you will want to put it on everything!
Course Breakfast
Cuisine American
Keyword blueberry syrup, homemade blueberry syrup
Prep Time 5 minutes
Cook Time 10 minutes
Total Time 15 minutes
Servings 8 servings
Calories 74kcal
Author Alyssa Rivers

Ingredients

  • 1/2 cup sugar
  • 1 Tablespoon cornstarch
  • 1/2 cup water
  • 1 Tablespoon lemon juice
  • 2 cups fresh blueberries*

Instructions

  • In a medium saucepan add sugar, cornstarch and water and lemon juice and whisk. Bring to a boil over medium high heat and add the blueberries.
  • Simmer from 4-5 minutes until the blueberries burst and it starts to thicken. Remove from heat and serve.

Notes

*Frozen will work too

Nutrition

Calories: 74kcal | Carbohydrates: 19g | Protein: 1g | Fat: 1g | Saturated Fat: 1g | Polyunsaturated Fat: 1g | Monounsaturated Fat: 1g | Sodium: 1mg | Potassium: 31mg | Fiber: 1g | Sugar: 16g | Vitamin A: 20IU | Vitamin C: 4mg | Calcium: 3mg | Iron: 1mg


from The Recipe Critic https://ift.tt/3cytmlb
https://ift.tt/3xcLPvq