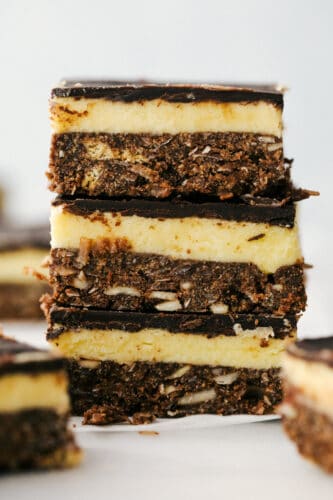
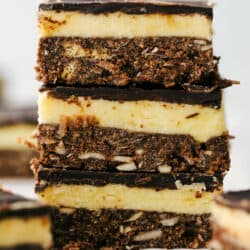
Nanaimo bars are a nutty, decadent dessert made with a graham cracker, coconut, and almond crust. Topped with buttery custard and melted chocolate, this creamy treat is the perfect sweet tooth fix.
Let’s just talk about nutty chocolate bars for a second. They are so hard to resist with how rich, flavorful and ooey-gooey they are! Snickers bars, fantasy fudge, and turtle pecan bars are some of my other favorites sure to be the star of your next party.

Easy Nanaimo Bar Recipe
If you are not familiar with Nanaimo bars, this triple-layer, chocolatey dessert originates from British Columbia, Canada. First appearing in a cookbook in 1952, these bars have now grown to be extremely popular throughout many other countries! This dessert is known by various names- New York slice, London fog bar, and prayer bar to name a few. Honestly, with how insanely good these are, it is no surprise that this Canadian treat has won the hearts of so many. Thinking about the texture of the almond-coconut crust paired with buttery, sweet custard and rich chocolate is enough to get me drooling.
Not only are these super delicious, but easy to make, too! No fancy ingredients are needed here- chocolate, pudding, coconut, almonds, and a couple of other pantry staples are all you need for Nanaimo bars. Then, all you have to do is mix up your crust, add some layers, and voila! An indulgent, delicious treat awaits. These get gobbled up at every family gathering. I have to make sure I grab some for myself before they all disappear. I know my waistline probably hates me, but these bars are so ooey-gooey I can’t resist! With just a few easy steps and ingredients, I know that you, too, will love these tasty treats from BC!
What You Need For Nanaimo Bars Recipe
A lot of these ingredients will probably already be in your pantry, but if not, I promise the grocery store run is worth it to make these bad boys! Nanaimo bars are the ultimate indulgence. You can find exact measurements for each ingredient below.
- Butter: For the crust, I use melted, unsalted butter.
- Granulated Sugar: Adds sweetness to the crust and melts down to help the ingredients meld together.
- Cocoa Powder: Since we are adding sugar separately, I use unsweetened cocoa powder.
- Salt: Added to enhance flavor.
- Egg: The egg in the crust works to bind everything together.
- Graham Cracker Crumbs: This is one of the key flavors of these bars. It adds the best gritty sweetness.
- Shredded Coconut: I use sweetened coconut in this recipe.
- Almonds: For the perfect amount of nuttiness, I use finely chopped almonds.
Vanilla Pudding Filling
- Vanilla Pudding Powder: Pudding is easy to find and tastes delicious, but you can also use Bird’s custard powder for a more traditional filling.
- Powdered Sugar: Powdered sugar will make your custard sweet while also adding a smooth texture.
- Vanilla Extract: I recommend using pure vanilla extract for the best depth of flavor!
- Butter: For the filling, I also use unsalted butter, softened.
- Heavy Whipping Cream: When whipped together, heavy cream will add the most amazing, light and fluffy texture to your custard filling.
Top Layer of Chocolate
- Semi-sweet Chocolate Chips: I like to use semi-sweet chocolate chips to balance out the sweetness of the rest of the bar.
- Unsalted Butter: Butter will be melted down with the chocolate chips to create a rich, tasty top layer.
How to Make The Homemade Nanaimo Bars
Nanaimo bars only require a few steps of melting, mixing, and layering. This is a great recipe for kids to help out with. It is so fun to see the end result come together!
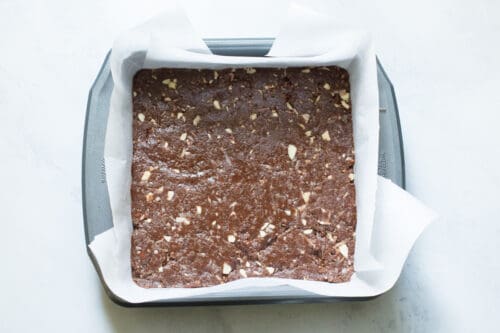
- Prepare Pan: First, line a 9×9 pan with parchment and set aside.
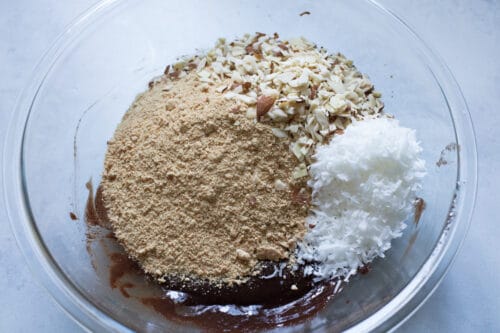
- Make Crust Mixture: In a medium bowl, mix the butter, sugar, cocoa powder, and salt together until combined. Add the egg and mix thoroughly. Mix in the graham cracker crumbs, shredded coconut and almonds.
- Press Into Pan: Press the crust evenly into the prepared pan and put in the fridge to chill for about 10-15 minutes while you prepare the custard filling.
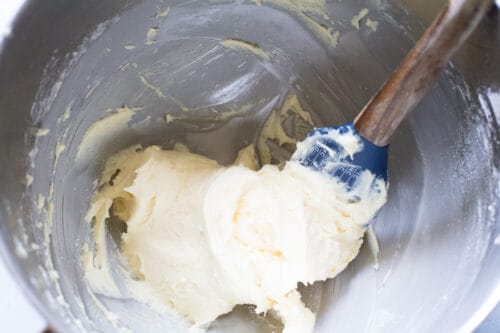
- Make Custard Filling: Next, in the bowl of a mixer combine the pudding powder, powdered sugar, vanilla extract and softened butter. Mix until combined, Add the heavy whipping cream a tbsp at a time until the frosting is fluffy and smooth.
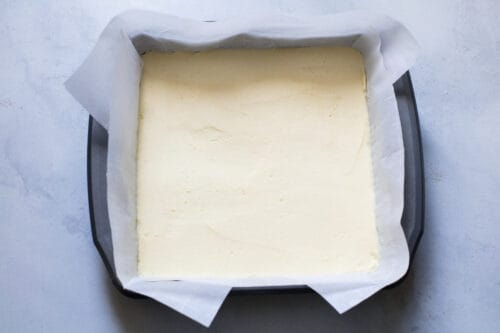
- Add Custard: When the base layer is nice and firm and cool, add the frosting on top and smooth evenly across it and return to the fridge.
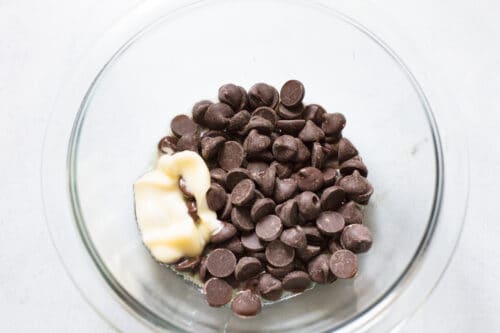
- Melt Chocolate: Put the chocolate and butter in a microwave safe bowl and heat in 30 second intervals until the chocolate is melted and it all mixes together smooth.
- Add Top Layer: Spread the chocolate evenly over the chilled frosting layer. Chill in the fridge for at least 4 hours.
- Serve: Remove from the pan and use a very sharp knife to cut into bars.

The Best Nanaimo Bars Tips
A few simple tips and tricks can ensure you create the most delicious, chocolatey squares possible. Perfecting Nanaimo bars will keep everyone coming back for more!
- Adding Egg: Don’t add your egg to a hot pan too quickly or it will curdle. Mix your egg and chocolate together slowly and whisk constantly.
- Cutting Your Bars: It is easier to cut through your chocolate top layer at room temperature. Using a sharp knife, score only the tops of your bars, when your chocolate is almost hardened but still maluable. Then, return them to the fridge to finish chilling. Once your bars have chilled completely, you will not only know where to cut your bars but also not crack your chocolate in the cutting process!
- Using a Food Processor for Your Crust: If you find it hard to pack down a crust with big pieces of almonds and graham crackers, you can first blend them together in a food processor. This way, you get smaller pieces and ultimately a denser crust.
- Nut Substitutes: Instead of almonds, you can substitute for pecans or the traditional walnut.
- Fruit Garnish: For a pop of beautiful ruby color and a slight fruity flavor, garnish your Nanaimo bars with cranberry or raspberry.
Storing Your Leftover Dessert Bars
Since they are best served cold, these tasty little bars are great for storing and eating later! Seeing them in my fridge when I’m craving something sweet has been a miracle, honestly.
- In the Refrigerator: Nanaimo bars will keep in an airtight container for up to 4 days. Serve straight from the fridge.
- In the Freezer: You can also keep your Nanaimo bars in the freezer for 2-3 months in an airtight container. Simply thaw in the fridge before consumption.

More Tasty No-Bake Treats
Desserts
No-Bake Chocolate Eclair Dessert

Desserts
Lemon Icebox Cake
American
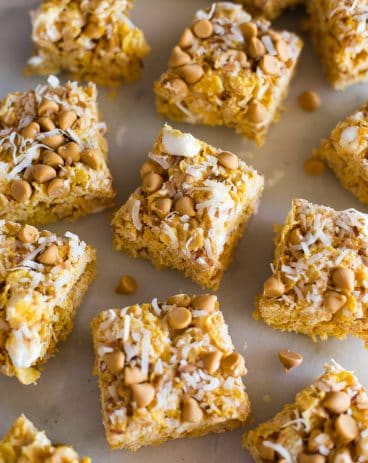
No Bake Butterscotch Bars
Desserts
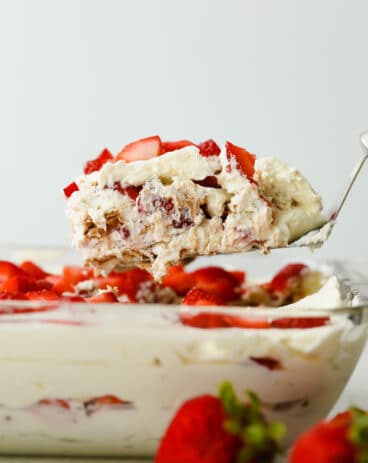
Strawberry Icebox Cake
Nanaimo Bars
Ingredients
Crust
- 1/2 cup unsalted butter melted
- ½ cup granulated sugar
- 6 Tablespoon unsweetened cocoa powder
- ¼ teaspoon salt
- 1 large egg
- 2 cups graham cracker crumbs
- 1 cup sweetened shredded coconut
- ½ cup almonds finely chopped
Filling
- 3 Tablespoon vanilla pudding powder or Bird’s custard powder, for a more traditional filling
- 2 cups powdered sugar
- 1/2 teaspoon vanilla extract
- ½ cup unsalted butter softened
- 2-3 Tablespoon heavy whipping cream
Top Layer
- 5 ounces semi sweet chocolate chips
- 2 Tablespoon unsalted butter
Instructions
-
Line a 9×9 pan with parchment and set it aside.
-
In a medium bowl, mix the butter, sugar, cocoa powder, and salt together until fully combined. Add the egg and mix thoroughly. Mix in the graham cracker crumbs, shredded coconut, and almonds.
-
Press the crust evenly into the prepared pan and put it in the fridge to chill for about 10-15 minutes while you prepare the custard filling.
-
In the bowl of a mixer, combine the pudding powder, powdered sugar, vanilla extract, and softened butter. Mix until combined, Add the heavy whipping cream a tbsp at a time until the frosting is fluffy and smooth.
-
Once the base layer is nice and firm and cool to the touch, add the frosting on top and smooth evenly across it and return to the fridge.
-
Put the chocolate and butter in a microwave-safe bowl and heat in 30-second intervals until the chocolate is melted and it all mixes together smooth. Spread the chocolate evenly over the chilled frosting layer. Chill in the fridge for at least 4 hours.
-
Remove from the pan and use a very sharp knife to cut into bars.
Nutrition
from The Recipe Critic https://ift.tt/3jvzKfw
https://ift.tt/3yz3L4M