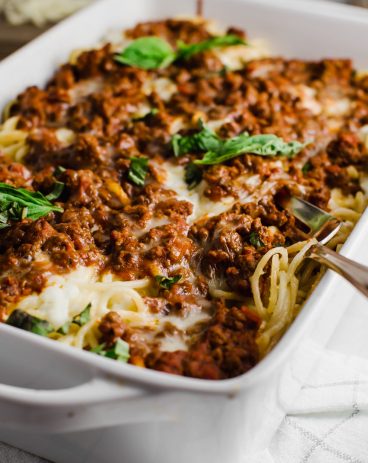
This tasty baked dish is super easy, cheesy, and flavorful! For adding a little Italian goodness to busy weeknights, spaghetti pie is the answer!
Deep-dish pasta dishes are some of my absolute favorites. You have got to try my baked manicotti, chicken spaghetti, and chicken parmesan casserole! They have the BEST texture and so much ooey-gooey cheese!

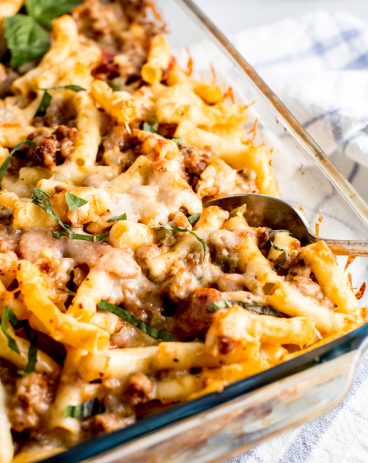
Cheesy Baked Spaghetti Pie Recipe
If you are anything like me, when you make spaghetti, you make enough to feed an army. No matter how I measure out my spaghetti, this always seems to be the case! So, when I’m left with tons of leftover noodles, I’m always on the hunt for ways to utilize them! Here’s the solution. Spaghetti pie! This incredible recipe has all of the things you love about traditional spaghetti; the sauce, the meat, the cheese, and of course, noodles! It’s just in casserole form. This particular recipe uses a pie dish for baking, hence the name spaghetti pie. It makes it easy to cut into pieces once it’s done! It’s the perfect way to use up leftover pasta and create a dinner your family will obsess over.
Even though making spaghetti pie is super simple, the flavor is anything but! The “crust” is spaghetti noodles mixed with butter, eggs, and parmesan. When baked, it creates the most AMAZING texture and buttery flavor! Then, we add layers of meat, homemade marinara, fresh herbs, and all the cheese on top. I love watching this bad boy cook. The cheese gets so bubbly and turns to an amazing golden brown. It honestly looks as good as it tastes. My family goes crazy whenever I tell them that I’m making spaghetti pie for dinner! I pair it with some Olive Garden copycat breadsticks and everything gets devoured at the speed of light. I mean, what’s better than a cheesy pasta bake in one convenient pie-shaped slice?
Ingredients Needed for Spaghetti Pie
I love that this recipe utilizes so many leftover and pantry-staple ingredients. It makes it even easier to throw together! For a full list of ingredients and measurements, check out the recipe card at the end of the post!
Crust
- Spaghetti Noodles: You can either make your spaghetti fresh or use leftovers! Also, feel free to experiment with other noodles like angel hair and bucatini.
- Butter: I use salted butter here. It’s going to help enhance the flavor of the “crust” and add richness!
- Egg: The egg is super important. It’s what will bind all the crust ingredients together and help it hold its shape.
- Parmesan Cheese: Grated parmesan adds an amazing flavor and texture to the spaghetti pie crust. You can’t go wrong with cheese!
Cheese Layer
- Ricotta Cheese: Creamy and sweet, ricotta is perfect for balancing savory flavors in this dish.
- Italian Seasoning: This seasoning is the secret weapon for all things Italian. It’s super easy to make at home! And, you can customize your own blend to your liking!
Meat Layer
- Lean Ground Beef: Beef crumbles make this recipe deliciously hearty. This is another great place to use leftovers!
- Marinara Sauce: You can use your favorite brand here, but I always like to make marinara sauce at home because the flavor is much more fresh.
Topping
- Mozzarella Cheese: Shredded mozzarella is the perfect topping for that cheesy effect. It gets so stretchy and melty when baked and is absolutely scrumptious!
- Basil: Topping your bake with fresh basil will give you the best, aromatic flavor.

How to Make Spaghetti Pie
Spaghetti pie is perfect for all of you busy moms out there. Not only does it use a lot of leftovers, but it’s quick to make, too! Only a few minutes of prep, and then it’s hands-off for 20 minutes in the oven! You can use that time to whip up some easy bread twists or even a side salad!
For the Crust
- Preheat Oven and Prep Dish: First, preheat oven to 350 degrees Fahrenheit. Spray a 9 inch pie dish with cooking spray and set aside.
- Cook Pasta: Next, cook the pasta according to package directions and drain.
- Toss with Butter, Egg, and Cheese: Toss with the butter until melted. Add in the egg and parmesan cheese and stir until combined.
- Press Into Dish: Finally, press into the bottom and sides of your pie dish. It’s ready for the next layer!
To Make the Cheese Layer
- Mix Cheese and Seasoning Together: Combine the ricotta cheese and the italian seasoning. Then, spread on top of the pasta.
For the Meat Layer
- Prepare Meat, Add Sauce: In a medium sized skillet over medium-high heat, add the ground beef and cook until no longer pink. Add in the marinara sauce. Spread on top of the cheese layer.
- Bake and Serve: Top with shredded cheese and bake for 20-25 minutes or until golden and bubbly. Serve with chopped basil if desired.

The Best Spaghetti Pie Tips and Tricks
This dinner is as easy as it gets. It is full of meat, cheese, and tasty baked noodles! The end result is going to be one you won’t forget! To make sure your spaghetti pie reaches peak deliciousness, use these simple tips and tricks!
- Don’t Skip the Egg: Using an egg in your crust is super important. Without it, your “pie” won’t hold its shape and it will be a mess when you try to dish up.
- Meat Alternatives: Feel free to swap out your ground beef with turkey or chicken for a lighter version of this dish.
- Additional Fillings: You can add other vegetables and flavors to your spaghetti pie to your liking! Chopped onions, garlic, and peppers are just a few tasty suggestions.
- Serve With: I like serving my spaghetti pie up with breadsticks, bread twists, or garlic knots as a classic side. For a complete Italian-inspired meal, you can also serve it with some chicken gnocchi soup and a green salad with homemade dressing! You and your family will love it!
Storing Leftover Baked Spaghetti Pie
Spaghetti pie makes a great leftover meal and tastes as good as when it was made fresh!
- In the Refrigerator: Wrap your spaghetti pie with plastic wrap before storing. It will keep for 2-3 days.
- In the Freezer: Prepared spaghetti pie can be stored in the freezer for up to 3 months wrapped in either tin foil or plastic wrap. Let thaw in the fridge overnight before reheating.
- To Reheat: Pop your spaghetti pie in the oven at 350 degrees Fahrenheit. Cook for 15-20 minutes or until warmed through.

More Delicious Baked Pasta Dishes


Spaghetti Pie
Ingredients
Crust:
- 6 ounce spaghetti noodles
- 2 tablespoons butter
- 1 large egg
- 1/4 cup grated parmesan cheese
Cheese Layer:
- 6 ounce ricotta cheese
- 1 teaspoon Italian seasoning
Meat Layer:
- 1/2 pound lean ground beef
- 24 ounce jar marinara sauce or homemade marinara
Topping:
- 2 cups shredded mozzarella cheese
- fresh chopped basil
Instructions
To make the crust:
-
Preheat oven to 350 degrees. Spray a 9-inch pie dish with cooking spray and set aside. Cook the pasta according to package directions and drain. Toss with the butter until melted. Add in the egg and parmesan cheese and stir until combined. Press into the bottom and sides of your pie dish.
To make the cheese layer:
-
Combine the ricotta cheese and the Italian seasoning. Spread on top of the pasta.
To make the meat layer:
-
In a medium-sized skillet over medium-high heat add the ground beef and cook and crumble until no longer pink. Add in the marinara sauce. Spread on top of the cheese layer.
-
Top with shredded cheese and bake for 20-25 minutes or until golden and bubbly. Serve with chopped basil if desired.
Nutrition
from The Recipe Critic https://ift.tt/3zsB09p
https://ift.tt/3AvEnxt