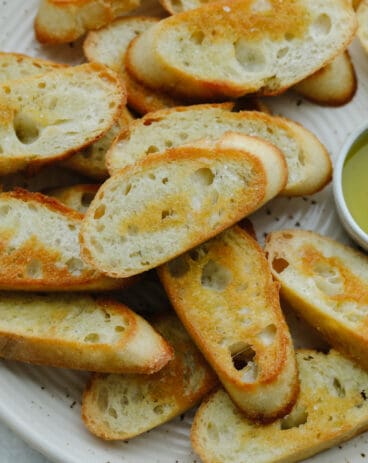
This olive oil bread dip is the absolute perfect appetizer! It has just the right blend of spices that taste SOO GOOD! It will definitely get a “WOW!” from all of your guests!
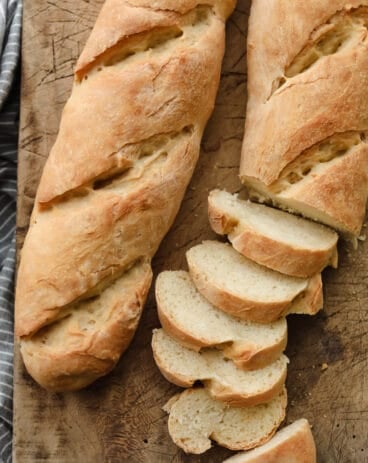
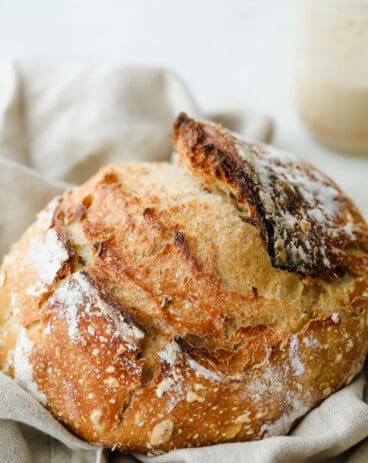
I love an easy dish that is made to impress! If you want to get the most out of this dip then try it with this crostini, this french baguette, or this Sourdough Bread!
The BEST Olive Oil Dip!
I love nothing better than being served olive oil dip with bread as I am ordering from a menu in a restaurant! I mean, the taste is perfect! It gets me in the mood for all of the delicious and savory things that I am about to eat. So, imagine how happy I was to be able to make this recipe in my own home! I could now have that luxury just about whenever I wanted. And that is exactly what I do!
This olive oil bread dip is SO easy to make. We are talking 5 minutes from start to finish and you are done. Which makes this perfect for a party because if you run out, you can make a fresh batch for everyone right then and there! You can also change it up but switching out which bread you serve with it! Or, you can do what I do and create a few platters with different dips and crackers and bread! Why limit myself to only one? Try making this Super Easy Beer Cheese Dip, 5 Minute Million Dollar Dip, and this Easy Crockpot Buffalo Chicken Dip!
Ingredients for Olive Oil Bread Dip
This dip only uses 7 ingredients and you probably already have all of them in your pantry! See the recipe card below for a list of exact ingredient measurements.
Olive oil: Olive oil is a must when you are making olive oil bread dip!
Garlic cloves: If you don’t have fresh garlic cloves then you can go ahead and use the minced garlic that you have in your fridge. ½ tsp equals about 1 clove of garlic!
Italian seasoning: I like that this is already a mixture of delicious flavors. If you want to take this up a notch then try making thing Homemade Italian Seasoning to put into this dip!
Parsley: You can use fresh or dried parsley flakes!
Crushed red pepper: Add more if you want this to take on a little bit of heat!
Salt and pepper: Put these in as you go and stop when you like the taste!
Let’s Make Some Dip!
Combine: In a small bowl add olive oil, garlic, Italian seasoning, parsley, and crushed pepper. Mix until combined and salt and pepper to taste.
Olive Oil Tips
This olive oil bread dip is SOO GOOD. If you want it to turn out perfectly then follow these tips and tricks! They are super easy!
How to store olive oil: olive oil is perishable and so you want to be careful about where you store it. Make sure that you put it in a cool, dark place. Once you’ve opened your bottle, it will last andout 1-2 months. So write the date on it and get a new one if you need to! Fresh olive oil tastes SO much better in any dish!
Fresh or dried herbs? You can use either in this recipe! If you have a lot of spices at your housee already, then this dip is extra easy to whip up in a flash. In fact, try making this Homemade Italian Seasoning ahead of time and you will always be ready to make this appetizer!
To make it kid-friendly: Go ahead and leave out the red pepper flakes and use rosemary or thyme instead. This takes out any heat and just adds a bit of extra flavor!
How to Store Leftovers
This olive oil bread dip is so easy to make! So if you don’t have leftovers, you can just whip some more up anytime. But if you do have some, here’s how you can store it for later!
Refrigerate it: Store your leftover dip in an airtight container and put it in the fridge. It can last up to a week! Once you are ready to eat it again, you can let it sit for a few minutes to come to room temperature before serving.
Breads Used for Dips
I love a good homemade bread that I can dip! There are so many options that have different flavors, textures and tastes! This is fantastic because then I can switch things up so easily! DOn’t forget to let you bread soak in the dip fo a few seconds so that it cal soak in ALL the flavor! Go ahead and try all of these with this dip, you will go crazy over them!
This olive oil bread dip is the absolute perfect appetizer! It has just the right blend of spices that taste SOO GOOD! It will definitely get a "WOW!" from all of your guests!
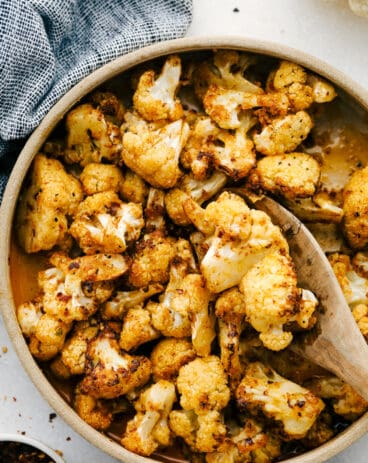
Making roasted cauliflower steaks is the best way to show all this veggie has to offer! They’re amazingly tender and tossed in a mouthwatering blend of garlic, paprika, and parmesan.
Using cauliflower is a great way to make all of your favorite recipes low-carb! You’ll have to try tots, parmesan roasted cauliflower, and mac and cheese! They’re all so incredibly good, you’ll be hooked!
Oven-Roasted Garlic Cauliflower Recipe
If you aren’t already on the cauliflower train, it’s time to get on. This is an incredibly versatile vegetable and can mimic the flavor and texture of tons of different dishes! You can find my master list here, but some of my all-time favorite recipes are “buffalo wing” cauliflower, cauliflower fritters, and Wisconsin cauliflower soup. I’m super excited to add a new cauliflower recipe to the lineup today! These “steaks” are thick cuts of cauliflower drizzled in olive oil and then coated in garlic, paprika, and parmesan cheese. All you’ve got to do is roast them for 20 minutes in the oven! They turn out warm, tender, and flavorful every time. A tasty side in a pinch! Perfect for you busy moms out there.
Cauliflower is great because it has a very mild flavor when cooked. It’s one of the few vegetables that my kids will actually eat! Sometimes I’ll throw it into a casserole or fried rice and they don’t even notice. These cauliflower steaks are no different! My family loves how soft and flavorful they are. I know yours will, too! I even caught my youngest licking her plate after she finished. That’s the sign of a successful dinner in my book! You can’t go wrong with parmesan, garlic, and paprika! The flavor of these cauliflower steaks is absolutely drool-worthy. Let’s make some!
Ingredients for Roasted Cauliflower Steaks
Only 6 ingredients for an amazing side that is sooo good, you’ll forget it’s healthy! Cauliflower steaks are super simple but have the most amazing flavor. If you’re looking for individual measurements, you can find them in the recipe card below!
Cauliflower: Our MVP! Because we’re making “steaks” here, you’ll want your cauliflower heads on the larger side.
Olive Oil: Used to drizzle across your steaks. If you want the best flavor, try using extra-virgin olive oil!
Paprika: Adds a mild, sweet spice.
Garlic: Garlic is a must! It makes your cauliflower steaks nice and savory. They smell absolutely divine when they’re cooking, too!
Salt and Pepper: Sprinkle salt and pepper on to enhance your flavors!
Parmesan: Parmesan makes everything better! I love the subtle cheesiness it adds to the flavor of the cauliflower.
Making Roasted Cauliflower Steaks
This is one of the easiest sides to whip up. It only takes a few minutes but will bring your whole meal together, trust me! The flavor and texture of cauliflower steaks are to die for!
Preheat Oven, Prep Caulifower: To start, preheat the oven to 400 degrees. Then, prepare the cauliflower by washing it and trimming the leaves and bottom of the core.
Slice: Next, slice the cauliflower into ¾ inch slices. The outer cauliflower will fall off. You can roast them on the edges of the cauliflower steaks.
Drizzle with Oil: Lay the cauliflower steaks into a single layer on a baking sheet. Drizzle the olive oil on top.
Mix Topping: Next up, combine the paprika, garlic, salt, pepper, and parmesan. Sprinkle evenly on each side of the cauliflower.
Roast and Serve: Roast the cauliflower for 10 minutes and flip. Roast for an additional 10 minutes or until they tender and brown. Enjoy!
Roasted Cauliflower Tips and Tricks
Everything from picking your cauliflower to adding additional flavors, I’ve compiled some of my favorite tips and tricks here! Just like it has for me, I’m sure cauliflower steaks will become a new favorite for you! They’re an awesome side!
Picking Cauliflower: Look for large, densely-packed heads of cauliflower. Make sure they are a bright white color and free of any blemishes or brown spots!
Allow Air to Flow: Don’t overcrowd your pan when roasting your cauliflower. They need plenty of space and airflow to become as tasty and caramelized as possible!
Don’t Forget to Flip: Be sure to flip your cauliflower steaks halfway through the baking time. This will make each side tender and perfectly golden brown!
Crispy Cauliflower: If you want your cauliflower to have a crispy outer layer, simply toss them in some cornflour before baking!
Adding Flavors: While I love the taste that paprika and garlic create, if you want something a little more toned down, these are amazing with a splash of olive oil and Italian seasoning! It’s a fresh, aromatic twist on the recipe. And if you’re wanting a little more heat, try adding a pinch of cayenne!
What to Serve With Cauliflower Steaks
Roasted cauliflower goes with just about anything. They’re a classic side for things like chicken and steak, but have a lot of other amazing pairings, too! I like throwing them into curry, or adding to salads and rice bowls. It’s a great low-carb way to add flavor to whatever you’re making!
If you don’t end up finishing this tasty side, it can be stored and enjoyed later! Here’s how to keep it as fresh and delicious as possible.
In the Refrigerator: You can store your leftover cauliflower steaks in an airtight container for up to 5 days.
Reheating: Since cauliflower has a high water content, I prefer reheating it in the oven. I have found that reheating it in the microwave can sometimes make it soggy. To reheat, place your cauliflower on a baking sheet in the oven at 350 degrees Fahrenheit until warmed through. Be sure not to let your cauliflower burn, as this makes the veggie quite bitter.
More Quick and Easy Cauliflower Recipes
Cauliflower is the chameleon of the veggie world. You can use it for anything and it tastes absolutely incredible! Here are some of my other favorite cauliflower recipes that are super simple to make. Quick and easy, diet-friendly, and delicious, you’re going to love what they have to offer!
Making roasted cauliflower steaks is the best way to show all this veggie has to offer! They're amazingly tender and tossed in a mouthwatering blend of garlic, paprika, and parmesan.
Oven-baked herb turkey is perfectly juicy and tender! It’s stuffed with slices of citrus, a crisp apple, and fresh herbs then baked until it’s a toasty golden brown. It’s mouthwatering and delicious!
Thanksgiving would not be the same without a beautiful turkey on your dinner table. This turkey recipe is the BEST. Your guests will not be disappointed! It will have everyone raving about your beautiful, golden-brown turkey. Dinner for Thanksgiving does take time and needs a lot of care and preparation before baking. But this recipe is super straightforward and anyone can make it! You will have the perfect turkey to serve this Thanksgiving.
The turkey is the most important part of Thanksgiving and what everyone is looking forward to. These step-by-step instructions will help make your Thanksgiving the best it has ever been! And when you’re done with the turkey then these sides of Sweet Potatoes and Mashed Potatoes, brown butter carrots, and Green Bean Casserole go fantastic with any Thanksgiving dinner!
How to Thaw and Prep a Turkey
It is best to start off with a completely thawed turkey. This can take 3 to 7 days depending on how frozen and how large your turkey is so you definitely need to be thinking ahead. You thaw a turkey by placing it into the refrigerator in a large pan or baking sheet. And then you just leave it there until it’s no longer frozen! Once your turkey is thawed and you are ready to bake your turkey here are a few steps to prepare your turkey for the oven:
Remove from fridge: Remove your turkey from the refrigerator for about 30 minutes prior to preparing. This will help it to bake more evenly.
Dry: Pat turkey completely dry, soaking up any excess water with paper towels.
Remove giblets: In the turkey cavity you will want to remove the neck and giblet bag.
Tie it up: With kitchen twine or string, tie the legs together.
Fold under the wings: Take the turkey wings and fold the end of them under your bird. This will prevent them from burning and drying out.
Brine the Turkey First!
Brining a turkey means that you soak it in a water and salt solution (a brine). If you brine your oven-baked herb turkey then it will help to keep the meat moist and it adds even more flavoring to the meat!
Create a water bath for your turkey with a salt and water solution. Then, you add in herbs and citrus flavors. Use this Turkey Brine Recipe for the best results!
Ingredients for Oven Baked Herb Turkey
Turkey is the most important part of a traditional Thanksgiving meal. Having just the right ingredients will tenderize, add flavor and create a perfectly golden turkey for your Thanksgiving! See the recipe card below for a list of exact ingredient measurements.
Turkey: 12 to 20 pounds
Stuffing ingredients:
Combine these stuffing ingredients for a sweet, rich, and tender turkey.
Onion: adds a bitter but sweet flavoring.
Garlic: has a mellow, sweet and spicy taste.
Rosemary sprigs: a lemon-pine flavoring with a peppery ending.
Apple: crisp and cut into quarters.
Lemon: sweet and sour lemon quartered for more flavoring.
Thyme sprigs: a powerful herb that is pungent and slightly bitter.
Herb butter:
Baste and coat your turkey with this buttery herbed mixture for a crispier outside and tender inside.
Butter: helps make everything tender and rich in flavor.
Garlic: minced and added into the mixture.
Thyme: fresh and finely chopped.
Oregano: finely chopped and adds a strong aromatic taste.
Rosemary: fresh and finely chopped.
Salt and pepper: just a pinch!
How to Make Oven Baked Herb Turkey
This oven-baked herb turkey is golden brown, tender and juicy! It’s the absolute perfect turkey recipe that will make you wish that Thanksgiving came around more often!
Prepare turkey: Preheat the oven to 325 degrees. To prepare the turkey, remove the neck and giblets. Tuck the wings underneath the turkey.
Stuff your turkey: Stuff the turkey with the onion, garlic, rosemary, apple, lemon and thyme. Tie the feet together with twine.
Combine the herb butter mixture: In a small bowl combine the butter, garlic, thyme, oregano, rosemary and salt and pepper. Rub evenly over the turkey and underneath the skin.
Bake turkey in roasting pan: Place the turkey in a roasting pan and cook for 15 minutes for each pound or until the internal temperature reaches 165 degrees and the juices run clear. Let the turkey rest for 20 minutes before carving.
Make turkey gravy: Save the drippings for the turkey and make this Turkey Gravy if desired.
How Long to Cook Your Oven Baked Herb Turkey
The last thing that you want to do is to overcook (or undercook) a turkey! So it’s important that you know a few things about your bird first!
Turkey size: Know how big your turkey is. You will cook it for about 13-15 minutes per pound!
Leave in meat thermometer: Use a meat thermometer! A leave in oven safe meat thermometer is a great way to continually check on the turkey. Place it in the thickest part of your turkey for the most accurate temperature reading. If you use a thermometer like this then you don’t have to keep opening your oven door towards the end. This will help keep the heat in and your turkey cooking!
Cooking temp: Once your turkey has reached 165 degrees then take it out and let it reset. This is when you don’t cut into it and just let the juices keep smoking into your meat! This part is SO important!
Brined turkey: A brined turkey will cook faster so keep a close eye on your turkey.
Don’t eat pink: If your turkey is pink AT ALL then it isn’t done.
Tips for Cooking a Turkey
This tried and true oven-baked herb turkey recipe is just what you need for this year’s Thanksgiving dinner. It roasts your turkey to a crisp, golden brown outside and tender, juicy meat on the inside.
Turkey size: You don’t want to run out of turkey! A good rule of thumb is to plan for a pound of turkey per person.
Don’t forget to thaw it!: Thaw your turkey days ahead of time to make sure it is completely thawed.
Use chicken stock: Adding 1 to 2 cups of chicken stock to the bottom of the roasting pan will keep the turkey from drying out. It also helps when making your turkey gravy at the end. If you are planning to brine your turkey then skip this tip.
Use foil: If you notice your turkey is getting dark on top but your meat is not cooked through then simply add a piece of foil over top while it finishes roasting.
How to Carve a Turkey
Looking at the turkey and knowing where to carve the turkey is sometimes overwhelming. Carving a turkey is just a large bird and will still taste delicious no matter how you slice it! Here are some tips on where to start! Make sure your knife is sharp and you have a fork to help hold your turkey and plate in place while carving.
Wings: Remove the turkey wings first.
Thighs: Thighs will go next, cutting through the joints.
Breast: Slice close to the rib cage carving the breast meat into individual slices.
Excess meat: Move your knife to the flat side, carve right up against the rib bones.
Separate: Now that the meat is off, separate the dark meat (thighs and drumsticks) from the white meat.
Plate: Plate everything all together for more option choices at the dinner table.
How to Store Leftovers
Leftover oven-baked herb turkey makes the BEST leftovers! There are so many things that you can do with it! I love to make Leftover Turkey Casserole to use up the rest of the Thanksgiving dinner. Here is how you can store extra turkey to save for later!
Refrigerate: Wait until your turkey has cooled. Then, place it in an airtight container and put it in your fridge, It can last there for 3 to 5 days.
Freezer: After your turkey has cooled down then place it in a freezer bag. Lay your turkey flat in the bag and then zip or suction out all the air in the bag. Label your bag with the date and then you can keep it frozen for up to 1 month in the freezer. When ready to reheat, place in the refrigerator over night to thaw.
Reheating: To reheat in the oven then place in a baking dish at 350 degrees for 12 to 15 minutes or until warm. When reheating in a microwave, heat 1 to 2 minutes at a time until warm. Try not to over heat. This will leave your leftover turkey dry and hard.
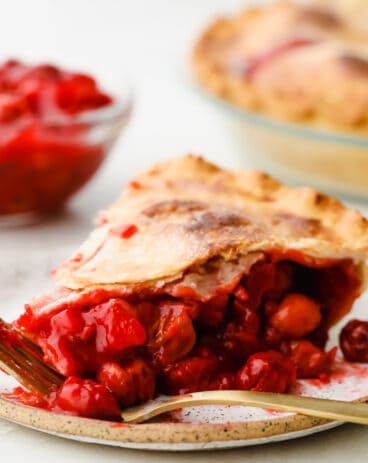
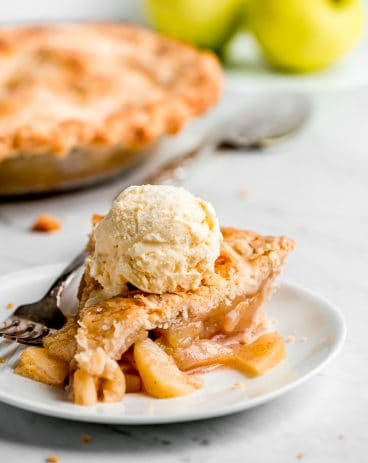
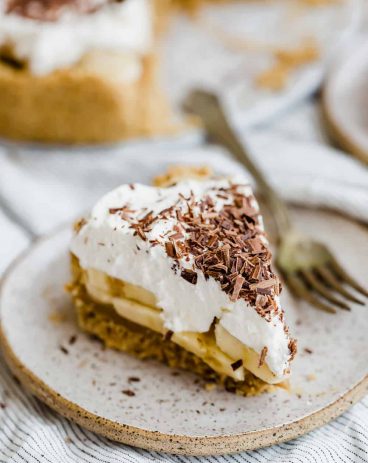
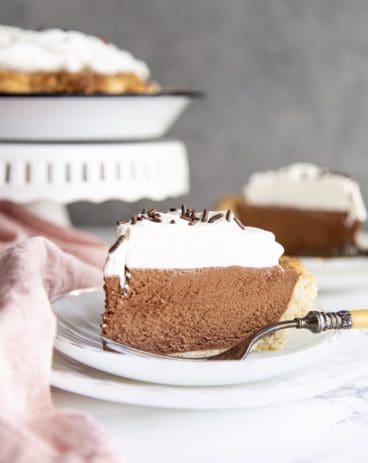
Pie Recipes for Dessert
Thanksgiving dinner is just not complete without some pies! And the greatest thing about pies is there are SO MANY flavors to choose from! I have rounded up a few of my favorite tried and true pie recipes that everyone loves. Pick one, or make them all! You can’t go wrong!
Oven baked herb turkey is perfectly juicy and tender! It's stuffed with slices of citrus, a crisp apple and fresh herbs then baked until it's a toasty golden brown. It's mouthwatering and delicious!
CourseDinner, Main Course
CuisineAmerican
Keywordbaked turkey, turkey
Prep Time20minutes
Cook Time4hours
Total Time4hours20minutes
Servings15people
Calories517kcal
AuthorAlyssa Rivers
Ingredients
1 12-20poundturkeythawed
Stuffing Ingredients
1mediumonionquartered
3clovesgarlic
2sprigsrosemary
1largeapplequartered
1mediumlemonsliced
2sprigsthyme
Herb Butter
1cupbutter softened
3clovesgarlic minced
1Tablespoonthyme finely chopped
1Tablespoonoregano finely chopped
1Tablespoonrosemary finely chopped
1teaspoonsalt
1/2teaspoonpepper
Instructions
Preheat the oven to 325 degrees. To prepare the turkey, remove the neck and giblets. Tuck the wings underneath the turkey. Stuff the turkey with onion, garlic, rosemary, apple, lemon, and thyme. Tie the feet together with twine.
In a small bowl combine the butter, garlic, thyme, oregano, rosemary, and salt and pepper. Rub evenly over the turkey and underneath the skin.
Place the turkey in a roasting pan and cook for 15 minutes for each pound or until the internal temperature reaches 165 degrees and the juices run clear. Let the turkey rest for 20 minutes before carving.
Save the drippings for the turkey and make this turkey gravy if desired.
Notes
Updated on November 9, 2021Originally Posted on October 20, 2019