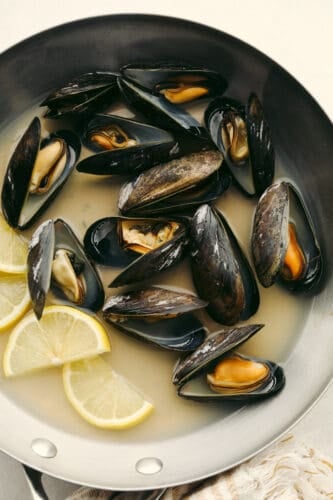
These steamed mussels are easy, elegant, and delicious! They are perfect for any dinner party and you won’t be able to stop after just one!
I love a recipe that I can surprise my guests with! These mussels do exactly that. If you are wondering what other sides to serve with this then try this Garlic Bread, these Potato Wedges or a toasted French Baguette!

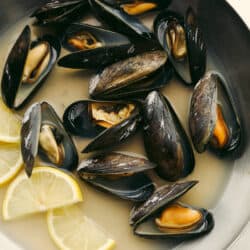
Steamed Mussels
If you are wondering what mussels are and what they taste like then I am here to tell you! Mussels are similar to clams and oysters in texture and taste. They look fancy but they are actually one of the easiest seafood to prepare! The outside is typically a dark black or blue color and the inside is cream or pink. They have something called a “beard” on the outside that is a stringy tag that you need to pull of before cooking!
Now that you know what a mussel is, the fun part is finding out what it tastes like! They have a texture that is sort of like a mushroom. It’s firm but soft at the same time. It doesn’t taste fishy at all, it just has a hint of a salty taste. The texture should never be rubbery… This means that they have been overcooked! Because the flavor of a mussel by itself is light, then they take on the taste of whatever flavor you are cooking them in! These mussels are SOO GOOD. You really just need to try them and find out! Pair them with a Crostini, Grilled Asparagus, and some Pesto Pasta and you have yourself a delicious meal!
What You Need to Make Mussels
You only need a couple of ingredients to make these steamed mussels! See the recipe card below for a list of exact ingredient measurements.
- Mussels: The key to this recipe! I have posted some tips below on how to pick them out at the store.
- Chicken broth: I used chicken broth instead of water so that these took on more of a flavor when steaming!
- White wine: The alcohol will cook out but this adds a delicious flavor to the recipe!

Let’s Steam Those Mussels!
Now that you know all about mussels, it’s time to make them! These will only take you about 20 minutes and then you will know why these are so hard to resist!
Prepare the Mussels
- Clean and debeard: Right before you cook them then rinse them in cold water. If the shell is open, tap on the shell to close before steaming. Check to see if they need to be debeard. This looks like a little tag on the side of the shell. Firmly tug the beard out.
Add the broth and wine to a saucepan:
- Cook: Cook in a medium sized sauce pan and then add the chicken broth and white wine. Bring to a simmer and let the alcohol cook out.
Add the Mussels
- Add mussels: Add them to the boiling water and cover to let steam. Cook for 5 minutes and then remove the lid and check to see if they have opened. If they have not yet opened add the lid back and cook for another minute. Discard the mussels with the shells that have not opened by now.
- Serve: Serve them as desired.

How to Pick Mussels
It’s important to know what to look for when buying mussels. This will make or break your recipe. Here are some tips to make this part of the process easier!
- Where do I find mussels? You should be able to find them at the seafood counter of your local grocery store!
- How many should I get? This depends on if you are serving this as a main course, side dish or an appetizer. For a main dish, the suggested amount is 1 pound per person!
- How to pick which ones to buy? You should look for farm-raised mussels. These kind are always a good choice because the quality is better.
- Buy extra: When you are buying mussels, there will always be some that are cracked or dead. So buy a few extra so that you don’t have to worry!

How to Store Mussels Until You Cook Them
Did you know that mussels are alive when you buy them? This means that you need to have a plan on what to do with them between then and when you plan on cooking them! Dead mussels will make you sick so follow these tips… They are important!
- In the fridge: Your mussels will come in a netted bag. Keep them in this until you plan on cooking them.
- Keep them cold and wet: You can wrap a wet paper towel around the bag to keep them wet while in your fridge. This is key!
- DON’T store them in water or a sealed bag: Because they are alive, they need to breathe!
- How long can I store them for? You can store your mussels this way for 24 hours or less. The more fresh they are, the better when it comes to eating them!

How to Clean Them
Anytime that you are working with seafood, it’s important to know how to safely clean it! Here are some tips on how to clean your mussels.
- Don’t soak them: You just want to give them a nice rinse with cold water. No soaking necessary.
- Scrub: If your mussel has dirt on it, scrub the shells with a brush or use your fingernails to remove any dirt.
- Debeard: If your mussels have stringy tags attached to the outside of the shell, pull that off before you cook them. To remove it, pull it towards the hinge of the shell. ONLY DEBEARD WHEN YOU ARE READY TO COOK. Removing the beard will cause the mussel to only have a few minutes left to live. Only do this when you are ready to cook them immedietely!

How to Store Leftovers
The steamed mussels taste delicious for leftovers. Here is how you can safely store them to eat later!
- Refrigerator: Once they have cooled, place the mussels in an airtight container in the fridge. They will last for 3-4 days!
- Freezer: If you want to freeze your steamed mussels, you need to wait for them to cool. Then, put them in an airtight container or freezer bag. (Make sure to label it with the date!) They will last for 2-3 months in your freezer.
- Reheating: If they are frozen, thaw them in the fridge overnight. Once thawed, place your mussels in the microwave and cover them. Cook for about 30 seconds or until heated through. Enjoy!

More Shellfish Recipes to Try!

How to Cook Steamed Mussels
Ingredients
- 3-4 pounds mussels or desired amount
- 2 cups chicken broth
- 1/4 cup white wine
Instructions
Prepare the Mussels:
-
Right before you cook the mussels. Rinse them in cold water. If the shell is open, tap on the shell to close before steaming. Check to see if the mussels need to be debeard. This looks like a little tag on the side of the shell. Firmly tug the beard out.
Add the broth and wine to a saucepan:
-
In a medium-sized saucepan add the chicken broth and white wine. Bring to a simmer and let the alcohol cook out.
Add the mussels:
-
Add the mussels to the boiling water and cover to let steam. Cook for 5 minutes. Remove the lid and check to see if the mussels have opened. If they have not yet opened add the lid back and cook for another minute. Discard the mussels with the shells that have not opened by now.
-
Serve the mussels as desired.
Nutrition
from The Recipe Critic https://ift.tt/3wH4fpf
https://ift.tt/3DgPtb4