सोमवार, 22 नवंबर 2021

Turkey Cupcakes

These turkey cupcakes are cute, festive, and oh so delicious! Your kids will love making these and they are perfect for the Thanksgiving season!

If you have a love for cupcakes like I do then you should definitely make these Apple Pie, these Angel Food, and these delicious Tres Leches Cupcakes. They are all SOO GOOD!

A chocolate cupcake decorated to look like a turkey.

Turkey Cupcakes

I love anything that is super festive that I can do to make a holiday extra special. Christmas is an easy holiday to do that for but Thanksgiving is a little bit trickier! That’s why these turkey cupcakes are perfect! Not only are they made from a classic chocolate cupcake with delicious frosting but they are so cute and VERY festive! I mean a cute little turkey to eat at Thanksgiving… It doesn’t get much better than that!

My kids always see me in the kitchen and are always asking how they can help. This recipe is perfect because not only do you end up with a cute and decorative cupcake but making them is fun and simple! I show my kids what to do and then they can get creative and make them their own! They have so much fun! Once they are finished, they can gobble them right up (I couldn’t resist!) or you can use them to decorate your Thanksgiving table with! It’s a win-win!

Ingredients for Turkey Cupcakes

To keep this simple, I like to bake up the cupcakes beforehand! Then, all we have to do is decorate and eat! See the recipe card below for a list of exact ingredient measurements.

  • Chocolate cupcakes: You can make these from a mix or make these amazing homemade chocolate cupcakes!
  • Chocolate frosting: I like to use homemade chocolate buttercream frosting! But if you want these to go super quick then using store bought is totally fine too!
  • Mini Oreos: The mini ones are the perfect size for the turkey’s head!
  • Candy eyeballs: Get the ones that are very small. They fit the best!
  • Candy corn: I used some candy corn to make the cute feathers. It’s the perfect way to use any leftover from Halloween!
  • Gummy worms: It’s not a turkey without its wattle!

Let’s Put Together Some Turkey’s!

Once you whip up your cupcakes, these turkey cupcakes only take a few minutes to put these together! Have so much fun! It’s the perfect Thanksgiving craft that you can eat!

  1. Make the cupcakes: Use your favorite recipe or a box mix to bake your choice of cupcakes. I used my recipe for chocolate cupcakes! Then, frost the tops of them with chocolate frosting (I used my classic chocolate buttercream frosting) using a frosting spatula or a knife.
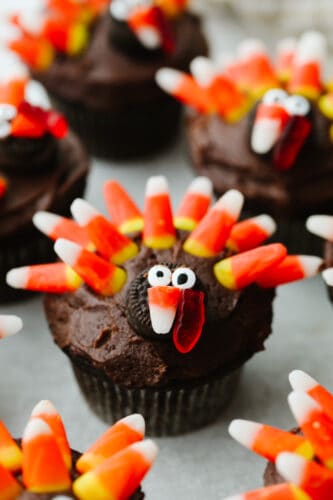
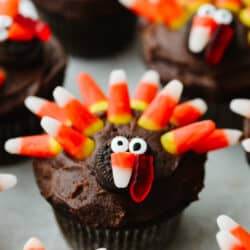
  2. Assemble the face: Assemble the turkey’s face by using the leftover chocolate frosting as “glue” to add the eyeballs to the mini oreo. Break off or cut the end of a candy corn for the beak and then cut the end of a red gummy worm off to use as the wattle. I made the gummy worm thinner by cutting off the back half and just using the top part for the wattle.
  3. Spread frosting as glue: Spread a small smear of frosting on the back of the oreo and press onto the center of the cupcake. Just a little bit forward from the direct center.
  4. Make the feathers: Use candy corn to create the tail feathers. I used six in the back row and five in the second row. And voila! You’ve got yourself a festive turkey cupcake! Repeat the steps for the remaining cupcakes.
4 pictures showing steps on how to decorate a cupcake.

Easy Variations

These turkey cupcakes can be easily changed up to have a bit more variety on your table! Here are a few ideas!

  • Change the frosting: If you aren’t a fan of chocolate frosting on top then try it with some Cream Cheese Frosting instead! It’s just as delicious!
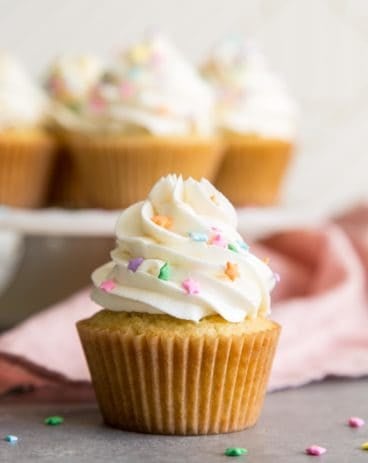
  • Try a different cupcake batter: Who says you have to make these out of chocolate? Try making the cupcakes with these Vanilla Cupcakes or these Red Velvet Cupcakes! Really, any cupcake will work!
  • Change up the cupcake liners: If you want to get extra festive, then you could change out the cupcake liner! Get plain white ones, fall ones, black ones or whatever you want!
  • Oreos: If you decide to make these with vanilla frosting and cupcakes then switch out those oreos to the mini vanilla oreos so that they match better!
A few turkey cupcakes on the counter.

How to Store Leftovers

If you are making these turkey cupcakes ahead of time or you have some extra, here’s how you can store them so that they stay fresh!

  • Room temperature: If you plan on eating them in the next day or two, the best way to store them is on your counter! Then, place them in an airtight container and get them out when you are ready to eat. Storing them at room temperature keeps them soft and moist!
A chocolate cupcake with a fork cutting into it.
Print

Easy Turkey Cupcakes

These turkey cupcakes are cute, festive, and oh so delicious! Your kids will love making these and they are perfect for the Thanksgiving season!
Course Dessert
Cuisine American
Keyword turkey cupcakes
Prep Time 25 minutes
Total Time 25 minutes
Servings 12 Cupcakes
Calories 163kcal
Author Alyssa Rivers

Ingredients

  • 12 baked chocolate cupcakes
  • 12 ounces Chocolate frosting store-bought or homemade
  • 12 mini Oreos
  • 24 mini Candy eyeball very small
  • 132 regular Candy corn
  • 6 classic Gummy worms cut in half

Instructions

  • Use your favorite recipe or a box mix to bake your choice of cupcakes. I used my recipe for chocolate cupcakes! Frost the tops of them with chocolate frosting (I used my classic chocolate buttercream frosting) using a frosting spatula or a knife.
  • Assemble the turkey’s face by using the leftover chocolate frosting as “glue” to add the eyeballs to the mini oreo. Break off or cut the end of the candy corn for the beak, and cut the end of a red gummy worm off to use as the wattle. I made the gummy worm thinner by cutting off the back half and just using the top part for the wattle.
  • Spread a small smear of frosting on the back of the oreo and press onto the center of the cupcake, just a little bit forward from the direct center.
  • Use candy corn to create the tail feathers. I used six in the back row and five in the second row. And voila! You’ve got yourself a festive turkey cupcake! Repeat the steps for the remaining cupcakes.

Nutrition

Serving: 1cupcake | Calories: 163kcal | Carbohydrates: 29g | Protein: 1g | Fat: 5g | Saturated Fat: 2g | Polyunsaturated Fat: 1g | Monounsaturated Fat: 3g | Trans Fat: 1g | Cholesterol: 1mg | Sodium: 89mg | Potassium: 59mg | Fiber: 1g | Sugar: 26g | Vitamin A: 1IU | Vitamin C: 1mg | Calcium: 4mg | Iron: 1mg


from The Recipe Critic https://ift.tt/3cyk6gv
https://ift.tt/3DIch3L

रविवार, 21 नवंबर 2021

Roasted Lemon Potatoes

Roasted lemon potatoes are the perfect side dish for any of your meals! They have the best fresh taste that is SOO GOOD! Your friends and family will love them!

This side dish is amazing and will go so well with this Chicken, this Salad, and these Rolls! Try them all and make it a meal that the whole family will eat!

Roasted potatoes in a serving dish garnished with seasonings and lemon slices.

Roasted Lemon Potatoes

Potatoes make the best side dish to any meal because they go with everything! And when you roast them up like I did in this recipe then it really makes them taste amazing! They are crispy on the outside and soft on the inside making the texture just about perfect. Not only that but the flavor of them is so good! I used fresh lemons to keep the potatoes tasting so fresh!

When you combine that fresh lemon taste with some herbs and seasonings then it really takes these potatoes to the next level! Not only do these taste SOO GOOD but they are super simple and easy to make! They only take about 5 minutes to put together and the rest of the time they are spent in the oven! This is why they are the perfect side dish because they don’t add a lot of extra work for you!

Ingredients in Roasted Lemon Potatoes

This is a simple list of ingredients that you will need to make this recipe. Most of the stuff you will already have on hand! See the recipe card below for a list of exact ingredient measurements.

  • Yukon potatoes: You can use whatever potatoes that you have on hand (russet or red potatoes work great too!). But I like the added flavor of the yukon potatoes!
  • Olive oil: Vegetable oil will work too if that’s all that you have on hand.
  • Lemon zest: Fresh lemon zest takes this recipe up a notch!
  • Lemon juice: I used fresh lemon juice since I already had a lemon from the zest!
  • Garlic cloves: If you don’t have fresh garlic cloves on hand then you can use the minced garlic instead! ½ tsp equals about 1 clove of garlic.
  • Parsley and Rosemary: Using these fresh herbs all chopped up as a garnish add so much delicious flavor to the potatoes.
  • Salt: This will enhance the flavors of all of the other ingredients!
  • Pepper: This won’t add any heat, just delicious flavor!

Let’s Roast Some Potatoes!

These roasted lemon potatoes only take about 5 minutes to put together and then they are ready to cook! I love them so much and I know that you will too!

  1. Preheat and spray: Preheat the oven to 400 and spray a sheet pan with cooking spray and then set aside.
  2. Combine ingredients: In a small bowl combine the olive oil, lemon zest, lemon juice, garlic, parsley, rosemary, salt and pepper. 
  3. Cut the potatoes and toss: Cut the potatoes into 1 inch pieces and toss in a large bowl with the olive oil mixture until evenly coated. 
  4. Place on baking sheet and cook: Spread the potatoes evenly on the sheet pan and bake for 40-45 minutes, stirring them around halfway through. Serve warm.

Quick Tips

These roasted lemon potatoes are so good! Here are a few tips and tricks to make them perfect and even new every time!

  • Thyme: You can use thyme instead of rosemary and it gives it a great new taste!
  • Basil or Dill: These are a great substitute for the parsley and can be used instead. It’s a super easy way to switch out the taste!
  • Can I use bottled lemon juice? I would not use bottled lemon juice. The flavor isn’t as fresh and you also have to use a different amount to get a lemony fresh flavor. Fresh is best!
Cubed potatoes seasoned on a baking sheet.

How to Store Leftovers

If you have leftovers of these roasted lemon potatoes then you can save them to eat later! Here is how to store and reheat them.

  • Refrigerate: Once your potatoes have cooled down then you can place them in an airtight container. They will last 3-5 days in the fridge!
  • Reheat: If you want them to be crispy then preheat the oven to 400 degrees and cook them for 20 minutes on a baking sheet. If you are looking for a quick way to eat them then just pop them in the microwave on high for about a minute or two. Take them out when they are heated through!
Print

Roasted Lemon Potatoes

Roasted lemon potatoes are the perfect side dish for any of your meals! They have the best fresh taste that is SOO GOOD! Your friends and family will love them!
Course Side Dish
Cuisine American
Keyword lemon roasted potatoes
Prep Time 15 minutes
Cook Time 40 minutes
Total Time 55 minutes
Servings 6 People
Calories 254kcal
Author Alyssa Rivers

Ingredients

  • 2 1/2 Pounds Yukon Potatoes
  • Cup Olive Oil
  • Zest of 1 Lemon
  • Juice of 1 Lemon
  • 3 Cloves Garlic, Minced
  • 2 Tablespoon Parsley, chopped
  • 1 teaspoon Rosemary, chopped
  • 1 teaspoon Salt
  • 1/2 teaspoon Ground Pepper

Instructions

  • Preheat the oven to 400 degrees fahrenheit and spray a sheet pan with cooking spray. Set aside.
  • In a small bowl combine the olive oil, lemon zest, lemon juice, garlic, parsley, rosemary, salt, and pepper.
  • Cut the potatoes into 1-inch pieces and toss in a large bowl with the olive oil mixture until evenly coated.
  • Spread the potatoes evenly on the sheet pan and bake for 40-45 minutes, stirring them around halfway through. Serve warm.

Nutrition

Calories: 254kcal | Carbohydrates: 34g | Protein: 4g | Fat: 12g | Saturated Fat: 2g | Polyunsaturated Fat: 1g | Monounsaturated Fat: 9g | Sodium: 399mg | Potassium: 804mg | Fiber: 4g | Sugar: 1g | Vitamin A: 5IU | Vitamin C: 38mg | Calcium: 26mg | Iron: 2mg


from The Recipe Critic https://ift.tt/3DDZPCc
https://ift.tt/3nDMxA9

शनिवार, 20 नवंबर 2021

World’s Best Green Bean Casserole

Green bean casserole is a classic, tried and true side dish that everyone loves! It’s so delicious and creamy that it just might steal the turkey’s spot as the star of the show!

This makes for a great side dish for any delicious holiday dinner! Try this Honey Glazed Ham, this Garlic Butter Herb Prime Rib, or this amazing Oven Baked Herb Turkey!

green bean casserole

Green Bean Casserole

Is Thanksgiving even Thanksgiving if there isn’t a green bean casserole on the table? Green bean casserole is a holiday side dish MUST TRY. I have never been a green bean lover, but I can’t seem to get enough of this creamy side dish. This recipe uses fresh mushrooms salted with onions and garlic which takes this green bean casserole to the next level with amazing flavor! One of my favorite parts of this casserole is topping it with those crisp and tasty onions!

It has the best combinations of textures and tastes… It will almost make you think that this is the star of the show instead of the turkey! You can’t go wrong with having this classic green bean casserole at your next holiday meal. This pairs well with both of my turkey recipes! My Oven Baked Herb Turkey or, for a quicker cooking method, this  Slow Cooker Turkey Breast. Don’t forget the turkey gravy too! Make this while your turkey is resting. Your holiday meal is going to be the talk of the town! 

Ingredients for Green Bean Casserole

This recipe has some fresh ingredients that take this casserole to the next level! See the recipe card below for a list of exact ingredient measurements.

  • Butter: I used unsalted butter so that I didn’t add any extra salt in the recipe!
  • Garlic cloves: If you don’t have any fresh garlic cloves on hand then you can use the minced garlic that’s in your fridge! ½ tsp equals about 1 clove of garlic.
  • Onion: Make sure that this is finely diced.
  • Button mushrooms: These are optional! If you don’t like mushrooms then you can just take these out!
  • Fresh green beans: Cut off the ends and then cute each green bean in half.  
  • Chicken broth: I use chicken broth because then it gives a slight added flavor.
  • Cream of mushroom soup: I try and use a can of low sodium cream of mushroom soup for this recipe!
  • Parmesan cheese: You can finely grate this to add to the recipe!
  • Salt: This is used to enhance all of the delicious flavors!
  • Black pepper: This won’t give any heat but the perfect amount of flavor!
  • Crispy onion strings: These give that perfect added crunch.

Let’s Make a Casserole!

This recipe only takes about 25 minutes and tastes amazing! Everyone at our house loves it and I know that you will too!

  1. Preheat oven and cook vegetables: Preheat oven to 350 degrees. Melt butter in a large skillet over medium heat. Then, add onions and mushrooms and cook, stirring occasionally, until just tender. Add garlic and cook another 1-2 minutes, then remove from heat and set aside.
  2. Cook green beans: Place green beans and chicken broth in a medium saucepan and bring to a boil. Cook about 8 minutes until beans are crisp tender and then drain.
  3. Bake green beans and vegetables together: Spray a 2 quart baking dish with cooking spray. Place the soup, mushroom mixture, green beans, parmesan, salt, and pepper in a large bowl and stir to combine. Then, transfer mixture to the prepared baking dish and top with crispy onion strings. Bake at 350 degrees for 20 minutes, until casserole is heated through.
steps to making green bean casserole

Frequently Asked Questions

  • Can you use canned green beans instead? I would stick to fresh green beans with this recipe! Canned green beans tend to be mushy and tasteless once baked into the casserole, but using fresh beans cooked in chicken broth makes them perfectly crisp-tender and full of flavor! I just grab a few big handfuls of beans, chop off the ends, and cut them in half. You want them in about 1 ½ inch pieces. You will notice the flavor is so much better with fresh green beans!
  • Cream of mushroom soup: Even though I use all kinds of fresh and homemade ingredients in this dish, I still stick with the classic cream of mushroom soup to bind all the ingredients together.Yes, I could make a sauce from scratch (and you totally can!) but I love using the canned soup as a shortcut. And quite frankly, I’ll take all the help and shortcuts I can get during the holidays!
  • Homemade or store bought onion strings: I like to use store bought onion strings for this because, once again, it makes this so much easier! But if you have time and want to take it to the next level then you can totally make some onion strings on your own!
green bean casserole

Can You Make This Ahead of Time?

Yes! You can make this green bean casserole 24-48 hours in advance and keep covered in the fridge. Be sure to add the fried onions right before baking.

A Reader’s Review

The absolute BEST green bean casserole recipe I’ve ever tried! It was a hit with my entire family! Even the picky non-green bean casserole eaters loved it! That’s saying something!
-Kristan
Print

World’s Best Green Bean Casserole

Green bean casserole is a classic, tried and true side dish that everyone loves! It's so delicious and creamy that it just might steal the turkey's spot as the star of the show! 
Course Side Dish
Cuisine American
Keyword green bean casserole
Prep Time 5 minutes
Cook Time 20 minutes
Total Time 25 minutes
Servings 6 people
Calories 134kcal
Author Alyssa Rivers

Ingredients

  • 2 tablespoons butter
  • 2 cloves garlic minced
  • 1/2 cup onion finely diced
  • 8 ounce package button mushrooms sliced
  • 3 cups fresh green beans ends removed and cut in half
  • 3 cups low-sodium chicken broth
  • 10.75 ounce can low-sodium cream of mushroom soup
  • 1/4 cup grated Parmesan cheese
  • 1/2 teaspoon salt
  • 1/4 teaspoon black pepper
  • crispy onion strings

Instructions

  • Preheat oven to 350 degrees. Melt butter in a large skillet over medium heat. Add onions and mushrooms and cook, stirring occasionally, until just tender. Add garlic and cook another 1-2 minutes, then remove from heat and set aside.
  • Place green beans and chicken broth in a medium saucepan and bring to a boil. Cook about 8 minutes until beans are crisp-tender and drain.
  • Spray a 2-quart baking dish with cooking spray. Place the soup, mushroom mixture, green beans, Parmesan, salt, and pepper in a large bowl and stir to combine. Transfer mixture to the prepared baking dish and top with crispy onion strings. Bake at 350 degrees for 20 minutes, until casserole is heated through.

Video

Notes

Updated on November 20, 2021
Originally Posted on March 28, 2019

Nutrition

Calories: 134kcal | Carbohydrates: 11g | Protein: 9g | Fat: 7g | Saturated Fat: 4g | Cholesterol: 16mg | Sodium: 692mg | Potassium: 421mg | Fiber: 2g | Sugar: 3g | Vitamin A: 532IU | Vitamin C: 9mg | Calcium: 78mg | Iron: 1mg


from The Recipe Critic https://ift.tt/2JCDvRM
https://ift.tt/2JWswQX