बुधवार, 27 मई 2020

Mixed Berry Crisp

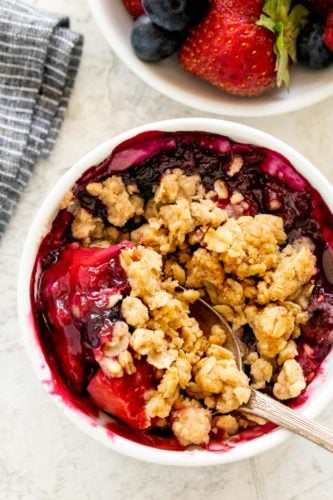
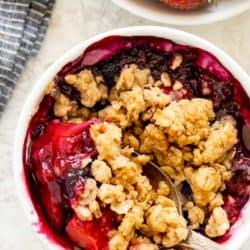
Mixed berry crisp is a colorful combination of fruit with a crunchy oat topping. These smaller individual portions baked in a ramekin make it easy to serve. The warm dessert tastes incredible topped with whipped cream or ice cream.

Crisps are one of my favorite desserts to make in the summertime. Try this peach crisp or strawberry rhubarb crisp for more varieties this summer!

Mixed Berry Crisp

Mixed Berry Crisp

The best way to enjoy seasonal fruit, especially during the summer, is to make a hot and bubbly baked fruit crisp. It’s really easy to prepare! Simply combine five cups of berries with sugar and flour to make a syrupy sweet filling. I used strawberries, blueberries, and raspberries, but you can use any combination you like.

The crispy, buttery and spiced topping is what makes this dessert irresistible. I combine flour, old fashioned oats, brown sugar, cinnamon, nutmeg, ginger, salt, and butter. Sprinkle it on top and bake, that’s it! I use a similar topping for my delicious apple crisp, it’s a family favorite!

granola in a bowl

How Do you Make Mixed Berry Crisp?

  • Preheat the oven to 375ºF.
  • Combine strawberries, blueberries, raspberries, flour, and sugar.
  • Evenly divide filling amongst ramekins.
  • In a bowl combine flour, oats, cinnamon, nutmeg, ginger, salt, and butter top make the topping.
  • Evenly sprinkle the crisp topping over the berry filling.
  • Bake until the topping is golden brown and the berries are hot and bubbly, about 30 minutes.
  • Serve warm mixed berry crisp warm.

fruit in white ramekins

Using Frozen Berries:

Frozen berries can be used instead of fresh. This makes for an easy crisp that you can make all year long. You do not have to defrost the fruit. Just combine with the flour and sugar and bake! It may take a little longer in the oven, shoot for 30 minutes, and add on more time as needed. Cover with foil to prevent the crisp from getting too dark.

Making a Crunchy Crisp Topping:

The combination of oats, flour, brown sugar, and butter creates big chunks of topping. Make sure to use old-fashioned rolled oats. The large flakes hold their shape well and make it extra crispy.

Mixed fruit berry crisp with oat topping

How To Make a Bigger Batch:

This recipe makes four, 1 cup of individual servings. If you don’t have ramekins, bake it in an 8×8 baking dish. You can easily make a larger batch to feed a crowd. Double the recipe and bake in a 13×9-inch casserole dish. The baking time needs to increase to account for more filling, about 30 to 40 minutes. Cover the top with foil to prevent the topping from burning.

Tasty Toppings:

Add some fresh whipped cream or vanilla ice cream. Chop up some nuts like almonds or pecans for extra crunch. Add some fresh berries on top for a contrast of textures. Extra fruit is always a good idea!

spoon scooping into a dessert

Looking For More Fruit Dessert Ideas? Try these!

Print

Mixed Berry Crisp

Mixed berry crisp is a colorful combination of fruit with crunchy oat topping. Individual portions baked in a ramekin make it easy to serve.
Course Dessert
Cuisine American
Keyword berries, fruit crisp, mixed berry crisp recipe
Prep Time 20 minutes
Cook Time 30 minutes
Total Time 50 minutes
Servings 4 servings
Calories 291kcal
Author Jessica Gavin

Equipment

  • Baking Sheet
  • Mixing bowls
  • Ramekins

Ingredients

Mixed Berry Filling

  • 2 cups strawberries quartered
  • 1 cup blueberries
  • 1 cup raspberries
  • cup granulated sugar
  • 3 tablespoons all-purpose flour

Crisp Topping

  • ¼ cup all-purpose flour
  • ¼ cup old-fashioned rolled oats
  • 2 tablespoons brown sugar
  • ¼ teaspoon cinnamon
  • teaspoon kosher salt
  • teaspoon nutmeg
  • teaspoon ground ginger
  • 3 tablespoons unsalted butter

Instructions

Mixed Berry Filling

  • Set the rack in the middle of the oven. Preheat the oven to 375ºF.
  • In a large bowl gently combine strawberries, raspberries, sugar, and flour.
  • Evenly divide the berry filling into 4 ramekins (8 ounce-sized), about 1 cup per dish.

Crisp Topping

  • Mix together flour, rolled oats, brown sugar, cinnamon, salt, nutmeg, and ginger in a small bowl.
  • Cut butter into small ¼-inch pieces and add to the flour mixture. Use your fingers to cut the butter into the dry ingredients, pressing together to create pea-sized pieces of topping.
  • Evenly sprinkle the topping over the berries, about ¼ cup per ramekin.
  • Place ramekins on top of a foil-lined baking sheet.
  • Bake until the topping is golden brown and crisp, and the fruit is bubbling, 25 to 30 minutes.
  • Serve mixed berry crisp warm.

Nutrition

Calories: 291kcal | Carbohydrates: 51g | Protein: 3g | Fat: 10g | Saturated Fat: 6g | Cholesterol: 23mg | Sodium: 78mg | Potassium: 202mg | Fiber: 5g | Sugar: 31g | Vitamin A: 282IU | Vitamin C: 54mg | Calcium: 29mg | Iron: 1mg


from The Recipe Critic https://ift.tt/2ZEHm7m
https://ift.tt/2XNJjMn

मंगलवार, 26 मई 2020

Greek Salad with the BEST Dressing

Greek Salad is a fresh, crunchy, vibrant salad with the BEST Greek dressing!  Every bite is packed with color and the best flavors that will keep you digging in for more!

I absolutely can’t get enough of salads with a feta crumble in them.  I find myself poking around in the salad to try to get some in every bite!  For more salads with feta cheese try Grilled Berry Feta Chicken Salad or Italian Avocado Cucumber Tomato Salad.

Greek salad in a white bowl with a wooden spoon.

Greek Salad

Juicy tomatoes, crisp cucumber, and a sweet and savory dressing, with feta crumbles throughout… Wow, when I read the description of a greek salad on a menu recently, I was so ready to go home and make it my own!  This vibrant salad is so full of color and flavor.  It easily compliments any meal or it can stand alone as the main dish.  Packed full of nutrients, it is a must try for any salad lover!

The Greek dressing the girls have been helping me make at home is so perfect on this salad! It brings the flavors of the fresh fruits and vegetables to life!  I love how fresh and light this salad is!  Simply said, this dish is amazing!  It is ready in just minutes and will be a favorite in our house for a while to come!

Greek Salad Ingredients:

All of these fresh ingredients are flavorful and delicious, but need to be washed before tossing together.  The best way to wash them is to fill a clean sink or large bowl with cool water and rinse each item thoroughly.  The dirt and debris will sink to the bottom.  Then, your left with clean fresh ingredients that are ready to combine, toss, and enjoy!

  • Romaine Lettuce: Adds a crunch to the texture of this salad.
  • Cucumber: Fresh melon flavor.
  • Roma Tomatoes: Sweet and colorful addition to the salad.
  • Kalamata Olives: Large, dark purple olive with a smooth, meaty texture.
  • Large black olives: Soft meaty texture with tart, tangy, slightly acidic flavor.
  • Feta Cheese: Crumbly Greek cheese with bright white color and a salty flavor.

We’re Making Salad!

The great thing about salads is they are so easy to make! Simply grab all your ingredients, toss them together with your favorite dressing, and voila a great meal or side dish is ready to go!  I love to wash and prep all the ingredients as soon as I get them home from the market or store and have them ready to go in the refrigerator.  This extra time is so worth it when I can pull all the ingredients out and toss them right away and have a delicious salad in minutes!

  1. Combine Ingredients: In a large bowl add the romaine, cucumber, tomatoes, olives , and feta cheese.
  2. Make Greek Dressing: Make the recipe for greek dressing.
  3. Toss: Toss together ingredients and Greek dressing to evenly coat all ingredients with the dressing.

Greek Salad ingredients in a clear bowl.

What are Roma Tomatoes?

A Roma tomato has a thick fruit wall and few seeds.  They have a dense and slightly grainy flesh.  They are oblong and a little heavy for their size.  The are more firm than other tomatoes.  They can be eaten raw or cooked.  They are often used to make tomato paste since they have less water content than most tomatoes.

What is the Difference Between Kalamata Olives and Black Olives?

First of all, Kalamata olives are purple whereas black olives are..wait for it…black.  However, in addition to the obvious color differences, there are some other differences between the two olives as well.  Kalamata olives are known as “Greek black olives” but are bigger and more oblong in shape than a black olive.  The cool thing is they are picked by hand in order to avoid bruising the olives.  They have a stone in the middle and are usually not pitted before being served. They are bitter when they are first picked so they go through a process of “debittering” which can take up to 3 months!  Their flavor is compared to that of a fine wine.

In contrast, a black olive that we would generally find in a jar at the grocery store is actually picked green then pumped with oxygen to turn them black, their new color is kept by adding ferrous gluconate. Both olives are high in sodium, rich in healthy fats and contain a natural antioxidants.  I prefer a mixture of the two in my greek salad because I think together they are just right.


Pouring dressing on Greek salad ingredients.

Greek Salad Tips and Variations:

  • No lettuce: I know, I know, you’re thinking a salad with no lettuce? But traditionally in Greece, their salads are served with no lettuce.
  • Feta Cheese: The crumbles of cheese throughout the salad are a favorite of mine.  However, if you are going for an authentic Greek presentation, place large chunks or blocks of feta cheese on the top of the salad instead.
  • Serve with: In Greece you will find this salad served with bread.  (Yes, please!) Also, I love the contrast of pairing this cool, fresh salad with a creamy warm soup.  Something about the yin and yang of that is just so perfect!
  • Storing: Eat it up quick because this salad will not last long in the refrigerator. Once prepared, the salad will last a maximum of 2 days, but you will probably experience sogginess.  Instead, I suggest you store the ingredients separately from the lettuce and mix up individual serving sizes as needed.
  • Optional Ingredients: Sometimes I love to just keep adding on to this delicious Greek salad.  Capers, lemon or lime juice, shrimp or chicken, red onion (Rinse in warm water and drain before adding to the salad), avocado (weird but good).  Really the options are limitless with this extremely versatile flavor base.
  • How to store olives: Unopened your olives can be stored at room temperature up to 2 years. Opened olives need to be refrigerated in their own liquid in a non-metal container.  When stored properly, they will last for 1 to 2 months after opening.

Finished greek salad in a white bowl.

More Delicious Greek Favorites:

Print

Greek Salad with the BEST Dressing

Greek Salad is a fresh, crunchy, vibrant salad with the BEST Greek dressing!  Every bite is packed with color and the best flavors that will keep you digging in for more!
Course Dinner, Dressing, Main Course, Salad, Side Dish
Cuisine Greek
Keyword greek salad
Prep Time 5 minutes
Total Time 5 minutes
Servings 24 Tablesppoon
Calories 12kcal
Author Alyssa Rivers

Ingredients

  • 3 cups romaine chopped
  • 1 cucumber sliced
  • 2 roma tomatoes sliced
  • 1/2 cup kalamata olives
  • 1/2 cup large black olives
  • 1/4 cup feta cheese
  • Greek Dressing Recipe

Instructions

  • In a large bowl add the romaine, cucumber, tomatoes, olives , and feta cheese. Make the recipe for greek dressing and toss with the salad.

Nutrition

Calories: 12kcal | Carbohydrates: 1g | Protein: 1g | Fat: 1g | Saturated Fat: 1g | Cholesterol: 1mg | Sodium: 62mg | Potassium: 44mg | Fiber: 1g | Sugar: 1g | Vitamin A: 581IU | Vitamin C: 1mg | Calcium: 13mg | Iron: 1mg


from The Recipe Critic https://ift.tt/2LZbrGH
https://ift.tt/2Xur2DB

Chicken Caesar Salad Wraps

Chicken Caesar Salad Wraps are quick and easy to make and to eat.  Filled with healthy, flavorful ingredients they are family friendly, great for lunch or a light dinner!

Wraps are perfect for all ages and taste delicious with so many flavors inside! If you are looking for other ideas of ways to turn your favorite meal into a handy wrap try this Buffalo Ranch Chicken Wrap or Bacon Cheeseburger Wrap.

Two parts of a wrap stacked on each other on a plate.

Chicken Caesar Salad Wraps

I am always trying to find new lunch combinations that are easy to make and healthy.  Recently, me and the hubby went to a local sandwich place that had chicken caesar salad wraps. Chicken caesar salad is my favorite of them all, so I ordered it and loved it. The best wrap that I have had, and I couldn’t wait to make it at home! Especially since the weather is getting warmer, and I find myself wanting more salads and lighter foods.  This wrap is definitely going to be a staple in my weekly menus this summer.

Not only is this a healthy and tasty wrap, but it is also just fun to make!  In fact, my kids want me to turn everything into a wrap now so that they can help make it! They love to help with the tossing and wrapping. I love that they are getting a healthy meal that they enjoy eating and I’m not having to force them to eat! I promise you this recipe is so simple and easy to follow and it will turn out looking so impressive.  Each bite is bursting with flavor while still keeping a fresh and light overall feel.  Be sure to try it for lunch or dinner soon!

Chicken Caesar Salad Ingredients:

Just a few simple ingredients come together so quickly and easily in this crowd pleasing wrap.  In fact, many of the ingredients can even be bought pre-made, which is so nice!  I love chicken caesar salads, I always have.  But, when you add in a tortilla to wrap it up, now that is just so much better!!

  • Caesar Salad Dressing: I use the light version to keep it a little healthier.
  • Parmesan cheese: Freshly grated
  • Garlic powder: Adds a little bit of subtle flavor.
  • Pepper: To taste
  • Lemon juice: The bright citrus flavor adds freshness.
  • Chicken breast: Cubed and cooked, Tyson grilled and ready worked great!
  • Romaine lettuce: I used the premium with shredded carrots.
  • Salad croutons: Chopped so that they are easier to eat.
  • Whole grain wraps or tortillas: Use an extra large one so that it is easier to wrap.

How to Make a Wrap:

Two simple steps are all it takes to have a delicious meal ready to go.  Just grab your ingredients, toss them together and wrap it up in your favorite tortilla.  In just minutes you can have a restaurant quality meal in your own kitchen.

  1. Toss Ingredients: In a medium bowl, combine caesar dressing, parmesan cheese, garlic powder, pepper, and lemon juice. Add the romaine lettuce, cubed chicken and salad croutons. Toss until coated well.
  2. Fill tortilla and roll: Place about 2/3 of the chicken mixture into each wrap and roll up.

Fresh Ingredients for the Chicken Caesar Salad Wrap in a clear glass bowl.

Is a Chicken Caesar Wrap Healthy?

The great thing about preparing your own food at home vs. eating out is that you have complete control over every ingredient that goes into your food.  To make sure this wrap is healthy, just make careful choices when choosing your ingredients.  Use a low-fat dressing and read labels carefully to ensure you find one without a lot of added sugars.  Also, there are so many great low carb or low fat wrap options available now, so be sure to choose one that suits your specific dietary needs.

Variations for Chicken Caesar Wraps:

These chicken caesar salad wraps are so easy to make there is really no way to mess them up! Here are a few tips and ideas to help you keep this classic recipe interesting.

  • Pinwheels: A  fun way to serve these chicken caesar wraps is to cut them into pinwheels! They would be great as an appetizer for entertaining.
  • Toothpicks: Add toothpicks to help them stay together if you’re bringing them somewhere.
  • Bacon: Adding crumbled bacon to the mixture of this wrap is so amazing!
  • Serving:  Serve your wrap with a side of fresh fruit, potato salad, pasta salad, chips, or chopped vegetables.

Overhead view of a open chicken caesar wrap.

How Long Can You Store Chicken Caesar Wraps?

Once fully prepared, eat or refrigerate your chicken caesar wrap within two hours.  If you are making these for later use like in weekly meal prepping, I suggest storing the ingredients separately then mixing together right before you eat it.  Otherwise, the croutons and other ingredients may turn slightly soggy.  If you want to make ahead for later use, just leave out the dressing in the mixture and dip the wrap in dressing as you eat it later instead.  To store, cover the caesar salad wrap tightly with plastic wrap or foil.  Stored this way, they will last in the refrigerator for 3-5 days.

Close up of a wrap in someone's hand.

More Delicious Chicken Caesar Recipes:

Print

Chicken Caesar Salad Wraps

A delicious and healthy chicken caesar salad wrap that is perfect for an easy meal or on the go!
Course Dinner, Main Course
Cuisine American
Keyword chicken caesar salad wraps, salad wraps, wrap recipes
Prep Time 10 minutes
Total Time 10 minutes
Servings 4 Servings
Calories 511kcal
Author Alyssa Rivers

Ingredients

  • 3/4 cup lite Caesar Salad Dressing
  • 1/4 cup parmesan cheese grated
  • 1/2 teaspoon garlic powder
  • 1/4 teaspoon pepper
  • 1 Tablespoon lemon juice
  • 2 cups chicken breast cubed cooked, Tyson grilled and ready worked great!
  • 2 cups romaine lettuce I used the premium with shredded carrots
  • 3/4 cup salad croutons chopped
  • 4 whole grain whole grain wraps or tortillas

Instructions

  • In a medium bowl, combine caesar dressing, parmesan cheese, garlic powder, pepper, and lemon juice. Add the romaine lettuce, cubed chicken and salad croutons. Toss until coated well.
  • Place about 2/3 of the chicken mixture into each wrap and roll up.

Notes

Updated on May 25, 2020
Originally Posted on September 4, 2014

Nutrition

Calories: 511kcal | Carbohydrates: 30g | Protein: 24g | Fat: 33g | Saturated Fat: 6g | Cholesterol: 69mg | Sodium: 1047mg | Potassium: 348mg | Fiber: 4g | Sugar: 4g | Vitamin A: 2133IU | Vitamin C: 3mg | Calcium: 193mg | Iron: 2mg


from The Recipe Critic https://ift.tt/2X1DjQX
https://ift.tt/3euVft9

सोमवार, 25 मई 2020

Homemade Spaghetti Sauce

Easy Spaghetti Sauce Over Pasta

There’s no need to purchase store-bought sauce, with this hearty and flavorful Homemade Spaghetti Sauce. Simple ingredients such as ground beef, onion, garlic, and spices of oregano and basil bring a bold flavor to this simple sauce.

This recipe is extremely simple. If you like easy Italian-inspired recipes then make sure to also try this Cajun Chicken Alfredo Pasta or this Prosciutto Mozzarella Pizza recipe.

classic spaghetti sauce over noodles

Homemade Spaghetti Sauce

Homemade spaghetti sauce is a classic recipe that can be prepared quickly and one everyone will love. This simple sauce is not only nostalgic but classic for a good reason. Everyone has their favorite recipe, but the best sauces are often the most basic. You can easily prepare this sauce and have plenty for leftovers or for freezing and using later.

Ingredients in Spaghetti Meat Sauce

  • Olive Oil: choose a high-quality olive oil to brown the meat and sauté the onions and garlic. This will only add to the flavor.
  • Ground Beef: the type of ground beef is entirely up to and you can also switch out the ground beef for ground sausage.
  • Yellow Onion: the onion brings a mild bite to the sauce that is a key flavor in spaghetti sauce.
  • Garlic Cloves: these minced cloves bring the most powerful flavor that is so common in Italian recipes. Using freshly minced garlic will also bring about the best flavor.
  • Tomato Paste: adding the tomato paste helps to thicken the sauce, but it also brings a strong flavor that is heightened when stirred in and cooked after the onions and garlic are cooked.
  • Diced Tomatoes or Crushed Tomatoes: for a smoother sauce use crushed tomatoes and for a chunkier sauce go with diced tomatoes. Either one makes a delicious sauce.
  • Water: this helps to bring the sauce together and you can use more or less to thicken it.
  • Dried Oregano: this classic spice adds a peppery flavor to the sauce.
  • Grated Parmesan Cheese: Adding parmesan cheese is optional, but strongly suggested for that delicious cheesy flavor.
  • Fresh Basil: the fresh aroma of this peppery flavored leaf also adds a small hint of mint.

ground beef for sauce

How to Make Spaghetti Sauce

  1. Brown the Meat: heat half of the olive oil over medium-high heat in a large iron skillet. Break the meat apart as it brown and then use a slotted spoon to remove the meat and set aside on a plate.
  2. Sauté the Onions and Garlic: add the remaining olive oil and reduce the heat to medium. Sauté the onions until translucent and then add the garlic.
  3. Simmer the Sauce: stir in the crushed tomatoes, water, tomato paste, ground beef, oregano, and salt and pepper. Bring to a boil and reduce heat to a simmer for about 20 minutes until the sauce thickens.
  4. Stir in Cheese: add the grated cheese and any additional seasoning. Garnish with fresh basil.

onions and garlic in skillet

How to Store Spaghetti Sauce

Place the spaghetti sauce in an air-tight container and store in the refrigerator for up to 5 days or freeze it for up to 18 months.

Can I make spaghetti sauce without the meat?

You can easily leave the meat out of this sauce for more of a marinara type sauce. If you choose to leave out the meat I suggest using both 1 28-ounce can of crushed tomatoes and 1 28-ounce can of diced tomatoes.

Can I freeze this spaghetti meat sauce?

Yes. This sauce can easily be frozen and saved for later. In order to freeze the sauce let it come to room temperature before placing it in a ziptop bag or an air-tight storage container. Make sure to include the date. The sauce will last for about 18 months stored in the freezer.

Can I use ground sausage instead of ground beef?

Yes. Changing the ground beef for sausage is an easy swap and one that will add a unique flavor.

Can I make this spaghetti sauce in the Instant Pot?

Yes. To make this easy spaghetti sauce in the Instant Pot,

  • Push the “sauté” button to heat the olive oil. Brown the meat and use a slotted spoon to remove the beef.
  • Add the remaining tablespoon of olive oil and then sauté the onions for 4 minutes and then add the garlic to cook for an additional 1 minute.
  • Add the remaining ingredients except for the parmesan and basil.
  • Cover and seal the lid. Set the manual/pressure cook button to 10 minutes. When the time is up let the pressure release naturally for 10 minutes and move the valve to vent.
  • Remove the lid and stir in the grated parmesan.

Easy Spaghetti Sauce Over Pasta

Tips for making the best Homemade Spaghetti Sauce

  • Use crushed tomatoes for a smoother sauce that has a thicker base to it.
  • For a thinner sauce, that big on tomato and beef chunks use canned diced tomatoes.
  • To add even more bold flavor increase the garlic. You can really use as much as you prefer, however, unless you have an aversion or allergy to garlic I wouldn’t use less than 4 close.
  • Stir some parmesan cheese directly into the sauce.

More delicious pasta recipes to try:

Easy Homemade Spaghetti Sauce
Print

Homemade Spaghetti Sauce

There's no need to purchase store-bought sauce, with this hearty and flavorful Homemade Spaghetti Sauce. Simple ingredients such as ground beef, onion, garlic, and spices of oregano and basil bring a bold flavor to this simple sauce.
Course Main Course
Cuisine Italian American
Keyword spaghetti sauce
Prep Time 10 minutes
Cook Time 33 minutes
Total Time 43 minutes
Servings 6 Servings
Calories 271kcal
Author Aimee Mars

Ingredients

  • 2 tablespoons Olive Oil
  • 1 lb Ground Beef
  • 1 Yellow Onion chopped
  • 4 Garlic Cloves minced
  • 3 tablespoons Tomato Paste
  • 1 28 ounce can Crushed Tomatoes
  • 3/4 cup Water
  • 1 tablespoon Dried Oregano
  • 1 teaspoon Salt
  • 1/2 teaspoon Ground Pepper
  • 1/4 cup Grated Parmesan Cheese
  • 2 tablespoons Fresh Basil chopped

Instructions

  • Heat 1 tablespoon of olive oil in a large cast-iron skillet over medium-high heat. Add the ground beef and break it into 4 equal parts to brown for 3 minutes. Begin breaking the ground beef down into bits and cooking until it's completely browned, about 5 minutes.
  • Use a slotted spoon to remove the beef from the skillet and transfer it to a side plate. If using a fattier version of ground beef drain half the grease leaving about 1 to 2 tablespoons.
  • Bring the heat down to medium and add the remaining tablespoon of olive oil and chopped onions. Cook for 3 to 4 minutes, until the onions become fragrant and translucent. Place the minced garlic in the skillet and cook for an additional 1 minute.
  • Stir in the tomato paste and cook for an additional minute, which brings out the flavors of the paste.
  • Pour the crushed (or diced) tomatoes, water, dried oregano, salt, and pepper into the skillet and bring to a boil. Let simmer for 15 to 20 minutes, until the sauce begins to thicken.
  • Stir in the grated parmesan to the sauce and serve over pasta. Garnish with fresh basil.

Notes

For a thicker sauce: add additional tomato paste and continue to let simmer until it begins to thicken.
For a thinner sauce: stir in more water and let it heat.

Nutrition

Calories: 271kcal | Carbohydrates: 5g | Protein: 15g | Fat: 21g | Saturated Fat: 7g | Cholesterol: 57mg | Sodium: 568mg | Potassium: 331mg | Fiber: 1g | Sugar: 2g | Vitamin A: 207IU | Vitamin C: 4mg | Calcium: 84mg | Iron: 2mg


from The Recipe Critic https://ift.tt/2XqviUC
https://ift.tt/2Zz0kfB