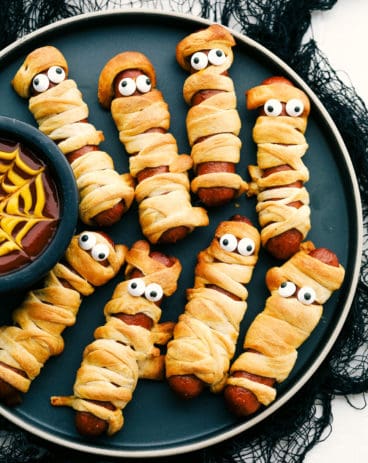
Nothing screams fun, quite like Mummy Hot Dogs for Halloween dinner. Serve these fun little vittles before trick or treating or at your next Halloween party!
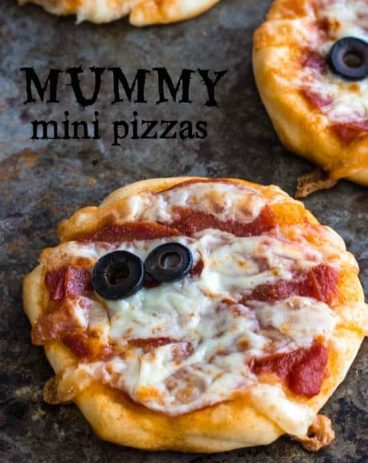
I love festive holiday treats! For more spooky options to serve with these, try Easy Mummy Mini Pizzas and Mummy Cookie Bites. These are all perfect Halloween treats!

Halloween Mummy Hot Dogs
These are super easy to make and even more fun to eat! And not only that but your kids will absolutely love helping you make them! Put them in charge of wrapping the dough around the hot dogs! Or, my kids’ favorite part is sticking the candy eyeballs on them and making them “come alive!” You might want to double the recipe because these will go fast! But because they were so easy, you can always whip up more in a breeze.
Not only are these super simple but they are almost too cute to eat! Plus, they will be the hit of the party! You can’t beat a meal that’s easy, looks festive, AND is kid-friendly to eat! Everyone will go crazy over them! Plus, you can take the extra minute or two to add in a spider web to your dipping sauce and the entire meal goes up a spooky notch! They’re easy, quick and a fun finger food for young and old alike. It’s so fun for Halloween and kids will totally approve!
Ingredients You Need to Make Mummy Hot Dogs
Have fun making these hot dog crescent rolls! Using only two ingredients, you really can’t go wrong! See the recipe card below for exact ingredient measurements.
- Crescent Roll Dough: For best results use regular crescent rolls. Reduced fat dough is stickier and makes wrapping the hot dogs difficult.
- Hot Dogs: Use your favorite kind of hot dogs
Let’s Make Some Fun Hot Dogs!
These are so simple to make and come together quickly. You can get creative then these so then each mummy dog can be unique!
- Prep: Preheat the oven to 375 degrees. Spray a baking sheet with cooking spray and set aside. Open the crescent dough and press seams together. Using a pizza cutter, cut ¼ strips.
- Create: Wrap each hot dog creating a bandage look leaving gaps and overlapping the dough. Then, create a crisscross pattern until the entire hot dog is wrapped.
- Bake: Place each mummy dog on the baking sheet and bake for 10-12 minutes. Using ketchup or mustard you can then create little eyes for the mummies.

Halloween Mummy Hot Dog Tips
Create a fun, spooky, and even scary mummy dog with these tips! Anything that you do will be a fun surprise for Halloween!
- Eyes: If you don’t have candy eyes handy then you can draw eyes on! Add a a couple of dots of ketchup or mustard to the mummy dogs where the eyes would go.
- Mini: Use little smokies as the hot dogs and then wrap them the same way to make baby mummies!
- Make them big: If you want tomake then bigger then use smoked sausages for bigger beefier ones.
- Cheese: Place a hot dog sized slice on cheese on the back of the hot dog and then wrap it with the crescent dough.
- Butter: Brush the dough with melted butter before placing in the oven for an even buttery flakey finish.

Spooky Spider Web Sauce
With a little bit of ketchup and mustard, you make a fun spooky spider web sauce for dipping. It’s super festive and so easy to prepare! Go ahead and try it! It really adds a fun touch!
- Place ketchup in a small bowl. Then, with the mustard draw a few circles.
- Use a toothpick to drag out the circles into a web design.

Make Ahead of Time
One of the best parts about this recipe is that you make them ahead of time. Wrap the hot dogs with the dough and then store in an airtight container in the fridge till ready to bake. When you’re ready to eat then pop those mummy hot dogs in the oven!

More Spooky Halloween Recipes


Mummy Hot Dogs
Ingredients
- 1 8 ounce package crescent roll dough
- 8 hot dogs
Instructions
-
Preheat the oven to 375 degrees. Spray a baking sheet with cooking spray and set aside. Open the crescent dough and press seams together. Using a pizza cutter, cut ¼ strips.
-
Wrap each hot dog creating a bandage look leaving gaps and overlapping the dough. Create a criss cross pattern until the entire hot dog is wrapped.
-
Place each mummy dog on the baking sheet and bake for 10-12 minutes. Using ketchup or mustard you can create little eyes for the mummies.
Notes
Nutrition
from The Recipe Critic https://ift.tt/2TzvYoX
https://ift.tt/2JiAtm4