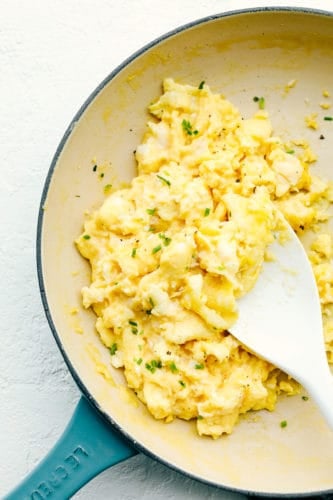
The Best Scrambled Eggs are fluffy, light, moist and taste amazing. There is a secret to it though, and I’ve got it. The secret to the perfect scrambled eggs is cooking them low and slow!
Eggs go with so many things, try them with these Perfect Fluffy Pancakes or Belgian Waffles. Or put them in these freezer friendly Breakfast Burritos.

Perfect Scrambled Eggs
Scrambled eggs are one of the easiest and quickest complete proteins out there. I’ve used them in a pinch for not just breakfast but lunch and dinner too. It’s the perfect answer for that dreaded question “What’s for dinner?” On those days where you’re lucky to have made it to dinner time at all, let alone know what to eat, grab eggs and you’ve got it made! They are so versatile you can do so many things with them!
You can rest easy knowing you’re giving your family and loved ones a nutritional meal when you serve eggs. Did you know that one egg has only 75 calories and 7 grams of high-quality protein. With only 1.6 grams of saturated fat and iron, vitamins, minerals and carotenoids, they are a powerhouse of disease-fighting nutrients. Including lutein and zeaxanthin. So heat up the pan, it’s time to have some eggs!
Fluffy Scrambled Egg Ingredients
Pretty simple ingredients. Super easy and quick to mix together!
- Butter: Just enough to help it not stick to the pan and impart a little bit of flavor.
- Eggs: This recipe uses 4 Large eggs
- Milk: Can substitute out with water
- Salt and Pepper: Add to your tastes
Let’s Make Scrambled Eggs!
It may take a little bit longer than you thought but, trust me, it’s worth the wait for these perfect delicate eggs! Add a side of bacon and this is the perfect breakfast!
- Melt: In a non stick skillet over medium low heat melt the butter
- Whisk: In a small bowl whisk together the eggs and milk.
- Pour: Once the butter has melted pour the egg mixture in the pan. Wait until you see a thin layer of egg cooking around the edges. Using a rubber spatula, move the eggs around the pan until they look fluffy and soft. Remove from heat when they look soft and slightly runny.
- Serve: Salt and pepper to your taste, top with chives if you desire and serve immediately.

Tips for the Best Egg Breakfast
- Whisk: This is a critical step, don’t under do it. Ditch the fork and cereal bowl and get a good sized bowl and whisk. Beat the eggs till all the yolks and whites are totally combined with no globby steaks. It should be light and airy. Whisk it will whip that air into the eggs to help them be fluffy and soft.
- Eggs: What ever you buy and wherever you buy your eggs, get good quality eggs, it matters.
- Seasoning: Wait till after you cook the eggs to season them with salt and pepper. Adding it in the beginning draws out the moisture in the eggs, making them watery.
- Milk: Without the fat in dairy added to the eggs can be very, easy to over cook. The milk results in creamy, moist and softer eggs than if you left it out.
- Secret Cooking Method: Remember it’s low and slow!! Don’t get in a hurry. The pan should be low enough that when the eggs are poured in, nothing happens. No sizzling. Trust me.
- Wait: You have to wait till that thin layer of cooked egg begins on the edges before you stirring.
- Stir: A rubber or silicone spatula is a must. The flexibility of the spatula allows you to hug the contours of the pan and get a really clean swipe/fold each time you push the eggs around.
- Remove: Make sure to remove from the pan when you still think they’re a bit too wet. They’ll continue to cook once removed.
What Can You Do With Eggs Scrambled?
Eggs can be a dish of its own or add it to create more breakfast, lunch or dinner ideas! Try these delicious egg recipes for more ways to enjoy your scrambled eggs.
- Solo: They are perfect on their own
- Add-Ins: Once you remove from the heat, you can add in sautéed veggies, cheese, bacon crumbles, chorizo, ham, or whatever else you can think up
- Tacos/Burritos: With a perfect protein you can wrap these up in way you’d like
- Toast: Place on top of toast, you can add avocado and fresh tomatoes.
- Sandwich: This makes the best sandwiches with bacon, or sausage, cheese, avocado, tomato on croissants, bagels or English muffins.
- Pizza: Use as a topping for breakfast pizza

More Classic Breakfast Recipes
Who knew that there were ways to making your favorites even better. Try these recipes that will do just that!
- Instant Pot Hard Boiled Eggs
- Secret Ingredient French Toast Recipe
- Homemade Pancake Mix Made from Scratch
- The Best Breakfast Casserole
- Homemade Biscuits and Gravy

Scrambled Eggs
Ingredients
- 1 Tablespoon Butter
- 4 large eggs
- 2 Tablespoons Milk
- salt and pepper
- optional chopped chives
Instructions
-
In a medium sized non stick skillet over medium low heat, add the butter. In a small bowl whisk together the eggs and milk.
-
Once the butter has melted pour the eggs into the pan and let them sit undisturbed until you see a thin layer of the egg cooking around the edge. Using the rubber spatula start moving the eggs around the pan until they look fluffy and barely set. They should be slightly runny and soft.
-
Serve immediately with salt and pepper and chopped chives on top.
Nutrition
from The Recipe Critic https://ift.tt/3eeA9Qs
https://ift.tt/37X3y0I