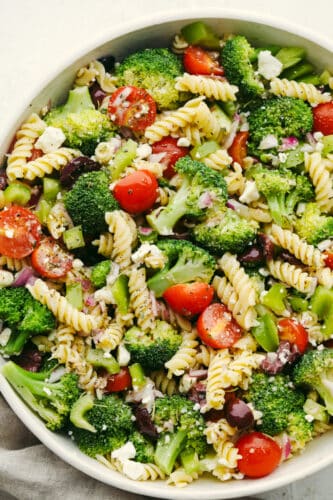
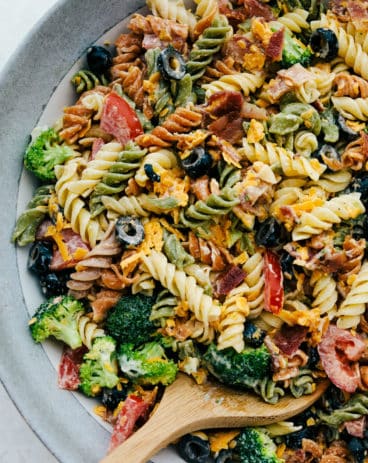
Greek Broccoli Pasta Salad combines tender fusilli pasta with fresh vegetables and a tangy herb dressing. This is the perfect dish to serve with grilled meats, or pack for a picnic or barbecue!
With their light and crisp flavor, pasta salads loaded with fresh veggies are the perfect summer side! If you’re looking for more nourishing vegetarian salads then try Caprese, Summer Corn, or Strawberry Spinach Salad.

Easy Greek Pasta Salad Recipe
Add a Meditteranean twist to a typical pasta salad with just a few key ingredients. By combining fresh vegetables, kalamata olives, and creamy feta cheese with al dente fusilli pasta, you add delicious Greek elements to each bite! I’m always looking for ways to sneak wholesome vegetables into each meal, and broccoli is one of the stars of this dish. Known as a ‘nutritional powerhouse,’ cooking with broccoli allows you to reap all of its health benefits- high antioxidants, fiber, vitamins, and minerals, just to name a few. Briefly cooking the broccoli beforehand ensures that each piece is tender and easy to eat.
Then, whipping up an easy Greek dressing is what will bring all of the ingredients together! Flavors of red wine vinegar, summery dijon, honey, and garlic combine to create an irresistible appetizer or side dish. Honestly, because of how flavorful and fresh this greek pasta salad is, it can easily be a healthy meal on its own! I always get compliments on this greek pasta salad which is great because it whips up in minutes! You, too, can easily impress your guests with just a few fresh veggies and an easy, zesty dressing on top. Don’t expect leftovers!
Broccoli Pasta Salad Ingredients
Having fresh ingredients is the key to making the best broccoli pasta salad. You can easily add other summer vegetables to customize your greek pasta salad to your liking! The Greek pasta dressing pairs perfectly with just about everything. All measurements can be found in the printable recipe card below!
- Rotini or Fusili Pasta: Fusilli pasta is a corkscrew shape that allows the dressing to stick on to the noodle. You can substitute this with your favorite pasta. I also like to use farfalle, rotini, or gemelli.
- Broccoli Florets: I like to blanch my broccoli to make it more tender. Also, you can cut florets into smaller pieces to match the size of other vegetables in your pasta salad.
- Cherry Tomatoes: I like to use sweet cherry tomatoes for their flavor, but any small variety of tomato will do!
- Green Bell Peppers: These peppers add a great texture. In addition, they have a slightly bitter, earthy flavor that I think tastes great paired with the other vegetables and a tangy dressing.
- Red Onion: Red onions will add a slightly sweet flavor to your pasta salad. They also have a beautiful color which looks great for presentation!
- Kalamata Olives: If you have never tried a kalamata olive before, they are dark brown and have a savory, meaty flavor.
- Feta: Feta is the perfect ingredient for getting that perfect Greek flavor!
Greek Pasta Salad Dressing Ingredients
This dressing is simple to make and adds the perfect touch to this pasta salad. The flavors combined create the best greek pasta dressing that is sweet and savory in every bite! For all ingredients measurements, see the recipe card below.
- Red Wine Vinegar: For a fruity, tangy base.
- Dijon Mustard: Dijon mustard adds creaminess and zippy flavor to your dressing!
- Honey: For sweetness and a smooth texture.
- Garlic: Minced garlic adds the perfect savory flavor to the salad.
- Oregano: Bold and earthy, this herb makes your dressing aromatic.
- Kosher Salt: Used to enhance flavor.
- Black Pepper: For a pop of flavor.
- Olive Oil: This will bind your ingredients together. I like to use extra virgin olive oil in this recipe because it isn’t processed. Because of this, it has more vitamin content!
How to Make Greek Pasta Salad
It is so easy to put this tasty greek pasta salad together, it’s the kind of thing you will want to make over and over again! Greek broccoli pasta salad is going to be your new favorite potluck dish.
- Cook Pasta: First, Bring a large pot of water to a boil and add the pasta and cook according to package directions.
- Blanch Broccoli: In the last two minutes, add in the broccoli. Drain and rinse in cold water.
- Toss Pasta and Veggies Together: Next, in a large serving bowl toss together pasta, broccoli, tomatoes, bell pepper, onion, and olives.
- Add Feta: Lastly, sprinkle crumbled feta on top of broccoli pasta salad.
- To Make Dressing: In a medium sized bowl, whisk together red wine vinegar, mustard, honey, garlic, oregano, 1 teaspoon salt, and pepper.
- Mix In Olive Oil: Slowly drizzle in olive oil and whisk until a thickened dressing is formed. If not using right away, which again before adding to the salad.
- Toss: To complete, toss pasta salad with dressing or serve on the side.


Broccoli Pasta Salad Tips and Tricks
This Greek broccoli pasta salad is light and flavorful with the best Mediterranean flavor. Make it even better with these easy tips and tricks!
- Salt Pasta Water: Salting your pasta water heavily helps to season from the inside-out!
- Pasta Types: I like using pastas that store sauce in their grooves. It makes a pasta salad more flavorful and enjoyable to eat. Penne and macaroni are other fun types to try!
- Blanch Broccoli: Broccoli can be extremely fibrous in texture and have a bitter taste when eaten raw. For this pasta salad recipe, I like to use a simple blanching method for cooking broccoli. It just takes 2 minutes to tenderize the vegetable, making it more palatable and sweeter in taste. Make sure to “shock” or chill the broccoli in an ice water bath to stop the cooking process.
- Other Vegetables: Use this recipe to showcase all of your favorite vegetables! I reccomend taking advantage of the delicious veggies in season right now and add in things like shredded zucchini, squash, or cucumber!
- Texture: Pasta will harden a bit as it cools down, so you can cook it for an extra minute before preparing the salad. Don’t overcook your pasta, though! It will fall apart when you mix everything together.

Greek Broccoli Pasta Salad Pairings
The flavor of this pasta salad is so versatile, it will go with just about anything! Serve it alongside juicy, grilled chicken for a healthy, complete meal! You could also whip up some of my other easy Greek recipes for a tasty Mediterranean-themed dinner! If your family is anything like mine, they will gobble it all up in no time!

Appetizers
Greek Chicken Sliders


Dressings, Sauces, and Dips
The BEST Hummus I Have Ever Had!
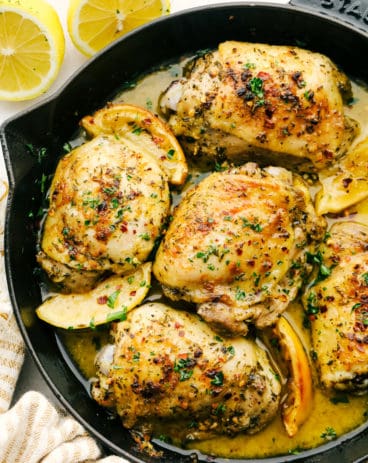
Dinner
Easy Greek Lemon Chicken

Storing Leftover Greek Broccoli Pasta Salad
Greek pasta salad is the best for storing and taking on the go! It can be eaten straight out of the fridge.
- In the Fridge: Stored in an airtight container, your broccoli pasta salad will stay good for up to 3 days.
- Making in Advance: Since pasta salad tends to get soggy as it sits, if you are making your salad in advance, it is best to wait until you are ready to serve before adding dressing.

My Other Favorite Pasta Salads

Greek Broccoli Pasta Salad
Ingredients
Broccoli Pasta Salad Ingredients
- 1 pound rotini pasta
- 4 cups broccoli florets cut into 1-inch pieces (8 ounces)
- 1 ½ cups cherry tomatoes cut in half
- 1 cup diced green bell pepper 1/2-inch dice
- ½ cup diced red onion ¼-inch dice
- ½ cup kalamata olives sliced
- ¼ cup crumbled Feta cheese
Dressing Ingredients
- ½ cup red wine vinegar
- 2 teaspoons Dijon mustard
- 2 teaspoons honey
- 2 teaspoons minced garlic
- 1 teaspoon dried oregano
- 1 teaspoon kosher salt
- ½ teaspoon black pepper
- ½ cup extra virgin olive oil
Instructions
-
Bring a large pot of water to a boil and add the pasta and cook according to package directions.
-
The last two minutes add in the broccoli. Drain and rinse in cold water.
-
In a large serving bowl toss together pasta, broccoli, tomatoes, bell pepper, onion, and olives.
-
Sprinkle crumbled feta on top of broccoli pasta salad.
-
In a medium-sized bowl whisk together red wine vinegar, mustard, honey, garlic, oregano, 1 teaspoon salt, and pepper.
-
Slowly drizzle in olive oil and whisk until a thickened dressing is formed. If not using right away, which again before adding to the salad.
-
Toss pasta salad with dressing or serve on the side.
Video
Notes
Nutrition
from The Recipe Critic https://ift.tt/2xiWDeQ
https://ift.tt/3x4L5rG