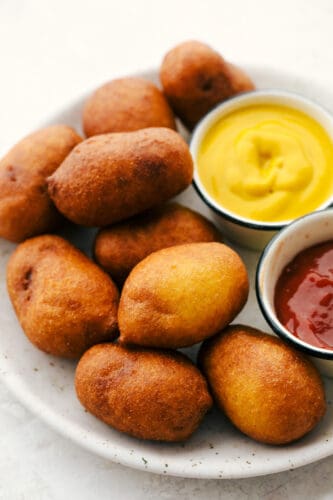
A crispy cornbread outer layer and snack-able size make these Mini Corn Dogs the perfect family treat! Recreate delicious county fair flavors in just a few simple steps!
Something about the summer makes me want to make all the fair and carnival-inspired treats. Try pickles, onion rings, and donut holes for other irresistible treats perfect for bringing street food to you.

Easy Mini Corn Dogs Recipe
Mini Corn dogs have been a favorite in my house! It is so much fun to put them together with my kids. It really is a recipe that the whole family can join in on. These mini corn dogs are so good, though, I won’t judge you if you keep the batch all for yourself! They have the most amazing cornbread and buttermilk breading which creates the perfect light and fluffy texture. Pair that with a savory, juicy hot dog in the middle, and these mini corn dogs become too good to resist!
My family has loved having these on summer afternoons paired with homemade cheese sauce for dipping. The smaller size of these corn dogs makes them perfect for taking on the go. But do not let their small size deceive you, they are bursting with flavor in every bite! If you are feeling extra hungry, you can also give my classic homemade corndogs a try. Whether they are bite or standard-sized, I am sure they will become a favorite at your house!
Mini Corn Dogs Ingredients
Ingredients and batter make all the difference in creating the perfect corn dog. These are mini corn dogs are so easy and fun to make! Find individual measurements for each ingredient in the recipe card below!
- Canola Oil: You will need enough for 2 inches of oil for frying.
- Hot Dogs: 6, regular size and thickness. These will be cut into 2-inch pieces.
- Skewers: You will need at least 12 wooden skewers. You can also use candy or popsicle sticks.
- All-Purpose Flour: Used to thicken the batter.
- Cornmeal: Fine cornmeal works best. It adds a light, crumbly texture to your batter and will make your corndogs perfectly crispy!
- Salt: To enhance flavors.
- Granulated Sugar: Adds a sweet flavor to your mixture.
- Baking Powder: This will give your corndogs a fluffy texture.
- Egg: You will need one egg in your mixture as a binding agent.
- Honey: Adds sweetness to your mixture and keeps it smooth.
- Buttermilk: Makes your batter rich and delicious. You can whip up some of my homemade buttermilk if you do not have it on hand!
- Milk: Keeps your mixture from becoming too thick.
Making the BEST Mini Corn Dogs
Making Mini Corn dogs is fun and easy! My kids love helping putting the sticks in and dipping them in batter. It is a great family activity!
- Prepare Your Oil: Heat about 2 inches of oil in a large pot or dutch oven to 350 degrees.
- Prep Hot Dogs: Pat them dry with paper towels. Set aside.
- Buttermilk Batter: In a large bowl, whisk the flour, cornmeal, salt, sugar, and baking powder together. In another bowl or large liquid measuring cup, whisk the egg, honey, buttermilk, and milk together. Add the wet ingredients to the dry and combine thoroughly. The batter will be thick, but smooth enough to evenly coat the hot dog once it has been dipped.
- Batter Hot Dogs: Cut the hot dogs into two-inch pieces. Stick a skewer into the hot dog. Dip into the batter until you no longer see bubbles.
- Fry: Gently drop the battered hot dog into the hot oil. Cook for about 2-3 minutes, until nice and golden brown on all sides. Remove from the oil and allow to drain on paper towels. Serve immediately.
- Leftovers: If you have leftover batter, it can be saved for 2-3 days in the fridge and used to fry up more dogs. With leftover dogs, they can be stored in the fridge in an airtight container for 2-3 days, or frozen.

Corn Dog Tips and Tricks
It is really hard to go wrong with mini corn dogs, but here are some tips to make yours as delicious as possible!
- Hot Dogs: The best part about this recipe is that you can interchange hot dogs for things like breakfast sausage links! I also like using cheese-filled hot dogs or sausages with jalapenos or peppers in them for a spicy twist on this classic.
- Batter Won’t Stick: If your batter will not stick to your hot dogs, give them a light dusting of flour before dipping.
- Skewer Length: Your popsicle sticks or skewers should be long enough that they can go into the hot dog halfway but still allow a few inches at the bottom to hold onto easily.
- Leftover Oil: It takes quite a bit of oil to fry these corn dogs up, and one can be left wondering what to do with it once cooking is done. If you are going to throw it away, never dump it down the drain. Instead, pour it into a disposable cup, seal it up, and toss it. You can also reuse your oil by running it through a strainer and then putting it in a clean container. Make sure your oil has cooled completely before transferring it anywhere to avoid burns.
What to Serve With Your Mini Corn Dogs
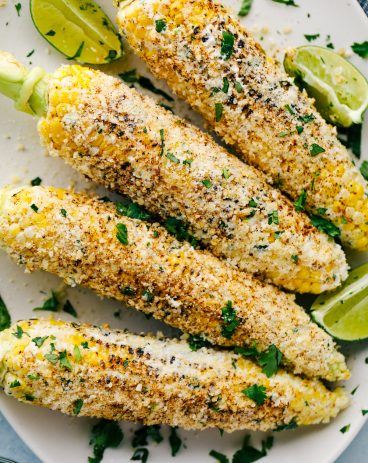
These Mini Corn dogs are delish as is, but using condiments can really enhance them! Go for classic ketchup or mustard for dipping, or for some cheesy goodness, try out my to die for homemade cheese sauce! Honey is also amazing for dipping. I first tried it at a food truck and instantly fell in love with the sweetness it gave my corn dog! I also like serving these alongside veggies and salads as a light contrast. You can even serve them up with Mexican street corn for a true food truck experience!
Dressings, Sauces, and Dips
Homemade Cheese Sauce
Dinner
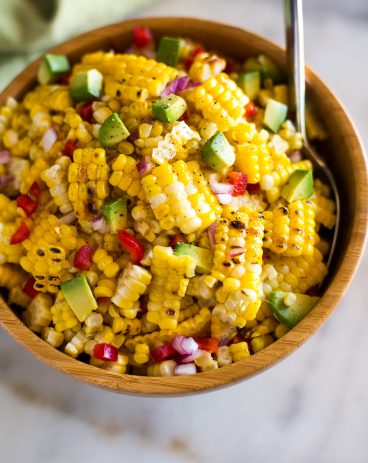
Summer Corn Salad
Side Dishes
Grilled Mexican Street Corn
Dressings, Sauces, and Dips
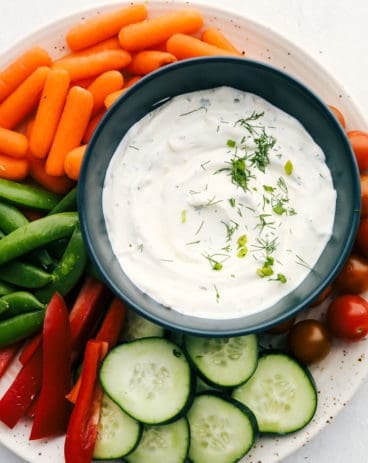
Easy Veggie Dip
Storing Your Mini Corn Dogs
Mini Corn dogs are the perfect thing to keep as leftovers. Heat them up for a quick and easy meal that tastes just as good as the day you made them! They are great to have on hand for hungry kids and easy enough for them to reheat on their own.
- Refrigerator: Keep corn dogs in an airtight container for up to 3 days. You can also store excess batter in the fridge for 2-3 days.
- Freezer: You can keep your corn dogs in an airtight bag or container for up to 3 months in the freezer.
- Reheating: Mini Corn dogs can be easily reheated in the microwave or on the skillet, but my personal favorite is to throw them in the air fryer at 360 degrees Fahrenheit, checking on them every few minutes. It keeps the outside perfectly crispy! Check out my air fryer corn dog recipe for more tips and tricks.

Other Fried Favorites
Appetizers
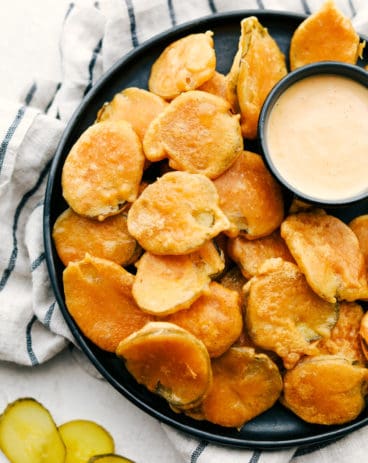
Fried Pickles Recipe
Dinner
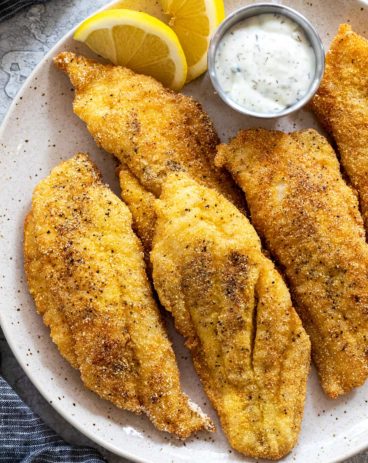
Fried Catfish
American
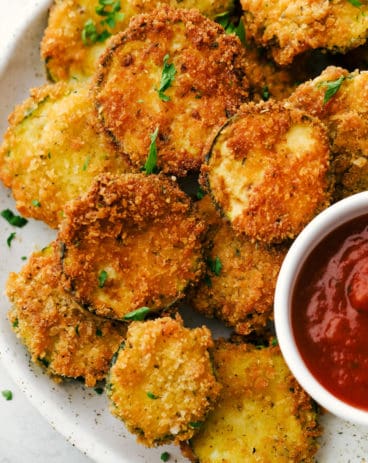
Crispy Parmesan Fried Zucchini
Appetizers
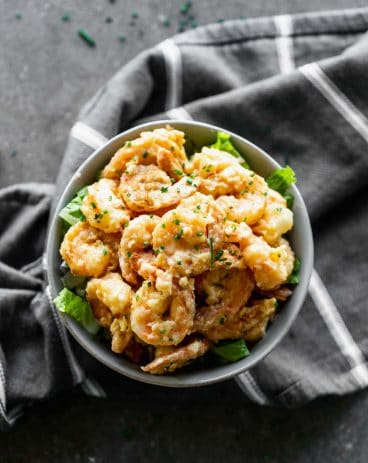
Copycat Bang Bang Shrimp
Mini Corn Dogs
Ingredients
- canola oil for frying
- 6 hot dogs regular size and thickness cut into 2 inch pieces
- 12 hot dog sticks or popsicle sticks candy sticks, wooden skewers, etc
- 1 cup all purpose flour
- 1 cup cornmeal fine
- ¼ teaspoon salt
- 2 Tablespoon granulated sugar
- 1 Tablespoon baking powder
- 1 large egg
- 2 Tablespoon honey
- 1 cup buttermilk
- ¼ cup milk
Instructions
-
Heat about 2 inches of oil in a large pot or dutch oven to 350 degrees.
-
Prep your hot dogs by patting them dry with paper towels and inserting the sticks. Set aside.
-
In a large bowl, whisk the flour, cornmeal, salt, sugar, and baking powder together. In another bowl, or large liquid measuring cup, whisk the egg, honey, buttermilk and milk together. Add the wet ingredients to the dry and combine thoroughly. The batter will be thick, but smooth enough to evenly coat the hot dog once it has been dipped.
-
Cut the hot dogs into two inch pieces. Stick a toothpick into the hot dog. Dip into the batter until you no longer see bubbles.
-
Gently drop the battered hot dog into the hot oil. Cook for about 2-3 minutes, until nice and golden brown on all sides. Remove from the oil and allow to drain on paper towels. Serve immediately.
-
If you have leftover batter, it can be saved for 2-3 days in the fridge and used to fry up more dogs. With leftover dogs, they can be stored in the fridge in an airtight container for 2-3 days, or frozen.
Nutrition
from The Recipe Critic https://ift.tt/3vnpB8Q
https://ift.tt/3wGLjG4