गुरुवार, 11 जून 2020

Grilled Vegetable Kabobs

Grilled vegetable kabobs served on a platter

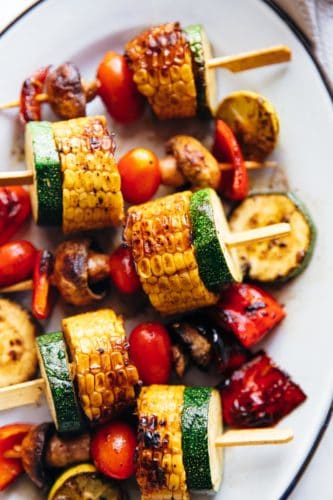
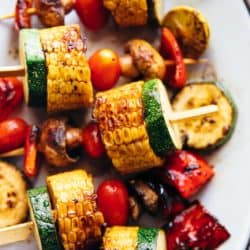
Grilled Vegetable Kabobs are tossed in a spicy lemony marinade and grilled till lightly charred. They soak up all the flavor and become juicy, tender but remain slightly crunchy.

If you love summer grilling recipes, try out our Hobo Dinner Foil Packets, Grilled Hawaiian Chicken, Grilled Coconut Lime Pineapple and Grilled Chicken Mango Salad.

Grilled vegetable kabobs served on a platter

Grilled Vegetable Kabobs

This is the best way to eat vegetables this summer. Lemony, garlicky marinade that’s got a slight spice kick from paprika and juicy veggies that stay that way on the grill. There is so much to love about this recipe. And these take just a few minutes on the grill so they are literally the first to cook and the first to finish.

Marinade for Grilled Vegetables

The marinade for these grilled veggies is really simple. I like to combine olive oil, butter (because flavour!), minced garlic, parsley, oregano, paprika, pepper, salt and lime juice. Just whisk everything together and pour it all over those veggies. Let them soak up the flavour for about ten minutes. This gives the veggies some time to sweat and the marinade to work its magic.

Make sure to use your hands to work the marinade into the veggies. That ways you’ll ensure that every tiny crevice has marinade on it. You don’t want to miss any bits and parts.

I prefer using dried herbs in the marinade because fresh herbs tend to burn easily on the grill. Dries herbs are easily available, and pack in so much flavour in just a little bit.

Pouring marinade over grilled vegetable kabobs

Vegetables for Grilled Vegetable Kabobs

You can pick from a variety of summer vegetables – corn, cherry tomatoes, zucchini, mushrooms and bell peppers are my favourite. But I also love adding pineapple, red onions, cooked baby potatoes and brussel sprouts. Just cut them into large pieces so that they don’t cook too fast and burn.

Marinated grilled vegetable kabobs in a bowl

Best Way to Cook Vegetable Kabobs:

You can make them on an outdoor grill, or if you live in an apartment and don’t have access to one, use an oven or the stove to grill these. Either way these will be delicious!

These are so easy to put together that you’ll be amazed at how good they taste when they come off the grill. The marinade can also be used for chicken, fish or steak. This recipe is so versatile!

More Grilling Recipes to Try:

Grilled vegetable kabobs served on a platter
Print

Grilled Vegetable Kabobs

Grilled Vegetable Kebobs take a few minutes to put together and are the perfect way to celebrate summer veggies!
Course Appetizer
Cuisine American
Keyword grilled vegetable kebobs
Prep Time 10 minutes
Cook Time 6 minutes
Total Time 16 minutes
Servings 4 people
Calories 195kcal
Author Richa Gupta

Equipment

  • Grill

Ingredients

Marinade

  • 2 tablespoons Olive Oil
  • 2 tablespoons Melted Butter
  • 3/4 teaspoon minced Garlic
  • 1/2 teaspoon dried Parsley
  • 1/2 teaspoon dried Basil
  • 3/4 teaspoon Paprika
  • 1/2 teaspoon Pepper
  • 1 tablespoon Lime Juice
  • 1 teaspoon Salt

Vegetables

  • 2 Corn on the Cob cut into 5 parts
  • 1 Red Bell Pepper cubed
  • .5 pound Mushrooms
  • .5 pound Cherry Tomatoes
  • 1 Zucchini cut into rounds

Instructions

  • Prepare the grill and heat it for medium high heat cooking.
  • Whisk together all the ingredients for the marinade and pour them all over the veggies. Mix well. Let this sit for 10 minutes and then skewer the veggies.
  • Place the skewers on the grill. Cook till the vegetables are lightly charred (approx 2-2.5 minutes) and then flip them to cook the vegetables on the other side. Brush once with leftover marinade in the bowl while they cook. Once they are charred all over and tender, remove them off the grill and serve.

Nutrition

Calories: 195kcal | Carbohydrates: 17g | Protein: 5g | Fat: 14g | Saturated Fat: 5g | Cholesterol: 15mg | Sodium: 653mg | Potassium: 616mg | Fiber: 3g | Sugar: 8g | Vitamin A: 1751IU | Vitamin C: 65mg | Calcium: 17mg | Iron: 1mg


from The Recipe Critic https://ift.tt/3cRabQT
https://ift.tt/2BXbdOA

बुधवार, 10 जून 2020

Grilled California Avocado Chicken

Grilled California Avocado Chicken is tender chicken marinated in an amazing honey garlic balsamic sauce and is grilled to perfection! It is topped with a thick slice of mozzarella cheese and avocados, tomatoes and basil. This chicken is INCREDIBLE!!

The combination of chicken and avocado is one of my favorites! If you love California chicken and don’t have a grill try this delicious California avocado skillet chicken.

Grilled California Avocado Chicken in a black skillet.

Grilled California Avocado Chicken

So, I could not wait to share with you this Grilled California Avocado Chicken!  Cue all of the heart eye emojis for the avocado, tomato, and basil combination!!!  My mouth was watering making this avocado salad of sorts to top off the chicken. It provides a fresh and delicious element on top of the moist, flavorful chicken. It also makes for a vibrant, colorful, and delicious presentation. So pretty!  In spite of looking too great to eat, this grilled California avocado chicken was quickly devoured by my family!!

Usually, when something looks and tastes this good, I know I am going to have to put in lots of ingredients and lots of time to make it.  However, this avocado chicken comes together so quickly and easily I was shocked!! I am telling you, this was one of the best things that I have ever thrown on the grill. I already can’t wait to make it again. The flavors came together so well and I know that this will become a family favorite at your house as well!

Avocado Chicken Ingredients:

First of all, this chicken marinates in a honey garlic balsamic sauce. I mean who doesn’t love that flavor combination? It marinates to perfection and honestly grills to tender and juicy perfection! The flavor is absolutely unreal in this chicken.

  • Balsamic vinegar: This is the acidic ingredient in the marinade that will act as a tenderizer.
  • Honey:  Part of the marinade that adds flavor and keeps the chicken super juicy.
  • Garlic: Cloves, minced
  • Olive oil: The oil in your marinade will penetrate the meat, and bring the other flavors of the marinade along with it.
  • Italian seasoning:  The perfect blend of flavors for most things, but especially this avocado chicken!
  • Salt and pepper: To taste.
  • Chicken: Boneless skinless breasts will grill best.
  • Mozzarella: I love how fresh sliced mozzarella pairs with the tomato and basil, but any good melting cheese will work to smother the chicken.
  • Avocados: Diced to bite size perfection.
  • Roma tomatoes:  Any tomato will work, just be sure to cut into bite sized pieces.
  • Basil: Fresh chopped basil is perfect on this chicken.
  • Optional: Balsamic vinegar for drizzling

How to Grill California Chicken:

And just when you think that it can’t get any better, top it with a thick slice of mozzarella cheese when it comes off of the grill. It gets so melty and ooey gooey. Then, JUST when you think it can’t possibly get any better with the ooey gooey cheese on top comes the avocado, tomato, and basil.  Mind blown!

  1. Marinate chicken: In a medium sized bowl, whisk the balsamic vinegar, honey, garlic, olive oil, italian seasoning, and salt and pepper. Add the chicken breasts and coat. Marinate for 30 minutes.
  2. Mix avocado topping: Meanwhile, in a small bowl add the avocado, tomato, basil and salt and pepper to taste. Set aside.
  3. Grill: Heat the grill to medium high heat. Grill the chicken on each side about 6 minutes or until cooked throughout and no longer pink.
  4. Dress chicken and serve: Top with mozzarella cheese and avocado, tomato basil mixture. Drizzle with balsamic vinegar and serve immediately.

Grilled California Avocado Chicken close up in a black skillet.

Grilling the Perfect Chicken:

  • Make sure your grill is clean before you begin and rub some oil on the grates to prevent the chicken from sticking.
  • Thinly sliced chicken breasts won’t take as long to reach temperature. If your chicken breasts are really thick, pound them to thin them out.  It will reduce cooking time and help it to cook more evenly.
  • Basic rule is 3-5 minutes per side on medium to high heat, but will vary depending on the thickness of your meat.
  • You are aiming for a medium, indirect heat while grilling so that the outside of the chicken does not burn while you get the inside up to temperature.
  • Keep the grill closed while cooking. This will keep the heat in and allow the chicken to cook quicker and more evenly.
  • The chicken is done the temperature reaches 165 degrees or the juices run clear.
  • The chicken will continue to cook slightly even after removed from the grill.

Chicken on the grill.

Variations:

  • Marinate: Marinate in a combination of olive oil, lime juice, cilantro and garlic. (The longer it marinates the more flavor you will get, so if you have more time, let it sit in the juices for up to 24 hours.)
  • Add more flavor! If you want even more spice and flavor: Add garlic seasoning on the chicken and use pepper jack cheese instead of mozzarella.
  • Toppings: To change it up, you could even add black olives or bacon on top. Because let’s be honest.  Everything is better with bacon!
  • What to serve with it? Serve with rice, a fresh salad, or seasoned fingerling potatoes.
  • Bake instead of grilling: Cover the chicken with foil and cook chicken only at 350 for approximately 45 minutes depending on thickness of the chicken.  Then, uncover and add cheese and basil and place back in the oven for an additional 5 minutes or until the cheese melts.  Finally, top with the fresh avocado mixture immediately before serving.

Avocado Chicken salsa in a clear bowl.

Storing Grilled Chicken:

I am not sure you will have any leftovers with this delicious chicken but it is easy to store just in case. Here are a few steps to help keep your grilled chicken fresh.

  • Allow to cool after cooking no more than 2 hours before refrigerating or freezing.
  • Store in a shallow airtight container.
  • Grilled California Avocado Chicken will be good in the refrigerator for 3-4 days or in the freezer for 4 months.
  • To avoid freezer burn be sure to pack your chicken tightly with airtight heavy-duty foil, plastic wrap or freezer paper or putting it in a freezer bag.

Grilled California Avocado Chicken being picked up off a skillet with a spatula.

Print

Grilled California Avocado Chicken

Grilled California Avocado Chicken marinates in an amazing honey garlic balsamic sauce and is grilled to perfection! It is topped with a thick slice of mozzarella cheese and avocados, tomatoes and basil. This chicken is INCREDIBLE!!
Course Dinner, Main Course
Cuisine American, Italian
Keyword avocado chicken, california avocado chicken
Prep Time 10 minutes
Cook Time 12 minutes
Total Time 22 minutes
Servings 4 People
Calories 558kcal
Author Alyssa Rivers

Equipment

  • Utopia Kitchen Cooking Knives

Ingredients

  • 3/4 cup balsamic vinegar
  • 1/4 cup honey
  • 3 cloves garlic minced
  • 2 Tablespoons olive oil
  • 2 teaspoons italian seasoning
  • 1/2 teaspoon salt
  • 1/4 teaspoon pepper
  • 4 boneless skinless chicken breasts
  • 4 slices mozzarella cheese
  • 2 avocados diced
  • 3 roma tomatoes diced (any tomato will work)
  • 1/4 cup fresh chopped basil
  • salt and pepper
  • balsamic vinegar for drizzling optional

Instructions

  • In a medium sized bowl whisk the balsamic vinegar, honey, garlic, olive oil, Italian seasoning, and salt and pepper. Add the chicken breasts and coat. Marinate for 30 minutes.
  • Meanwhile, in a small bowl add the avocado, tomato, basil and salt and pepper to taste. Set aside.
  • Heat the grill to medium high heat. Grill the chicken on each side about 6 minutes or until cooked throughout and no longer pink. Top with mozzarella cheese and avocado, tomato basil mixture. Drizzle with balsamic vinegar and serve immediately.

Notes

Updated on June 10, 2020
Originally Posted on June 11, 2017

Nutrition

Calories: 558kcal | Carbohydrates: 38g | Protein: 33g | Fat: 31g | Saturated Fat: 8g | Cholesterol: 95mg | Sodium: 621mg | Potassium: 1123mg | Fiber: 8g | Sugar: 27g | Vitamin A: 775IU | Vitamin C: 18.5mg | Calcium: 198mg | Iron: 2mg


from The Recipe Critic https://ift.tt/2MbHLZD
https://ift.tt/30pIpsh

मंगलवार, 9 जून 2020

Mouthwatering Fruit Salsa with Cinnamon Pita Chips

Mouthwatering Fruit Salsa with Cinnamon Pita Chips is an easy to make salsa filled with vibrant fresh fruit and paired with the best homemade cinnamon-sugar chips!  The sweet and warm flavors of the crispy cinnamon pita chips and colorful fruit salsa will make this your new favorite version of chips and salsa this summer!!

These tortilla chips are so unforgettable and satisfying your family and friends will begging you to make them over and over.  For more fruit salsas that would be fantastic to dip into with your Cinnamon Pita Chips try Fresh Fruit Salsa or Mango Salsa!

Mouthwatering salsa in a bowl.

Amazing Fruit Salsa with Cinnamon Pita Chips

One thing I have really been enjoying as the weather warms up is all the fresh fruit recipes.  So, when I discovered this mouthwatering fruit salsa, I was in love!  When I dipped a cinnamon pita chip into it for the first time, I was amazed! I knew I had to type this one up right away and share with you!

This fruit salsa is so easy to make and the lemon juice helps the fruit to stay fresh and the colors to stay vibrant.  The sugar creates this amazingly sweet sauce that will make you want to lick the bowl! The crispy chip is the perfect vessel to scoop up all the flavors of the fruit with its warm seasoning.  You will not be able to get enough of this cinnamon chips and fruit salsa combination this summer!

What’s in Fruit Salsa?

The most incredible thing about this fruit salsa is how versatile the ingredients are.  Use what is fresh and looks colorful and ripe at your local farmers market, the produce isle at your favorite grocery store, or even in your garden!  The lemon juice will help your diced fruit stay fresh as long as possible and the sugar will bring out the flavors and give this salsa a natural glaze.

  • Strawberries: Hull before dicing into small pieces. The goal is to have all the fruit be even sizes.
  • Granny Smith Apples: Peel first before chopping and mixing in with the other fruit.
  • Kiwis: Scoop out of peel and dice. I love the soft texture of this fruit in the salsa.  A great contrast to the apples.
  • Blueberries: The only fruit you won’t have to cut!
  • Mango: Peel, then cut into small pieces and mix together with all the ingredients.
  • Sugar: Adds sweetness and helps form a glaze from the juices in the fruits!
  • Lemon Juice: If you are using a fresh lemon you will need about half a lemon.

Cinnamon Pita Chip Ingredients:

The ingredients for the cinnamon pita chips are staples at my house.  I don’t even have to make a run to the store to make these chips happen!  Pair them together with fruit salsa as a quick appetizer for guests or for an afternoon snack for hungry kids!  You really can’t go wrong when these ingredients are involved!

  • Flour tortillas: Cut into triangles, then coat with butter and cinnamon sugar.
  • Butter: Brushing with butter on both sides helps the tortilla to crisp up.  You could also swap out for a cooking spray on both sides if you prefer.
  • Sugar: Sweetness sprinkled on top of the chip.
  • Cinnamon: Warm spice covering the chip that perfectly compliments sweetness.

How to Make the Best Fruit Salsa with Cinnamon Pita Chips:

When I found out how simple it is to make pita chips at home, I was amazed.  They are so quick and easy to prepare and it is so worth the extra few minutes to have fresh tortilla chips.  First of all, the smell is amazing!  The buttery tortilla crisping up while the cinnamon-sugar coating melts in, fills the kitchen with an unbelievably delicious smell!   Then, chop up some of your favorite fruit and stir it together with lemon juice and sugar and voila, you have a huge hit on your hands!

  1. Prep: Heat the oven to 350 degrees.
  2. Combine ingredients for salsa: In a small bowl mix together the strawberries, apples, kiwis, blueberries, and mango, with sugar and lemon juice.
  3. Prepare tortillas: Lay the tortillas in a single layer and brush with the butter. Sprinkle the cinnamon sugar on top. Using a pizza cutter, cut the tortillas into triangles and lay on a single layer on your baking sheet.
  4. Bake tortillas: Place tortillas in your preheated oven for 8-10 minutes or until they become crisp.

Fruit salsa cut up in a glass bowl with juice being poured over top in a measuring cup.

Tips for Choosing the Freshest Fruits:

To create the best tasting salsa, carefully choose your fruit.  Here are some things to look for when selecting the best fruit…

  • Strawberries: Look for healthy green leaves and bright red color.  Size doesn’t really effect the flavor, so don’t worry too much about that!
  • Blueberries: Ripe blueberries should be a deep blue color.  If you are picking them yourself, they should come right off and not have to be twisted or pulled off the stem.
  • Mangos: Picking a good mango is not about color.  Instead, look for one that is soft when you squeeze it, but not mushy.
  • Kiwi: Size does not matter when it comes to the ripeness of a kiwi.  When you apply gentle pressure on a ripe kiwi it should yield slightly.  If it is still hard, allow it to ripen on your counter a few more days before using.
  • Granny Smith Apples:  Bright green skin with small spots indicates a ripe apple.  The skin inside should be white and crisp.

Storing Fresh Fruit Salsa:

I would be super surprised if you have any of this left over after you take it to a gathering of any kind!  People seriously go crazy over this salsa!  However, I do know that there are occasions where you may find yourself with leftovers.

  • How do I store fresh salsa? Store in an airtight container.  Shallow containers or re-sealable bags work best. The key is to allow the least amount of air in the container as possible.
  • Can I make salsa ahead of time? Yes! It will last 3-5 days in the refrigerator when properly stored.  I love to store it in the basket of a salad spinner for best results.  The juice drips out and keeps the fruit from getting soggy.  Then, I add the juice back to the fruit right before serving.
  • Can you freeze fruit salsa? Salsa will be good for 2 months in the freezer.  Thaw overnight in the refrigerator when ready to use.
  • Which fruit works best in a fruit salsa? Try to choose a balanced combination of both sweet and acidic fruits. Sweet fruits include: grapes, bananas, persimmons, figs.  Acidic fruits would be: grapefruit, pineapple, and sour apples.
  • How to store fresh fruit until I am ready to make salsa? Prepare the fruit as if you are going to use it right away.  Wash, peel, cut, and allow fruit to dry completely.  Then, lay fruit out flat on a parchment paper lined baking tray and allow to freeze. Then remove fruit and put in a resealable bag.  This will freeze the fruit in individual pieces instead of one big clump.  When you are ready to make your salsa, allow the fruit to thaw in the refrigerator, then mix together.  Just beware, the fruit may be slightly more fragile than normal after defrosting.

Tortilla being brushed with butter then adding cinnamon over top and cutting into triangle slices with a pizza cutter.

What to Serve with Cinnamon Pita Chips:

I love these pita chips with my mouthwatering fruit salsa any afternoon of the week! They get my kids eating fruit and are packed with delicious flavor!  I also love them as a dessert though! Together with a cream cheese dip or drizzled with melted chocolate, they are irresistible!

Storing Cinnamon Pita Chips:

I have learned recently the importance of making things ahead and storing them. It has come in handy so often when unexpected visitors stop by.  These tortilla chips have been a lifesaver a couple times already! I just pull them out and have a great tasting homemade snack or dessert in minutes!

  • How do I store tortilla chips? Allow chips to cool completely before storing.  Place in an airtight container.  Store at room temperature.
  • How long are Pita chips good? Homemade pita chips will last 4 days after being made.  If you refrigerate or freeze them they will last even longer!
  • Can I freeze my homemade cinnamon pita chips? Yes, freezing tortilla chips will give them their longest lifespan.  To thaw place in the refrigerator overnight or simply microwave for 10-30 seconds to heat them back up to their fresh from the oven state!

Fruit salsa in a bowl with a cinnamon chip being dipped in it.

More Delicious Fruit Salsa Recipes You’ll Love!

Print

Fruit Salsa with Cinnamon Pita Chips

Mouthwatering Fruit Salsa with Cinnamon Pita Chips is an easy to make salsa filled with vibrant fresh fruit and paired with the best homemade cinnamon-sugar chips!  The sweet and warm flavors of the crispy cinnamon pita chips and colorful fruit salsa will make this your new favorite version of chips and salsa this summer!!
Course Appetizer, Snack
Cuisine American
Keyword cinnamon pita chips, fruit salsa, fruit salsa with cinnamon pita chips, fruit salsa with pita chips, pita chips
Prep Time 15 minutes
Cook Time 10 minutes
Total Time 25 minutes
Servings 8 People
Calories 230kcal
Author Alyssa Rivers

Ingredients

  • 1 pound strawberries diced
  • 2 Granny Smith apples diced
  • 2 kiwis diced
  • 1/2 cup blueberries diced
  • 1 mango diced
  • 2 Tablespoons sugar
  • juice of half a lemon

Cinnamon Pita Chips

  • 8 flour tortillas
  • 2 Tablespoons butter melted
  • 1/4 cup sugar
  • 1 tablespoon cinnamon

Instructions

  • In a small bowl combine the strawberries, apples, kiwis, blueberries, mango, sugar and lemon juice.

To make the cinnamon pita chips

  • Preheat the oven to 350 degrees. Lay the tortillas in a single layer and brush with the butter. Sprinkle the cinnamon sugar on top. Using a pizza cutter, cut the tortillas into triangles and lay on a single layer on your baking sheet. Bake for 8-10 minutes or until they become crisp.

Nutrition

Calories: 230kcal | Carbohydrates: 45g | Protein: 4g | Fat: 5g | Saturated Fat: 2g | Cholesterol: 8mg | Sodium: 233mg | Potassium: 303mg | Fiber: 5g | Sugar: 25g | Vitamin A: 419IU | Vitamin C: 67mg | Calcium: 64mg | Iron: 2mg


from The Recipe Critic https://ift.tt/2BQkE2j
https://ift.tt/30qLats

सोमवार, 8 जून 2020

Vegan Buddha Bowl

This Vegan Buddha Bowl is loaded with colorful raw summer vegetables, whole grains, good fats, and topped with a tangy creamy balsamic dressing. Make adjustments to use up whatever vegetables you have on hand and enjoy this delicious vegan meal for lunch or dinner all summer long!

It’s summer time and there is an abundance of fresh produce ready to be eaten! A great way to enjoy all those vibrant vegetables is in a Buddha Bowl! For more well balanced meals, try Cilantro Lime Chicken Salad, Summer Cobb Salad, and Asian Turkey Lettuce Wraps.

A large Buddha Bowl with spinach, quinoa, carrots, cucumbers, tomatoes, chickpeas, and avocado with a jar or dark creamy dressing to the side.

VEGAN BUDDHA BOWL

If you’d like to eat a more balanced diet, start making Buddha Bowls! They are so easy to throw together, taste awesome, and make you feel so good. They are so versatile but here is a my fresh garden version that is loaded with raw crisp veggies, chickpeas, quinoa, spinach, basil, and topped with a yummy creamy balsamic dressing.

WHAT IS A BUDDHA BOWL?

A buddha bowl is a plant-based one-dish meal. It is usually made and served in a large bowl and consists of: a whole grain, greens, protein (usually vegan), vegetables, toppings, and a sauce. Some might also refer to it as a bliss bowl, power bowl, glow bowl, hippie bowl,…

A true Buddha bowl is vegetarian and typically vegan since Buddhists follow a plant-based diet but you will find that some “buddha bowls” have meat.

Various size bowls of vegetables, quinoa, seeds, chickpeas, and dressing.

WHERE DID BUDDHA BOWLS GET THEIR NAME?

It is thought that the name might come from the fact that people would place food into Buddha’s bowl as a donation as he walked the streets.

It could also possibly be called this because balance is an important Buddhist concept and this dish is a balanced meal of vegetables, protein, and healthy fats.

The large stuffed bowl, resembling Buddha’s belly could also be a reason.

A close up shot of chickpeas and vegetables in a bowl.

HOW TO MAKE A BUDDHA BOWL:

COOK THE QUINOA:

  • Place water and quinoa in a 2 quart pot and bring to a boil over medium high heat. Reduce heat to low, stir in salt, and allow to simmer for about 15 minutes or until a white tail appears around the grains.
  • Remove from heat, cover with lid, and let sit for 5 minutes. Fluff and then serve or refrigerate.

MAKE THE CREAMY BALSAMIC DRESSING:

  • Puree all dressing ingredients together in a blender or with an immersion blender until smooth. Place in jar and refrigerate until ready to use.

ASSEMBLE THE BOWLS:

  • Assemble bowls with spinach, quinoa (warm or cold), chick peas, carrots, cucumbers, tomatoes, avocado, sunflower seeds, and basil. Drizzle with dressing and serve.

BUDDHA BOWL SAUCE:

You can really use any dressing or sauce for a buddha bowl. Some of my favorites are: tahini dressing, Creamy Cilantro Lime Dressing, pesto, a drizzle of plain olive oil, or this Creamy Balsamic Dressing.

To make this bowl completely vegan, use a vegan mayonnaise or yogurt. Regular mayo and Greek yogurt work great too.

Smooth creamy balsamic dressing in a jar with a spoon dripping dressing back into the jar.

WHAT ELSE CAN YOU PUT IN A BUDDHA BOWL?

Honestly, you can put whatever you heart desires into that bowl. Here are some ideas so you can make more Buddha Bowls:

  • Grains: brown rice, quinoa, barley, farro, bulgur wheat…
  • Greens: spinach, romaine, spring greens, arugula, kale…
  • Vegetables: these can be raw, steamed, or roasted- sweet potatoes, broccoli, radish, cabbage, bell peppers, onions, beets, tomatoes, carrots, cucumber, peas, corn…
  • Plant Based Proteins: Beans, lentils, chickpeas, tofu, tempeh, edamame…
  • Toppings: nuts, seeds, dried or fresh fruit, herbs…
  • Fats/Dressings: olive oil, avocado, hummus, pesto, tahini, peanut sauce…

A salad of spinach, cucumbers, grape tomatoes, carrot ribbons, avocado, chickpeas, and quinoa all mixed together.

HOW TO MEAL PREP:

If you are not planning on serving all 4 bowls in one sitting, you can store the remaining ingredients in the fridge in large 64 ounce jars.

Place ingredients into the jars in this order: dressing, quinoa, carrots, cucumber, tomatoes, and spinach. I recommend adding avocado just before serving since they brown. The sunflower seeds can be placed in the top of the jar but can get a little soft so I would add those just before serving as well so you get maximum crunchy texture.


A raw vegetable Vegan Buddha Bowl made up of with spinach, carrots, avocado, chickpeas, grape tomatoes, cucumbers, quinoa, basil, sesame seeds, and a creamy balsamic dressing.

MORE QUINOA SALAD RECIPES YOU’LL LOVE:

Print

Vegan Buddha Bowl

This Vegan Buddha Bowl is loaded with colorful raw summer vegetables, whole grains, good fats, and topped with a tangy creamy balsamic dressing. Make adjustments to use up whatever vegetables you have on hand and enjoy this delicious vegan meal for lunch or dinner all summer long!
Course Main Course
Cuisine American
Keyword Buddha Bowl
Prep Time 10 minutes
Cook Time 20 minutes
Total Time 30 minutes
Servings 4 People
Calories 452kcal
Author Melanie Dueck

Ingredients

For the Quinoa:

  • 1 cup quinoa
  • 2 cups water
  • 1/2 teaspoon salt

For the Bowl:

  • 8 cups baby spinach
  • 1 1/2 cups grape tomatoes halved
  • 1 English Cucumber sliced
  • 1 can chick peas drained and rinsed
  • 1 large avocado sliced
  • 4 carrots peeled
  • 1/4 cup sunflower seeds
  • 8 basil leaves chopped

For the Creamy Balsamic Dressing:

  • 3 tablespoons olive oil
  • 3 tablespoon balsamic vinegar
  • 3 tablespoon vegan mayonnaise or plain yogurt
  • 1 teaspoon Dijon mustard
  • 1 clove garlic
  • 1/4 teaspoon kosher salt
  • Fresh cracked black pepper

Instructions

For the Quinoa:

  • Place water and quinoa in a 2 quart pot and bring to a boil over medium high heat. Reduce heat to low, stir in salt, and allow to simmer for about 15 minutes or until a white tail appears around the grains.
  • Remove from heat, cover with lid, and let sit for 5 minutes. Fluff and then serve or refrigerate.

For the Dressing:

  • Puree all dressing ingredients together in a blender or with an immersion blender until smooth. Refrigerate until ready to use.

For assembling the bowls:

  • Assemble bowls with spinach, quinoa (warm or cold), chick peas, carrots, cucumbers, tomatoes, avocado, sunflower seeds, and basil. Drizzle with dressing and serve.

Nutrition

Calories: 452kcal | Carbohydrates: 49g | Protein: 12g | Fat: 25g | Saturated Fat: 3g | Sodium: 560mg | Potassium: 1323mg | Fiber: 11g | Sugar: 8g | Vitamin A: 16477IU | Vitamin C: 35mg | Calcium: 136mg | Iron: 5mg


from The Recipe Critic https://ift.tt/37hYf9F
https://ift.tt/3cHybWz