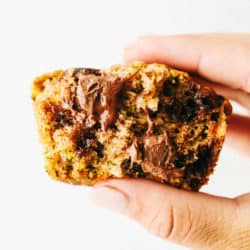
Chocolate Chip Zucchini Muffins are moist and rich muffins that are loaded with flavor from rich chocolate and shredded zucchini! They will be a huge hit and will give you a great way to use all that zucchini from your garden!
Turning nutritious zucchini into a chocolate treat is easier than you think! Chocolate Zucchini Cupcakes with Chocolate Cream Cheese Frosting and Chocolate Zucchini Brownies with Chocolate Cream Cheese Frosting are two more delicious chocolate and zucchini recipes you’ll love!

Chocolate Chip Zucchini Muffins
Muffins are a MUST have in our house! They are quick and easy to make and eat. The soft and fluffy texture and crave-worthy flavors are everyone’s favorite. These chocolate chip zucchini muffins are a healthier version that we all enjoy for breakfast on repeat over the summer! This is a great way to use up zucchini from the garden and a bonus alternative to sugary morning breakfasts.
On top of their fantastic flavors and texture, these chocolate chip muffins are so easy to make! They come together in no time. These are so good, you will want to double or triple this recipe once you see what a huge hit they are! Having some of these muffins made ahead and stored in the freezer will save you time later and make your mornings easier. They can be reheated in the microwave, and the warm melted chocolate chips are so delicious and satisfying. Your entire family will be happy and full!
Zucchini Muffin Ingredients:
This family friendly chocolate chip muffin is crowd pleasing and you will be amazed at the simplicity of the ingredients! Most are things you can store easily in your pantry or spice cabinet. Everything comes together perfectly to form the most amazing muffins!
- All purpose flour: Adds thickness and structure.
- Sugar: Just the right amount of sweetness!
- Baking Soda: Helps the muffins rise to that perfect muffin dome.
- Cinnamon: Adds great warm cinnamon spice
- Salt: Just a pinch!
- Egg: Lightly beaten egg will act as a binding agent for the muffin.
- Vegetable Oil: The oil creates a tender and moist texture.
- Vanilla: A hint of vanilla flavor.
- Milk: Gives the batter a creamy texture.
- Zucchini: Adds moisture to the muffin. Shred finely and dry completely before folding in.
- Chocolate Chips: The melty chocolate chips are so rich and sweet!
- Chopped Walnuts: Optional, but I love the crunch adding in some walnuts creates!
Let’s Make Muffins!
These muffins are quick and easy to make. You will just need a medium and small bowl and a muffin pan. This is a no fail recipe that will become your tried and true favorite!
- Prep: Preheat oven to 350 degrees. Line a muffin tin with liners or grease each tin.
- Mix dry ingredients: In a medium sized bowl combine flour, sugar, baking soda, cinnamon and salt.
- Mix wet ingredients: In a small bowl combine the egg, vegetable oil, vanilla, and milk.
- Combine wet and dry ingredients: Add to the dry ingredients and mix until combined.
- Fold in final ingredients: Gently fold in zucchini, chocolate chips and walnut to batter.
- Bake: Scoop the batter and fill 1/2 full. Bake for 20-15 minutes or until a toothpick comes out clean and lightly brown.

The Perfect Chocolate Chip Zucchini Muffins:
Making the most perfect zucchini muffin is a skill you will use forever. So, I’m going to pass along to you some tips on how to create them.
- Finely shred: Shred zucchini on the finest setting. By doing a very thin shred you will just create an amazing muffin that is moist and secretly healthy.
- Dry zucchini: Before adding in zucchini to the mixture, make sure to remove any excess water. Just blot with a paper towel to remove the extra liquid.
- To peel or not to peel: You do not need to peel the zucchini first! Since you are finely shredding the zucchini, the peel being on or off will make no difference to the overall taste and texture of your muffin.
- Cooling: Place the muffins on a wire cooling rack to cool. This will give them the perfect texture and keep them from getting too soggy.

Storing Made from Scratch Zucchini Muffins:
These muffins can be made ahead and will store very well! You can still enjoy this moist chocolate chip muffin for days and weeks after baking them! Start by allowing the muffins to cool completely before storing. I recommend you move them to a wire rack for the quickest cooling time. Then, wrap them tightly in foil or plastic wrap to keep that amazing zucchini moisture in!
- Room temperature storage: These muffins will last for 1-2 days on the counter at room temperature.
- Refrigerator Storage: When chilled in the fridge they will last for up to 1 week. I store them this way when making a week’s worth of breakfast so they will be fresh the entire week.
- Freezer Storage: Freezing your muffins will keep them fresh for up to 3 months. This is great when you make more than one batch and you know they will not be eaten within the week.
- Re-heating: Frozen muffins will need to thaw at room temperature for 3-4 hours before serving. Or microwave for 20-30 seconds. I love to make these ahead and freeze them. I just pop them in the microwave in the mornings. The warm chocolate muffin with my coffee has become my go-to breakfast.

More Delicious Zucchini Recipes:
- Zucchini Chips
- Baked Zucchini Fries
- Cheesy Zucchini Fritters
- Chocolate Zucchini Bread
- Double Chocolate Zucchini Brownies
Chocolate Chip Zucchini Muffins
Ingredients
- 1 1/2 cups purpose flour
- 1 cup sugar
- 1 teaspoon baking soda
- 1 teaspoon cinnamon
- pinch of salt
- 1 egg lightly beaten
- 1/2 cup vegetable oil
- 1 teaspoon vanilla
- 1/4 cup milk
- 1 cup zucchini shred and wring out with paper towel
- 1 cup chocolate chips
- 1/2 cup chopped walnuts optional
Instructions
-
Preheat oven to 350 degrees. Line a muffin tin with liners or grease each tin. In a medium sized bowl combine flour, sugar, baking soda, cinnamon and salt. In a small bowl combine the egg, vegetable oil, vanilla, and milk. Add to the dry ingredients and mix until combined.
-
Fold in zucchini, chocolate chips and walnut. Scoop the batter and fill 1/2 full. Bake for 15 to 20 minutes or until a toothpick comes out clean and lightly brown.
Nutrition

from The Recipe Critic https://ift.tt/2NlkQZE
https://ift.tt/3doGiaL