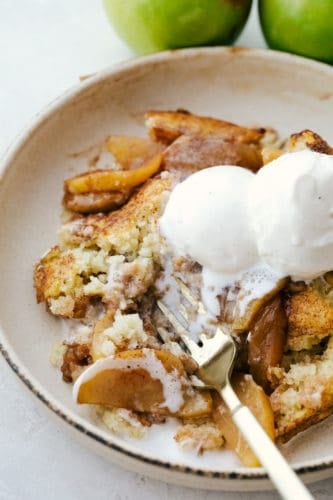
Old Fashioned Apple Cobbler is a warm baked fruit dessert that is topped with a perfect biscuit-like crust. The warm cinnamon spice is comforting and satisfying and nails a perfect summer dessert!
For more delicious sweet apple flavor try Best Ever Dutch Apple Pie or Perfect Apple Pie. Top these sweet and fruity pies with ice cream for a huge hit dessert!

Old Fashioned Apple Cobbler
Apple cobbler is a classic dessert that families have been enjoying together for years. However, it is in no way out of style. This cobbler is timeless and will continue to be a tried and true hit for a long time to come. The flavors are perfectly balanced with the sweet and tart flavors of the apples and the warm cinnamon. Then the soft and flaky crust on top creates a pie like texture that melts in your mouth.
Not only does this old fashioned apple cobbler taste amazing, but it is versatile and easy to make. The recipe is quick and easy to follow and is impossible to mess up. Everyone will be amazed at how soft and sweet this cobbler is. Pair it with a large scoop of vanilla ice cream and this dessert will be the star of the meal!
Ingredients Apple Cobbler:
Don’t be scared off by this long list of ingredients. Many of the items are seasonings and basics you already have in your pantry. The classic apple cobbler flavors are created quickly with these simple and easy to use items.
Filling:
- Granny Smith apples: Peel and sliced before adding them to the bottom of the dish.
- Brown sugar: Measure brown sugar when packed down.
- Apple juice: Gets poured over the apples to make the most delicious sauce as it cooks.
- Cinnamon: Warm spice that creates the classic apple/cinnamon flavor.
- Lemon Juice: The acid helps soften the apples and gives a hint of citrus.
- Cornstarch: Thickens the apple sauce that gets poured over the apples.
Biscuit Topping:
- Flour: Thickening agent.
- Sugar: Adds sweetness to the crust.
- Baking powder: Creates a light, biscuit like texture.
- Cold butter: Sliced
- Milk: Keeps the dough moist.
Topping:
- Sugar: Even more sweetness!
- Cinnamon: Warm spice found in the topping and the filling for consistent flavor throughout.
How to Make Apple Cobbler from Scratch:
A perfect apple cobbler is much easier that you would think. It is really a no fail recipe that even a beginning baker will be successful making every time!
- Prep: Preheat oven to 350 degrees and lightly grease a 9×13 inch pan. Then, add sliced apples to the bottom.
- Cook apple sauce: In a medium sized saucepan add the brown sugar, apple juice, cinnamon, lemon juice and cornstarch. Now, bring the mixture to a boil and reduce heat. Let that simmer until it starts to thicken for about 2 minutes. Once it is finished, pour it over the apples and toss.
- To make the biscuit topping: In a food processor add the flour, sugar, baking powder and butter. Pulse until the butter has incorporated. Add to a medium sized bowl. Add the milk and combine. Drop on top of the apple mixture.
- Add topping: Combine sugar and cinnamon then sprinkle on top of the biscuits.
- Bake: Cook for 35-40 minutes or until the top is golden brown and toothpick comes clean.

What’s the Difference Between Pie and Cobbler?
The main difference between a pie and a cobbler has to do with the crusts. A pie has a top and bottom crust where a cobbler has only a top crust. The fruit is placed directly on the bottom of the dish in a cobbler. Additionally, the crust of a cobbler is more like a biscuit consistency instead of the pastry dough you will find in a pie. Cobblers can also be prepared in any dish, where a pie is presented in a pie pan.
Tips for the BEST Apple Cobbler:
A flaky crust drizzled with cinnamon sugar is perfect for entertaining. Everyone will devour it quickly and talk about it for much longer. Keep these couple of tips in mind as you prepare to wow your friends and family.
- Apples: There is no need to pre-cook the apples because they will cook during the bake time. The peel does need to be removed because it will not break down during cooking.
- Butter: Use real butter for this recipe. Swaps are not going to give you the same delicious buttery crust and flaky texture.

Can you Make Homemade Cobbler Ahead?
Yes! You can prepare this amazing dessert up to 2 days before you plan to bake it. Loosely cover your cobbler to store it in the refrigerator. However, to freeze it you will need to tightly cover it and bake it within 5 months. For best results, poke a few holes in the top of the apple cobbler if baking it from frozen.
Store the apple pie for two days at room temperature. So, if you know you will not eat it right away, loosely cover and keep it in the refrigerator instead where it will stay good for up to 5 days. To freeze, you will want to wrap it tightly and enjoy it within 3 months.

More Delicious Cobbler Recipes:
- Homemade Mini Peach Cobbler
- Peach Cobbler Bars
- Apple Cobbler Crisp
- Amazing Pecan Pie Cobbler
- Slow Cooker Peach Cobbler

Old Fashioned Apple Cobbler
Ingredients
- 2 pounds Granny Smith apples peeled and sliced 1/4 thick
- 1/3 cup brown sugar packed
- 1/2 cup apple juice
- 1 teaspoon cinnamon
- 1 Tablespoon Lemon Juice
- 1 Tablespoon Cornstarch
Biscuit topping:
- 1 1/4 cup flour
- 1 cup sugar
- 2 teaspoons baking powder
- 10 tablespoons cold butter sliced
- 3/4 cup milk
Topping:
- 1 Tablespoon Sugar
- 1 teaspoons cinnamon
Instructions
-
Preheat oven to 350 degrees and lightly grease a 9x13 inch pan. Add sliced apples to the bottom.
-
In a medium sized saucepan add the brown sugar, apple juice, cinnamon, lemon juice and cornstarch. Bring to a boil and reduce heat and let simmer until it starts to thicken about 2 minutes. Pour over apples and toss.
To make the biscuit topping:
-
In a food processor add the flour, sugar, baking powder and butter. Pulse until the butter has incorporated. Add to a medium sized bowl. Add the milk and combine. Drop on top of the apple mixture.
To make the topping:
-
Combine sugar and cinnamon and sprinkle on top of the biscuits. Bake for 35-40 minutes or until the top is golden brown and toothpick comes clean.
Nutrition
from The Recipe Critic https://ift.tt/2WI1B1I
https://ift.tt/2ZRvz5v