शुक्रवार, 14 अगस्त 2020

White Chocolate Oreo Cookies

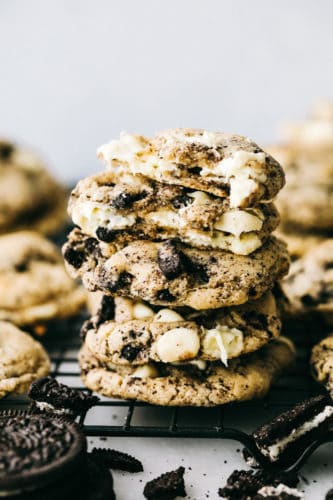
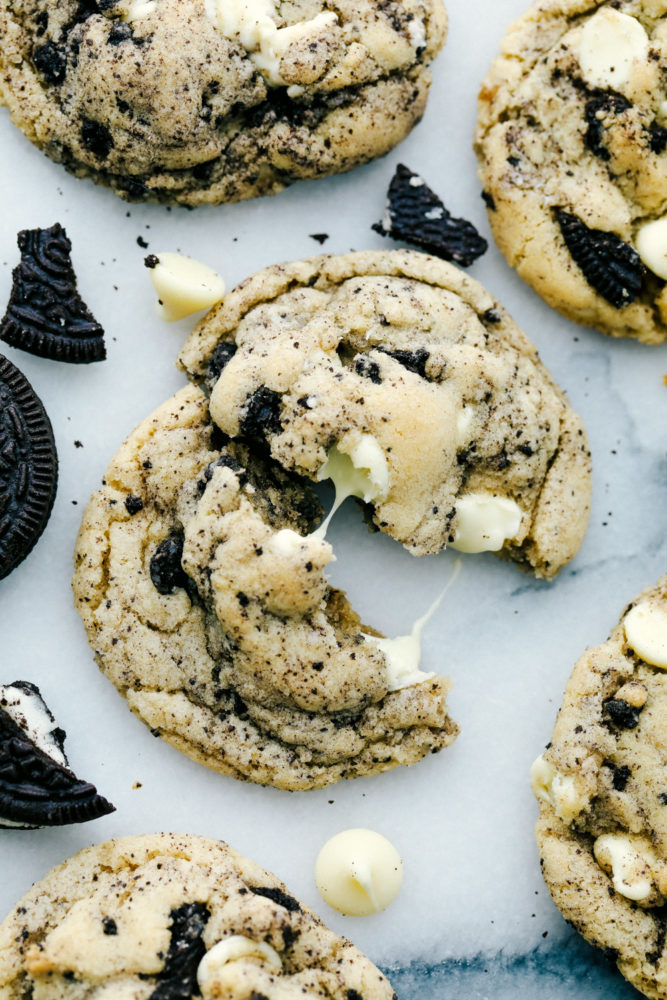
White Chocolate Oreo Cookies are perfectly soft and chewy cookies loaded with slightly melted white chocolate chips and crushed Oreo cookies. These are warm and delicious cookies with just the right amount of sweetness!

Oreos are so fun to create recipes with. If you are a lover of Oreos try this Gooey Oreo Brownies, Oreo Fluff Dessert Salad or No Bake Oreo Balls.

Oreo cookies stacked on top of each other on a cooling rack garnished with oreos surrounding them.

White Chocolate Oreo Cookies

I declare these the best cookies ever! These are the cookies that become an instant favorite. You know the kind of cookies that you can’t stop eating? And just when you think you can’t eat another cookie you do? And then you fall asleep thinking about them and wake up and eat one for breakfast. These are those cookies.

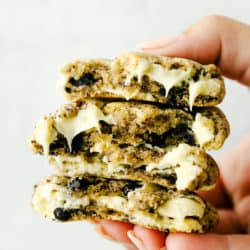
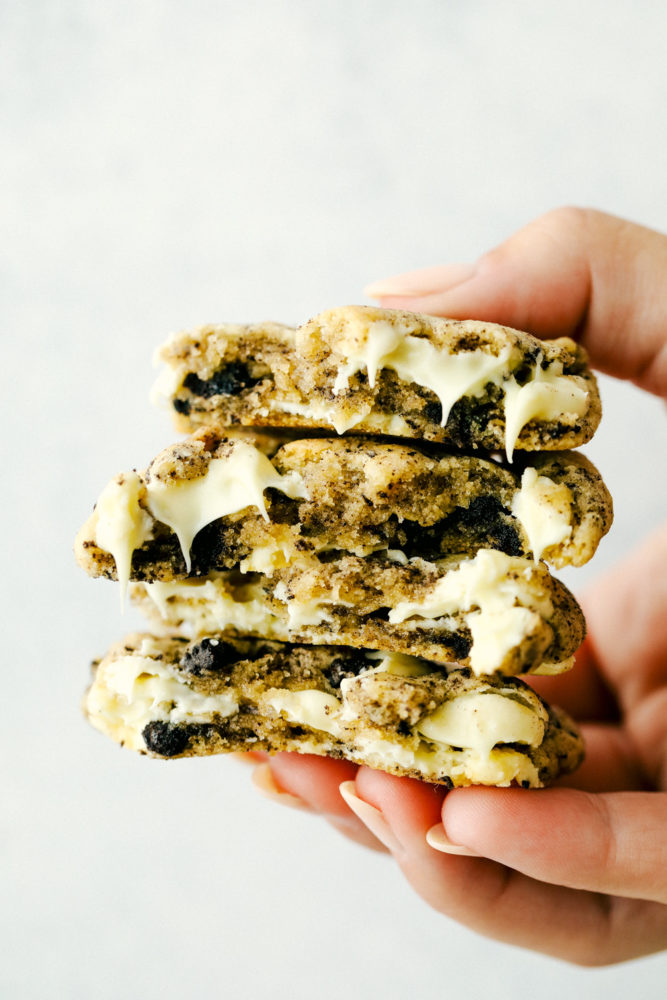
So perfect that I couldn’t stop at just one. I took the recipe from my favorite chocolate chip cookie dough and added loads of white chocolate chips and crushed oreo pieces. The cookie dough was speckled with oreo cookie pieces throughout and it was incredible! I loved the melty white chocolate and my first bite was amazing. The cookies had a crunch on the inside but were soft, ooey, gooey and chewy in the middle. Perfection!

Oreo Cookie Ingredients:

If you love cookies, Oreos and white chocolate chips these will become your new bff. Trust me. You have got to make them! These cookies have it all. The gooey white chocolate,  and chunks of oreo cookies baked inside a soft and chewy cookie. The cookies turn out perfect every time!

  • Butter: Cream this butter for a smooth batter.
  • Brown Sugar and Sugar: A hint of sweetness and softness using both types of sugar.
  • Eggs: Gives the cookies a nice soft and creamy texture. Plus helps it stick together and bakes evenly.
  • Vanilla: Added for flavor!
  • Flour, Baking Soda, Baking Powder and Salt: Combined these create a softer, more fluffier cookie that will rise high when whisked together.
  • Oreo Cookies: Crush them up and add them into the cookie mixture.
  • White Chocolate Chips: Sprinkle them in at the end!

Let’s Bake Some Cookies!

It took me a while to become an oreo lover. I just didn’t like eating them plain. I loved them baked in something or even used as a crust. But I wasn’t a huge fan. I am more of an eat the middle of an oreo type of person. But when you bake them in something I am in heaven!

  1. Prepare for Baking: Preheat oven to 350 degrees. Line a cookie sheet with parchment paper or lightly spray with cooking spray.
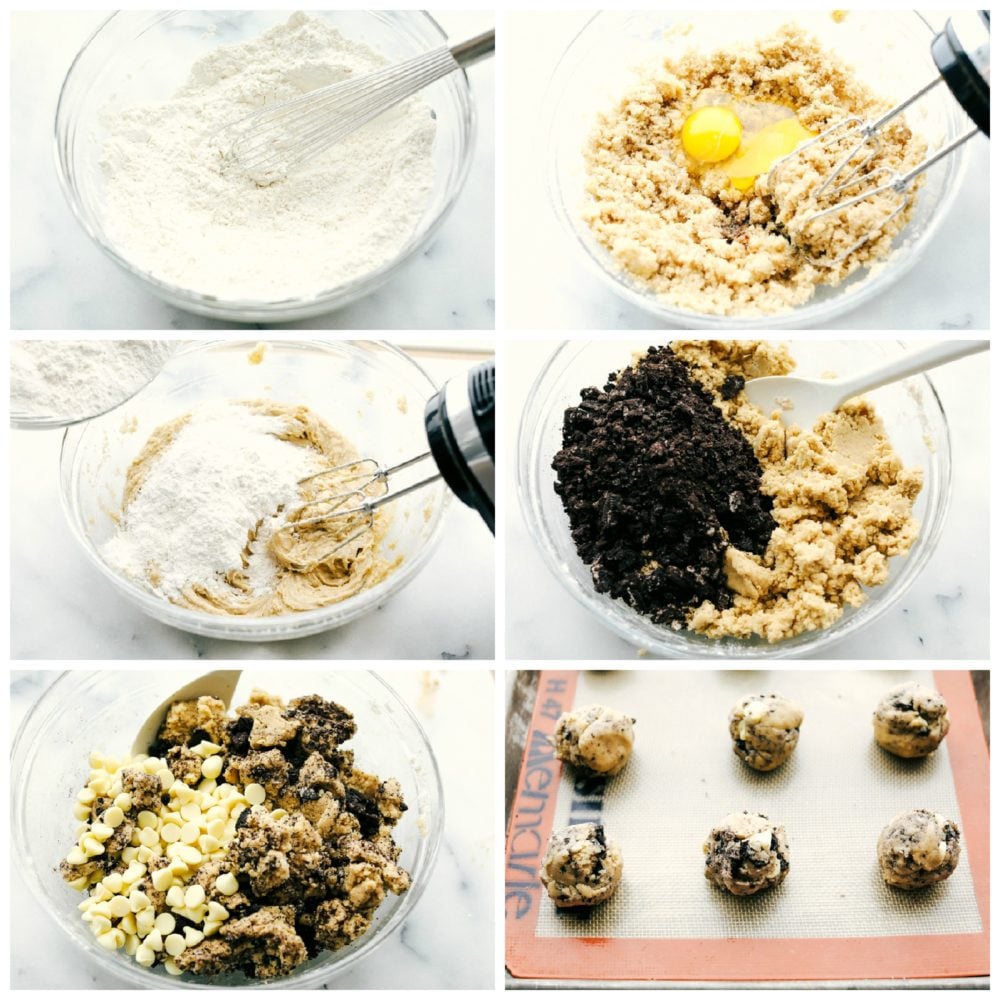
  2. Mix Together: In a medium sized mixing bowl, whisk together the flour, baking soda, baking powder, and salt. Set aside.
  3. Blend Ingredients: In a stand mixer or medium sized mixing bowl, beat together butter, sugar, and brown sugar about 2 minutes until fluffy. Beat in the eggs and vanilla. Slowly beat in the dry ingredients until incorporated. Mix in the crushed oreos until combined and lastly add the white chocolate chips.
  4. Create Cookies: Roll into 1 1/2 inch balls and place 2 inches apart on the cookie sheet. Bake for about 7-9 minutes until just starting to lightly brown.

How Do You Crush Oreo Cookies? 

Crushing oreo cookies is a simple process but can be a bit messy. Luckily, it is best to not overly crush the Oreos so there is some texture and consistency in the cookies. Larger chunks of oreo is great and a MUST in these cookies to taste all the flavor.

  • Plastic Ziplock Bag: Place the oreo cookies into the ziplock bag and using a rolling pin or something hard, break the Oreos up into smaller chunks.
  • Blender or Food Processor: You will want to be careful not to over blend the Oreos. Simply add the oreos into the blender and pulse a few times, stirring in between. Try not to over blend.

Tips and Variations: 

  • Lining Baking Sheet: Using parchment paper or reusable silicone baking mats are the best way to ensure the cookies are baked evenly and perfectly. This will also help lift the cookies off without them sticking to the pan.
  • Mixing: When creaming the butter and sugars together, add an extra 2 to 3 minutes to enrich that creamy texture. It will help improve the consistency of the cookies.
  • Flour: It is important to have enough flour in the dough. If your dough seems too sticky or wet, simply add in 1 to 2 Tablespoons of flour until it is more creamy texture.
  • Chocolate Chips: For a more chocolatey cookie, add in chocolate chips instead of white chocolate chips.
  • Cookie Scoop: For more evenly made cookie dough balls, using a cookie scoop will help ensure they are all the same size. Once they are scooped then roll into a ball and place on the baking sheet.
  • Baking Cookies: It is best to not over bake the cookies. Remove the baking sheet from the oven and allow the cookies to cool on the baking sheet while they are still slightly under baked. Once they are cool, place on a cookie rack to finish cooling and hardening.

More Delicious Cookie Recipes:

Print

White Chocolate Oreo Cookies

Perfectly soft and chewy cookies loaded with white chocolate chips and oreo cookies!  
Course Dessert
Cuisine American
Keyword cookie recipes, cookies, oreo cookies, white chocolate oreo cookies
Prep Time 10 minutes
Cook Time 8 minutes
Total Time 18 minutes
Servings 24 Cookies
Calories 268kcal
Author Alyssa Rivers

Ingredients

  • 3/4 Cup butter softened
  • 3/4 Cup brown sugar
  • 3/4 Cup sugar
  • 2 eggs
  • 1 teaspoon vanilla
  • 2 1/2 cups flour
  • 1 teaspoon baking soda
  • 1/2 teaspoon baking powder
  • 1 teaspoon salt
  • 14 oreo cookies coarsely crushed
  • 2 cups white chocolate chips (12 oz) bag

Instructions

  • Preheat oven to 350 degrees. Line a cookie sheet with parchment paper or lightly spray with cooking spray.
  • In a medium sized mixing bowl, whisk together the flour, baking soda, baking powder, and salt. Set aside.
  • In a stand mixer or medium sized mixing bowl, beat together butter, sugar, and brown sugar about 2 minutes until fluffy. Beat in the eggs and vanilla. Slowly beat in the dry ingredients until incorporated. Mix in the crushed oreos until combined and lastly add the white chocolate chips.
  • Roll into 1 1/2 inch balls and place 2 inches apart on the cookie sheet. Bake for about 7-9 minutes until just starting to lightly brown.

Notes

Updated on August 14, 2020
Originally Posted on April 9, 2015

Nutrition

Calories: 268kcal | Carbohydrates: 37g | Protein: 3g | Fat: 12g | Saturated Fat: 7g | Cholesterol: 32mg | Sodium: 246mg | Potassium: 96mg | Fiber: 1g | Sugar: 25g | Vitamin A: 202IU | Vitamin C: 1mg | Calcium: 46mg | Iron: 1mg


from The Recipe Critic https://ift.tt/2PRxyAH
https://ift.tt/2CviJkq

गुरुवार, 13 अगस्त 2020

Classic Hummingbird Cake

Classic Hummingbird Cake is a soft and tender cake that is loaded with tropical flavors including banana and pineapple. Plus it’s perfectly spiced with a hint of cinnamon. All covered with a luscious, smooth cream cheese frosting. Be prepared for this to become your new favorite cake!

Enjoy all of the flavors of the tropics with this Classic Jamaican cake recipe. Loaded up with tropical flavors of bananas and pineapple this cake is perfectly tender. For more flavorful cakes you can also check out this Pineapple Cake, Best Carrot Cake Recipe Ever, and this Banana Cake with Cream Cheese Frosting.

Hummingbird cake with a slice of cake taken out of it.

Classic Hummingbird Cake

Move over carrot cake! This tropical flavored, spice cake is worthy of the same amount of praise..if not more! The recipe for Hummingbird Cake is originally from Jamaica and has been a favorite cake recipe in America since the 1970s. This cake is tender and moist thanks to the banana, crushed pineapple, and juices.

The hint of cinnamon and pecans adds a perfect balance of spice and texture to the finished cake. Top it all off with this perfectly smooth cream cheese frosting and this cake is a crowd pleaser!

How to Make Hummingbird Cake:

  1. Toast the pecans: This step only takes a few minutes, but it adds a nice depth of flavor to the pecans in the cake.
  2. Dry Ingredients: Mix together the dry ingredients.
  3. Mix together the wet ingredients: Start with the sugars and eggs. Then add in the oil (which we use instead of butter to help balance the flavors of the cake. Butter can overpower the flavors.) Then add in the bananas and pineapple. Make sure you get all of the juices from the pineapple. Using canned pineapple is best, but you can crush your own pineapple, just be sure to get as much juice as possible.
  4. Add in the dry ingredients to the wet: Combine and fold in the pecans.
  5. Pour into prepared baking pans: Either spray the baking pans with a baking spray that has flour, or grease and flour the baking pans. Traditionally the cake is made as a three layer cake. However, just to keep things a little less complicated I went for a two layer cake.
  6. Bake the cakes: Bake completely and a toothpick inserted in the center comes out clean. Under-baking the cake can cause the center to cave in.
  7. Make the cream cheese frosting: Frost and layer the cake when the cakes have cooled completely to room temperature. Top with crushed pecans and serve!

Variations of this Hummingbird Cake Recipe:

  • Make this recipe as cupcakes: spoon the batter into cupcake liners and bake for about 16 minutes. The frosting recipe will be able to be reduced to adjust for the amount needed.
  • Make this a sheet cake: pour the batter into a standard 13×9 cake pan. Bake for 40-45 minutes or until the cake is fully cooked, with a toothpick inserted in the center coming out clean. Again, the amount of frosting can be adjusted.
  • Add coconut: some recipes do add some sweetened shredded coconut to the cake to add an extra bit of flavor and texture.
  • Use walnuts or leave out the nuts: if needed leave out the nuts, they are not required for the recipe. They are an extra bit of flavor and texture. If you are unable to get or use pecans you could also use walnuts.

How to Store This Cake:

This hummingbird cake with cream cheese frosting should be stored in a sealed container to prevent it from drying out. Store the cake at room temperature for up to 2 days. Or you can seal and store in the refrigerator for up to one week. Simply let the cake slices come to room temperature before serving if desired.

A slice of hummingbird cake laying on its side on a blue plate.

More Delicious Cake Recipes to Try: 

Print

Classic Hummingbird Cake

Classic Hummingbird Cake is a soft and tender cake that is loaded with tropical flavors including banana and pineapple. Plus it's perfectly spiced with a hint of cinnamon. All covered with a luscious, smooth cream cheese frosting. Be prepared for this to become your new favorite cake!
Course Dessert
Cuisine Caribbean
Keyword hummingbird, hummingbird cake, hummingbird cake recipe
Prep Time 30 minutes
Cook Time 30 minutes
Total Time 1 hour
Servings 14 Slices
Calories 646kcal
Author Serene Herrera

Ingredients

  • 1 cup pecan halves
  • 3 cups all purpose flour
  • 1 tsp baking powder
  • 1 tsp baking soda
  • 1 tsp salt
  • 1 tsp ground cinnamon
  • 1 cup sugar
  • 1 cup light brown sugar
  • 3 large eggs
  • 1 cup vegetable oil
  • cup banana mashed (approx 4 bananas)
  • 8 ounces crushed pineapple
  • 2 tsp vanilla extract

Cream Cheese Frosting:

  • 2 8 ounce pkgs cream cheese room temperature
  • ½ cup unsalted butter room temperature
  • 4½-5 cups powdered sugar
  • 2 tsp vanilla extract
  • pinch salt
  • Chopped Pecans for garnish as desired

Instructions

  • Preheat oven to 350°F. Grease and flour two 9 inch round baking pans, set aside.
  • Toast the pecans in a medium size skillet on the stovetop over medium heat. Stir the pecans while toasting for 3-5 minutes until the pecans have darkened in color and are fragrant. Remove from the heat and set aside.
  • In a medium size mixing bowl combine the dry ingredients: flour, baking powder, baking soda, salt and cinnamon. Whisk to combine. Set aside.
  • In a large bowl combine the sugars and add in the egg. Whisk together. Pour in the oil and stir until mostly combined. Add in the banana and crushed pineapple. Stir until well combined.
  • Add the dry ingredients into the wet ingredients, stirring until the batter is just coming together.
  • Chop up the toasted pecans and fold into the batter.
  • Divide the batter and pour into the prepared baking pans. Bake the cakes on the same rack for 30-35 minutes or until baked through and a toothpick inserted in the center comes out clean.
  • Remove the baked cakes and set to cool in the pans for 10 minutes. Then gently remove the cakes from the pan and continue to cool on a wire rack until cooled completely to room temperature.

Cream Cheese Frosting

  • Add the room temperature softened cream cheese and butter to a large mixing bowl. Beat either in a stand mixer or with a hand mixer until smooth and creamy. Mix in the vanilla and salt.
  • Gradually add in the powdered sugar while mixing. Continue until the frosting has a smooth, spreadable consistency.
  • Assemble the cake by placing one of the cakes on the plate, top with a thick layer of frosting. Smooth to make an even layer. Gently place the other cake layer upside down on the top (this helps give a nice flat top to the cake. Cover the cake with the rest of the frosting. Garnish with chopped pecans as desired.

Nutrition

Calories: 646kcal | Carbohydrates: 96g | Protein: 5g | Fat: 29g | Saturated Fat: 18g | Cholesterol: 53mg | Sodium: 277mg | Potassium: 205mg | Fiber: 2g | Sugar: 72g | Vitamin A: 276IU | Vitamin C: 3mg | Calcium: 50mg | Iron: 2mg


from The Recipe Critic https://ift.tt/2Fg1jZT
https://ift.tt/3gWNQnK

बुधवार, 12 अगस्त 2020

Walking Tacos

Walking Tacos are quick and easy deconstructed tacos that are made and served right in a chip bag.  Great for active parties or on the go meals because they are filling and fast!

If you have time to sit and enjoy all the crunchy taco goodness, try Beef Taco Salad or Taco Casserole.  They are flavorful and easy to load with all your favorite taco ingredients!

Overhead view of walking tacos.

Easy Walking Tacos

Walking tacos remind me of a taco salad, just in a handy, portable bag.  These are definitely a huge hit at sleepovers or campsites where no one wants to slow down long enough to sit down while they eat.  Pack them with fresh, healthy toppings like avocado and lean ground beef to ensure they are not only fun and fast, but filling too!

This is the best kid friendly meal ever!  Not only because it includes their favorite chips, but also because cleanup is a breeze.  Each bag can be filled with their favorite ingredients and adapted to fit even the pickiest eater.  The best part is this meal only uses one dish.  So, helping with dishes has never been easier!

Taco Ingredients?

Just 3 main ingredients get these amazing walking tacos started.  Then, just add on however many additional toppings your family would like.  Make these as simple or dynamic as you like, you can’t go wrong!

  • Ground beef: Lean ground beef is best because it makes less grease in the taco meat.
  • Taco Seasoning: Homemade taco seasoning is amazing or use store bought in a pinch.
  • Small bags of chips: Frito chips are my favorite, but Doritos also are great!
  • Optional toppings: Sliced tomatoes, sliced olives, shredded lettuce, shredded cheese, sour cream, sliced avocado.

How to Make a Taco Bag:

Walking tacos are so simple to make and only use one pan.  After cooking your ground beef and adding seasoning, all you have to do is add your favorite toppings.  Clean up is just as easy as the preparation, which makes for a perfectly stress free meal.

  1. Cook beef: In a medium sized skillet cook and crumble the ground beef.
  2. Add seasoning: Add in 2 tablespoons taco seasoning, then simmer for a couple of minutes.
  3. Assemble the walking tacos: Add ground beef and favorite toppings to the bag of chips.

Overhead view of all the ingredients in a walking taco.

How to Eat Walking Tacos:

Eating walking tacos is super quick and convenient.  The best part about walking tacos is their versatility and portability.  They can be easily made in ways that are unique to each person.  Here are some secrets to make your walking tacos even easier to enjoy!

  • Crush your chips first: While they are still in the bag, crunch up the doritos to make them easier to scoop up.
  • Cut the side of the bag open: Instead of opening the bag of chips at the top, cut or tear down the side of the bag to create a bigger space to dip into the delicious taco mixture.
  • Mix ingredients with the chips: Add all ingredients directly into the bag.  Start with your seasoned taco meat, then add your favorite mix-ins like pico de gallo, guacamole or avocado slices, sour cream, cheese, and salsa.  Finally, stir it all together, then dip straight into the bag and enjoy!
  • Camping: This is seriously the most perfect camping food. Make the meat ahead and freeze.  Then thaw and heat over the grill/fire with a bit of water.   Build your taco using ingredients you love and toss the bag in the garbage for cleanup.
  • Storing: Pack your ground beef separately from the toppings. Let it cool completely before sealing in airtight foil.  Keep it in the refrigerator for 3-4 days or the freezer for up to 3 months.  Simply reheat in the microwave or on the stove-top with a bit of water.

Scooping a bite out of a walking taco bag.

More Taco Recipes:

Print

Walking Tacos

Walking Tacos are quick and easy deconstructed tacos that are made and served right in a chip bag.  Great for active parties or on the go meals because they are filling and fast!
Course Dinner, Main Course
Cuisine American, Mexican
Keyword tacos, walking tacos, walking tacos recipe
Prep Time 5 minutes
Cook Time 15 minutes
Total Time 20 minutes
Servings 5 Bags of Tacos
Calories 126kcal
Author Alyssa Rivers

Ingredients

Optional Toppings:

  • sliced tomatoes
  • sliced olives
  • shredded lettuce
  • shredded cheese
  • sour cream
  • avocado sliced

Instructions

  • In a medium sized skillet cook and crumble the ground beef. Add in 2 tablespoons taco seasoning.
  • Assemble the walking tacos by adding ground beef and favorite toppings to the bag of chips.

Nutrition

Calories: 126kcal | Carbohydrates: 1g | Protein: 19g | Fat: 5g | Saturated Fat: 2g | Cholesterol: 56mg | Sodium: 141mg | Potassium: 314mg | Fiber: 1g | Sugar: 1g | Vitamin A: 94IU | Vitamin C: 1mg | Calcium: 8mg | Iron: 2mg


from The Recipe Critic https://ift.tt/33YQFku
https://ift.tt/3fQIF7q

मंगलवार, 11 अगस्त 2020

Classic Fried Green Tomatoes

Fried Green Tomatoes are extremely popular sliced and fried crunchy bites of tangy green tomatoes. They are totally addictive and easy to make at home!

For great fried appetizers, try Crispy Parmesan Fried Zucchini, Mozzarella Sticks or Onion Rings.  They are warm and crispy crowd favorites that will keep everyone happy while dinner is on the way!

Stack of fried green tomatoes on a white plate.

Classic Fried Green Tomatoes

Green tomatoes are a great sign that fall is on its way. The cooler weather delivers an abundance of these unripe tomatoes. They are a more firm tomato with a tangy flavor that changes things up from the red tomatoes that filled the summertime menus. The juicy sweet and sour red tomatoes give way to the less moist green tomato.  Although it is not a great tomato to eat raw, it is the perfect texture to cook or pickle.  Load them up with flavorful batter and fry them for a warm and crisp bite that doesn’t collapse in the process.

Frying green tomatoes is the most common way to cook them. That’s no surprise because they are easy to make at home and taste amazing every time. Simply slice them in even sized slices, dredge through savory batter, then fry them to a crispy perfection.  Every bite is filled with an explosion of firm, sour tomato on the inside and the crunch of a perfectly seasoned crust.  Add these to your must try fall recipes, because your family will go crazy over them!

Ingredients For Green Tomatoes:

Green tomatoes start this short list of simple ingredients that make up this family favorite appetizer.  They are firm enough to hold up to the flavorful fried batter that creates a light and crispy crust.  These will be the best fried tomatoes you have ever had!

  • Green tomatoes: Firm and acidic slightly sour unripe tomatoes.
  • Oil: Canola or vegetable oil is used for frying the tomatoes.
  • Eggs: Adds a golden color and crispy texture.
  • Milk: Helps the batter stick to the tomato.
  • Flour: Adds to the crispiness of the batter and keeps it from soaking up too much oil.
  • Salt and pepper: To taste.
  • Cornmeal: Adds to the golden coating.
  • Breadcrumbs: Adds crunch and flavor to the breading.
  • Parmesan: Grated cheese will add nutty flavor to the crust.
  • Italian seasoning: A fantastic blend of seasonings. If you want to make your own use a combination of basil, oregano, rosemary, thyme, garlic powder, sage, or coriander.

How to Fry Green Tomatoes:

These amazing bites of crispy fried green tomato are super easy to make from scratch at home.  No doubt, they are the most satisfying snack or appetizer you will make this fall!

  1. Heat oil: In a medium size saucepan add the oil until it is about 1/2 inch up the sides of the pan. Heat to medium high heat. Slice the tomatoes 1/4 inch thick.
  2. Prepare batter: In a small bowl add the eggs and whisk. Gradually add in the milk. In another small bowl add the flour, salt and pepper. In another small bowl add the cornmeal, bread crumbs, and Parmesan cheese.
  3. Dredge: Dip each tomato slice first in the eggs, then coat in the flour, and lastly the cornmeal mix. Add the tomatoes to the pan of oil and cook for 2-3 minutes until crispy and golden brown. Finally, remove with a slotted spoon and let cool.

Green tomatoes close up.

Tips for Classic Fried Green Tomatoes:

Fried Green Tomatoes are a delicious start or side to any meal.  They are tried and true crowd-favorites that are bursting with vibrant flavor.

  • Green Tomatoes: Since the star of this recipe is the green tomato, be sure to choose tomatoes that are all green. Any red on the tomato means they have started to ripen. Red tomatoes are more moist and will interfere with the crispy crust you are trying to achieve.
  • Reheat: Warm up leftovers in a toaster or oven at a low temperature (below 350 degrees) until they are heated throughout. For best results, do not microwave or the fried tomatoes will be chewy, not crisp.
  • Cold batter and hot oil: Keep your batter cold and your oil hot to make the most crispy and light fried green tomatoes.  If the oil is too cool, the tomatoes will soak up too much oil.  However, if the oil is too hot they will burn.  To be sure your oil is just right, use a thermometer to make sure the oil stays around 350 degrees or medium-high heat.

Steps to make fried green tomatoes.

What to Serve:

Classic fried green tomatoes are so satisfying just the way they are.  It is hard not to eat them all right out of the skillet! However, they do not have to be served alone.  Actually, they pair well with many dishes.  Here are a few ideas on ways to serve these insanely delicious tomato bites.

  • Caprese Twist: These tomatoes are a fantastic way to liven up those summer Caprese recipes and transition them to fall.  For example, try a tangy twist on a Caprese salad, Farro Caprese Salad, or Chicken Caprese Macaroni and Cheese.
  • Dipping Sauce: Dip in tabasco sauce, Tzatziki Sauce or remoulade sauce for a creamy burst of flavor.
  • Serve with: While at first glance this recipe may seem like a perfect appetizer or afternoon snack, they also pair well with Eggs Benedict for breakfast or Lobster Mac and Cheese at dinnertime.
  • Buttermilk: Leave out the egg and soak tomatoes in buttermilk instead of regular milk.  Additionally, let them soak in the buttermilk for a couple of minutes before dredging them through the batter mixture.

View of finished fried green tomatoes on a tray.

Can You Make Ahead Fried Green Tomatoes?

These bite size appetizers are easy to make ahead. Simply dip them in the breadcrumb mixture and freeze until you are ready to fry them. The best way to freeze them is to place them on a baking sheet in a single layer for about 15 minutes. Then, they can be easily transferred to a Ziploc bag to continue freezing. They do not need to be thawed before frying.

Fried green tomatoes stacked on a white plate.

More Crowd Favorite Appetizers:

Print

Fried Green Tomatoes

Fried Green Tomatoes are extremely popular sliced and fried crunchy bites of tangy green tomatoes. They are totally addictive and easy to make at home!
Course Appetizer, Side Dish, Snack
Cuisine American
Keyword classic fried green tomatoes, fried green tomatoes, green tomatoes
Prep Time 10 minutes
Cook Time 10 minutes
Total Time 20 minutes
Servings 8 People
Calories 163kcal
Author Alyssa Rivers

Ingredients

  • oil for frying
  • 4 green tomatoes firm
  • 2 eggs
  • 1/4 cup milk
  • 1 cup flour
  • 1/2 teaspoon salt
  • 1/4 teaspoon pepper
  • 1/2 cup cornmeal
  • 1/2 cup breadcrumbs
  • 2 Tablespoon grated parmesan
  • 1 tablespoon Italian seasoning

Instructions

  • In a medium size saucepan add the oil until it is about 1/2 inch up the sides of the pan. Heat to medium high heat. Slice the tomatoes 1/4 inch thick.
  • In a small bowl add the eggs and whisk. Add in the milk. In another small bowl add the flour, salt and pepper. In another small bowl add the cornmeal, bread crumbs, and parmesan cheese.
  • Dredge each tomato slice first in the eggs, then coat in the flour, and lastly the cornmeal mix. Add the tomatoes to the pan of oil and cook for 2-3 minutes until crispy and golden brown. Remove with a slotted spoon and let cool.

Nutrition

Calories: 163kcal | Carbohydrates: 28g | Protein: 6g | Fat: 3g | Saturated Fat: 1g | Cholesterol: 43mg | Sodium: 242mg | Potassium: 221mg | Fiber: 3g | Sugar: 4g | Vitamin A: 488IU | Vitamin C: 14mg | Calcium: 61mg | Iron: 2mg


from The Recipe Critic https://ift.tt/2PFfhqp
https://ift.tt/3gQg1oC