रविवार, 6 सितंबर 2020

Copycat Texas Roadhouse Rolls

Fluffy, melt in your mouth rolls are the perfect Copycat of Texas Roadhouse Famous Rolls. Watch these rolls disappear as soon as they hit the table!

I declare these the best rolls in the entire world!   Freshly baked, and so soft inside they are perfect, Try with this Cinnamon Honey Butter (which is BETTER than Texas Roadhouse Butter for a heavenly experience.
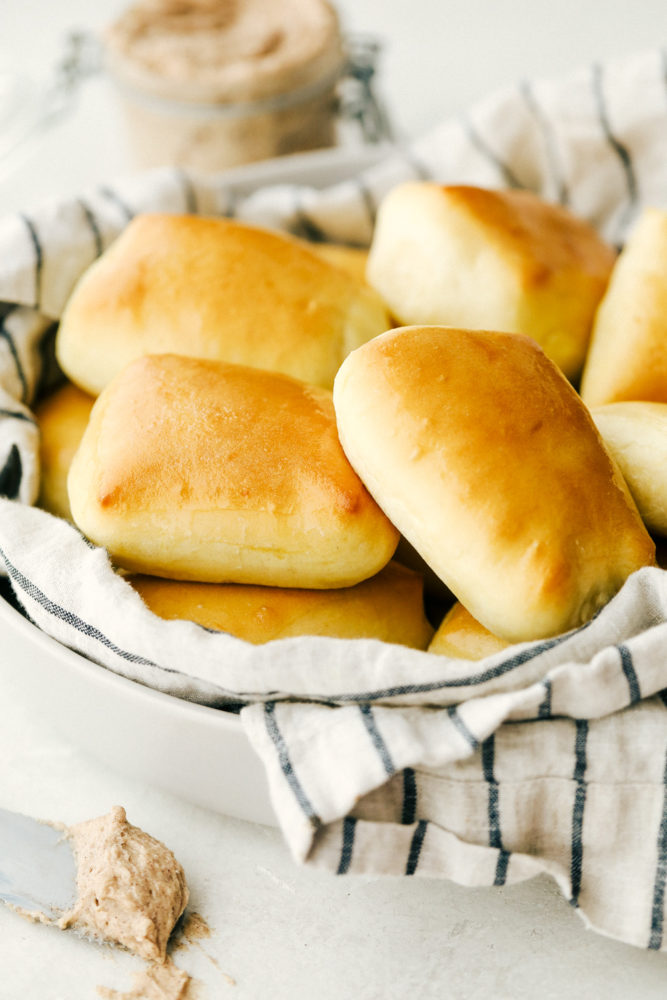
Fluffy soft Copycat Texas Roadhouse Rolls with Cinnamon Honey Butter.

Copycat Texas Roadhouse Rolls

If everyone is truly honest with themselves they would all admit they go to Texas Roadhouse for the rolls. They are so soft and flavorful, with a brush of melted butter on top. Served warm with cinnamon honey butter they are so good and now they can grace your table anytime you get a craving.

It’s an enriched dough slathered with butter and then again with cinnamon honey butter, what’s not to love?! Incredibly simple and even easier to shape, a beginner baker can master this and wow families and friends. The hardest part will be waiting for them to rise and bake!

Roadhouse Roll Ingredients:

Keep these pantry staples on hand to whip these Texas roadhouse rolls up whenever the urge or occasion occurs. These rolls are always a family favorite and can be made in a short amount of time!

  • Active Dry Yeast: There is a difference between active and Instant yeast, you can use either, I’ll explain below.
  • Sugar: The food for the yeast.
  • Warm Water: Necessary to help yeast bloom.
  • Milk: Use whole milk to really create a soft tender roll.
  • Melted Butter: Mixes better when it’s melted and gives incredible flavor.
  • Flour: Unbleached Bread Flour is the best to replicate Texas Roadhouse texture.
  • Egg: Adds more richness to the dough.
  • Salt: Don’t skip the salt, it’s a must to slow the rise and give depth of flavor to dough.

Making Texas Roadhouse Rolls:

Bread can be kind of intimidating to make at times. But seriously. Nothing compares to freshly made bread at home. Surprisingly this recipe is pretty simple! You will be surprised how quick and easy these roadhouse rolls are to make.

  1. Yeast: Place the yeast, sugar and warm water in your stand mixer and allow to double in size which takes about 5 minutes.
  2. Scald: Meanwhile place your milk in the microwave for 45 seconds. Add the butter and stir till butter is melted. Allow to cool till it’s lukewarm.
  3. Mix: Add the milk to your yeast mixture, along with the sugar and half of the flour. Mix thoroughly, then let it rest for 10 min.
  4. Blend: Next add in the egg and salt, mix well. Followed by the remaining flour mixing till a soft dough has formed.
  5. Knead: Using a dough hook or your muscles knead the dough until it’s smooth and satiny.
  6. Rise: Cover with plastic wrap and let it rise until doubles in size. Punch it down and let it rest for 10 minutes.
  7. Roll: On a lightly floured surface roll the dough in a large rectangle about a 1/2 inch thick. Cut in half then cut each half into 6 square pieces.
  8. Bake: Place on a greased baking sheet and allow to rise again then Bake at 350 for 10-15 minuets.
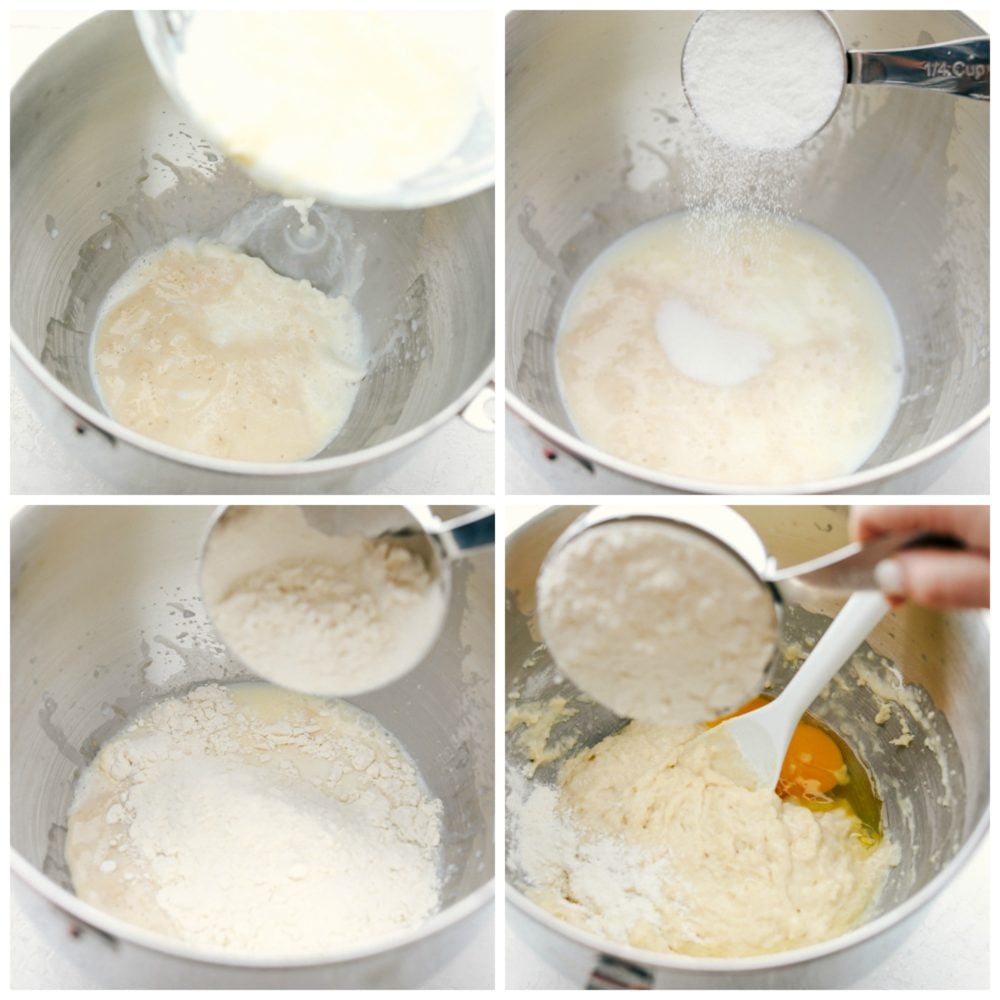
 

Making fluffy soft rich rolls

Tips for Working with Yeast:

Yeast breads can be intimidating but if you follow these tips you’ll become skilled and successful every time. Learn the best way to manage yeast and master making these Texas Roadhouse rolls often!

  • What is it? Yeast is a microscopic living cell that can reproduce rapidly creating carbon dioxide which allows the bread to grow and rise.
  • Feed it: Yeast needs a sugar and warm liquid to grow.
  • Warm Water: Water should be about 80 degrees Fahrenheit for optimal yeast growth. Using warm water from the tap works perfectly.
  • Active Yeast: This recipe uses active yeast which needs to be activated, using the sugar and warm water.
  • Instant Yeast: You don’t have to activate Instant yeast so it can be mixed right in.
  • Expired Yeast: Always check your expiration date and store unused yeast in the fridge or freezer to maintain freshness. If you mix your yeast with water and sugar and it does not “grow” don’t use it. Your bread won’t rise.
  • Warm Place to Rise: Dough will rise best if kept in a warm place. If your kitchen is cold, warm your oven to 100-125 degrees then turn it off. Place your dough in an oven safe bowl and place in your oven till it doubles in size.
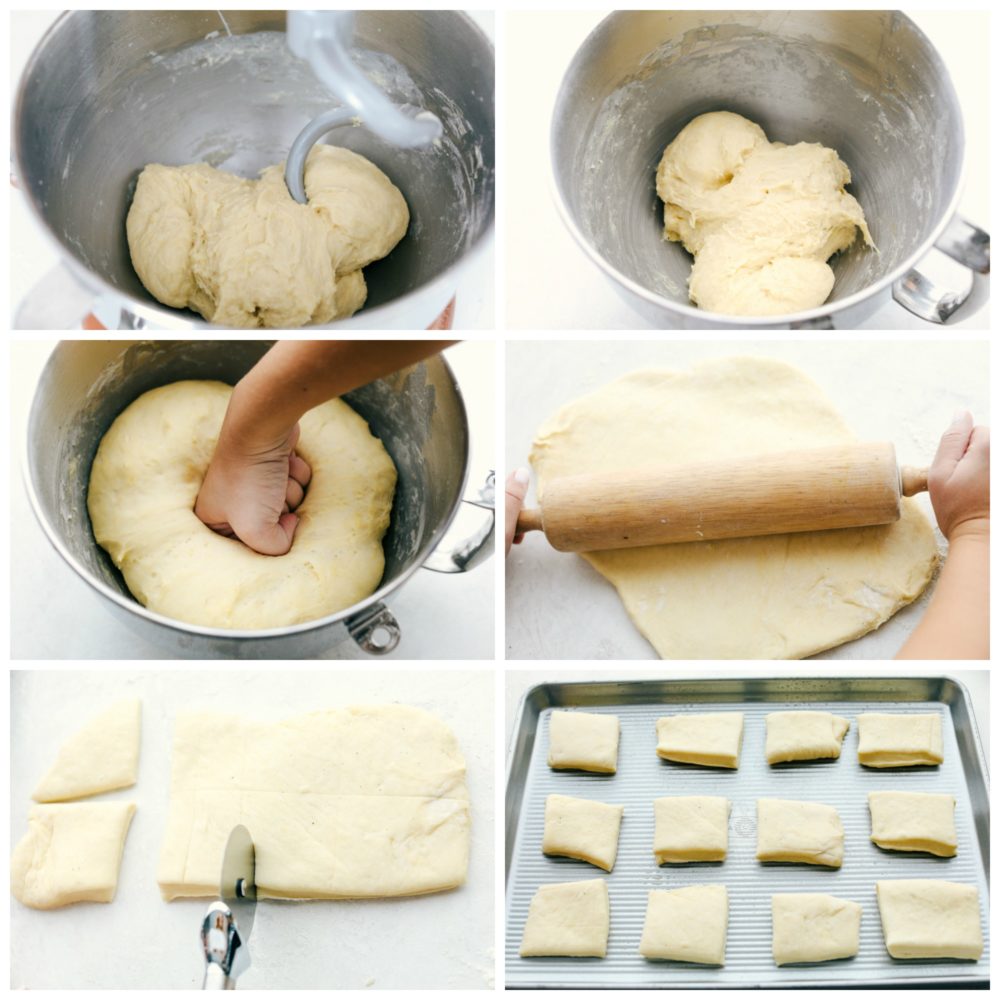
Making fluffy soft rich rolls and cutting them getting ready to bake.

Hints for the Perfect Texas Roll:

Making these rolls is easy, but here are some sure fire ways to make them perfect every time and some variations as well. This roll recipe is definitely a keeper!

  • Sugar: Sugar is the food for your yeast, it helps make it grow, Use white sugar so as not to change the flavor,
  • Dough: Your dough should be tacky but not sticky. If it’s too sticky you’ll have lots of it on your hands if you touch it. Add a little more flour 1 tablespoon at a time till you get the desired consistency.
  • Milk: Scalding the milk is crucial to helping it break down the proteins, which can keep the gluten from forming properly in your bread. Bringing it down to lukewarm temperature is vital to helping the yeast grow without killing it.
  • Cutting:  Getting that classic square Roadhouse shape, use a pizza cutter for quick easy cutting without tearing the dough which a knife will do.
  • Buttered Tops:  Add extra goodness by waiting till rolls are slightly cooled to brush with melted butter.
  • Storage: Store completely cooled rolls in a sealed container or Ziploc bag for up to 3 days. Freeze in a freezer bag for up to 2 months.
  • Double: This recipe is easy to double for a crowd. Double the ingredients but don’t increase cooking time.
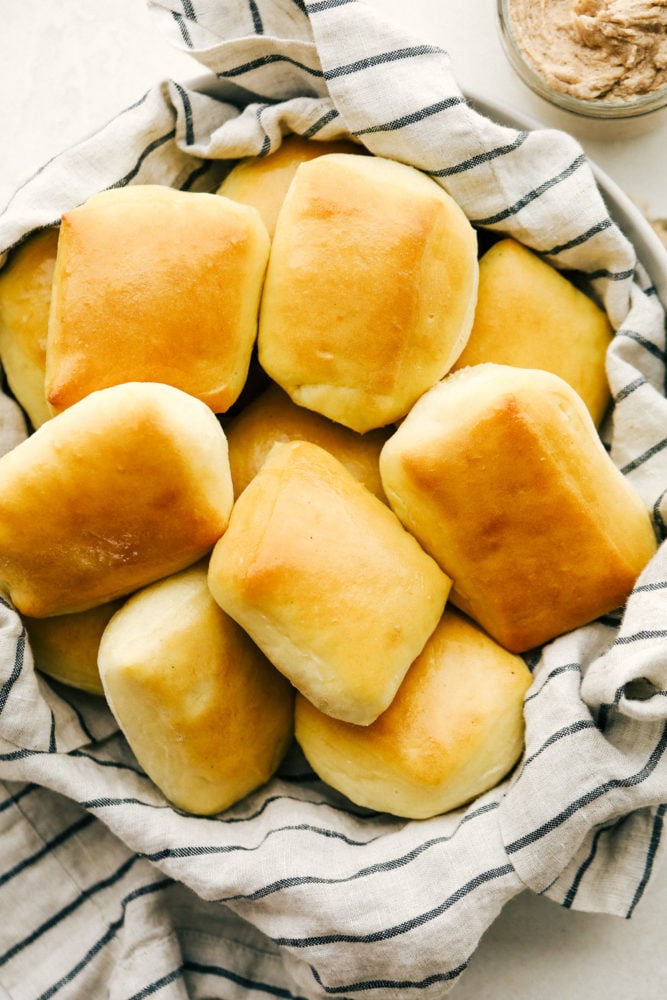
Fluffy soft Copycat Texas Roadhouse Rolls with Cinnamon Honey Butter.

Cinnamon Honey Butter:

Now this cinnamon honey butter is just what these roadhouse rolls love! Spread this butter over top a warm Texas roll and you have the MOST amazing combination ever!

  • Butter: Soften, but don’t melt the butter to make it easier to mix.
  • Powdered Sugar: mixes in smoothly without making it grainy like sugar and provides fluff.
  • Honey: Golden, drippy sweet must helps to thicken the spread.
  • Cinnamon: Adds a nice little spicy punch.

Fluffy soft Copycat Texas Roadhouse Rolls with Cinnamon Honey Butter.

More Amazing Roll Recipes to Try:

Print

Copycat Texas Roadhouse Rolls with Cinnamon Honey Butter

Delicious and soft homemade rolls that taste just like Texas Roadhouse Rolls!
Course Appetizer, Side Dish
Cuisine American
Keyword copycat texas roadhouse roll, roadhouse rolls, rolls, texas roadhouse rolls, texas rolls
Prep Time 25 minutes
Cook Time 10 minutes
Total Time 35 minutes
Servings 12 Rolls
Calories 291kcal
Author Alyssa Rivers

Ingredients

  • 2 tsp active dry yeast
  • 1 tsp sugar
  • ¼ cup warm water
  • 1 cup milk
  • 1 Tbsp. melted butter
  • ¼ cup sugar
  • 3-4 cups flour
  • 1 egg
  • 1 tsp salt
  • Cinnamon Honey Butter

Instructions

  • In the bottom of your stand mixer bowl, add yeast and 1 tsp sugar to 1/4 cup warm water. Allow yeast to proof, or double in size, which takes about 5 minutes.
  • Place milk in microwave for 45 seconds. Add the butter to the milk and stir until it is completely melted. Allow milk to cool until it is lukewarm.
  • Once the yeast has doubled, add the milk to the yeast mixture. Add sugar and about half of the flour until it reaches a muffin batter. Let rest for 10 minutes.
  • Add egg and salt to the mixture. Mix well. Add remaining flour to form a soft dough. Knead the dough until it is smooth and satiny.
  • Cover and let rise until it doubles in size. Once it has doubled, punch the dough and let it rest for 10 minutes.
  • Lightly flour a surface and roll the dough into a large rectangle, about a 1/2 inch thick. Cut the rectangle in half, and then cut each half into 6 square pieces with a pizza cutter.
  • Place on a greased baking sheet and allow to rise until double in size.
  • Bake at 350 for 10-15 minutes or until the tops are golden brown.
  • To make the honey butter, whip together butter, powdered sugar, honey, and cinnamon and serve on warm rolls.

Notes

Recipe Originally posted on November 5, 2013 
Updated on September 6, 2020

Nutrition

Calories: 291kcal | Carbohydrates: 47g | Protein: 5g | Fat: 10g | Saturated Fat: 6g | Cholesterol: 39mg | Sodium: 286mg | Potassium: 79mg | Fiber: 1g | Sugar: 22g | Vitamin A: 320IU | Vitamin C: 1mg | Calcium: 37mg | Iron: 2mg

A bunch of Texas road house rolls in a basket together.


from The Recipe Critic https://ift.tt/3h4I7LV
https://ift.tt/3lYvrK6

शनिवार, 5 सितंबर 2020

Cream Cheese Wontons

Crispy, fried to perfection pastry wraps around savory smooth cream cheese filling for a homemade version of everyone’s favorite restaurant style Cream Cheese Wonton.

Serve these fantastic starters before any meal. Make it a complete Chinese night with some of these favorites. Baked Sweet and Sour Chicken, Skinny Slow Cooker Kung Pao Chicken, or Firecracker chicken.

Cream cheese wontons in a creamy bowl with a side of sauce.

Cream Cheese Wontons

The hardest part of these is yummy mouth popping appetizers is  going to be shaping them. Super simple, few ingredients, yet amazingly delicious. A new favorite for the whole family to love. You’ll get asked to make these over and over. And because you make them at home, you can eat as many as you want,for half the price. Making it a perfect addition for any party.

These hot crispy outsides, and warm oozy tasty insides, are a perfect marriage of American and Chinese cuisine. Cream Cheese Wontons, which are also sometimes called Ragoons, are a staple in most American Chinese establishments and now they can be in your own home as well.

Wonton Ingredients:

  • Cream Cheese: You can use low fat cream cheese, soften in the microwave on high for about 20 sec.
  • Green Onion: Finely chop the onions to avoid large chunks
  • Garlic Powder: Adds a nice subtle savoriness
  • Salt: Helps to cut the sweetness of the cream cheese
  • Wonton Wrappers: Look for these in your grocery store often near the produce in the refrigerator section or an Asian specialty store.
  • Oil: Peanut oil is the best oil for frying.

How to Make Cream Cheese Wontons:

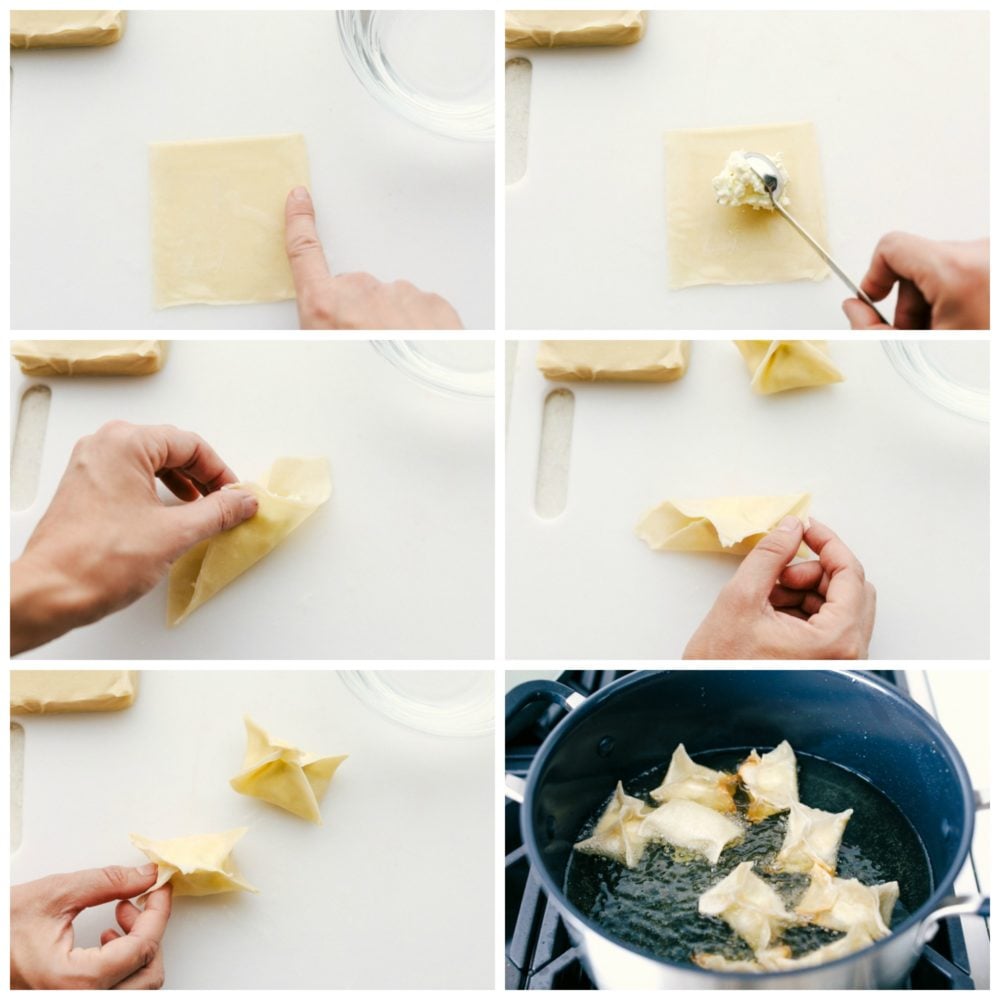
  1. Beat: In a small bowl bet the cream cheese, finely chopped onion, garlic powder and salt till nice and creamy.
  2. Fill: With a wonton wrapper on a non slick surface wet the edges all the way around. Add a teaspoon of the filling.
  3. Fold: Pinch tightly  each corner bring them together to create a star.
  4. Fry: Add enough oil so it’s about 1/2 an inch deep to a medium sized pan. Heat on medium high, add the wontons and cook on each side for 2-3 min or until golden brown.

The process of making cream cheese wontons

Tips and Variations:

  • Wonton Wrappers: Wrappers can dry out quickly so cover the ones you are not using with a damp paper towel, or plastic to keep them moist while you work. Work in small batches if that helps.
  • Folding: There is no wrong way to fold a wonton. Search ideas on the internet or create your own fold. The key is to make sure they are sealed so the creamy goodness doesn’t leak during frying.
  • Sealing: If you struggle to keep them sealed try using a well beaten egg mixed with a Tablespoon of water.
  • Just Damp: Over wetting the wrappers will cause them to be soggy and not seal at all. A little bit goes a long way.
  • Placing: Put made wontons on parchment paper while finishing the others to prevent them from sticking to other surfaces.
  • Fillings: You can get creative with the insides. Try adding sriracha or hot sauce to spice it up a bit. Leave out the onions and garlic and in drained crushed pineapple and or coconut for a sweeter side. Add bacon and chives or strawberries and powdered sugar. The possibilities are as endless as your imagination.
  • Sauce: These can be served with your favorite sweet and sour sauce, Thai sweet chili sauce, or any of your other favorite sauces.
  • Bake: These can be baked instead of fried, it won’t be exactly the same but still very tasty. Bake at 325 for 8-10 minutes until golden brown.

Storing Cream Cheese Wontons:

  • Refrigerator: Cooked wontons can be refrigerated in single layers separated by paper towel in a sealed container for up to 2 days. Reheat on a baking tray in the oven at 325 for 5-8 minutes.
  • Freeze: Uncooked Wontons can be made ahead of time and frozen till needed.
    • Make Cream Cheese Wontons according to directions.
    • Place in single layer on a baking tray lined with parchment paper and freeze for 1 hour.
    • Place frozen wontons in a gallon freezer bag.
    • Fry straight from the freezer just add a few more minutes to frying time.
  • Freeze: Cooked Wontons: Freeze the same way you would uncooked wontons and warm up the same as well. Perfect for a quick appetizer on the fly.

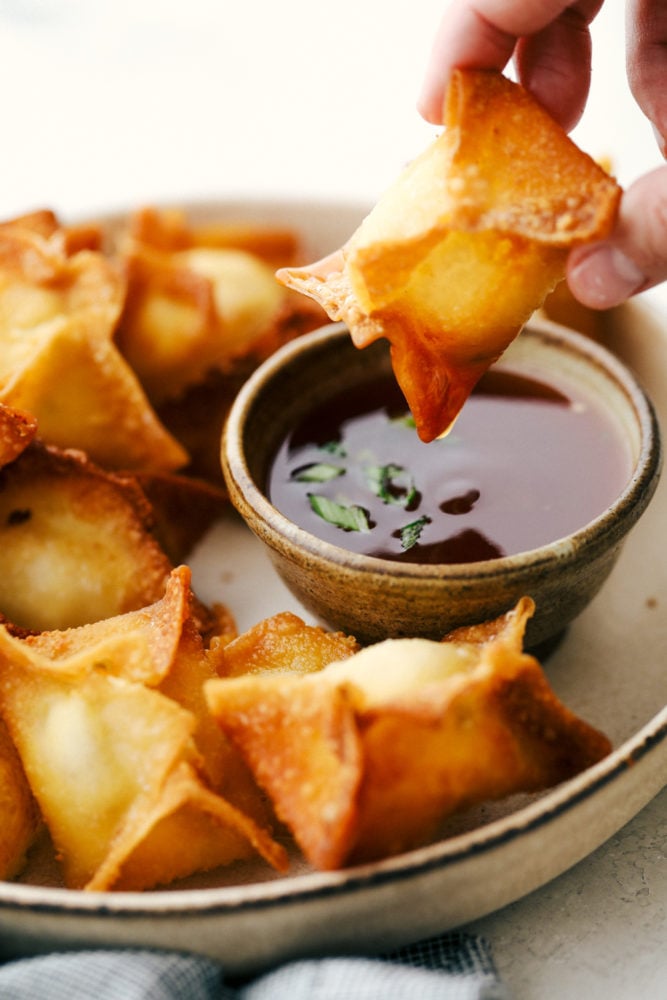
A wonton being dipped in sauce with other cream cheese wontons on the side.

More Amazing Asian Appetizers:

Print

Cream Cheese Wontons

Crispy, fried to perfection pastry wraps around savory smooth cream cheese filling for a homemade version of everyone's favorite restaurant style Cream Cheese Wonton.
Course Appetizer, Side Dish
Cuisine Asian American, Chinese
Keyword cream cheese wontons, wontons
Prep Time 10 minutes
Cook Time 10 minutes
Total Time 20 minutes
Servings 4 People
Calories 196kcal
Author Alyssa Rivers

Ingredients

  • 8 ounce cream cheese softened
  • 2 Tablespoons green onion finely chopped
  • 1/2 teaspoon garlic powder
  • 1/4 teaspoon salt
  • wonton wrappers
  • oil for frying

Instructions

  • In a small bowl add the cream cheese, green onions, garlic powder and salt and beat until creamy.
  • Lay a wonton wrapper on a non stick surface. With your finger wet the edges of the wonton wrapper. Add about a teaspoon of the cream cheese filling and bring up each corner creating a star and seal tightly.
  • In a medium sized saucepan add 1/2 inch of oil along the sides. Heat to medium high heat. Add the wontons to the hot oil and fry until golden brown and crispy 2-3 minutes. Remove with a slotted spoon and set on a paper towel lined plate. Serve with sweet and sour sauce if desired.

Nutrition

Calories: 196kcal | Carbohydrates: 3g | Protein: 3g | Fat: 19g | Saturated Fat: 11g | Cholesterol: 62mg | Sodium: 328mg | Potassium: 78mg | Fiber: 1g | Sugar: 2g | Vitamin A: 791IU | Vitamin C: 1mg | Calcium: 56mg | Iron: 1mg


from The Recipe Critic https://ift.tt/322ukRG
https://ift.tt/331oxLK

शुक्रवार, 4 सितंबर 2020

Chicken Stew

Chicken Stew is a hearty, filling and comforting! It is the perfect dish for Sunday dinner or a cold rainy day! This chicken stew is made with potatoes, carrots, onions, celery and chicken cooked until fall apart tender.

Stews are a fall favorite! Try this Slow Cooker Chicken Tortellini Soup, Best Ever Slow Cooker Beef Stew or Vegetable Beef Soup for more stew ideas this fall.

Chicken stew in two white bowls with a spoon on the side.

Homemade Chicken Stew

Nothing says comfort food like a warm stew. I took one of my favorite Beef Stew Recipes and replaced the beef with chicken thighs. It is just as rich and comforting as Beef Stew and is perfect for those cold winter days! The BEST thing about this recipe is everything is made in one pot!

This chicken stew cooks in the oven for 1 1/2 hours or until the chicken is super tender and falls apart easily. It is best to cut the celery, carrots, potatoes and onions on the larger side. This will help them since they will be cooking for a long period of time in the oven without breaking down.

Ingredients for Chicken Stew:

This stew is perfect for your family! I love to serve this chicken stew with crusty bread and a side salad. This is a comfort food for sure!

  • Chicken: I like to use boneless skinless chicken thighs. They have the most flavor and hold up better when cooking for longer periods of time.
  • Vegetables: Onions, carrots, baby potatoes and celery are added.
  • Spices: Bay leaves, fresh thyme and sage are added. Feel free to substitute dried in place of the fresh.
  • Dry sherry: You can also substitute white wine in place of the dry sherry or leave it out if you prefer.
  • Chicken broth: Gives the dish a lot of flavor. I prefer to use low sodium chicken broth to ensure the stew is not too salty.

Chicken stew in a white pot.

How to Make Stew:

Enjoy this homemade chicken stew this fall. Wow your family with how simple it is to make a hearty and delicious family dinner!

  1. Brown the Chicken: Take the chicken and season it on both sides with salt and pepper. Heat butter in a large dutch oven over medium high heat. Add the chicken in the pan and sear on both sides until golden brown. This takes about 2-3 minutes on each side. (You just want to get color on the chicken it won’t be fully cooked). Lastly, remove the chicken from the pan and set aside.
  2. Sauté Veggies: Add in the carrots, onion and celery to the pan and saute for 5 minutes.
  3. Deglaze the Pan: Add in the sherry to deglaze the pan. Scrap the brown bites off the bottom of the pan.
  4. Cook: Return the chicken to the pan along with the chicken broth, thyme, sage and bay leaves. Cover and place in the oven for 1 hour. Carefully remove the pot from the oven and add in the potatoes. Place the pot back to the oven and cook for 30 more minutes or until the potatoes are tender.
  5. To Thicken Stew: Remove 1/4 cup of the chicken broth liquid to a small bowl and whisk in 2 tablespoons of cornstarch. Add the mixture to the pot and bring to a rolling simmer on the stove.
  6. Serve: Remove bay leaves and top with fresh parsley and serve immediately with crusty bread for serving!

Up close photos of chicken stew in a white bowl with a spoon.

Here Are More Soup Recipes To Enjoy!

Print

Chicken Stew

Chicken Stew is a hearty, filling and comforting! It is the perfect dish for Sunday dinner or a cold rainy day! This chicken stew is made with potatoes, carrots, onions, celery and chicken cooked until fall apart tender.
Course Dinner, Main Course
Cuisine American
Keyword Chicken Stew, stew
Prep Time 10 minutes
Cook Time 40 minutes
Total Time 50 minutes
Servings 8 People
Calories 192kcal
Author Kelley Simmons

Ingredients

  • 1 1/2 pounds boneless skinless chicken thighs
  • 1 tsp salt
  • 1/2 tsp pepper
  • 2 tbsp unsalted butter
  • 1 large onion, large dice
  • 3 medium carrots, sliced into 1/2 inch slices
  • 3 ribs celery, large dice
  • 1/2 cup dry sherry
  • 1 tsp fresh thyme
  • 2 tsp fresh sage
  • 3 whole bay leaves
  • 1 1/2 pounds mini tri-color potatoes, cut in half
  • 4 cups chicken stock
  • 2 tbsp cornstarch
  • parsley for serving, if desired

Instructions

  • Preheat oven to 350 degrees.
  • Season chicken on both sides with salt and pepper.
  • Heat butter in a large dutch oven over medium high heat. Add in chicken and sear on both sides until golden brown, 2-3 minutes a side. (You just want to get color on the chicken it won't be fully cooked). Remove the chicken from the pan and set aside.
  • Add in the carrots, onion and celery to the pan and saute for 5 minutes.
  • Add in the sherry to deglaze the pan. Scrap the brown bites off the bottom of the pan.
  • Return the chicken to the pan along with the chicken broth, thyme, sage and bay leaves.
  • Cover and place in the oven for 1 hour.
  • Carefully remove the pot from the oven and add in the potatoes.
  • Return back to the oven and cook for 30 more minutes or until the potatoes are tender.
  • To thicken the stew remove 1/4 cup of the chicken broth liquid to a small bowl and whisk in 2 tablespoons of cornstarch. Add the mixture to the pot and bring to a rolling simmer on the stove. Cook for 1-2 minutes or until the sauce is thickened.
  • Remove bay leaves and top with fresh parsley and serve immediately with crusty bread for serving!

Nutrition

Calories: 192kcal | Carbohydrates: 7g | Protein: 20g | Fat: 8g | Saturated Fat: 3g | Cholesterol: 92mg | Sodium: 539mg | Potassium: 345mg | Fiber: 1g | Sugar: 2g | Vitamin A: 144IU | Vitamin C: 1mg | Calcium: 19mg | Iron: 1mg


from The Recipe Critic https://ift.tt/3i2oHsk
https://ift.tt/31XPJvp

गुरुवार, 3 सितंबर 2020

Zucchini Lasagna

Zucchini Lasagna is a low-carb, gluten free twist on your favorite Italian comfort food. This is an absolutely scrumptious way to use all that zucchini from your garden.

Round out this satisfying family Zucchini Lasagna with a nice salad and tasty bread. Try these excellent choices: Miracle No Knead Bread, Focaccia Bread, Mouthwatering Strawberry Spinach Salad, or this refreshing Greek Salad with the Best Dressing.

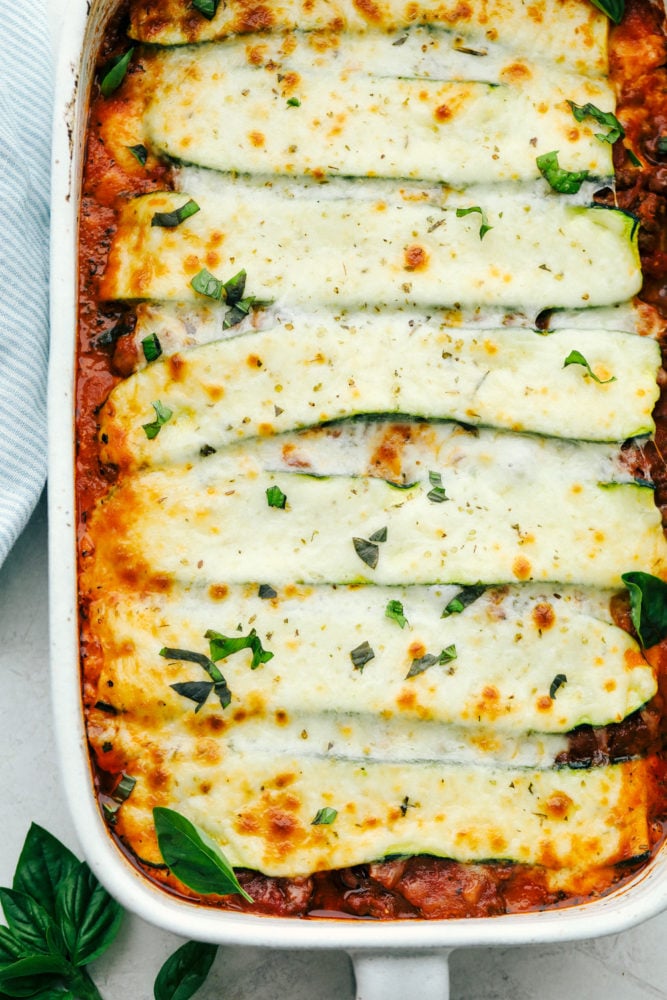
Zucchini lasagna in a white casserole dish.

Homemade Zucchini Lasagna

Everyone loves lasagna and this Zucchini Lasagna will be no different. With the same satisfying taste and even texture of regular lasagna, this soon to be new family favorite will have them coming back for seconds and even thirds. Just like regular lasagna, you can make this ahead of time. Make it the night before and pop it into the oven when ready. Or even better make and freeze for up to 2 months for a busy day when you need a good quick homemade meal.

Comfort food that is soul satisfying and low-carb, gluten free and keto friendly is like a dream come true. You’ll never miss the pasta with this gratifying dish. Delicately sliced zucchini is layered between hearty zesty Italian sauce. It’s a perfect blend of spices and meat in a vibrant tomato sauce. Smothered in with an indulgent ricotta and parmesan cheese layer and smooth mozzarella it’s a feast everyone will LOVE!

Zucchini Lasagna Ingredients:

Don’t let these ingredients scare you! This is a perfect combination of deliciousness that your family is going to love.

  • Olive Oil: I like to use Extra Virgin Olive Oil for it’s flavor
  • Onion: Dice well,  you don’t want large chunks of onion
  • Ground Beef: You could substitute ground turkey or ground chicken
  • Italian Sausage: This will give it the meal it’s zest, if you like spicy for Hot Italian Sausage.
  • Crushed Tomatoes: Gives the recipe some texture with out the lumps
  • Tomato Sauce: Use low sodium to make it just heart healthier.
  • Tomato Paste: Gives richness and body without extra water.
  • Italian Seasoning: Don’t skimp on the seasoning. Zucchini will take on the flavor
  • Sugar: Cuts the acidity in the tomato sauce so don’t leave out.
  • Fresh Basil: Can use dried basil, just half as much.
  • Ricotta Cheese: Low fat works great if you want.
  • Parmesan: Make sure it’s finely grated to make sure it melts well.
  • Egg: Adding an egg to the ricotta helps bind the cheese together and makes it rich and creamy.
  • Zucchini: Keep the zucchini the same length for even “noodles”
  • Mozzarella Cheese: Buy pre-shredded mozzarella for faster prep.

How to Make Lasagna:

A rich zesty meat sauce is layered with a cheesy, creamy ricotta and thinly sliced zucchini that has been cooked to perfection. All of it is topped with ooey, gooey Parmesan and mozzarella cheese.

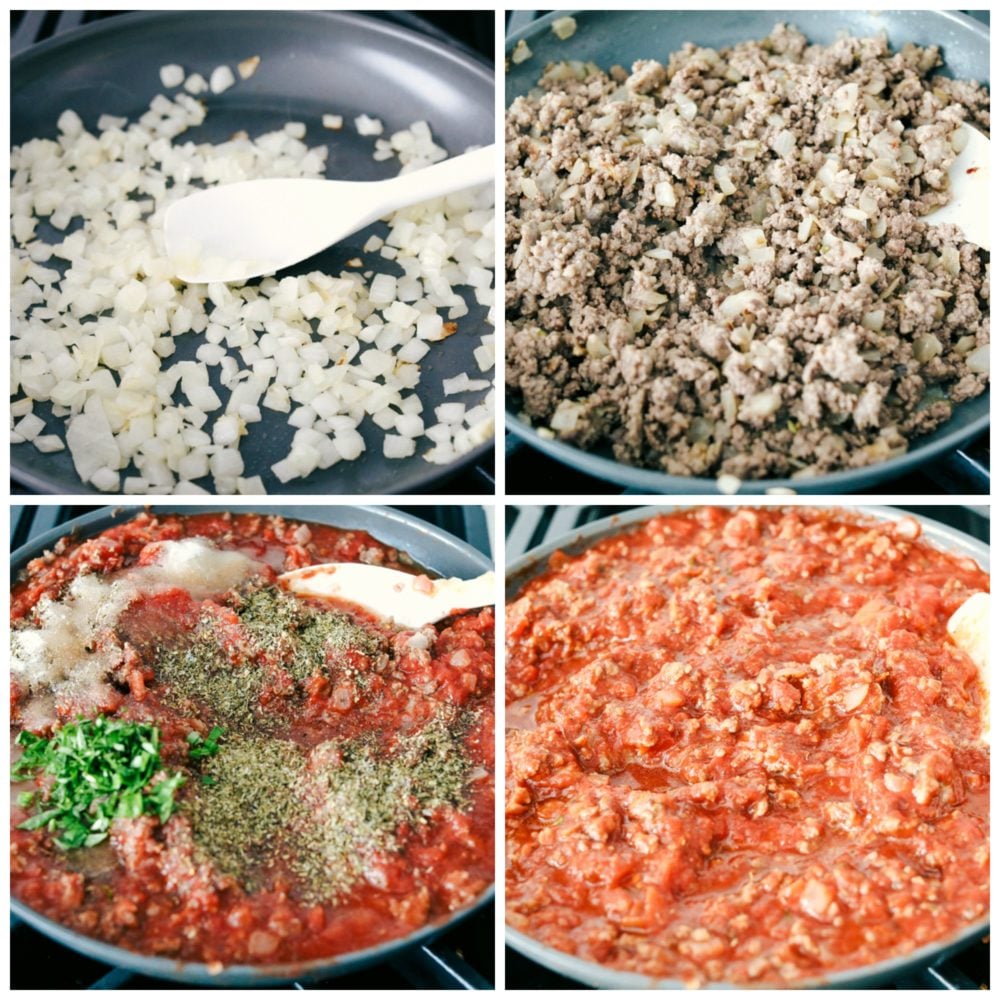
  1. Saute: In a large skillet saute the onions in olive oil till tender.
  2. Cook: To the onions add the beef and sausage and cook and crumble till brown and cooked through
  3. Add: Next stir in the crushed tomatoes, tomato sauce, tomato paste, Italian seasoning, sugar and basil. Let it simmer on low heat.
  4. Mix: In a separate bowl mix the ricotta cheese, parmesan and egg together thoroughly.
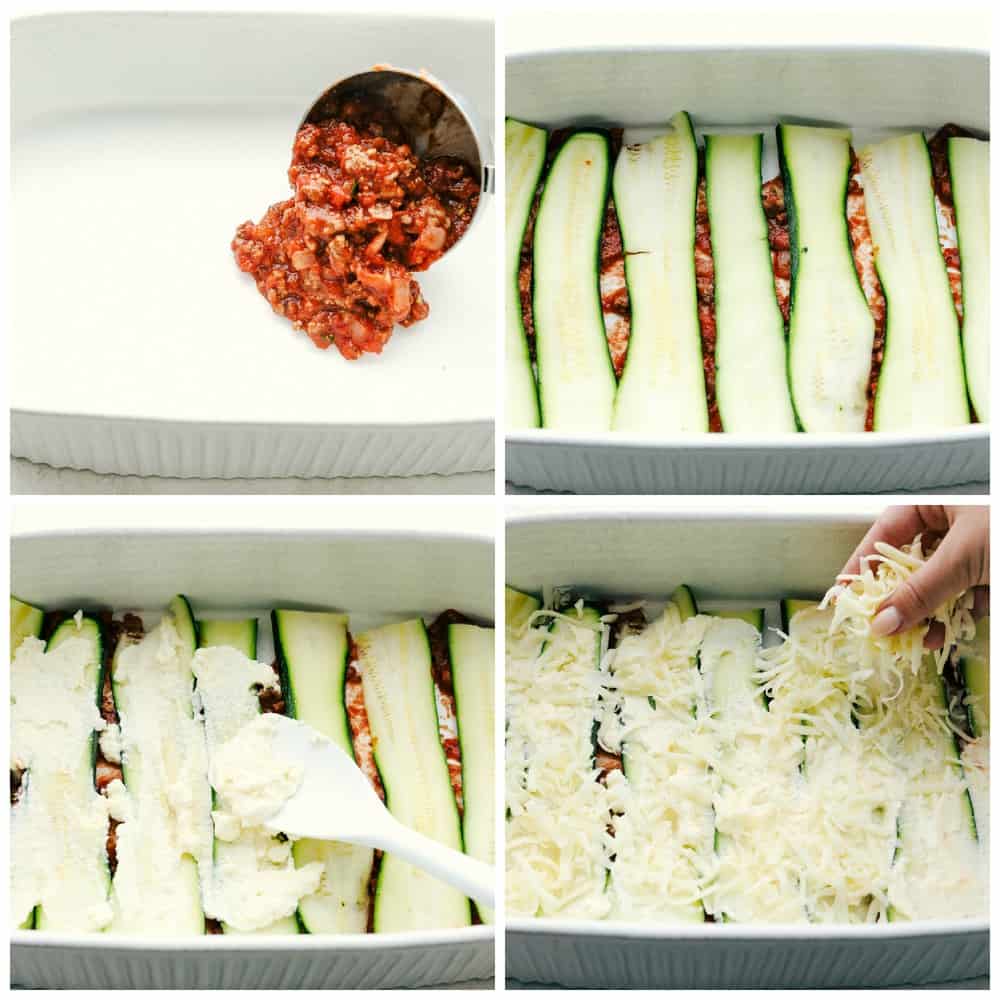
  5. Layer: In a 9×13 well oiled pan begin to layer the lasagna starting with 1 cup of the meat sauce then the zucchini, followed by the ricotta mix  and then some mozzarella cheese. You’ll repeat the layers and end with ooey gooey mozzarella on top.
  6. Bake: Cover with a aluminium foil and bake in 375 degree oven for 20 min. Then remove the foil and bake for an additional 20-25 minutes till heated through.
  7. Cool: Cool for at least 10 min to help the lasagna set before cutting.

Steps to making zucchini lasagna, onions, tomato sauce and cheese.

Tips And Tricks for the BEST Zucchini Lasagna: 

Zucchini has a lot water in it naturally, use some of these tips to make sure your BEST Zucchini Lasagna isn’t soggy.

  • Slice: To slice the zucchini thinly use a mandoline to get even 1/8″ slices.
  • Salt: Salt the zucchini to draw out the water and let it sit for 15 minutes, then pat thoroughly dry. If you use kosher salt it’ll be easier to wipe it off.
  • Dry: Broil or grill your zucchini slices to dry out even further and give it a little extra flavor as well.
  • Thicken: Make sure your sauce is good and thick, if you need to thicken it take 1 Tablespoon of cornstarch mixed in 2 Tablespoons of cold water and stir into your sauce bringing it to a boil. Having a thick sauce will help absorb any water released from the zucchini.
  • Sneaky: If all else fails you can layer uncooked lasagna noodles on the very bottom of your pan. It won’t be completely gluten free but the uncooked noodles will soak up any liquid. You can always remove that bottom layer to make it low-carb before eating.

The process of layering zucchini lasagna.

Variations and Storing Lasagna:

This Zucchini Lasagna is so adaptable and stores nicely for leftovers, if you have them.

  • Vegetables: Swap out the zucchini for eggplant or thinly sliced sweet potatoes. Add a layer of chopped vegetables, like cooked spinach, or saute peppers, mushrooms, or asparagus.
  • Protein:  You can use ground chuck, ground turkey or Italian chicken sausage instead of regular sausage.
  • Sauce: Make a whole new flavor by using Alfredo sauce instead of a tomato based sauce.
  • Store: Lasagna can be stored in the fridge for up to 5 days, cooked lasagna for up to 2 months.

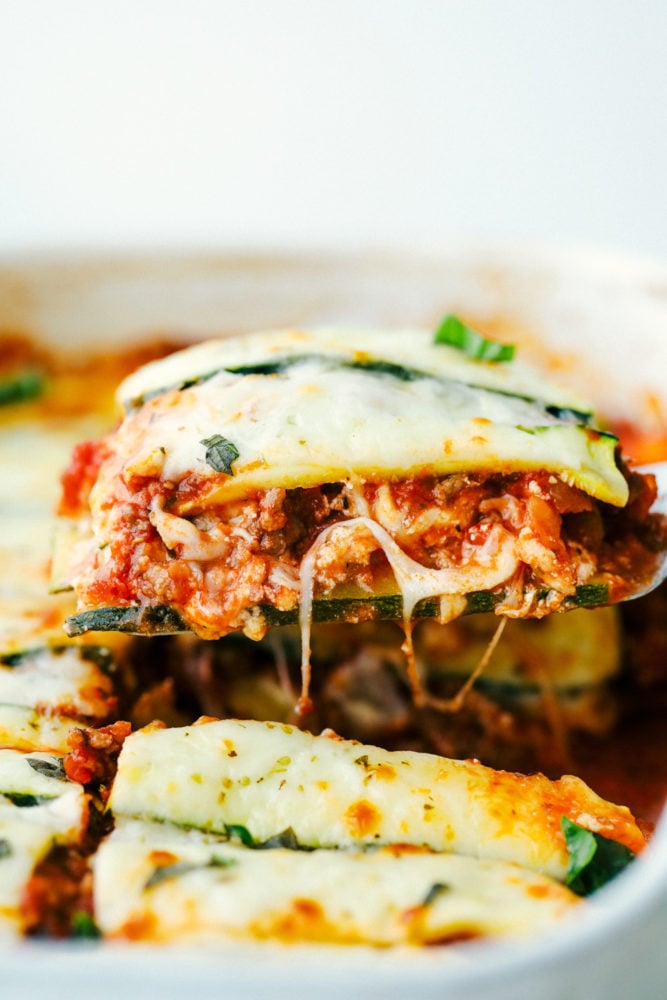
A photo of zucchini lasagna having a piece taken out of the casserole dish.

More Zucchini Dinner Ideas:

Print

Zucchini Lasagna

Zucchini Lasagna is a low-carb, gluten free twist on your favorite Italian comfort food. This is an absolutely scrumptious way to use all that zucchini from your garden.
Course Dinner
Cuisine American
Keyword zucchini lasagna
Servings 12 Slices
Calories 436kcal
Author Alyssa Rivers

Ingredients

  • 1 Tablespoon olive oil
  • 1 small onion diced
  • 1 pound ground beef
  • 1 pound Italian sausage
  • 1 28 Ounce can crushed tomatoes
  • 2 6.5 ounce can tomato sauce
  • 1 6 ounce can tomato paste
  • 2 Tablespoons Italian Seasoning
  • 1/4 cup sugar
  • salt and pepper to taste
  • 1 tablespoon fresh basil chopped
  • 16 ounce ricotta cheese
  • 1/2 cup parmesan finely grated
  • 1 egg
  • 4 medium sized zucchini thinly sliced
  • 2 cups mozzarella cheese shredded

Instructions

  • In a large skillet over medium high heat add the olive oil and onion. Sauté until tender and add the ground beef and sausage. Cook and crumble until brown and cooked throughout. Add crushed tomatoes, tomato sauce, tomato paste, Italian seasoning, sugar, and basil. Let simmer on low heat.
  • In medium sized bowl add the ricotta cheese, parmesan, and egg. Mix until incorporated.
  • Preheat oven to 375 degrees and spray a 9x13 inch pan with non stick spray and set aside.
  • To make the lasagna start by spreading 1 cup of the meat sauce on the bottom. Arrange the zucchini slices in a single layer over the meat sauce. Spread 1/2 cup of the ricotta cheese, on top of the zucchini followed by shredded mozzarella cheese. Repeat the layers and top with cheese.
  • Cover with aluminum foil and bake for 20 minutes. Remove the foil and bake and additional 20-25 minutes or until it is heated throughout and cheese is bubbly. Let it cool for 10 minutes before serving.

Nutrition

Calories: 436kcal | Carbohydrates: 18g | Protein: 24g | Fat: 31g | Saturated Fat: 13g | Cholesterol: 103mg | Sodium: 788mg | Potassium: 881mg | Fiber: 3g | Sugar: 12g | Vitamin A: 954IU | Vitamin C: 24mg | Calcium: 245mg | Iron: 4mg


from The Recipe Critic https://ift.tt/2Z4KGaC
https://ift.tt/3jNyrHH