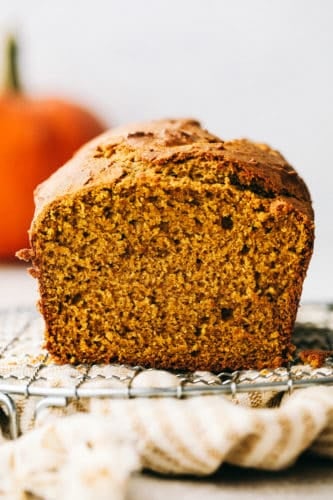
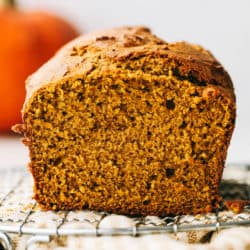
This Absolutely Perfect Pumpkin Bread is moist, spiced and will fill your home with the most amazing aroma. Your friends and family will devour this flavorful bread that screams it’s time for fall. This is such an easy quick bread, you’ll make it all the time.
I love all the things you can make with pumpkin, it’s so versatile. Try these recipes for some pumpkin inspiration; Soft and Puffy Pumpkin Snickerdoodles, Chocolate Chip Pumpkin Muffins or this Pumpkin Cinnamon Roll Cake.

Absolutely Perfect Pumpkin Bread
The hardest thing about this super easy loaf is waiting for it to cool enough so you can eat it. This is so easy to make you’ll want to make it every day. Serve it for breakfast, snack or even dessert. Warm sweet balance of spices makes this irresistible whenever you serve it.
This Pumpkin bread also makes a perfect gift for any occasion. Take it as a home warming gift, a thank you gift, or a just because gift. It’ll make anyone’s day just better.
Perfect Pumpkin Bread Ingredients:
- Butter: Adds moisture and flavor
- Sugar: Adds sweetness to the pumpkin
- Pumpkin Puree: Can use canned or make your own puree
- Sour Cream: Secret ingredient that adds moisture and super tender
- Vanilla: Love the flavor it adds
- Flour: Sift your flour for the perfect insides
- Cinnamon, Nutmeg & Cloves: The must have perfect trio of spices to go with pumpkin
- Baking Soda & Baking Powder: These are your leavening agents to help the bread rise and make it light and airy.
How to Make Perfect Pumpkin Bread:
- Prepare: Preheat the oven to 350 degrees. Take a 9×5 loaf pan and line it with parchment paper and spray with non stick spray.
- Wet Ingredients: In a medium bowl you’ll beat butter, sugar together till combined well. Add eggs, pumpkin puree, sour cream and vanilla and beat well.
- Dry Ingredients: In another bowl whisk the flour, cinnamon, nutmeg, cloves, baking soda and baking powder.
- Combine: Gently fold in the dry ingredients into the wet ingredients till combined.
- Bake: Pour into the loaf pan and bake for 45-60 minutes or till a toothpick comes out clean.

Tips and Variations for the Absolutely Perfect Bread:
- Pumpkin: Make sure you buy canned pumpkin puree and don’t confuse it with canned pumpkin pie filling. They are two very different things. The pie filling will have sugar and spices already added, you just want plain pumpkin so make sure you double check your can.
- Add-ins: Make variations to this recipe by adding a half of cup of chopped pecans, or walnuts. Chocolate chips, cranberries or raisins.
- Muffins: You can easily turn these into muffins, just pour into greased muffin tin filling each about 3/4 full. Bake for 20 minutes or till an inserted toothpick comes out clean. Should make roughly 24 muffins.
- Double: This is simple to double and make two loaves. One to eat right away and one to save for later.

Make Homemade Pumpkin Puree:
Super simple and fun to do, fresh puree will make these Pumpkin Pie Cupcakes with Cream Cheese Whipped Cream that much more amazing.
- Prep: Take a small 4-6 pound pumpkin, often called a sugar or pie pumpkin and cut off the stem with a sharp knife. Cut the pumpkin in half and scoop out the seeds and strings. Keep the seeds if you want to roast them later.
- Roast: Preheat oven to 400 degrees. Lay the pumpkin cut side down on a baking sheet that has been lined with parchment paper. Roast until a knife can easily be inserted and the flesh feels soft. Should take about 35-45 minutes depending on the size.
- Scrape: Once the pumpkin has cooled scrape the insides from the shell and place in a food processor.
- Puree: Blend until smooth and creamy. The puree can then be stored in your fridge for a few days or in the freezer for a few months.

Storing Pumpkin Bread:
Everyone will love this so much, there may not be leftovers but if there are, it’s easy to store:
- Storage: Pumpkin bread does not need to be refrigerated. Make sure it’s cooled completely and store tightly wrapped in a cool dry place for up to 4 days. If it lasts longer than that, put in the fridge for up to 7 days.
- Freeze: This freezes beautifully. Once the loaf is completely cooled wrap in plastic wrap, at least two layers to prevent freezer burn. It can be frozen for up to 3 months. Thaw on the counter top overnight.

More Perfect Quick Breads:
I love quick breads, they don’t take extra time to rise and the flavors are amazing.
- Lemon Almond Poppyseed Quick Bread
- Cranberry Orange Quick Bread
- Award Winning Banana Bread
- My Favorite Zucchini Bread
- Eggnog Bread with Eggnog Glaze
Pumpkin Bread
Ingredients
- 1/2 cup butter melted
- 1 cup sugar
- 2 eggs
- 3/4 cup pumpkin puree
- 1/4 cup sour cream
- 1 teaspoon vanilla
- 2 cups flour
- 2 teaspoons cinnamon
- 1/4 teaspoon nutmeg
- 1/4 teaspoon cloves
- 1 teaspoon baking soda
- 1/2 teaspoon baking powder
Instructions
-
Preheat the oven to the 350 degrees. Line a 9x5 inch loaf pan with parchment and spray with non stick spray. In a medium sized bowl beat the melted butter and sugar together. Add eggs, pumpkin puree, sour cream, and vanilla and beat until combined.
-
In a small bowl whisk together flour, cinnamon, nutmeg, cloves, baking soda and baking powder. Add the dry ingredients to the wet ingredients and stir until combined. Pour into the prepared loaf pan.
-
Bake for 45-60 minutes or until a toothpick inserted comes clean.
Nutrition
from The Recipe Critic https://ift.tt/2RCjBrk
https://ift.tt/2FJxH7I