रविवार, 1 नवंबर 2020

Crispy Parmesan Air Fryer Brussels Sprouts

Crispy Parmesan Air Fryer Brussels Sprouts are super easy, packed with flavor and have tasty golden crunch. This is going to be one of the best ways to get your kids to say “More Please!” when it comes to their veggies. These are just that good!

Brussel Sprouts are so fun to eat, especially when you have an incredible recipe to use them in.  Try them in these Awesome Bacon Wrapped Brussel Sprouts, Apple Bacon Brussel Sprout Salad and Roasted Maple Brussel Sprouts.

Crispy, parmesan crusted brussel sprouts in the air fryer.

Brussel Sprouts Air Fryer

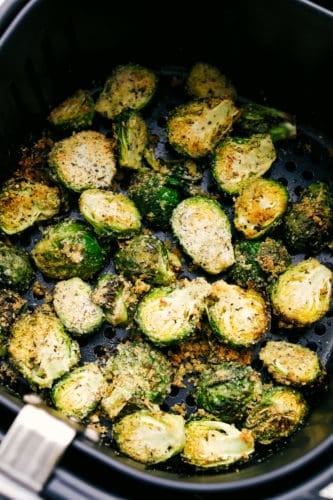
These are not your grandma’s brussel sprouts! Trust me! Cooking them in the air fryer creates a tender inside and the coating gives it a bursting with flavor crunchy golden crust. These are so good! It will change the way you see brussel sprouts forever.

It’s so easy and quick. Using an Air Fryer cuts the cooking time in half and makes it so much healthier because you can use less oil. Now you can get all the nutrition without choking them down. These are a perfect side dish for any meal, from spaghetti to fish to steak. Make these part of your side dish rotation.

What is an Air Fryer?

Air Fryers are a countertop appliance similar to a convection oven in that it circulates hot air to cook food. This process produces a crispy product without the added oil or extra calories of deep fat frying. It cooks at a high speed so it cooks faster than a convection or regular oven as well. It’s compact and won’t heat your whole kitchen either. It won’t sacrifice flavor even though it slashes fat and calories. It’s a total win.

Parmesan Brussels Sprout Recipe

  • Brussel Sprouts: Cut the brussel sprouts in half
  • Olive Oil: This is just to help the coating adhere to the sprouts
  • Salt and Pepper: Just to taste
  • Parmesan Cheese: Use grated parmesan for best results
  • Panko Bread Crumbs: Panko is light and crisps nicely
  • Italian Seasoning: The perfect flavor to go with the cheese

Making Brussels Sprouts in the Air Fryer

  1. Combine: In a bowl combine the sprouts, oil and salt and pepper, toss gently to coat
  2. Mix: In a separate bowl mix together the parmesan cheese, panko, and italian seasoning. Sprinkle half of the mixture on the brussel sprouts and toss.
  3. Cook: Place the sprouts in the an even layer in the basket of your air fryer. Cook at 390 for 5 minutes. Open the fryer and toss the brussel sprouts with the rest of the topping. cook for an additional 5 min. till golden brown and tender.

Coating the brussel sprouts with parmesan and seasonings.

Benefits of Brussels Sprouts

Brussels sprouts are part of the vegetable family that includes broccoli and cabbage, a cruciferous veggie. I personally love that they look like mini cabbage heads, they’re kinda cute. They are a super power house food with their high contents of vitamin C, and K and other minerals. They are best known for the high antioxidant compounds. Antioxidants reduce the oxidative stress in your cells and helps lower your risk of chronic disease.  So grab a bag of brussel sprouts and eat up to your health!The flavors brought on from roasting can be described as savory, slightly nutty, and even a tad sweet – especially the smaller sized sprouts.

Parmesan coated Brussel Sprouts in the air fryer.

Tips and Variations for the Best Air Fried Vegetables

  • Seasoning: You can change up the seasoning for whatever your craving. Try cajun, mexican, spicy, or indian inspired spices to change up the flavor. It’s so versatile and easy to do.
  • Don’t Crowd: The best tip for any food coming out perfectly from your air fryer is to make sure they have space around them, don’t over crowd, if you need to work in batches.
  • Double: This is super easy to double for a crowd, again just work in batches.
  • Toss: After cooking you can toss with more cheese if you desire
  • Bread Crumbs: Panko or breadcrumbs work well in this recipe. You can ramp up the flavor with seasoned bread crumbs too.
  • Storing: Keep leftovers in an airtight container in the fridge for up to 4 days. Reheat in the air fryer for 1-2 min, just till heated through, to restore their crispiness. It won’t be exactly the same but it should help.

Parmesan crusted air fryer brussel sprouts.

More Ways to Eat Your Veggies

Veggies are just good for you and these recipes make them easy to eat!

Print

Crispy Parmesan Air Fryer Brussels Sprouts

Crispy Parmesan Air Fryer Brussels Sprouts are super easy, packed with flavor and have tasty golden crunch. This is going to be one of the best ways to get your kids to say "More Please!" when it comes to their veggies. These are just that good!
Course Side Dish
Cuisine American
Keyword air fryer, air fryer brussels sprout recipe, air fryer brussels sprouts, brussels sprouts
Prep Time 5 minutes
Cook Time 10 minutes
Total Time 15 minutes
Servings 4 People
Calories 127kcal
Author Alyssa Rivers

Ingredients

  • 1/2 pound Brussel sprouts cut in half
  • 1 Tablespoon olive oil
  • salt and pepper
  • 1/2 cup parmesan cheese grated
  • 2 Tablespoons panko bread crumbs
  • 1 Tablespoon Italian seasoning

Instructions

  • In a medium sized bowl add the Brussels sprouts, olive oil and sprinkle with salt and pepper.
  • In a small bowl add the parmesan cheese, panko, and Italian seasoning. Sprinkle half of the mixture on the brussel sprouts and toss.
  • Add the brussel sprouts in an even layer in the basket of your air fryer. Cook the brussels sprouts at 390 degrees for 5 minutes. Open the air fryer and toss the brussels sprouts with the rest of the topping. Cook for an additional 5 minutes or until golden brown and tender.

Nutrition

Calories: 127kcal | Carbohydrates: 10g | Protein: 7g | Fat: 7g | Saturated Fat: 3g | Cholesterol: 9mg | Sodium: 251mg | Potassium: 258mg | Fiber: 3g | Sugar: 2g | Vitamin A: 546IU | Vitamin C: 48mg | Calcium: 201mg | Iron: 2mg


from The Recipe Critic https://ift.tt/3efn1Lh
https://ift.tt/2TIPG1y

शनिवार, 31 अक्तूबर 2020

How to Make the Best Scrambled Eggs Ever!

The Best Scrambled Eggs are fluffy, light, moist and taste amazing. There is a secret to it though, and I’ve got it. The secret to the perfect scrambled eggs is cooking them low and slow!

Eggs go with so many things, try them with these Perfect Fluffy Pancakes or Belgian Waffles. Or put them in these freezer friendly Breakfast Burritos.

Fluffy, soft, perfect scrambled eggs.

Perfect Scrambled Eggs

Scrambled eggs are one of the easiest and quickest complete proteins out there. I’ve used them in a pinch for not just breakfast but lunch and dinner too. It’s the perfect answer for that dreaded question “What’s for dinner?” On those days where you’re lucky to have made it to dinner time at all, let alone know what to eat, grab eggs and you’ve got it made! They are so versatile you can do so many things with them!

You can rest easy knowing you’re giving your family and loved ones a nutritional meal when you serve eggs. Did you know that one egg has only 75 calories and 7 grams of high-quality protein. With only 1.6 grams of saturated fat and iron, vitamins, minerals and carotenoids, they are a powerhouse of disease-fighting nutrients. Including lutein and zeaxanthin. So heat up the pan, it’s time to have some eggs!

Fluffy Scrambled Egg Ingredients

Pretty simple ingredients. Super easy and quick to mix together!

  • Butter: Just enough to help it not stick to the pan and impart a little bit of flavor.
  • Eggs: This recipe uses 4 Large eggs
  • Milk: Can substitute out with water
  • Salt and Pepper: Add to your tastes

Let’s Make Scrambled Eggs!

It may take a little bit longer than you thought but, trust me, it’s worth the wait for these perfect delicate eggs! Add a side of bacon and this is the perfect breakfast!

  1. Melt: In a non stick skillet over medium low heat melt the butter
  2. Whisk: In a small bowl whisk together the eggs and milk.
  3. Pour: Once the butter has melted pour the egg mixture in the pan. Wait until you see a thin layer of egg cooking around the edges. Using a rubber spatula, move the eggs around the pan until they look fluffy and soft. Remove from heat when they look soft and slightly runny.
  4. Serve: Salt and pepper to your taste, top with chives if you desire and serve immediately.

Making the best scrambled eggs with milk and on medium low heat.

Tips for the Best Egg Breakfast

  • Whisk: This is a critical step, don’t under do it. Ditch the fork and cereal bowl and get a good sized bowl and whisk. Beat the eggs till all the yolks and whites are totally combined with no globby steaks. It should be light and airy. Whisk it will whip that air into the eggs to help them be fluffy and soft.
  • Eggs: What ever you buy and wherever you buy your eggs, get good quality eggs, it matters.
  • Seasoning: Wait till after you cook the eggs to season them with salt and pepper. Adding it in the beginning draws out the moisture in the eggs, making them watery.
  • Milk: Without the fat in dairy added to the eggs can be very, easy to over cook. The milk results in creamy, moist and softer eggs than if you left it out.
  • Secret Cooking Method: Remember it’s low and slow!! Don’t get in a hurry. The pan should be low enough that when the eggs are poured in, nothing happens. No sizzling. Trust me.
  • Wait: You have to wait till that thin layer of cooked egg begins on the edges before you stirring.
  • Stir: A rubber or silicone spatula is a must. The flexibility of the spatula allows you to hug the contours of the pan and get a really clean swipe/fold each time you push the eggs around.
  • Remove: Make sure to remove from the pan when you still think they’re a bit too wet. They’ll continue to cook once removed.

What Can You Do With Eggs Scrambled?

Eggs can be a dish of its own or add it to create more breakfast, lunch or dinner ideas! Try these delicious egg recipes for more ways to enjoy your scrambled eggs.

  • Solo: They are perfect on their own
  • Add-Ins: Once you remove from the heat, you can add in sautéed veggies, cheese, bacon crumbles, chorizo, ham, or whatever else you can think up
  • Tacos/Burritos: With a perfect protein you can wrap these up in way you’d like
  • Toast: Place on top of toast, you can add avocado and fresh tomatoes.
  • Sandwich: This makes the best sandwiches with bacon, or sausage, cheese, avocado, tomato on croissants, bagels or English muffins.
  • Pizza: Use as a topping for breakfast pizza

Perfectly soft, fluffy and light scrambled eggs.

More Classic Breakfast Recipes

Who knew that there were ways to making your favorites even better. Try these recipes that will do just that!

Print

Scrambled Eggs

The Best Scrambled Eggs are fluffy, light, moist and taste amazing. There is a secret to it though, and I've got it. The secret to the perfect scrambled eggs is cooking them low and slow!  
Course Breakfast
Cuisine American
Keyword eggs, scrambled eggs
Prep Time 5 minutes
Cook Time 5 minutes
Total Time 10 minutes
Servings 2 People
Calories 202kcal
Author Alyssa Rivers

Ingredients

  • 1 Tablespoon Butter
  • 4 large eggs
  • 2 Tablespoons Milk
  • salt and pepper
  • optional chopped chives

Instructions

  • In a medium sized non stick skillet over medium low heat, add the butter. In a small bowl whisk together the eggs and milk.
  • Once the butter has melted pour the eggs into the pan and let them sit undisturbed until you see a thin layer of the egg cooking around the edge. Using the rubber spatula start moving the eggs around the pan until they look fluffy and barely set. They should be slightly runny and soft.
  • Serve immediately with salt and pepper and chopped chives on top.

Nutrition

Calories: 202kcal | Carbohydrates: 1g | Protein: 13g | Fat: 16g | Saturated Fat: 7g | Cholesterol: 389mg | Sodium: 198mg | Potassium: 158mg | Sugar: 1g | Vitamin A: 715IU | Calcium: 73mg | Iron: 2mg


from The Recipe Critic https://ift.tt/3eeA9Qs
https://ift.tt/37X3y0I

शुक्रवार, 30 अक्तूबर 2020

Fried Catfish

Fried catfish is a delicious quick to prepare main seafood dish. The seasoned cornmeal coating creates a golden crispy crust. Serve with your favorite Southern-inspired side dishes. 

Dinner from the ocean is a real treat! Try more seafood meals like this  The Best Lobster Tail Recipe, Garlic Butter Herb Scallops, or Cajun Garlic Butter Shrimp

Fried Catfish on a white plate with two lemon slices.

Pan Fried Catfish

If you’re looking for a quick and delicious fish dinner, fried catfish is a satisfying dish. The flakey white fish is perfect for pan-frying. The fillet is lightly coated with a cornmeal coating and fried until crispy. Plus, it only takes minutes to prepare and cook.

Serve with savory side dishes for a complete meal. When my family is craving southern comfort food, if I’m not making buttermilk fried chicken, this fish recipe is always a hit!

seasoned fillets of fish in a pan

How to Fry Catfish

  • Season the catfish fillets with salt and pepper.
  • Combine cornmeal, flour, garlic powder, salt, pepper, and cayenne.
  • Dredge the fish in the cornmeal coating. 
  • Heat vegetable in a cast iron skillet until it reaches 350ºF. 
  • Fry the fish in batches until golden brown on each side. 

Preparing the Fish

Catfish comes in large fillets, about 6 to 8 ounces per piece. I like to cut them in half so that each piece cooks more evenly and faster. Once the fish is cut in half, I season with salt and pepper. The fish doesn’t need to be dried before. You want a little bit of moisture for the coating to stick to.

dredging catfish in flour

Making a Crunchy Coating

A light coating is added to the exterior of the fillets. I use a combination of yellow cornmeal and a small amount of flour to help it stick. The ground dried cornmeal adds the perfect amount of crunch to the fish without being overpowering. Salt, pepper, garlic powder, and a little bit of spicy cayenne powder and a nice savory flavor. Make sure to completely dredge the surface for complete pieces.

How Long to Fry Catfish

Use a large skillet like cast iron or nonstick to fry the fish. Use a high smoke point oil like vegetable oil because you will be frying between 350 to 360ºF. You want to add just enough oil to come up to at least halfway up the fish’s sides, about 1-inch high. The moderate temperature will ensure that the fish cooks through, and the crust gets golden and crisp. It only takes about 3 to 4 minutes per side.

frying fish in a cast iron skillet

What to Serve with the Catfish

I like to serve lemon wedges, tartar sauce, and hot sauce with the fried fish. Collard greens, candied yams, cornbread, or mashed potatoes are excellent side dishes to add to make it a complete meal. 

fried catfish on a plate

More Tasty Seafood Recipes

Print

Fried Catfish

Fried catfish is a delicious quick to prepare main seafood dish. The seasoned cornmeal coating creates a golden crispy crust.
Course Dinner
Cuisine American
Keyword fried catfish, fried catfish recipe
Prep Time 10 minutes
Cook Time 20 minutes
Total Time 30 minutes
Servings 6 servings
Calories 333kcal
Author Jessica Gavin

Ingredients

  • 2 cups yellow cornmeal
  • ¼ cup all-purpose flour
  • 1 teaspoon garlic powder
  • 1 teaspoon kosher salt
  • ½ teaspoon black pepper
  • ¼ teaspoon cayenne pepper
  • Vegetable oil as needed for frying
  • 1 ½ pounds catfish fillets 3 large fillets, cut into 6 smaller pieces

Instructions

  • In a shallow bowl whisk together corneal, flour, garlic powder, salt, black pepper, and cayenne pepper.
  • Season both sides of the catfish with salt and pepper. Dredge both sides in the cornmeal mixture.
  • Add enough vegetable oil in a large nonstick pan or cast iron skillet to reach ¾ to 1-inches in depth. Heat over medium heat until temperature reaches 350 to 360ºF (177 to 182ºC). Check the temperature between each batch and adjust the heat as needed to maintain this range.
  • Add two pieces of fish at a time to the pan, fry until golden brown and crispy on both sides, about 3 to 4 minutes per side, and internal temperature reaches 145 °F (63°C). Transfer to a paper towel-lined pan to drain—Fry the remaining pieces of fish.
  • Serve with lemon wedges and tartar sauce.

Nutrition

Calories: 333kcal | Carbohydrates: 43g | Protein: 24g | Fat: 6g | Saturated Fat: 1g | Cholesterol: 66mg | Sodium: 439mg | Potassium: 583mg | Fiber: 5g | Sugar: 1g | Vitamin A: 91IU | Vitamin C: 1mg | Calcium: 19mg | Iron: 2mg


from The Recipe Critic https://ift.tt/3oGNPZG
https://ift.tt/2TF733y

Delicious Homemade Root Beer Recipe (Ready in 15 minutes!)

This Homemade Root Beer is a fun, sweet, refreshing treat to make any occasion extra special. It takes just 4 ingredients to create a little magic and a whole lot of tasty fun! I have two ways to make this luscious drink!

I love to serve this at Halloween time, the dry ice gives it such a spooky flare. But serve this with Philly Cheese Steak Sloppy Joes, Homemade Sweet Potato Fries and Perfect Apple Pie for an all American dinner.

Homemade Root Beer in a frosty mug.

The Best Homemade Root Beer

Who knew you could make your own Root Beer and that it could be so fun. Family and friends will gather quickly around to see what all the fog is about. It’s fun and exciting and brings an extra special flare to any occasion. It’s rather simple to make and tastes fantastic. The hardest part will be the wait!

If you can’t find Dry Ice I’ve included a non dry ice variation. It does take up to 4 days to make however, so plan ahead. Feel free to double the batch for a huge party. I promise it won’t go to waste. it’s just too good and just that much fun!

Old Fashioned Homemade Root Beer Ingredients

Dry ice is so fun to use in this recipe, it creates the bubbly and a little bit of atmosphere too. Serve up this refreshing beverage everyone will enjoy at any event!

  • Cold Water: Even room temp water is ok, as you’ll see in my tips below
  • Sugar: Adds the needed sweetness
  • Root Beer Extract: Flavor and color make this even better. I used Hires Big H Root Beef Extract for this recipe.
  • Dry Ice: Dry ice provides the fun and bubbles

How to Make Root Beer from Scratch

  1. Mix: In a large container mix the cold water and sugar and stir till dissolved. Add the Root Beer Extract.
  2. Dry Ice: Add the dry ice and stir frequently to prevent the ice from clumping. Serve once Dry Ice is dissolved.

Mixing up sugar and water.

Making Yeast Carbonated Root Beer

Don’t have Dry Ice locally? Try this method. It takes time but has excellent results.

  1. Mix:  Add Sugar and the Root Beer Extract to 11 cups of warm water.
  2. Yeast:  Add one Tablespoon of yeast to a separate cup of warm water and stir.
  3. Stir: Stir the yeast mixture with the sugar mixture.
  4. Pour: Place into clean bottles leaving an inch of space. Let them sit at room temp for four days.
  5. Fridge: After four days place them in the fridge till ready to use.

Adding in Root Beer extract to the sugar mixture.

Root Beer Extract Vs Root Beer Concentrate

Just so you aren’t surprised by your flavor or lack of, double check what you buy. Either will work for your Homemade Root beer, but they are different.

  • Root Beer Extract (What this recipe calls for) Extract has a milder flavor so you need more to get that flavor. You can always add extra if you feel it needs it too.
  • Root Beer Concentrate: If this is what you have make note is much stronger than extract so you’ll need less. For this recipe you would need only 3 teaspoons of concentrate for 12 cups of water.

Stirring up the mixture till dissolved.

Dry Ice 101

When making Homemade Root Beer, dry ice is a must. It creates that smokey exciting atmosphere and bubbles. There are a few things to remember when working with it however.

  • Where to find: To save yourself trouble and frustration, call your local stores to see if they carry it. You’ll be surprised that many do. Warehouse stores such as Sam’s Club and Costco often carry it as well as Walmart and Krogers if you have them in your area.
  • Storing: Dry ice evaporates quickly. Do not buy days before you need it. Buy it the day you plan on making your Root Beer.
    Keeping it:  Never completely cover a container with dry ice. For this reason don’t keep it in a shut freezer either. Place in a cooler or styrofoam cooler with a towel over it. Keep it as cool as possible to help it last longer.
  • Break it: If it needs to be broken up, place in a brown paper bag and hit it with a hammer or mallet outside.
  • Burns: Never touch dry ice with your bare hands and keep it away from children. It can cause severe burns immediately. Wear gloves and use tongs when handling.
  • Inhale: Do not inhale the smoke from dry ice, in fact this should be made in a well ventilated area or outside so the carbon monoxide doesn’t build up.
  • Drink: Never drink or swallow dry ice. Wait till the ice has melted before drinking or ladel out only the rootbeer without the ice.
  • Fog: To get the best fog for your homemade root beer use in tepid temperature water.
  • Carbonation: Dry ice will actually not add a ton of carbonation. If you want more use sparkling or soda water for best results for perfect Homemade Root beer.

Adding the dry ice and stirring the Root Beer.

More Lushious Drink Recipes to Try

Drink it up!

Print

Homemade Root Beer

This Homemade Root Beer is a fun, sweet, refreshing treat to make any occasion extra special. It takes just 4 ingredients to create a little magic and a whole lot of tasty fun!  
Course Beverage, Drinks
Cuisine American
Keyword Homemade root beer, Homemade root beer recipe, root beer
Prep Time 10 minutes
Total Time 10 minutes
Servings 8 People
Calories 242kcal
Author Alyssa Rivers

Ingredients

  • 12 cups cold water
  • 2 1/2 cups sugar
  • 2 Tablespoons Root Beer Extract
  • 3 pounds Broken Dry Ice

Instructions

  • In a large container add the cold water, sugar, and root beer extract.
  • Mix together until sugar starts to dissolve.
  • Add the dry ice to the mixture and stir frequently to prevent the dry ice from clumping.
  • Continue to stir until the dry ice has dissolved.

Notes

To make Yeast Carbonated Root Beer:
Add the sugar and the root beer extract to 11 cups warm water.  Add 1 cup of warm water to 1 Tablespoon of yeast.  Add the contents together and mix thoroughly.  Pour the mixture  into clean bottles leaving an inch of space.  Let them sit at room temperature for four days. After four days place them in the fridge until they are used. 


Nutrition

Calories: 242kcal | Carbohydrates: 62g | Sodium: 1mg | Sugar: 62g | Iron: 1mg


from The Recipe Critic https://ift.tt/3kH5ii6
https://ift.tt/31Xtllv

गुरुवार, 29 अक्तूबर 2020

Mummy Hot Dogs

Nothing screams fun, quite like Mummy Hot Dogs for Halloween dinner. Serve these fun little vittles before trick or treating or at your next Halloween party!

Looking for more spooky options to serve with these, try Easy Mummy Mini Pizzas and Mummy Cookie Bites. These are all perfect Halloween treats!

Mummy Hot dogs on a plate with spider webb dip.

Halloween Mummy Hot Dogs

These are super easy to make and even more fun to eat! You will have to make sure you make enough, because these will go fast! But because they were so easy, you can always whip up more in a breeze.

These Mummy dogs are almost too cute to eat! What makes these great is that they are kid friendly to make. Let them help you wrap the hot dogs and put the eyes on. They’ll love it! These mummy dogs will be the hit of the party! They’re easy, quick and a fun finger food for young and old alike.

Crescent Roll Hot Dog Ingredients

Have fun making these hot dog crescent rolls. This dinner is so fun for Halloween and kids will totally approve!

  • Crescent Roll Dough: For best results use regular crescent rolls. Reduced fat dough is stickier and makes wrapping the hot dogs difficult.
  • Hot Dogs: Use your favorite kind of hot dogs

How to Make Mummy Hot Dogs Recipe

These are so simple to make and come together quickly. Each mummy dog is going to be unique and fun looking!

  1. Prep: Preheat the oven to 375 degrees. Spray a baking sheet with cooking spray and set aside. Open the crescent dough and press seams together. Using a pizza cutter, cut 1/4 strips.
  2. Create: Wrap each hot dog creating a bandage look leaving gaps and overlapping the dough. Create a crisscross pattern until the entire hot dog is wrapped.
  3. Bake: Place each mummy dog on the baking sheet and bake for 10-12 minutes. Using ketchup or mustard you can create little eyes for the mummies.

The process of cutting out, wrapping and forming the mummy dogs.

Halloween Mummy Hot Dog Tips

Create a fun, spooky and even scary mummy hot dog with these tips. Anything you do will be a fun surprise for Halloween!

  • Eyes: If you don’t have candy eyes handy you can draw eyes on by adding a a couple of dots of ketchup or mustard to the mummy dogs where the eyes would go.
  • Make it Stick: Press dough at perforations to seal.
  • Mini: Use little smokies and wrap the same way to make baby mummies.
  • Big Guys: Used smoked sausages for bigger beefier ones.
  • Cheese: Place a hot dog sized slice on cheese on the back of the hot dog and wrap with the crescent dough.
  • Butter: Brush the dough with melted butter before placing in the oven for an even buttery flakey finish.

Cooked mummy hot dogs on a pan with eyes.

Spooky Spider Web Sauce

With a little bit of ketchup and mustard you make a fun spooky spider web sauce for dipping. It’s super festive and so easy to prepare. Super easy and the kids love to dip the mummy  hot dogs into it!

  1. Place ketchup in a small bowl.
  2. With the mustard draw a few circles.
  3. Use a toothpick to drag out the circles into a web design.

Making Spider Web dipping sauce.

Make Ahead of Time

One of the best parts about this recipe is that you make them ahead of time. Wrap the hot dogs with the dough and then store in an airtight container in the fridge till ready to bake. When ready, pop those mummy hot dogs in the oven.

Dipping a mummy dog into spider web sauce.

More Quick and Easy Recipes Made with Crescent Dough

Having a short cut to make your dishes quick and easy is always convenient!

Print

Mummy Hot Dogs

Nothing screams fun, quite like Mummy Hot Dogs for Halloween dinner. Serve these fun little vittles before trick or treating or at your next Halloween party.
Course Dinner, Main Course
Cuisine American
Keyword halloween mummy hot dogs, mummy hot dogs
Prep Time 5 minutes
Cook Time 12 minutes
Total Time 17 minutes
Servings 8 Hot Dogs
Calories 112kcal
Author Alyssa Rivers

Ingredients

  • 1 8 ounce package crescent roll dough
  • 8 hot dogs

Instructions

  • Preheat the oven to 375 degrees. Spray a baking sheet with cooking spray and set aside. Open the crescent dough and press seams together. Using a pizza cutter, cut 1/4 strips.
  • Wrap each hot dog creating a bandage look leaving gaps and overlapping the dough. Create a criss cross pattern until the entire hot dog is wrapped.
  • Place each mummy dog on the baking sheet and bake for 10-12 minutes. Using ketchup or mustard you can create little eyes for the mummies.

Nutrition

Calories: 112kcal | Carbohydrates: 8g | Protein: 5g | Fat: 7g | Saturated Fat: 2g | Cholesterol: 20mg | Sodium: 309mg | Potassium: 66mg | Sugar: 1g | Calcium: 11mg | Iron: 1mg


from The Recipe Critic https://ift.tt/2TzvYoX
https://ift.tt/2JiAtm4