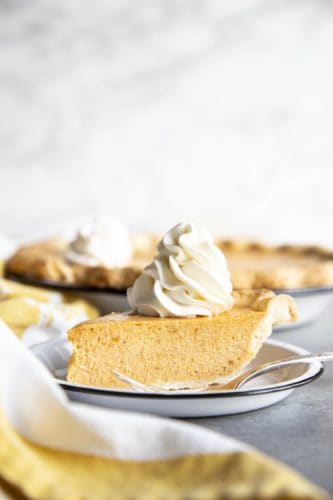
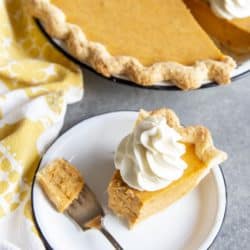
This Sweet Potato Pie is unlike any others you’ve eaten. The filling is made with cream cheese for a cheesecake like creaminess and texture you won’t be able to resist.
There are so many ways to incorporate sweet potatoes into your meal besides Sweet Potato Fries. You can make Maple Sweet Potato Pancakes for breakfast, Sweet Potato Cake for dessert, or Sweet Potato Rolls to pair with soup.

Homemade Sweet Potato Pie
Sweet potato pie is a traditional Southern dessert, and usually served during the holidays like Thanksgiving and Christmas. But between you and me, I will gladly eat this pie all year round. It is creamy with a cheesecake like quality and decadence. The filling is spiced with cinnamon, nutmeg and ginger for that holiday vibe. And let’s not forget about the buttery pie crust that encases this creamy filling.
For this particular recipe, you will need to par-bake the pie crust before adding the filling so it doesn’t get soggy since our pie filling is liquidy. I would par-bake both homemade and store bought pie crust, whichever one you decide to use.

How to Prepare the Pie Crust
The pie crust is made up of 5 ingredients if you want to count water, and is very simple to make. But you do have the option to use store bought pie crust to save some time.
- Flour: A MUST obviously!
- Sugar: Little more than a typical pie crust recipe because I like mine sweet.
- Salt: To enhance the flavor.
- Butter: For the best tasting pie crust. You could use shortening or a mixture of butter or shortening.
- Water: Just enough for the dough to bind.

Ingredients for Southern Sweet Potato Pie
The ingredients for the sweet potato pie filling are also quite simple.
- Sweet potatoes: This is the star of the recipe. The recipe calls for 15 oz by weight, so you can purchase about 1 pound of potato or 1 can of sweet potato. However, I highly recommend roasting your own sweet potato for that caramelized flavor from roasting.
- Cream cheese: The key to making a cheesecake like sweet potato pie.
- Condensed milk: Use sweetened condensed milk for the sugar and added creaminess.
- Eggs: This is a custard base pie filling, so we use egg to thicken.
- Vanilla extract: For flavoring!
- Spices: I used a mixture of cinnamon, nutmeg and ginger for a traditional holiday vibe. Feel free to substitute or add other spices that you love.
How to Make the Best Sweet Potato Pie
The recipe calls for roasting the sweet potato while par-baking the pie crust. But it will take longer for the potatoes to cook, 45 minutes to 1 hour depending on the size of your potatoes. If you want to cut down on waiting time while making the pie, you can roast the sweet potatoes ahead of time.
Once you have roasted and cooled the potatoes, making the pie filling is super easy. You don’t even need a stand mixer for this part.
- First, peel the potatoes and mash them in a bowl with a potato masher until creamy.
- Whisk together softened cream cheese and condensed milk, then the eggs, one at a time. Then beat in the mashed sweet potato, vanilla and spices until smooth.
- Pour the filling into the par-baked pie crust.
- Bake until the middle is still slightly jiggly, 35 – 40 minutes.
If you have excess batter, fill small ramekins and bake the ramekins along with the pie. Small ramekins filled half way will complete baking around 15 – 20 minutes.
Be patient and wait for the pie to cool completely, then chill it in the fridge, preferable overnight, before slicing to ensure the filling is set completely. Serve with plenty of whipped cream.

Storing Sweet Potato Pie
Be sure to store leftover pie in the refrigerator, it will last 3 to 4 days.

More Holiday Worthy Pies
- Perfect Apple Pie
- Grandma’s Famous Pumpkin Pie
- Pear Cranberry Pie
- Best Ever Dutch Apple Pie
- Banoffee Pie Recipe
Sweet Potato Pie
Ingredients
Pie Crust
- 1 and ½ cup all-purpose flour
- 2 rounded tablespoon granulated sugar
- ¼ rounded teaspoon kosher salt
- 5 ounce unsalted butter cold & cubed
- 2 to 3 tablespoon cold water
Sweet Potato Pie Filling
- 8 ounces cream cheese microwave 30 seconds to soften
- 1 14 ounce can condensed milk
- 3 large eggs
- 15 ounces sweet potato roasted & mashed, about 2 medium
- 1 teaspoon pure vanilla extract
- 1 teaspoon cinnamon
- ½ teaspoon nutmeg
- ½ teaspoon ginger
Instructions
Making the Pie Crust
-
Add flour, sugar and salt in a small mixing bowl and mix thoroughly with a whisk. Transfer flour mixture to a food processor fitted with the dough blade. Add cubed cold butter to the flour mixture, pulse several times until butter is about pea and bean size. Variations in size are okay.
-
Turn the food processor to “on” position and drizzle cold water over the dough mixture through the water hole, as soon as the dough starts to pull together turn the food processor off. You may need to stop the food processor in between and get a spatula to mix up the flour at the bottom.
-
Turn the dough out on the counter or cutting board, and shape into a disk. Wrap in plastic and rest in the refrigerator for at least an hour.
-
Take the disk of pie dough out of the fridge and roll into a circle about 2” larger than your pie dish. Use extra flour to keep the dough from sticking to the counter and roller.
-
Carefully place the dough over the pie dish, lightly press the dough into the bottom and side of the pie dish, let the excess dough hang over the side. Trim the excess dough leaving just enough to fold under and create a fluted edge.
-
Cover the pie dish with plastic wrap and keep refrigerated, or freeze (preferred), for 15 - 30 minutes.
-
Preheat the oven to 425°F.
-
Remove pie crust from the freezer and use a fork to poke steam vents on the bottom of the pie dough and on the sides.
-
Place a large piece of parchment paper over the frozen pie dough, place pie weights on top or pour dry beans on top to fill the whole pie crust. Make sure the parchment is large enough to cover the edges of the crust entirely.
-
Place the pie dish on a large baking sheet.
-
Pierce the sweet potatoes with the tip of a paring knife and wrap them in foil, place them next to the pie dish on the baking sheet.
-
Place the baking sheet with the pie crust and the sweet potatoes into the oven.
-
Bake pie crust for 25 minutes with pie weights or beans, then carefully remove the parchment paper along with the pie weights and bake for another 5 minutes.
-
Remove the pie crust from the oven and let it cool on a wire rack.
Baking Sweet Potoates
-
Meanwhile, continue to bake the sweet potatoes for another 15 - 30 minutes until cooked through. Check the potatoes by piercing it with a paring knife or fork in the thickest part of the potato, if the knife or fork goes through easily, it is done.
-
Remove the sweet potatoes from the oven and allow to cool to the touch on a wire rack.
-
Once the potatoes are cool enough to peel, preheat the oven to 350°F and make the pie filling.
Making the Pie Filling
-
Peel the potatoes and mash it in a bowl with a potato masher.
-
In a larger bowl, whisk together softened cream cheese and condensed milk. Beat in the eggs, one at a time until smooth. Add mashed sweet potato, vanilla and spices and beat until smooth.
-
Place the pie dish with the par-baked crust on a baking sheet, pour filling into the crust. Cover the edge with a pie shield or thin strips of foil.
-
Bake for 35 - 40 minutes until the middle is still slightly jiggly.
-
Remove from the oven and allow to cool to room temperature. Refrigerate until the filling is completely set, preferably overnight, before slicing.
Notes
Nutrition
from The Recipe Critic https://ift.tt/3eFMHRi
https://ift.tt/3ldxw4j