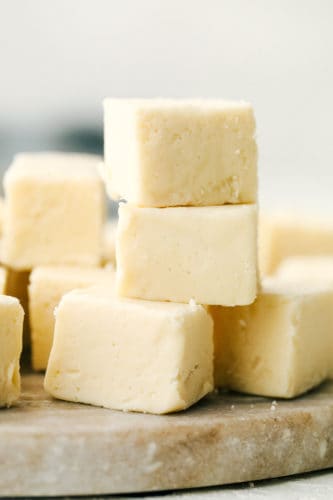
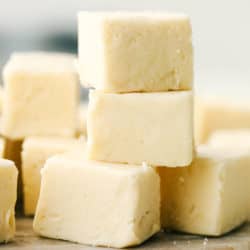
Vanilla Fudge is rich, indulgent and absolutely amazing! This is going to such a nice addition to your holiday sweet treats.
Vanilla is a classic flavor that is up there as one of the topped ranked favorites. It can be a nice change from chocolate. Try Delicious Vanilla Cupcakes, Vanilla Soft Serve Frozen Yogurt, and White Hot Chocolate.

Homemade Vanilla Fudge
This is the perfect solution for when you need something sweet, rich, and indulgent but you don’t want chocolate. Or maybe someone doesn’t like chocolate all together. Decadent and divine, this Vanilla Fudge will satisfy.
It’s a fairly simple, straight forward recipe and so easy to customize. You can really have fun with this recipe and create your own fun fudge. Smooth creamy and a wonderful delicate flavor. Divine!
White Chocolate Fudge Ingredients
A few ingredients make this indulgent dessert.
- White Chocolate Chips: These can be found with the chocolate chips
- Marshmallow Cream: Look for this in the baking section of your local store
- Vanilla: It wouldn’t be Vanilla with this classic flavor
- Sugar: White Sugar
- Evaporated Milk: Adds the creaminess
- Butter: Adds richness and flavor
Making Sweet and Tasty Fudge!
This is pretty simple but it takes time, and it’s worth it.
- Prep: Line a 8×8 pan with parchment paper or aluminum foil set aside.
- Place: In a medium bowl place the white chocolate chips, marshmallow cream and vanilla and set aside.
- Boil: In a medium saucepan add the sugar, evaporated milk and butter. Bring to a boil on medium heat and let it boil for 10 min, stirring occasionally.
- Pour: Pour the hot mix over the white chocolate chips, marshmallow cream, butter and vanilla.
- Mix: Whip in your mixing bowl until fully incorporated
- Set: Pour into the pan and let cool, place in fridge for a few hours till set. Cut and enjoy.

Tips for Melt in Your Mouth Vanilla Fudge
- Creaminess: Fudge gets it’s creaminess from small sugar crystals that form as you mix it while it cools. But be sure to allow it to cool slightly before you mix it. It should be about 230 degrees before you start to mix it. Otherwise large sugar crystals will form and result in grainy fudge.
- Beat it: For best results mix till almost set then pour into the pan.
- Why does mine look darker? Don’t fret if your vanilla fudge isn’t white but more of a tan. This could be because of two things. The caramelization of the butter, sugar and evaporated milk. And if you used a dark vanilla extract. Both are totally normal and won’t change the flavor.
- Store it: Fudge can be kept at room temperature or in the fridge. After about a week the fudge can begin to dry out and become crumbly. Make sure to wrap tightly and store in air tight container to help it not dry out.
Variations of White Vanilla Fudge
This is a beautiful recipe to customize to your needs or tastes. You can get really creative with it.
- Nuts: Add cashews, almonds, walnuts, pecans or a mixture of all of the above if you love nuts.
- Color: Add food coloring to change the color to match your festivities from holidays to baby showers.
- Dried Fruit: Add dried cherries or cranberries for a nice tart tang to your fudge
- Candy: Crush candy canes (there are so many flavors now) you can really have fun with this one.
- Cookies: Stir in your favorite crushed cookies, from Oreos to Ginger Snaps, the possibilities are endless.
- Flavorings: Change up the flavorings for a different flavor, try butter rum, lemon, almond or coconut.

More Indulgent Fudge to Try
Fudge is great treat to make and take as gifts.
- Peanut Butter Chocolate Fudge
- Peppermint Swirl Fudge
- Chocolate Caramel Fudge
- Easy Butterfinger Fudge
- Cookies and Cream Fudge
Vanilla Fudge
Ingredients
- 16 ounce bag white chocolate chips
- 1/2 cup marshmallow cream
- 1 teaspoon vanilla
- 2 cups sugar
- 1 cup evaporated milk
- 1/2 cup butter
Instructions
-
Line a 8x8 inch pan with parchment paper or aluminum foil and set aside. In a medium sized mixing bowl add the white chocolate chips, marshmallow cream, and vanilla.
-
In a medium sized saucepan add the sugar, evaporated milk and butter. Bring to a boil on medium high heat and let it boil for 10 minutes. I kept stirring mine occasionally with a wire whisk.
-
Remove from heat and pour the hot mixture over the white chocolate chips, marshmallow cream and vanilla. Stir with a spoon to incorporate. Then with an electric mixer, mix till almost set.
-
Pour into your prepared 8x8 inch pan. Place into the fridge for a couple of hours to set. Cut into 2 inch squares.
Nutrition
from The Recipe Critic https://ift.tt/2UxwkNh
https://ift.tt/3ny27ds