शनिवार, 19 दिसंबर 2020

Best Ever German Oven Pancake

German Pancakes are a hot and puffy golden pancake that only requires 5 minutes of prep! This classic breakfast is always a huge hit at our house!

We love a good classic breakfast at our house. Try this Breakfast Casserole,  Quick 45 Minute Cinnamon Rolls  or these Grandma’s Perfect Fluffy Pancakes for a breakfast the family won’t be able to get enough of!

German pancake in a frying pan with a variety of berries overtop.

German Pancakes

Breakfast is always a struggle at our house because mornings are always so busy! I love to surprise the kiddos with a delicious and hot breakfast at least once a week before school. That is why we love German Pancakes at our house. 5 minutes of prep with ingredients that you have on hand. This breakfast is totally doable even for the busiest families!

My little girl loves to watch things baking in the oven. She likes spending time with me in the kitchen and helping. Or making a mess. But we sure have fun together. It is fun to watch this german pancake bake in the oven and get puffy and golden.

Are German Pancakes really from Germany?

German Pancakes or Dutch Baby Pancakes are not German Pancakes the way they are prepared in Germany. The American “German Pancakes” are more like a popover, either entirely baked in the oven or started in a pan and finished in the oven.

German over pancake with fruit and syrup being poured overtop.

German Puff Pancakes Ingredients

If you haven’t tried this classic breakfast you need to make it. We absolutely love it at our house and it is so fun and easy to make! It is sure to be a huge hit with family or guests! Pantry ingredients that is sure to please you any morning of the week.

  • Flour: All purpose flour is best for it to thicken.
  • Eggs: This helps with the form and taste of the pancake.
  • Milk: Creamy and smooth in the mix!
  • Butter: Melt before adding it to the batter.
  • Sugar: Sweeten the pancakes up!
  • Salt: Just a pinch will help it rise.

How to Make German Pancakes from Scratch?

Make this easier even and add the batter to a blender for about 30 seconds. Start with blending the wet ingredients together first then proceed to add the dry ingredients until it is smooth. Once the lumps are out, place the batter in the cast iron skillet.

  1. Whisk Together: Preheat oven to 450 degrees. In a medium sized bowl whisk the eggs, milk, melted butter, salt and sugar. Add the flour and stir until incorporated being careful not to overmix.
  2. Bake in a Skillet: Add 1 tablespoon melted butter to the bottom of a 9 or 11 inch cast iron skillet. Pour the batter into a skillet and bake for 12-18 minutes or just until the edges start to brown. Top with desired toppings.

The process of making German pancakes in each photo. First whisk together eggs, add flour and other ingredients then butter a pan and pour the batter into the pan.

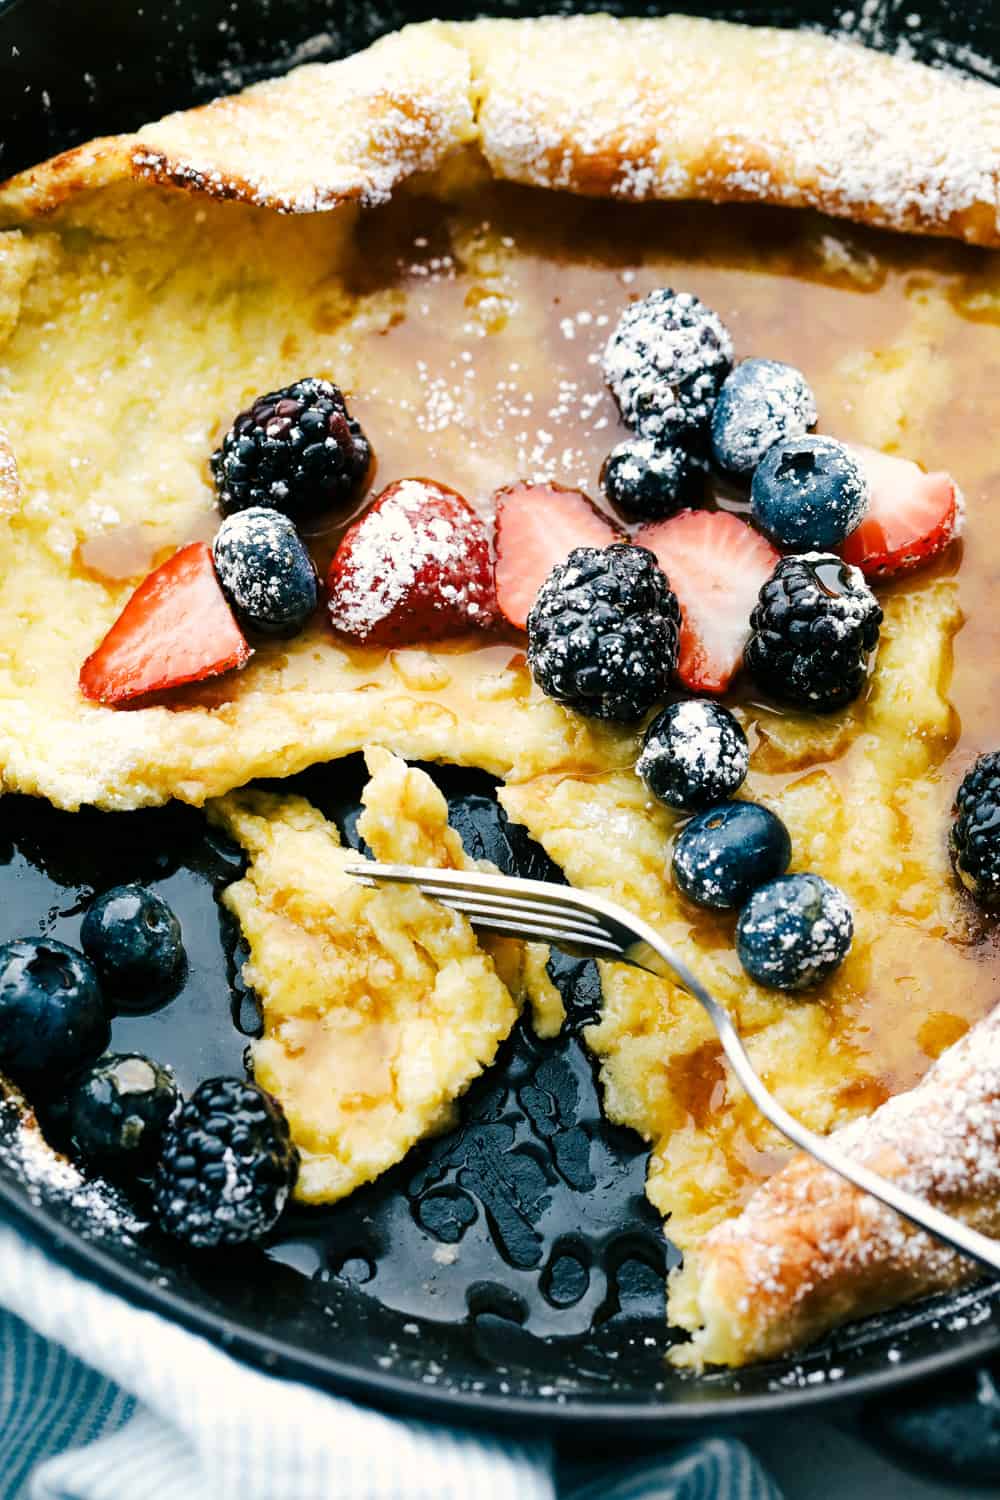
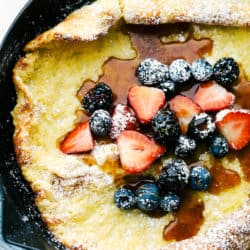
Golden Brown German Pancakes

German pancakes are a little tricky to know if they are done or not. As it is baking in the oven, the sides of the pancake will rise about 1 to 2 inches and even creep over top of the skillet. Once the edges and top of the German pancake is nice and golden brown that is when you know to remove the pancake from the oven. The middle of the pancake will be a yellow, egg color. Once the pancake is removed from the oven, in a short amount of time the German oven pancake will fall a bit. This happens as it is cooling. You will be ready to cut and serve the pancake then!

Tips for the Best German Pancakes

The best things about baking German pancakes is watching them rise up and over the pan as it is baking in the oven. To get that nice fluffy texture and high rise takes a few tips and tricks to make the perfect German pancakes.

  • Eggs: Fresh eggs are best! Taking the time to whisk each egg individually will also help fluff up the pancake. This does take extra time but can be so worth it!
  • Flour: For best results use an all purpose flour to help with the rise and thickness of each pancake.
  • Preheating the pan: Before adding the batter to the pan, it helps to melt butter ahead of time to help the pancake rise. The butter will help as a non-stick agent which creates a taller rise and also keeps the pancake from sticking to the pan.

Optional Toppings to Try

Traditionally adding syrup or sprinkling powdered sugar are always popular choices. Once the German pancake is baked and ready to serve, add your favorite toppings and create a delicious breakfast everyone will love.

  • Syrup: Buttermilk syrup or berry syrup
  • Jam: Strawberry is my favorite!
  • Fresh Berries: Raspberries, strawberries and blueberries
  • Powdered Sugar: Sprinkle over top!
  • Chocolate Chips: Add the chocolate chips right on top of the pancake while it is warm.
  • Cinnamon Sugar: A little more sweetness!
  • Nutella: A chocolatey taste!

More Delicious Breakfast Ideas

Print

German Oven Pancake

A hot and puffy golden pancake that only requires 5 minutes of prep! This classic breakfast is always a huge hit at our house!
Course Breakfast
Cuisine German
Keyword german oven pancake, german pancakes
Prep Time 5 minutes
Cook Time 12 minutes
Total Time 17 minutes
Servings 4 People
Calories 212kcal
Author Alyssa Rivers

Ingredients

  • 1/2 cup all purpose flour
  • 3 eggs
  • 1/2 cup milk
  • 3 tablespoons melted butter divided
  • 1 tablespoon sugar
  • 1/4 teaspoon of salt

Instructions

  • Preheat oven to 450 degrees. In a medium sized bowl whisk the eggs, milk, melted butter, salt and sugar. Add the flour and stir until incorporated being careful not to overmix.
  • Add 1 tablespoon melted butter to the bottom of a 9 or 11 inch cast iron skillet. Pour the batter into a skillet and bake for 12-18 minutes or just until the edges start to brown. Top with desired toppings.

Video

Notes

Updated on December 19, 2020
Originally Posted on March 21, 2019

Nutrition

Calories: 212kcal | Carbohydrates: 17g | Protein: 7g | Fat: 13g | Saturated Fat: 7g | Cholesterol: 149mg | Sodium: 138mg | Potassium: 103mg | Fiber: 1g | Sugar: 5g | Vitamin A: 490IU | Calcium: 55mg | Iron: 1mg


from The Recipe Critic https://ift.tt/2UUBXUF
https://ift.tt/3rbzZPY

Jalapeno Popper Dip

Jalapeno Popper Dip takes all the flavor of the popper and turns it into a creamy, cheesy, easy to eat dip. Super effortless and full of enticing flavors, this dip will be the star of the party! 

Show up to your next party with this dip and it will be the star! Combine this with any of my other favorites like Insanely Delicious Hot Crab Dip, Loaded Creamy Ranch Dip or 5 Minute Million Dollar Dip. Now this is an appetizer line up if I ever saw one!

Creamy, spicy jalapeno dip with bread for dipping.

Jalapeño Popper Dip Recipe

Warm, creamy and cheesy with a crunchy buttery top, this dip is just about as perfect as they come! It has all the flavors you love from jalapeño poppers, but is so much easier to make and eat. Plus I’ll error on the side that it’s going to be a lot more popular too! It’s so addicting you’re going to want to eat the whole thing by yourself. It’s such a comfort food with its ooey goodness. Every time I take this dip somewhere I get asked for the recipe and it’s a quick favorite. So go ahead, make it for game night, movie night or just because night. Any time of the year is the right time to make this!

If you’re worried about the spice, don’t be. I’m not a huge jalapeño fan myself, but this was the perfect amount of heat to creaminess. The cheese helped to cool the spice and the spices and crumb topping meld it all together. And the bacon! Don’t forget the bacon, it adds the perfect bite of saltiness and hint of savory making this dip absolutely heavenly.This is such a great dip because you can make it an advance and keep it in the fridge till ready to bake. Seriously, you need to make this today!

Ingredients for Jalapeño Popper Dip with Bacon

  • Bacon: Because everything is better with bacon! Use a thick cut bacon so the savory salty flavor doesn’t get lost in the mix.
  • Cream Cheese: Creamy and velvety, full fat will melt best but low fat works too!
  • Mayonnaise: Make sure it’s not the salad dressing such as Miracle Whip, it’ll change everything. Not a fan of mayo, sub with sour cream.
  • Canned Diced jalapeños  You can substitute with 4 diced deseeded jalapeños, but I like the canned and I’ll explain further.
  • Mozzarella Cheese: This is such a perfect melty ooey gooey cheese.
  • Cheddar Cheese: Adds flavor, use medium cheddar for a nice good taste.
  • Green Onion: Gives a bit of color as well as nice bit of sharpness.

Creating a Crispy Topping

  • Ritz Crackers: Buttery and crunchy, these make the best topping.
  • Parmesan Cheese: More cheese!
  • Butter: Helps it all get nice and toasty.

How do You Make Easy Jalapeño Popper Dip

  1. Mix: In a medium sized mixing bowl, mix bacon, cream cheese, mayonnaise, jalapeños, mozzarella and cheddar cheese and green onion. Stir till combined and spread in a 1-1/2 quart casserole dish.
  2. Topping: In a small separate bowl combine the crushed ritz crackers, parmesan cheese and melted butter. Spread evenly over the cream cheese mixture.
  3. Bake: Bake in a preheated oven at 350 degrees F, for 20-30 min till the top begins to brown and the edges start to bubble. Serve warm.


The ingredients for jalapeno dip and layering it in a baking pan.

All About Jalapeños

When you look at similar recipes like Jalapeno Bacon Cheese Ball or Cheesy Hot Corn Dip you’ll notice I use Fresh jalapeños, but not in this recipe and I’ll tell you why. But first, if fresh is what you’d like to use, then do it! It’ll still taste amazing. I just prefer the canned version for some recipes like this Must Try Jalapeno Artichoke Dip.

  • Unlike the fresh jalapeños, the canned version gives you a consistent spice all the way through. I don’t have to wonder if my fresh are spicy or bland, which can happen.
  • They are already cut, deseeded and ready to go. That’s a really good reason! Fast and no worries about getting the juices on my skin or in my eyes.
  • Canned Jalapenos are actually pickled which adds beautiful tang to this creamy dip.
  • In this dip I love how everything is so smooth and creamy, using the jarred jalapeños means they’re soft too. This way you won’t have any crunchy peppers to disrupt the creamy lusciousness.
  • If you do use fresh, the spice is in the seeds so take out or leave in the seeds to your level of heat.

Tips For the Best Dip

There are a few things to keep in mind about this amazing jalapeño popper dip when serving, to make sure it’s as awesome as can be. Are you prepared for what’s about to happen? Truly, because this dip is going to blow everyone away.

  • Hot: This dip is best served warm. If you are taking it somewhere you’ll want to make sure you can serve it and keep it warm as long as possible.
  • Crockpot:  Because you want to serve it warm, it can easily be made in the crock pot. Mix everything together except the topping and place in the crockpot. Cook on low for 3-4 hours. Before serving, mix the crackers and butter and toast in a pan. Sprinkle over the top along with the parmesan cheese.
  • Spicy: This is the perfect balance of spice in my opinion. If you love the spice you can always add more jalapeños.

What to Dip in Jalapeño Popper Dip

You can serve this with a variety of foods. It goes great with crackers, pretzel thins, pita chips,  tortilla chips, baguettes sliced, or crostini. It will even go well with veggies like carrots, celery, peppers, sugar snap peas and tomatoes. YUM!

Can You Make Jalapeño Popper Dip Ahead of Time?

Yes! This is a great dip that can be made ahead of time or the day of. Perfect for game night, party time and holiday events! Get ready to have the best Jalapeno Popper Dip recipe!

  • Make Ahead: You can totally make this ahead of time which can be a huge time saver. Mix as directed and cover tightly with foil and refrigerate for up to 3 days. You’ll need to add about 5-10 minutes of cooking time to make sure it’s heated through.
  • Leftovers:  Jalapeno Popper Dip will keep in the fridge for 4 days. I don’t recommend freezing it, dairy doesn’t tend to reheat well when frozen. It can separate. Try thinning the leftovers with a little bit of milk and serve over rice or pasta with a protein of your choice. So yummy!

Dipping bread into the creamy jalapeno dip.

Love a Spicy Kick, Try some of these Recipes

Jalapenos are the darlings of the spicy pepper family. They add such a beautiful spice that compliments so many flavors. It can add new life to your recipes, quite literally. Try some of these recipes if you like to play with just a little bit of heat in your food.

Print

Jalapeno Popper Dip

A delicious and creamy jalapeño dip that is combined with amazing flavors! This dip will be the hit of the party!
Course Appetizer
Cuisine American, Mexican
Keyword dip recipes, jalapeno popper dip
Prep Time 10 minutes
Cook Time 20 minutes
Total Time 30 minutes
Servings 8 Servings
Calories 690kcal
Author Alyssa Rivers

Ingredients

  • 8 slices bacon diced and cooked
  • 2 8 ounce packages cream cheese softened
  • 1 cup mayonnaise
  • 4 ounce can diced jalapenos or 4 fresh chopped and deseeded
  • 1 cup Mozzarella Cheese shredded
  • 1 cup Cheddar Cheese Shredded
  • 1/4 cup green onion diced

TOPPING:

  • 1 cup Ritz Crackers crushed
  • 1/2 cup Parmesan Cheese
  • 1/4 cup butter melted

Instructions

  • Preheat oven to 350 degrees. In a medium sized mixing bowl, mix bacon, cream cheese, mayonnaise, jalapeños, mozzarella and cheddar cheese, and green onion. Spread in a 1 1/2 quart casserole dish.
  • For the topping, combine crushed ritz crackers, parmesan cheese and melted butter. Spread on top of the cream cheese mixture.
  • Bake 20-30 minutes until the top is starting to brown and the edges start to bubble.

Notes

Updated on December 18, 2020
Originally Posted on September 25, 2014

Nutrition

Calories: 690kcal | Carbohydrates: 9g | Protein: 16g | Fat: 66g | Saturated Fat: 27g | Cholesterol: 134mg | Sodium: 898mg | Potassium: 192mg | Fiber: 1g | Sugar: 4g | Vitamin A: 1354IU | Vitamin C: 9mg | Calcium: 320mg | Iron: 1mg


from The Recipe Critic https://ift.tt/3atRXY7
https://ift.tt/3mvBgy0

शुक्रवार, 18 दिसंबर 2020

Orange Rolls

12 orange rolls on a gold baking tray covered in orange icing

Sticky and soft with a vibrant orange flavor, these orange rolls are the best you’ll find. Simple to make, these are the zesty sister to a cinnamon roll!

Cinnamon rolls are a popular favorite in our home! Try these fun variations like this Cinnabon Cinnamon Roll Cake, Quick 45 Minute Cinnamon Rolls or this Delicious Cinnamon Roll Pancakes Recipe for more delicious ways of enjoying a sweet and savory breakfast.

12 orange rolls on a gold baking tray covered in orange icing

Orange Cinnamon Rolls

These sweet rolls are infused from top to toe in zesty fresh orange flavor and you’ll never want store-bought again.

  • The bread roll is soft and fluffy and the perfect vehicle for the orange flavor.
  • The orange sugar filling is just 3 ingredients, that gets scattered and spread evenly over the rolled out dough.
  • The orange icing is, again, just 3 simple ingredients, mixed together in a bowl, then poured all over the top of your rolls once baked.

Ingredients in Homemade Orange Rolls

You’ll need typical baking ingredients like flour, sugar, eggs and butter but there are a couple of ingredients to elaborate on.

  • Oranges: You’ll need 2 large oranges for this recipe. You’ll use all the zest and most of the juice. Make sure to give them a wash first.
  • Yeast: Instant or active dry yeast are what you’re after here.

Mixing together the dough for orange rolls in a glass bowl

How to Make Orange Sweet Rolls

Making orange rolls from scratch doesn’t require too much hands on time (even if you’re kneading by hand) but it does require planning ahead to allow for rising time.

The steps are all simple though and it’s always so therapeutic making bread from scratch.

  1. Make the dough: Melt together butter and some milk, then add orange juice and add it to the dry ingredients.
  2. Knead the dough: In a stand mixer, this only takes about 6-7 minutes or you can do this by hand. The dough is sticky but see my tips below.
  3. Rest: Place the dough into an oiled bowl, cover with plastic wrap and let it rise until doubled in size.
  4. Make the filling: Combine the sugar and orange zest in a bowl, using your fingertips to press it together. This will release the oils from the zest, intensifying the flavor. Then add butter.
  5. Form the rolls: Roll the dough out, and scatter over the filling. Roll the dough up and cut 12 slices, then place them cut side up on a greased tray. Let them rise again.
  6. Bake the rolls: Bake for around 24 minutes or until nice and golden on top. Let them cool slightly before mixing the icing ingredients and pouring it over the top. Tips and variations

Rolling and filling dough for orange rolls, then placing the cut rolls on a baking tray

Can I Make Them Without a Stand Mixer?

You can knead this dough by hand. It will take a little elbow grease and about 10 minutes but it’s not difficult.

This is a sticky dough which is what keeps it nice and soft once they’re baked so try to resist the urge to add flour. I find the easiest way to knead it is to press down with one hand then use a bench scraper in the other hand to lift and fold it so you can press down again.

It’s ready when the dough is smooth and bounces back when you lightly press your finger into it.

An orange roll with a large chunk cut out showing the texture of the dough

Can I Make These Rolls Ahead?

You can make orange rolls ahead of time, part of the way. You can make the dough and leave that covered in the fridge overnight. The next day, let it come to room temperature (about 2 hours) before rolling it out and proceeding.

You can also make it ahead right up until the second rise. So, once you’ve placed the cut rolls into the baking tray, cover it with plastic wrap and let them sit in the fridge overnight. Let them come to room temperature (about 1 hour) before baking.

Homemade orange rolls are best eaten fresh but if you have any leftover, store them in an airtight container in the fridge for 2-3 days. Give them just a short 8-10 burst in the microwave to fluff up the bread again.

8 orange rolls on a gold baking tray with slices of orange in the background

More Breakfast Recipes You Will Love

12 orange rolls on a gold baking tray covered in orange icing
Print

Orange Rolls

Sticky and soft with a vibrant orange flavour, these orange rolls are the best you’ll find. Simple to make, these are the zesty sister to a cinnamon roll.
Course Breakfast, brunch, Dessert
Cuisine American
Keyword orange rolls, orange rolls recipe
Prep Time 25 minutes
Cook Time 25 minutes
Rising time 1 hour 30 minutes
Total Time 2 hours 20 minutes
Servings 12 rolls
Calories 309kcal
Author Marie Roffey

Ingredients

For The Rolls

  • ¼ cup (½ stick) unsalted butter
  • ½ cup cold milk
  • ½ cup fresh orange juice
  • 1 pound (3 ½ cups) all-purpose flour
  • 2 teaspoons instant or active dry yeast
  • cup white granulated sugar
  • ½ teaspoon salt
  • zest of 1 large orange
  • 1 large egg

For The Filling

  • ½ cup white granulated sugar
  • zest of 1 large orange
  • 2 tablespoons unsalted butter, melted

The Orange Icing

  • 1 ¼ cups powdered sugar
  • 6-8 teaspoons orange juice

Instructions

MAKING THE DOUGH

  • In a small saucepan over low heat, melt together the butter and milk. Stir or swirl to melt without overheating. Add the orange juice and set aside.
  • In the bowl of a stand mixer (or see notes), add the flour, yeast, sugar, salt and orange zest then give it a good mix around.
  • Pour in the warm milk mixture and egg, then give it a quick stir.
  • Attach the dough hook to the stand mixer and mix the dough for 6-7 minutes until smooth and elastic looking.
  • Brush a clean bowl with a little oil then place the dough into it. flip it over so that has a coating of oil all over. Cover with plastic wrap and let it sit in a warm place for 1 hour or until doubled in size.

MAKE THE FILLING

  • Set aside 1 teaspoon of zest for the topping, then add the rest to the sugar. Press together with your fingers to release the oils until fully incorporated.
  • Add the melted butter and stir together.

ASSEMBLING THE ROLLS

  • Preheat the oven to 180C / 350F / 160C fan forced and grease a 9x13 inch baking tray with butter.
  • Roll the dough out on a lightly floured surface to a large rectangle, about 12x14 inches.
  • Evenly spread the filling over the dough leaving 1 inch on the longest side uncovered.
  • Roll up from the longest side nearest you towards the other, as tightly as you can into a long log, then cut into 12 even pieces with a sharp knife.
  • Place the rolls evenly spaced onto the baking tray cut side up. Let them rest and rise for another 30 minutes.

BAKING

  • Bake for 22-24 minutes, turning the tray at the halfway mark, until golden.

FOR THE ORANGE ICING

  • Mix together the icing sugar, set aside zest and half the orange juice. Slowly add more juice until it gets to the desired consistency, then pour it over the rolls

Notes

  • You'll need 2 large oranges for this recipe
  • If you don't have a stand mixer, it will take around 10 minutes to knead by hand. It will be sticky but resist the urge to add flour. The easiest way to knead it is to press down with one hand then use a bench scraper in the other hand to lift and fold it so you can press down again.

Nutrition

Calories: 309kcal | Carbohydrates: 57g | Protein: 5g | Fat: 7g | Saturated Fat: 4g | Cholesterol: 32mg | Sodium: 109mg | Potassium: 87mg | Fiber: 1g | Sugar: 28g | Vitamin A: 243IU | Vitamin C: 7mg | Calcium: 22mg | Iron: 2mg


from The Recipe Critic https://ift.tt/2WtTB3G
https://ift.tt/38ihNeW

बुधवार, 16 दिसंबर 2020

The Best French Onion Dip

The Best French Onion Dip ever begins with caramelized onions, and ends with you eating it all in one sitting! Seasoned cream cheese and sour cream create a dip so addictive and creamy, it’ll be gone before you know it.

Dips are always a favorite at parties.  Make this dip along side my other favorites for a dip smorgasbord of awesomeness. Try Insanely Delicious Hot Crab Dip, Loaded Creamy Ranch Dip and 5 Minute Million Dollar Dip.

The Best French Onion Dip in a bowl with chips for dipping.

French Onion Dip Recipe

At some point in your life, I’m guessing, you’ve had the classic french onion dip made from a packet, am I right? I’ll admit there is something about that dip that is just good. Everyone seems to like a great onion dip. But wait till you taste this, you’ll never reach for another packet again! Made with your own caramelized onions this dip has such a distinct flavor that’ll you’ll fall for immediately. Combined with savory spices and rich creamy sour cream and cream cheese, it’s texture is incomparable. All of that combines to make a dip so addicting you might need to make two batches, just so you have some to take to the party!

One of the best things about this dip, is that it’s homemade. You know exactly what’s in your dip. If you’ve ever read the ingredient list on those packets, or worse the pre-made cartons, it’s a bit of a shocker. You can feel good about serving this dip to your friends and family. Just like Homemade Cheese Sauce or Guacamole, homemade is always best. So go ahead and make this dip, then I dare you to eat just one chip with it! I’ll win guaranteed!

French Onion Ingredients

This creamy savory dip is made with ingredients you probably have on hand. If not a quick trip the local grocery store should get you what you need. No special crazy ingredients here. Just a classic dip made with classic ingredients, that will knock your socks off.

  • Butter: This is to cook the onion in and add flavor.
  • Onion: I used a small onion.
  • Salt: Salt helps the onions release their juices to help them cook.
  • Sugar: This will help caramelize the onions and help give them that golden color.
  • Cream Cheese: Full fat or low fat cream cheese softened.
  • Sour Cream: Use a good quality sour cream, low fat or regular.
  • Worcestershire Sauce: This gives the dip a great savory flavor.
  • Onion and Garlic Powder: These are the all important seasonings that make it taste amazing.
  • Salt and Pepper: Add to taste.

How to Make French Onion Dip

Yes, it might take a little longer to make this because you’ll need to caramelize your own onions, but it’ll be so worth it, I promise. You’ll also need some time to allow the onions to cool before mixing it all together. It takes a little bit of time, but after you taste it, you won’t complain at all. Maybe just about how fast it disappears!

  1. Caramelize: In a medium skillet over medium heat melt the butter. Add the onions, salt and sugar. Sauté for 25-30 min. or until the onions are a deep golden brown. Let cool completely.
  2. Mix: In a medium sized bowl add the onions, cream cheese, sour cream, Worcestershire sauce, onion powder, garlic powder, salt and pepper. Mix until combined. Refrigerate till ready to serve.

sauteing onions, and mixing with the ingredients for French Onion Dip.

What’s The Difference Between Caramelizing and Sautéing Onions?

The rich deep golden color and sweet yet still savory flavor of a caramelized onion is hands down one of the most amazing things ever. It can be tricky to caramelize onions without burning them, the secret is low and slow! It will take patience to caramelize your onions, but the taste will be worth it. I promise.

  • Sauté vs Caramelize: Sautéing onions is done at a higher heat and is meant to just tenderize them and brown the outside. Caramelizing is cooking the onions at a lower heat, slowly coaxing the flavor out of them and allowing the natural sugars to caramelize creating a deep rich flavor.
  • Do I have to stir the onions? The great thing about caramelizing is that you don’t have to babysit the pan too much. Check on the pan every 2-3 min and give it a good stir
  • What is the sticky stuff on the bottom of the pan? As the onions cook you’ll notice a dark fond form on the bottom of the pan. That’s part of the caramelization process. Simply scrape the fond back into the onions as they continue to cook. If it starts to build up, use a little bit of water to help deglaze the pan and watch it carefully for burning. If you feel like they are cooking too fast you can always turn down the heat.
  • How do I know when they are done?  Your onions should be a deep brown and soft but not mushy. Taste the onions when you think they’re ready. If you love the flavor, they’re done.
  • Storing: They will keep in the fridge for about a week, and freeze well too. Now you can make extras and use them in this Easy French Onion Soup or this amazing Skillet French Onion Chicken.

Hints for an Amazing French Onion Dip

Choosing to make this dip for your next event is definitely a step in the right direction. You just can’t go wrong with all the flavor and creaminess. It’s going to be a quick favorite.

  • What Onions Should I Use? Any onion will do for this recipe. Use yellow, white or even a sweet onion. It’s really up to you on this one.
  • How small do I chop the Onion? There are two ways to go about the chopping. You don’t want large stringy onion chunks for a dip, it’ll be hard to eat. I chopped my onion before caramelizing it. This also quickens the cooking time for the caramelization. You can also slice and caramelize the onion then chop them, although it might be tougher to cut them nicely.
  • What do I serve with this dip? The most common and beloved thing to serve this with is a ruffled plain potato chip. But you can also serve it with crackers, pretzels, crusty bread and pita chips. It also goes perfectly with a vegetable tray of carrots, celery, olives, sugar snap peas, peppers or grape tomatoes.

Can I Make this Ahead of Time?

Yes, you can! In fact allowing it to sit overnight in the refrigerator helps the flavors meld together all that much more.

How Long Does Homemade French Onion Dip Last? 

This will keep beautifully in the fridge for up to a week. You can use the leftovers in a variety of ways. Try it as a spread for sandwiches, a topping for baked potatoes, or try smothering baked chicken or beef.

Dipping chips into the Best French Onion Dip.

More Incredible Appetizers

We’ve all probably done it before, we make an entire meal out of just appetizers. They are just so yummy! When you pick the right ones they can really steal the show. It can be hard to leave room for anything else. Try these meal spoiling appetizers the next time you need one!

Print

French Onion Dip

The Best French Onion Dip ever begins with caramelized onions, and ends with you eating it all in one sitting! Seasoned cream cheese and sour cream create a dip so addictive and creamy, it'll be gone before you know it.
Course Appetizer
Cuisine American, French
Keyword french onion dip, french onion dip recipe
Prep Time 10 minutes
Cook Time 30 minutes
Total Time 40 minutes
Servings 4 People
Calories 400kcal
Author Alyssa Rivers

Ingredients

  • 3 Tablespoons Butter
  • 1 small onion coarsely chopped
  • 1/2 teaspoon salt
  • 1 teaspoon sugar
  • 8 ounces cream cheese softened
  • 1 cup sour cream
  • 1 tablespoon worcestershire sauce
  • 1/2 teaspoon onion powder
  • 1/2 teaspoon garlic powder
  • 1/4 teaspoon salt
  • pinch of pepper

Instructions

  • In a medium sized skillet melt the butter over medium heat. Add the onions, salt and sugar. Sauté 25-30 minutes until the onions are a deep golden brown.
  • In a medium sized bowl add the onions, cream cheese, sour cream, worcestershire sauce, onion powder, garlic powder, salt and pepper. Mix until combined.

Nutrition

Calories: 400kcal | Carbohydrates: 9g | Protein: 5g | Fat: 39g | Saturated Fat: 23g | Cholesterol: 115mg | Sodium: 782mg | Potassium: 233mg | Fiber: 1g | Sugar: 6g | Vitamin A: 1382IU | Vitamin C: 3mg | Calcium: 132mg | Iron: 1mg


from The Recipe Critic https://ift.tt/34eR5CE
https://ift.tt/3nou3Ry