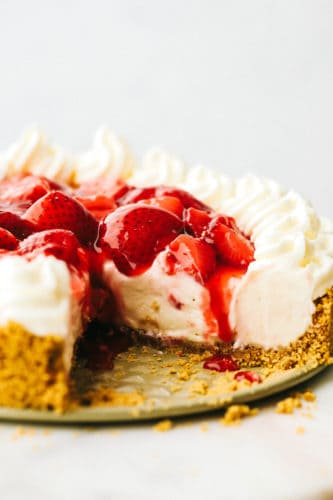
No Bake Cheesecake is so creamy, luxurious, and surprisingly easy to make from scratch at home. Top it with whipped cream and fresh fruit and it will be a huge hit that everyone will obsess over!
Simple variations of this no bake cheesecake can make a big impact when entertaining. Try 2 Ingredient Cheesecake Dip or Cheesecake Stuffed Strawberries for quick and easy twists on no-bake cheesecake that can be served as delicious starters.

Easy No Bake Cheesecake
No Bake cheesecake is the best no bake cheesecake you will make! The rich flavors are easy to achieve and effortless to create. It is an amazing dessert that your family will request over and over. The good news is you can make simple swaps to the crust and switch up toppings for an entirely different feel so you will never get tired of it!
Every bite of the filling is bursting with tangy cream cheese, smooth vanilla, and bright lemon flavors that are irresistible together! The crunch of the crumbly graham cracker crust is a perfect contrast to the soft and sweet filling. Your family and friends will go crazy over how incredibly delicious it is! Make more than one at a time, because this no bake cheesecake gets devoured quickly!
No Bake Cheesecake Ingredients:
A short list of no-fuss ingredients come together to make the most decadent cheesecake. For the best results, make sure all the ingredients are at room temperature before you begin the recipe. This will prevent the cheesecake from cracking, and give you a perfectly smooth and creamy filling.
- Graham crackers: Crush in food processor or with a rolling pin over a bag of crackers.
- Brown sugar: Mix together with butter and graham crackers to make a sweet and buttery crust.
- Butter: Binding agent to hold together the crust.
- Cream cheese: Mild and tangy flavor and smooth texture for the filling.
- Lemon juice: A hint of vibrant citrus flavor.
- Vanilla: Brings out all the flavors in the filling.
- Sugar: Adds sweetness!
- Heavy whipping cream: Makes the filling even more smooth and sweet.
- Optional Topping: Strawberry sauce
How to Make Cheesecake:
No-bake cheesecake is a luxurious dessert that is no longer only reserved for a restaurant on date night. Now, you can make this any day of the week because it is so easy to put together from scratch at home!
- Mix crust: In a medium sized bowl add the crushed graham cracker, brown sugar, and butter and mix until incorporated.
- Form crust: In a springform pan add the graham crackers and press firmly into the bottom and sides. Place in the refrigerator.
- Combine filling: In a large bowl combine the cream cheese, lemon juice, vanilla and sugar. Beat until smooth and creamy. Add in the heavy whipping cream and continue to beat until stiff peaks form.
- Layer filling over crust: Spread filling evenly along the crust.
- Chill and Serve: Place in refrigerator to chill for 3 hours or overnight and serve with strawberry topping if desired.

Variations for Homemade Cheesecake:
No Bake cheesecake is less dense and heavy than baked cheesecakes. It is incredibly delicious, light and tasty! Here are my ideas for how to create a variety of inspired twists on this one amazing recipe!
- Design: Prepare the cheesecake in a parchment paper lined 8×8 dish. Then, after chilling in the refrigerator lift the cheesecake out with the parchment paper and cut the cheesecake into small squares for bite sized treats. Even dip them in chocolate for a smooth outer shell and professional looking presentation. Or prepare them in small cups or a mini muffin pan for smaller servings you don’t have to slice.
- Toppings: Add whipped cream and fresh fruit for extra sweetness and color. Strawberries are a favorite, but raspberries, blueberries, or any fruit that’s in season make great toppings. Also try sauces like lemon curd, freezer jam, homemade salted caramel sauce, or chocolate syrup.
- Filling: Add a bit of sour cream for even more tangy flavor and creaminess. Or for a small crunch try adding in some crushed oreos, sprinkles (a hit with kids) or chocolate shavings.
- Crust: To change up the flavor try using chocolate or cinnamon sugar graham crackers or crushed oreos in the crust.

Can you Freeze Strawberry Cheesecake?
Yes! Before decorating, wrap your no bake cheesecake in heavy duty aluminum foil, plastic wrap, or place in a shallow airtight container. Then store it in the freezer for up to 3 months. Thaw it in the refrigerator and add toppings before serving. It will remain good for up to 3 days in the refrigerator.

More Decadent Cheesecake Recipes:
- Mint Oreo Cheesecake
- No Bake Key Lime Cheesecake
- Berry Swirl Cheesecake Bars
- Death by Chocolate Cheesecake
- Samoa Cheesecake Bars

No Bake Cheesecake
Ingredients
- 2 cups graham cracker crushed
- 1/4 cup brown sugar
- 1/2 cup butter melted
- 2 8 ounce cream cheese softened
- 1 Tablespoon lemon juice
- 1 teaspoon vanilla
- 1/2 cup sugar
- 1 cup heavy whipping cream
Optional Topping:
Instructions
-
In a medium sized bowl add the crushed graham cracker, brown sugar, and butter and mix until incorporated. In a 9 inch springform pan add the graham crackers and press firmly into the bottom and sides. Place in the refrigerator.
-
In a large bowl combine the cream cheese, lemon juice, vanilla and sugar. Beat until smooth and creamy. Add in the heavy whipping cream and continue to beat until stiff peaks form.
-
Spread filling evenly along the crust. Chill for 3 hours or overnight and serve with strawberry topping if desired.
Nutrition
from The Recipe Critic https://ift.tt/2OYIUTc
https://ift.tt/2X3nd93