मंगलवार, 27 अक्तूबर 2020

Brown Butter Chocolate Chip Cookies

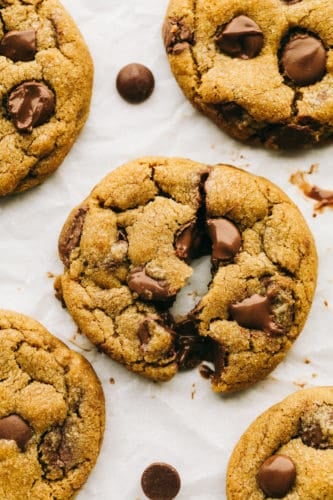
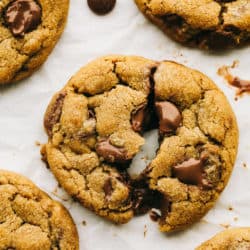
Brown Butter Chocolate Chip Cookies are perfect thick, chewy chocolate chip cookies that are made even better with the unique flavor of browned butter. These are the BEST tasting cookies EVER!

Browned Butter is a special ingredient that makes every sweet a little bit more special. Try it in these other recipes, Browned Butter Snickerdoodles, Brown Butter M&M Cookies, and Maple Cookies with Brown Butter Frosting

Browned butter chocolate chip cookies, chewy, thick and incredible.

Brown Butter Chocolate Chip Cookie Recipe

Brown butter just makes every cookie recipe better. It gives them a caramelly, nutty flavor that is to die for! Combined with chocolate and a chewy soft center. These will reinvent your chocolate chip cookie forever.

I think that this might just be the best cookie recipe that I have tried! I like when cookie recipes stay soft and chewy after you bake them for days after. They were perfect! I know that you will love them too!

Brown Butter Cookie Ingredients

They cookies take a classic favorite to a whole new level!

  • Butter: Use unsalted butter
  • Flour: All purpose will work
  • Baking Soda: The leavening agent
  • Coarse Sea Salt: Creates pockets of saltiness
  • Brown Sugar: Light or dark will both work
  • Sugar: White granulated
  • Egg: Make sure the Egg is large
  • Egg Yolk: Adds extra moisture
  • Vanilla: Adds classic sweetness and flavor
  • Plain Yogurt: Creates the essential moisture lost by browning the butter.
  • Chocolate Chips: Semi sweet, dark, milk, chunk or a mixture of chocolate works

How to Bake Brown Buttered Chocolate Chip Cookies

There is nothing better than a gooey chewy warm out of the oven chocolate chip cookie. Brown butter just makes every cookie recipe better. They were perfect

  1. Butter: Cut the butter in piece and place in a saucepan over medium heat. Whisking constantly allow the butter to brown. Remove from heat and let cool to room temp.
  2. Mix: Whisk the flour, baking soda, and sea salt together in a bowl and set aside.
  3. Combine: In a mixer combine sugars and brown butter, blend until smooth. Add in the egg, egg yolk, vanilla and yogurt
  4. Fold: Next fold in the flour mixture into the wet. Stir in the chocolate chips.
  5. Chill: Cover and place in refrigerate for at least 30 min.
  6. Bake: On a baking sheet lined with parchment scoop the dough out by tablespoons about 2 inches apart and bake for 10-12 min. in a 350 degree oven.

Making the perfect browned butter chocolate chip cookie

How to Make Brown Butter Successfully

Browning butter is quite simple but you do have to be careful you don’t burn it. Make it on the stovetop and wait for the nutty aroma to fill your home.

  • Light colored pan: If you have it, use a light colored pan. This will help you see when the butter is browned. This will help you tell the difference between browned and burnt.
  • Stir: Continue to stir as it melts and watch as it turns to an amber color and smells nutty. Then it’s done.
  • Remove: To keep it from continuing to cook, quickly remove from heat and pour into a heat-proof bowl. Make sure to scrape all the dark brown bits from the bottom. Those are the flavor makers.
  • Moisture: When you brown butter, you get incredible flavor but you do lose moisture. That’s why adding yogurt, or milk is necessary.

Browned butter chocolate chip cookies are thick, chewy and amazing.

Tips for the Best Browned Butter Chocolate Chip Cookies

  • Chill: It is so important to chill cookie dough. It ensures a thicker cookie and a more intense flavor. It will also heighten the buttery caramel flavor of the browned butter.
  • Nuts: Add chopped nuts for added texture.
  • Sea Salt: The sea salt creates these pockets of saltiness that balances the sweetness, you can add up to 1 teaspoon of the sea salt.
  • Yogurt: Seems weird but it’s necessary since the browned butter loses moisture, so this replaces it.
  • Storage: Keep cookies in a fresh in an airtight container for up to a week.
  • Freeze: You can freeze precooked cookie dough for cookies later. Just roll out and freeze for 30 min. Then transfer to a freezer safe bag, they’ll keep for up to 3 months.
  • Freeze Cooked Cookies:  Cool completely then place in a freezer safe bag and keep for up to 3 months.

Browned Butter Chocolate Chip Cookies that are thick chewy and amazing.

More Browned Butter Recipes to Fall in Love With

Browned butter makes everything taste better!

Print

Brown Butter Chocolate Chip Cookies

Perfect chocolate chip cookies are made even better with brown butter!
Course Dessert
Cuisine American
Keyword brown butter chocolate chip cookies, chocolate chip cookies, cookie recipes
Prep Time 15 minutes
Cook Time 12 minutes
Total Time 27 minutes
Servings 24 Cookies
Calories 212kcal
Author Alyssa Rivers

Ingredients

  • 1 cup unsalted butter
  • 2 1/4 cups all-purpose flour
  • 1 1/4 teaspoon baking soda
  • 1/2 teaspoon coarse sea salt
  • 1 cup light brown sugar
  • 1/2 cup granulated sugar
  • 1 large egg
  • 1 egg yolk
  • 2 1/2 teaspoon vanilla extract
  • 1 Tablespoon plain yogurt I used Greek yogurt
  • 1 cup semisweet chocolate chips I used jumbo

Instructions

  • Preheat oven to 350 degrees. Cut the butter in pieces and place in a saucepan over medium heat. Whisking frequently allow the butter to brown. Remove from heat and let cool to room temperature.
  • In a mixing bowl, whisk together flour, baking soda, and sea salt. Set aside,
  • In your mixer, combine sugars and brown butter. Blend until smooth. Add the egg, egg yolk, vanilla, and yogurt.
  • Next, mix in the dry ingredients. Fold in the chocolate chips until incorporated. Cover and chill in the refrigerator for 30 minutes.
  • On a non-stick baking sheet, or lined with parchment paper, scoop the dough out by tablespoons about 2 inches apart.
  • Bake until golden brown in the preheated oven for 10-12 minutes.

Video

Notes

Updated on October 27, 2020
Originally Posted on July 28, 2013

Nutrition

Calories: 212kcal | Carbohydrates: 26g | Protein: 2g | Fat: 11g | Saturated Fat: 7g | Cholesterol: 36mg | Sodium: 118mg | Potassium: 72mg | Fiber: 1g | Sugar: 16g | Vitamin A: 261IU | Calcium: 19mg | Iron: 1mg


from The Recipe Critic https://ift.tt/35yJoXY
https://ift.tt/3mqfgER

सोमवार, 26 अक्तूबर 2020

Corn Pudding

Corn Pudding is one of our favorite fall sides to serve alongside a roast chicken, hearty stew, or of course, turkey! Our version is ultra creamy, slightly sweet, with a hint of savory and packed with while corn kernels.

For more easy fall sides, don’t miss the best Creamy Scalloped Potatoes, these Creamy Mashed Potatoes, and the Best Green Bean Casserole. These are all perfect for the holiday season too!

Corn pudding in a white dish.

Jiffy Corn Pudding Recipe

There are a lot of sides I love around this time of year, but corn pudding has to be at the top of the list! Our version is crispy on the outside, warm and creamy on the inside and packed with sweet corn flavor. Because we love to play on a good sweet and salty factor, we try to balance out the sweetness with a little bit of sautéed onion and garlic.

Of course, corn pudding wouldn’t have its namesake without actual corn. Here, we use corn in three ways. First, with a little bit of cornmeal to mimic the texture of cornbread a little bit. Second, with frozen corn. We opt to use frozen corn this time of year since it’s usually frozen at its peak. If you still have fresh corn around, then by all means use that. Third, canned cream of corn for the creamy factor we all love about corn pudding.

Be sure to serve straight from the oven and dig in!

What’s The Difference Between Corn Pudding, Corn Casserole And Cornbread?

Ok, so those are a lot of very similar terms. I would say that corn pudding is obviously more pudding like in texture. Cornbread is very sturdy and bread-like. Corn casserole is somewhere in the middle.

Whisking ingredients into the glass bowl.

Ingredients for Southern Corn Pudding

  • Butter: It’s no secret – corn pudding is an indulgent dish, so let’s not skimp on the butter. We use unsalted butter, and quite a bit of it. One whole stick to be exact. Of course, it adds richness to the corn casserole itself, but it’s also what we use to sauté the onion and garlic.
  • Onion and garlic: This is where the sweet and salty factor comes in with our corn pudding. Adding a little bit of sautéed onion and garlic, gives us just the kick of savory we need.
  • Flour and Cornmeal: Corn pudding is basically just a play off cornbread, but much creamier and less sturdy. All we need is juuuust enough flour and cornmeal to hold the pudding together a little bit.
  • Eggs: Because corn pudding is, as the name implies, a pudding, we want it to have a custard texture and that means a heavy hand of eggs. We use large eggs.
  • Milk: We like to use whole milk, but if you really want to indulge, use heavy cream.
  • Corn: As mentioned before, we like to use frozen or fresh corn instead of canned corn. I find canned corn doesn’t have as much texture and lacks the freshness frozen and fresh corn has. Of course, if that’s all you have on hand, that’s find, just make sure to drain it well.
  • Cream of corn: On the other hand, you can’t get the texture and creaminess of cream of corn with fresh or frozen corn, so we have no qualms using it.

How to Make Homemade Corn Pudding!

Prepare the pan. Butter or grease a 9×9 baking dish really well.

  1. Sauté onion and garlic: Start by melted the butter in a small sauté pan or skillet. Add the onion and garlic. Gently sweat the onion and garlic until soft and fragrant, about 5 minutes. Set aside to cool slightly.
  2. Whisk everything together: Whisk the flour, cornmeal, and salt together. Add in the milk, eggs, cream of corn, butter, onion, and garlic. Whisk to combine. Add in frozen corn. Gently fold into the batter.
  3. Bake! Pop into a 400 degree oven and bake until golden brown and bubbly on the top. Rest for a few minutes before diving in!

Sautéing onions in butter.

Do You Eat Corn Pudding Casserole Hot Or Cold?

I say hot all the way! Although, once it rests to room temperature, it’s still really delicious.

Corn pudding baked in a white dish.

Can I Make Corn Pudding Ahead of Time?

Yes! If you want to make it ahead of time, I’d suggest under baking it just a touch, and then popping it back into the oven at 325 degrees. about 20 minutes before you’re ready to serve.

Corn pudding with a wooden spoon.

More Fall Favorite Side Dishes

Print

Corn Pudding

Corn Pudding is one of our favorite fall sides to serve alongside a roast chicken, hearty stew, or of course, turkey! Our version is ultra creamy, slightly sweet, with a hint of savory and packed with while corn kernels.
Course Side Dish
Cuisine American
Keyword corn casserole, thanksgiving sides
Prep Time 15 minutes
Cook Time 30 minutes
0 minutes
Total Time 45 minutes
Servings 10 people
Calories 196kcal
Author Nicole Leggio
Cost $10

Equipment

  • Mixing Bowl
  • Baking dish

Ingredients

  • 1/4 cup unsalted butter
  • 1/2 cup chopped onion (1/2 small onion)
  • 1 large garlic clove, minced
  • 1/4 cup flour
  • 1/4 cup cornmeal
  • 2 teaspoon cornstarch
  • 3 Tablespoon sugar
  • 1/2 cup heavy cream
  • 4 large eggs
  • 14 ounce canned cream style corn
  • 1 cup frozen or fresh corn

Instructions

  • Preheat oven to 400 degrees. Grease a 9x9 baking dish or similar size baking dish with non-stick cooking spray.
  • Heat a small saute pan over a medium heat. Add butter. Once the butter melts, add onion and garlic and turn the heat to medium-low. Sweat the onion and garlic until slightly softened, about 4-5 minutes. Season with a little salt and pepper. Remove from heat and let cool slightly.
  • Add flour, cornmeal, cornstarch, and sugar to a large bowl. Whisk to combine. Add heavy cream, eggs, creamed corn, butter, onion, and garlic. Whisk just until combined. Fold in frozen corn.
  • Pour into prepare baking dish and pop in the oven. Bake until golden brown on top, about 30 minutes. The center should be set, but slightly jiggly. Let the corn pudding rest for 3-4 minutes before serving.

Nutrition

Serving: 1serving | Calories: 196kcal | Carbohydrates: 20g | Protein: 5g | Fat: 12g | Saturated Fat: 6g | Cholesterol: 103mg | Sodium: 147mg | Potassium: 136mg | Fiber: 1g | Sugar: 6g | Vitamin A: 495IU | Vitamin C: 3mg | Calcium: 21mg | Iron: 1mg


from The Recipe Critic https://ift.tt/3mAIMrV
https://ift.tt/3mqQAMq

रविवार, 25 अक्तूबर 2020

Sausage Pumpkin Pasta

Sausage Pumpkin Pasta is savory, creamy, indulgent and perfectly spiced.  This is hearty, delicious and comforting!
Serve this with a  fresh green salad with this quick and amazing Ranch Dressing. And pair it with some Homemade Easy Cheesy Garlic Bread, or Italian Bread Twists for a dinner that’s sure to please!
Sausage pumpkin pasta in a bowl with a fork.

Pumpkin Sausage Pasta

Believe it or not, but pumpkin isn’t just for dessert. If you have pumpkin in your pantry that needs to be used, but if you can’t stomach one more dessert then this is the recipe for you. It’s savory, rich  delicious and still uses up your pumpkin.
This sausage pasta recipe with pumpkin sauce is so easy, and will leave your home smelling absolutely wonderful. It’s such a comforting dish for those chilly days. And because it’s so quick you can make it even after a busy crazy day.

Pumpkin Pasta with Sausage Ingredients

Your family is going to love this. And if you don’t tell them, they’ll never know there’s pumpkin in it!

  • Pasta: Use a good sturdy pasta like Penne
  • Olive Oil: Perfect for pasta dishes
  • Sausage: Use extra lean sausage for a healthier dish
  • Garlic and Onion: Finely chopped and minced
  • Red and Yellow Pepper: Chop into bite sized pieces for easy eating
  • Chicken Broth: Could use Beef or Veggie Broth
  • Canned Pumpkin: Please don’t use canned pie filling, that would be bad
  • Heavy Cream: Can sub out for half and half.
  • Ground Nutmeg: Just a little bit add such a rich complex flavor
  • Salt and Pepper: Add more or less to taste
  • Parmesan Cheese: Freshly grated

How to Make Pumpkin Pasta

It’s a quick and easy and on your dinner table in 30 minutes. Perfect for any day of the week!

  1. Cook: In a skillet over medium high heat add the olive oil and brown the sausage. Once it’s cooked remove to a paper towel lined plate, drain the fat from the skillet and return to heat.
  2. Saute: Add more olive oil and saute the garlic, onion and peppers till tender
  3. Sauce: Add the chicken broth, and pumpkin to the pan and bring to a boil, add the sausage, reduce the heat and then stir in the heavy cream
  4. Simmer: Simmer the mixture 5-10 minutes
  5. Cook: Cook the pasta al dente
  6. Combine: Return the drained pasta to the pot, pour the sauce over the pasta and toss gently to coat. Top with parmesan cheese.

The process photos of sausage pumpkin pasta being made in 4 steps.

Tips for Making Sausage and Pumpkin Pasta

  • Sausage: There are so many varieties out there that you can use, pick what you love. Hot Italian, sweet Italian, pork, turkey or chicken sausage. If you don’t use a ground sausage, however, be sure to remove the casings.
  • Vegetarian: Skip the sausage all together for a vegetarian meal.
  • Sage: If you love the taste of sage with your pumpkin throw in 2-3 leaves in your sauce while it simmers, then remove.
  • Pasta: Use a sturdy pasta to pair with sausage. Things like Orecciette, Rigatoni or any chubby big pasta will work well.
  • Al Dente: Don’t over cook your noodles, you don’t want them soggy. They will absorb some of the sauce so keep them firm.
  • Vegetables: If you don’t like peppers you can substitute them for zucchini, or other vegetables of your choice.
  • Pumpkin: I really like to use the canned pumpkin puree, it makes it so smooth and creamy. Homemade pumpkin will work just as well and give it a nice fresh flavor. I would blitz the homemade puree to make sure it’s super smooth before adding it to the sauce.

Storing Pasta Skillet

This is even better the next day!

  • Fridge: This keeps really well in an airtight container for up to 4 days in the fridge. Leftovers taste even better.
  • Freeze: You can freeze the sauce before or after you add the noodles. Both will keep in an airtight container for up to 2-3 months. Thaw in fridge and warm in a saucepan on the stove or in the microwave. You may need to add some broth or water to thin the sauce.

Sausage pumpkin pasta in a skillet with a wooden spoon stirring it.

More Savory Pumpkin Recipes to Love

Print

Sausage Pumpkin Pasta

This sausage pasta recipe with pumpkin sauce is an easy dish to make — it takes less than 30 minutes from start to finish. 
Course Dinner, Main Course
Cuisine American
Keyword pasta, pasta recipes, sausage pumpkin pasta
Prep Time 10 minutes
Cook Time 10 minutes
Total Time 20 minutes
Servings 6 Servings
Calories 659kcal
Author Alyssa Rivers

Ingredients

  • 2 tablespoons olive oil
  • 1 pound extra lean sausage
  • 2 teaspoons garlic minced
  • 1 medium onion finely chopped
  • 1 red bell pepper chopped
  • 1 yellow bell pepper chopped
  • 2 cups chicken broth
  • 1 cup canned pumpkin not pumpkin pie filling
  • 1/2 cup heavy cream
  • 1/2 teaspoon ground nutmeg
  • Salt and pepper
  • 1 pound penne pasta
  • Freshly grated Parmesan cheese

Instructions

  • Heat a skillet over medium-high heat. Add 1 tablespoon of olive oil to the pan and brown the sausage in it. Transfer sausage to paper towel-lined plate. Drain fat from skillet and return pan to the stove.
  • Add the remaining tablespoon oil, and then the garlic, red pepper, yellow pepper and onion. Saute until the vegetables are tender.
  • Add the chicken broth and pumpkin and stir to combine, stirring sauce until it comes to a bubble. Return sausage to pan, reduce heat and stir in the heavy cream.
  • Season the sauce with the nutmeg, salt and pepper, to taste.
  • Simmer mixture 5 to 10 minutes to thicken sauce.
  • Cook the pasta according to the package directions and then drain.
  • Return the pasta to the pot you cooked it in and pour the sausage pumpkin sauce over the pasta.
  • Top the pasta with Parmesan cheese and enjoy.

Notes

Updated on October 25, 2020
Originally Posted on September 17, 2014

Nutrition

Calories: 659kcal | Carbohydrates: 65g | Protein: 23g | Fat: 34g | Saturated Fat: 12g | Cholesterol: 82mg | Sodium: 784mg | Potassium: 628mg | Fiber: 5g | Sugar: 5g | Vitamin A: 7364IU | Vitamin C: 71mg | Calcium: 59mg | Iron: 3mg


from The Recipe Critic https://ift.tt/31Hp7ym
https://ift.tt/3dZCz5t

शनिवार, 24 अक्तूबर 2020

Homemade Donuts

Glazed donuts with sprinkles on a wire rack

Homemade Donuts are easier to make than you might think! And yes, I’m talking about soft and fluffy fried yeasted donuts, dressed in your choice of vanilla or chocolate glaze.

Have a hankering for more comforting fried dough? Try this Easy Beignets Recipe, or these delicious and tender Apple Fritters. You can even skip the fair and make your very own homemade Funnel Cake!

Glazed donuts with sprinkles on a wire rack.

Homemade Donuts Recipe

Do you prefer baked donuts or fried donuts? I do love both but I think I love fried yeasted donuts just a little bit more. If you’re a tiny bit afraid of frying like I used to be, my biggest tip is to invest in a thermometer! Knowing the oil temperature made a huge difference in my frying confidence.

Easy Homemade Donuts Ingredients

This homemade donut dough is exactly the same as my milk bread dough. The list of ingredients is very simple and can be halved or doubled easily to make less or more donuts in just a pinch.

  • Heavy cream: Used for the added fat content for more tender bread dough.
  • Whole milk: You can use 2% milk but remember more fat yields more tender bread. And we’re not adding eggs or butter in this recipe, so the fat comes directly from milk and heavy cream.
  • Granulated sugar: For added sweetness in the dough. The majority of the sweetness will still come from the glaze.
  • Active Dry yeast: to help the bread dough rise.
  • Salt: For flavor.
  • Flour: All purpose flour will do.

Note: The recipe calls for exactly half heavy cream and half milk so you can replace both the heavy cream and milk with half and half if you wish.

How to Make Homemade Donuts

  1. Heat up the cream, milk and sugar and allow it to cool down a bit before adding the yeast to activate it. Tip for working with yeast: make sure the liquid mixture is not too hot or you will kill the yeast.
  2. Once the yeast mixture is bubbly, mix it with the flour and salt to form a dough.
  3. Shape the dough into a ball and place it in an oiled bowl. Allow to rise until at least double in size.

Dough in a bowl risen to double in size

Cutting Homemade Yeast Donuts 

  1. Roll the dough out to about ½” thick and cut with a donut cutter if you have one. Don’t have a donut cutter? I used a 3” round cookie cutter for the outer ring and a 1 ½” round cookie cutter for the donut holes.
  2. Reroll the scraps and donut holes to cut out more donuts. Option: You can keep the donut holes for frying if you want, but you’ll end up making less donuts.
  3. Tip for rerolling: You will need to allow the dough to rest a bit when rerolling so the gluten has time to relax, otherwise when you cut the donuts, they will shrink.

Cutting out the dough for donuts

Frying the Donuts

  1. Heat the oil in a thick bottom pot. I used a cast iron pan. Use a thermometer to keep the temperature between 350°F – 375°F. You will need to adjust the heat during the frying process.
  2. Fry 3 – 4 donuts at a time depending on the size of your pan until golden brown, flip the donuts halfway through frying. Don’t crowd your pan.

Frying donuts in a cast iron pan

Homemade Glazed Donuts

I included 2 options for glaze in this recipe: a vanilla glaze and a chocolate glaze. Both are very easy sugar glaze made with powdered sugar and milk. But there are endless options of glaze you can try to pair with these donuts.

Storing Donuts

Fried homemade donuts are best the day they are made but they will stay soft up to 2 days, just keep them at room temperature in a lightly covered container.

A stack of glazed donuts

More Sweet Breakfast Recipes

Glazed donuts with sprinkles on a wire rack
Print

Homemade Donuts

Homemade Donuts are easier to make than you might think! And yes, I’m talking about soft and fluffy fried yeasted donuts, dressed in your choice of vanilla or chocolate glaze.
Course Bread, Breakfast, Dessert
Cuisine American
Keyword fried donuts, homemade donuts, yeast donuts
Prep Time 30 minutes
Cook Time 25 minutes
Resting Time 2 hours
Total Time 2 hours 55 minutes
Servings 10 donuts
Calories 229kcal
Author Trang Doan

Ingredients

Dough

  • 1/2 cup heavy cream
  • 1/2 cup whole milk
  • ¼ cup granulated sugar
  • 1 teaspoon active dry yeast
  • ¾ tsp kosher salt
  • 2 cup all-purpose flour
  • Extra flour for rolling
  • Oil for frying

Vanilla Glaze

  • 1 cup + 6 tablespoon powdered sugar
  • ½ teaspoon vanilla extract
  • 2 tablespoon milk
  • A tiny pinch of salt

Chocolate Glaze

  • ½ cup powdered sugar
  • ¼ cup dark cocoa powder dutch-processed
  • A tiny pinch of salt
  • ¼ teaspoon vanilla extract
  • 7 teaspoon whole milk

Instructions

  • Add cream, milk and sugar to a small saucepan and bring the mixture to a simmer over medium heat stirring occasionally. Turn off the heat and let the mixture cool down to below 110°F.
  • Sprinkle active dry yeast over the liquid surface and let it bloom for 10 - 15 minutes, the mixture should puff up.
  • Add the flour and salt to a stand mixer bowl and stir to distribute. Add the yeast mixture to the flour mixture and knead with the dough hook on speed 2 for about 5 minutes.
  • Oil a glass bowl and your hands. Scrape the dough out of the mixing bowl and shape it into a ball in your hands and place it in the oiled bowl.
  • Cover, and let rise in a warm place for 1 - 2 hours until at least more than double in size.
  • Turn the dough out onto a lightly floured surface and roll out to about ½” thick. Use a 3” round cookie cutter to cut out the donuts and use a 1 ½” round cookie cutter to cut out the donut holes.
  • Reshape the dough including the donut holes into a ball and let it rest for about 10 - 15 minutes before you roll it back out and again and cut into more donuts. Continue to do this until you have cut out all of the donuts. Or leave the donut holes if you’d like.
  • Heat the oil in a heavy pot to 360°F, use a thermometer to monitor the temperature during frying as you may need to adjust the heat, try to keep the temperature between 350°F - 375°F.
  • Drop 3 - 4 donuts into the hot oil, depending on the size of your pan, and fry until golden brown, flipping the donuts halfway through cooking. Don’t crowd the pot.
  • Remove the donuts from the hot oil and rest them on a wire rack placed over a baking sheet to drain excess oil or simply place them on some paper towels to absorb the excess oil.
  • To make the vanilla glaze, whisk together powdered sugar, salt, vanilla extract and milk in a small mixing bowl until smooth.
  • To make the chocolate glaze, whisk together powdered sugar, cocoa powder, salt, vanilla extract and milk in a small mixing bowl until smooth.
  • Dip the donuts into the glaze of your choice and place them on a wire rack placed over a baking sheet to allow excess glaze to drip off.

Notes

This recipe makes 10 donuts if you reshape the donut holes. You can leave the donuts holes if you wish but this will reduce the amount of whole donuts.
When reshaping the dough to cut out more donut, you’ll need to allow the dough to rest to relax the gluten or it will shrink back on itself when cut.

Nutrition

Calories: 229kcal | Carbohydrates: 42g | Protein: 4g | Fat: 5g | Saturated Fat: 3g | Cholesterol: 18mg | Sodium: 187mg | Potassium: 67mg | Fiber: 1g | Sugar: 22g | Vitamin A: 195IU | Calcium: 29mg | Iron: 1mg


from The Recipe Critic https://ift.tt/3omJ2w1
https://ift.tt/3oxYtBU