2020 at 02:30AM The Recipe Critic लेबलों वाले संदेश दिखाए जा रहे हैं. सभी संदेश दिखाएं

सोमवार, 21 सितंबर 2020

Melt in Your Mouth Pot Roast Recipe

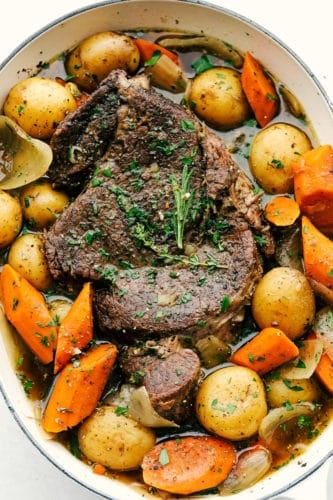
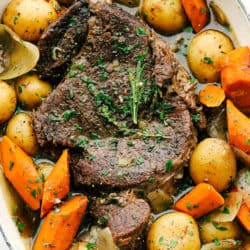
Utterly perfect fork tender, melt in your mouth pot roast, with delicate potatoes, sweet carrots, sits in a perfectly seasoned broth. This recipe is super simple but will make you feel like you’ve spent all day cooking.

Make a balanced meal with a nice fresh garden salad and some homemade rolls. Perfect Soft and Buttery Rolls or Copycat Texas Roadhouse Rolls should do the trick.

Melt in you mouth pot roast with tender carrots and potatoes

Melt in Your Mouth Pot Roast

Not only is this melt in your mouth Pot Roast a quintessential Sunday meal, it’s also perfect for company, or a special occasion because it’s just so easy. Prep it, throw it all together and at the end of the day you have a perfect sit down dinner hearty enough to fill any appetite. Generously seasoned meat, coupled with onions and vegetables surrounded by a savory broth is just so heavenly.

One of the best things about this roast is that it’s almost better the next day. Perfect for leftovers or use to make sandwiches, tacos or other hearty roast meals. It’s one of those meals that you make once and can usually use at least twice. Perfect a hectic work week.

Pot Roast Ingredients:

I’ve given you three ways to cook the roast but the ingredients are all the same. It’s one of those hearty meals that brings everyone together around the table for good conversation and great memories.

  • Olive Oil: Can use Canola oil, but I like the extra bit of flavor the Olive Oil adds.
  • Chuck Roast: 3-4 pound roast. If your roast is much bigger, you’ll need to adjust the seasonings to accommodate so you have enough flavor
  • Salt and Pepper: This is for generously seasoning the roast before searing.
  • Carrots: Use large carrots you have to cut yourself, they have so much more flavor than baby carrots.
  • Potatoes: The best potatoes for putting in a roast are yellow, golden or Yukon potatoes.
  • Onion: Yellow or white onions are flavorful but mellow enough to add flavor but not over power.
  • Beef Broth: Make your own or buy from your local store located usually near the soups.
  • Red Wine: The alcohol will cook off and your left with flavor and tenderness, but if you’d like a substitute use apple juice, cranberry juice or more beef broth.
  • Worcestershire Sauce: Boosts and intensifies the meaty flavor
  • Garlic: Use fresh minced garlic for the best taste.
  • Onion and Garlic Powder: Using powder helps enhance the flavor.
  • Salt and Pepper: This is to add to the sauce.

How to Make Tender Roast:

The wonderful thing about this recipe is that you can make it Three different ways and end up with the same result any way you make it. The main premise of putting it together is the same for all three methods. So whether you use a slow cooker, Instant Pot or the Oven it will always be melt in your mouth delicious.

  1. Sear: For the oven and slow cooker, heat the oil over medium high heat in a cast iron skillet or heavy frying pan.  Salt and pepper the roast generously rubbing it in good. Once the oil starts to smoke sear each side of the roast for 2-3 minutes to give it a nice dark brown crust. If using an Instant Pot use the saute button. Wait till it says “Hot” before adding the oil and once it smokes sear the roast on all sides. Remove the roast from the instant pot.
  2. Assemble: In the slow cooker, instant pot or a large casserole dish place the carrots, potatoes and onions into the bottom.  Next place the meat on top. In a small bowl combine the beef broth, red wince, Worcestershire sauce, garlic, onion and garlic powder and salt and pepper. Pour over the roast.
  3. Cook: In the Slow Cooker cook on low for 10 hours or till tender. In the Instant Pot cook on high for 60 minutes and natural release. For the oven cover tightly with foil or a fitted oven safe lid and cook at 425 for ONLY 30 min then turn the oven down to 300 for 4-5 hours.

The steps to making melt in your mouth pot roast with tender carrots and potatoes

Tips for The Best Pot Roast:

  • It’s all about the Beef:  For that super tender roast it starts with the cut of meat. You want a cut that has lots of marbling. Which means it’s got lots of striations of fat running through it. This produces that amazing texture. Chuck Roast is the ideal cut, Brisket is another heavily marbled meat. Bottom or Top Round roasts are leaner and won’t be as tender.
  • Why Sear: Don’t skip this essential step. Searing the meat at a high temperature brings out the most flavor in the meat by caramelizing the natural sugars and brings out the savory flavor of the beef with it’s rich brown crust. It will also seal in those amazing juices.  Make sure your pan is HOT. If your pan isn’t hot enough you will steam the meat which can actually make it tough.
  • Simplify: You can make the morning prep faster for yourself by prepping the veggies the night before. Place in a sealed container or bag in the fridge till morning
  • Size: Size of meat and vegetables matter. If your roast is too large for your pan, pot or cooker you can cut it down to fit. Sear the cut pieces individually before adding them. If your roast is overly large you may want to add a little extra spices to your sauce. Cut all the veggies to roughly the same size for even cooking. Chunk your onions don’t finely chop them. I find they give off more flavor and don’t turn to mush.
  • Low and Slow:  To achieve the perfect tenderness it is always best to cook your roasts long and low. It will yield the best flavor and texture.

Melt in you mouth pot roast with tender carrots and potatoes

Storing and Freezing:

Pot Roast makes the best leftovers.

  • STORE: Cool the roast and vegetables and store in an air tight container for up to 4 days.
  • Freeze: Freeze the roast in a freezer safe container or bag for up to 2 months. Thaw overnight in the fridge and reheat in a pan on the stove in it’s sauce or microwave.

Melt in you mouth pot roast with tender carrots and potatoes

More Amazing Beef Recipes:

Beef is so tasty hearty and versatile. Try these other yummy beef recipes.

Print

Course Dinner, Main Course
Cuisine American
Keyword pot roast, pot roast recipe
Prep Time 10 minutes
Cook Time 10 hours
Total Time 10 hours 10 minutes
Servings 6 People
Calories 566kcal
Author Alyssa Rivers

Ingredients

  • 2 Tablespoons olive oil
  • 3-4 pound chuck roast
  • salt and pepper
  • 4 large carrots sliced
  • 1 pound baby potatoes
  • 1 yellow onion chopped into large pieces
  • 2 cups beef broth
  • 1/2 cup red wine
  • 3 Tablespoons Worcestershire sauce
  • 3 cloves garlic minced
  • 1 teaspoon onion powder
  • 1 teaspoon garlic powder
  • 1 teaspoon salt
  • 1/2 teaspoon pepper

Instructions

To make in the slow cooker:

  • In a large cast iron skillet heat the olive oil on medium high heat until it starts smoking. Salt and pepper each side of the roast and sear for 2-3 minutes on each side to give it a dark brown crust.
  • In a 5 quart slow cooker add the carrots, potatoes, and onion. Place the roast on top. In a small bowl combine beef broth, red wine, Worcestershire sauce, garlic, onion, garlic powder, salt and pepper. Pour over the top of the roast.
  • Cook on low for 10 hours or until tender.

To make in the Instant Pot:

  • Press the sauté button on the instant pot and wait for it to say "HOT". Add in the olive oil. Salt and pepper the beef and slice the beef in half if it doesn't fit. Working in batches, sear on each side for 2-3 minutes.
  • Place the carrots, potato, and onion into the bottom of the instant pot. Place the meat on top. In a small bowl combine beef broth, red wine, Worcestershire sauce, garlic, onion, garlic powder, salt and pepper. Pour over the top of the roast.
  • Cook on high pressure for 60 minutes and then do a natural release.

To roast in the oven:

  • Preheat oven to 425 degrees. In a large cast iron skillet heat the olive oil on medium high heat until it starts smoking. Salt and pepper each side of the roast and sear for 2-3 minutes on each side to give it a dark brown crust.
  • In a large casserole dish add the carrots, potatoes, and onion. Place the roast on top. In a small bowl combine beef broth, red wine, Worcestershire sauce, garlic, onion, garlic powder, salt and pepper. Pour over the top of the roast. Cover tightly and roast for 30 minutes. Turn the oven down to 300 degrees and allow to roast for 4-5 hours.

Nutrition

Calories: 566kcal | Carbohydrates: 22g | Protein: 47g | Fat: 31g | Saturated Fat: 12g | Cholesterol: 156mg | Sodium: 987mg | Potassium: 1377mg | Fiber: 3g | Sugar: 4g | Vitamin A: 6823IU | Vitamin C: 20mg | Calcium: 82mg | Iron: 6mg


from The Recipe Critic https://ift.tt/35S2pGA
https://ift.tt/2FLdz5n

शुक्रवार, 31 जुलाई 2020

Oven Baked Denver Omelet

An Oven Baked Denver Omelet is a delicious omelet packed with ham, onions, peppers and cheese that you can throw into the oven in a moments notice!  It is a hearty and satisfying family breakfast that everyone will go crazy over!

Freezer friendly breakfast meals are a must on busy mornings that still require warm nutritious meals.  Try Breakfast Burritos or Denver Omelet Breakfast Muffins for delicious and easy recipes everyone will enjoy.

Denver omelet slice on a white plate.

Oven Baked Denver Omelet

Commonly known as a “Western Omelet” this Baked Denver Omelet is the BEST baked omelet recipe. It is filled with fresh ingredients like ham, fresh onion, green peppers and cheese and is ready in no time at all!  Break out of a breakfast rut and try these warm, fluffy eggs fresh out of the oven.  A large pan of these tasty and healthy eggs that are filled with ooey-gooey cheese will be an instant hit for breakfast, lunch or dinner!

Whether you are baking them for your family or a brunch for a crowd, they are easy to prepare for a crowd.  They are light and tasty but also filling and satisfying!  No more standing over a skillet while you cook omelet after omelet for every member of your family.  Simply whisk these ingredients together then bake.  In less than 30 minutes you will have a warm and filling breakfast that everyone will love and enjoy together!

Denver Omelet Ingredients:

Just a few simple ingredients come together quickly and easily to make a fresh and satisfying breakfast for your entire family.  These are staple ingredients are no-fuss and set up perfectly in your oven and become a light and fluffy omelet everyone will love!

  • Eggs: Whisk together eggs with cream to make the perfect buttery and light egg.
  • Half and half cream: Makes the eggs light and fluffy.
  • Cheddar cheese: Freshly shredded cheese mixed in will add sharp, earthy flavor.
  • Ham: Chopped and fully cooked deli ham adds the perfect salty taste.
  • Onion: Adds a sweet bite of flavor!
  • Green pepper: Mild and sweet flavor that adds color, flavor, and crunch.

Let’s Bake an Omelet!

All the flavors you love in an omelet are easy to put together and bake in less than 30 minutes!  Just whisk together the ingredients and pour into a greased pan, then relax while your stress free breakfast bakes!

  1. Prep: Preheat oven to 400 degrees. In a medium sized mixing bowl whisk together eggs and cream. Add in cheese, ham, onion and green pepper.
  2. Bake: Pour into a greased 9×9 inch pan. Bake for 25 minutes or until golden brown.

Steps to make a denver omelet.

Variations of Denver Omelette:

This Baked Denver Omelet is packed with so many delicious ingredients my family loves like ham, onions, peppers, and gooey cheese. The great thing about this recipe is that you can customize it so it is a huge hit with your family like it is with mine!

  • Toppings: Pico de Gallo, Mango Lime Avocado Salsa, Salsa, sausage gravy, sour cream, or guacamole.
  • Serve with: Hash browns, Sweet Potato Hash, bacon, fresh fruit, Biscuits and Gravy
  • Additional fillings: Bacon, crumbled cheese such as feta or blue cheese, spinach, mushrooms, zucchini.
  • Ingredient swaps: Use milk or heavy whipping cream instead of half and half.
  • Pro Tip: Cook onion and peppers before adding them in to give them a slightly caramelized taste and reduce the moisture they will add to the egg.
  • Seasoning: Add seasoning salt for and pepper to increase the flavor of this light and tasty baked omelet.  Also try paprika, chili powder or red pepper flake if you like an extra punch of spice.

Can You Make a Baked Denver Omelet Ahead?

Yes! Make this Denver omelet ahead and store it until you are ready to serve.  Let the omelet cool completely before covering it tightly with aluminum foil or plastic wrap.

  • Freeze: Make ahead and freeze for 3-6 months without sacrificing flavor or quality.
  • Refrigerate: Store in an airtight container for 3-4 days in the refrigerator.
  • To thaw: Thaw in the refrigerator or place directly in the oven to heat.
  • To re-heat:  Microwave a slice of Denver omelet for 30 seconds at a time until it is heated throughout.  Or place entire tray in the oven at 350 for 10 minutes or until warm throughout.

Cutting a slice of oven baked denver omelet.

More Egg Breakfast Recipes:

Print

Oven Baked Denver Omelet

A delicious omelet packed with ham, onions, peppers and cheese that you can throw into the oven in a moments notice!
Course Breakfast
Cuisine American
Keyword omelet, omelet recipe, oven baked denver omelet
Prep Time 10 minutes
Cook Time 25 minutes
Total Time 35 minutes
Servings 6 Servings
Calories 251kcal
Author Alyssa Rivers

Ingredients

  • 8 eggs
  • 1/2 cup half and half cream
  • 1 cup cheddar cheese shredded
  • 1 cup ham chopped fully cooked
  • 1/2 cup onion
  • 1/2 cup green pepper

Instructions

  • Preheat oven to 400 degrees. In a medium sized mixing bowl whisk together eggs and cream. Add in cheese, ham, onion and green pepper.
  • Pour into a greased 9x9 inch pan. Bake for 25 minutes or until golden brown.

Notes

Updated on July 30, 2020
Originally Posted on July 4, 2014

Nutrition

Calories: 251kcal | Carbohydrates: 3g | Protein: 18g | Fat: 18g | Saturated Fat: 9g | Cholesterol: 260mg | Sodium: 486mg | Potassium: 234mg | Fiber: 1g | Sugar: 1g | Vitamin A: 623IU | Vitamin C: 11mg | Calcium: 193mg | Iron: 1mg


from The Recipe Critic https://ift.tt/39JJUE0
https://ift.tt/314mO7b

गुरुवार, 23 जुलाई 2020

Lemon Garlic Cream Fettuccini

Lemon Garlic Cream Fettuccini is a quick meal that is loaded with rich flavors that taste like they took all day to create, but are ready in under 30 minutes.  This will be a huge hit recipe that your entire family will go crazy over!

For a lighter version of this creamy favorite try Skinny Fettuccini Garlic Alfredo.  It has half the calories, but you won’t even be able to tell!

Lemon Garlic Cream Fettuccini on a white plate.

Lemon Garlic Cream Fettuccini

This recipe has been around in my home for years and it has been a tried and true meal we all enjoy.  The creamy sauce with the fresh lemon flavor is incredibly delicious.  The lemon garlic bursts through in every bite.  It is the perfect twist on the classic homemade alfredo sauce that we all love.

Lemon garlic cream fettuccini feels like a gourmet meal with rich garlic and perfectly cooked fettuccini, but it is really a simple pasta recipe that even a beginning cook can prepare.  Since it is ready to serve in under 30 minutes, it makes a quick weeknight meal, but is luxurious enough for a homemade celebration.  Add in some grilled chicken or shrimp for a full meal or let it shine by itself, and soon this recipe will become a family favorite in your home as well!

Lemon Garlic Fettuccini Ingredients:

These ingredients are all must have items that you will find yourself using again and again.  They are simple to prepare and easy to find in the grocery store, but are loaded with incredible flavors you will start to crave.

  • Fettuccini: Use whichever pasta you have on hand.  I just love how these thick noodles hold up to the cream sauce.
  • Butter: Melt unsalted butter in the pan to sauté onion in until tender.
  • Onion: Chopped onion smells so amazing as it cooks with the butter to form a great flavor base for the sauce.
  • Garlic cloves: Adds rich garlic flavor.
  • Lemon peel: The peel is where most of the lemon flavor comes from so add more or less to your taste.
  • Heavy whipping cream: Gives the sauce its rich creamy texture.
  • Salt and Pepper: To taste!
  • Cream cheese: Allow cubes of cream cheese to come to room temperature before adding them in.
  • Lemon juice: Fresh and bright flavor twist to a classic cream sauce.
  • Fresh parsley: Minced parsley on top adds great color and flavor.
  • Grated parmesan cheese: Optional but highly recommended for the perfect nutty flavor at the end.

How to Make Homemade Fettuccini:

This super easy recipe is perfect when you are wanting to satisfy a pasta craving quick!  It is ready in under 30 minutes.  While your fettuccini cooks, you can prepare the sauce and have it ready to toss with the pasta when it is al dente.  A vibrant and rich dinner has never been so easy!

  1. Cook Pasta: Cook the fettuccine according to package directions and drain.
  2. Make the sauce: In a large skillet over medium high heat melt the butter. Add the onion and cook for 3-4 minutes until tender. Add the garlic and lemon peel. Slowly stir in the heavy cream, salt and pepper. Whisk in the cubed cream cheese and stir until melted. Remove from heat and allow to cool slightly. Add in the lemon juice.
  3. Combine pasta and sauce: Add pasta, and parsley to the sauce. Toss to coat.
  4. Serve immediately: Garnish with lemon peel, parsley, parmesan cheese if desired.

Process of making Lemon Garlic Cream Fettuccini.

Tips for the BEST Creamy Fettuccini:

This is one of the best pasta dishes because it is easy, delicious and versatile.  Here are my pro tips for making this pasta dish an over the top success.

  • Ingredients: Use the freshest ingredients possible for the most vibrant flavors.  For example, freshly grated parmesan cheese will give you the best melt into your lemon garlic cream sauce.  The store bought kind is coated with preservatives that do not allow the cheese to melt properly.  Fresh garlic will have a stronger flavor too.
  • Salt the pasta water:  Adding salt to the pasta water will bring out the flavor of the pasta as it cooks.
  • Garnish: For more color and a punch of flavor add in chopped plum or cherry tomatoes at the end or even sprinkle some red pepper flakes in for a bit of heat.
  • Protein: Add in shrimp or chicken to make this a complete protein-packed meal.
  • Serve with: Roasted Asparagus, Caesar Salad, and Perfect Soft and Buttery Rolls.

Lemon Garlic Cream Fettuccini in a frying pan with sliced lemon mixed in.

How to Store Lemon Fettuccini:

The best thing about pasta for dinner is the leftovers.  They store well and still taste amazing the next day for a hearty lunch.  Just be sure to store in an airtight container after the pasta has cooled, but no longer than 2 hours after preparing it.

  • Refrigerator: 5-7 days in the refrigerator.
  • Freezer: 4-6 months if properly stored in a freezer bag.  However, due to the nature of cream sauces, freezing is not ideal.  The sauce may break and it can be hard to regain the creamy texture after thawing.
  • Reheat: To warm leftovers in the microwave, heat for 30-45 seconds then stir and repeat until heated throughout. If the sauce is not as creamy, add a bit of liquid to return it to its original creamy texture. Try milk, broth, or cream and stir vigorously.

Close up of Lemon Garlic Cream Fettuccini with a fork removing some.

More Lemon Garlic Recipes:

Print

Lemon Garlic Cream Fettuccini

Delicious and creamy fettuccini with added lemon and garlic for the perfect twist.
Course Dinner, Main Course
Cuisine Italian American
Keyword fettuccini recipes, lemon garlic cream fettuccini
Prep Time 10 minutes
Cook Time 20 minutes
Total Time 30 minutes
Servings 6 Servings
Calories 366kcal
Author Alyssa Rivers

Ingredients

  • 8 oz fettuccini uncooked

Lemon Garlic Cream Sauce:

  • 1/4 cup butter
  • 1 small onion chopped
  • 2 garlic cloves minced
  • 1 tsp lemon peel grated
  • 1/2 cup heavy whipping cream
  • 1/4 tsp salt
  • 1/8 tsp pepper
  • 4 oz cream cheese cubed
  • 2 Tablespoons lemon juice
  • 2 teaspoons fresh parsley minced
  • grated parmesan cheese optional

Instructions

  • Cook the fettuccini according to package directions and drain.

Lemon Garlic Cream Sauce:

  • To make the sauce, In a large skillet over medium high heat melt the butter. Add the onion and cook for 3-4 minutes until tender. Add the garlic and lemon peel. Slowly stir in the heavy cream, salt and pepper. Whisk in the cubed cream cheese and stir until melted. Remove from heat and allow to cool slightly. Add in the lemon juice.
  • Add pasta, and parsley to the sauce. Toss to coat. Serve immediately and garnish with lemon peel, parsley, parmesan cheese if desired.

Notes

Updated on July 22, 2020
Originally Posted on March 6, 2014

Nutrition

Calories: 366kcal | Carbohydrates: 33g | Protein: 8g | Fat: 23g | Saturated Fat: 14g | Cholesterol: 100mg | Sodium: 244mg | Potassium: 257mg | Fiber: 2g | Sugar: 3g | Vitamin A: 1147IU | Vitamin C: 11mg | Calcium: 59mg | Iron: 1mg


from The Recipe Critic https://ift.tt/3fRGxND
https://ift.tt/32JW9PC