गुरुवार, 18 जून 2020

Pistachio Pudding Salad

This pistachio pudding salad is a super easy and delicious dessert made with only 5 ingredients!  Sweet and simple and bursting with pineapple, pistachio and marshmallow flavors, you will have a new favorite dessert salad after you try this recipe!

Pistachio is so unique but has that unforgettable flavor! For more pistachio flavored dessert ideas, try Pistachio Cream Bars or No Bake Pistachio Cream Pie.

Pistachio pudding salad in a bowl topped with whipping cream and a cherry on top.

The Best Ever Pistachio Pudding Salad

It has been warming up around these parts!  I feel like my life has been so busy trying to get ready for friends and family to get here on their visits. My family and I are so excited and I can’t believe it is just a little over a week until my best friend arrives!  You know what also comes with warmer weather right? Barbecues!! It is my favorite time of the year and I absolutely love grilling season.  Especially when I know I will be cooking delicious treats like this pistachio salad for those I love so much!

We had our first real family BBQ last Sunday to kick the season off. The first recipe I knew I had to make was this pistachio pudding salad.  It has been a part of my family for years. I remember my mom would take it everywhere when I was little. I’m pretty sure you could go to any family reunion in Utah and this salad is guaranteed to be there. It is clearly amazing! The pudding is so delicious and creamy and the flavors combined with the pineapple and marshmallow are awesome. It makes such a cool summer dessert. If you give it a try it will become a favorite in your house as well!

What is Pistachio Pudding Salad or Watergate Salad?

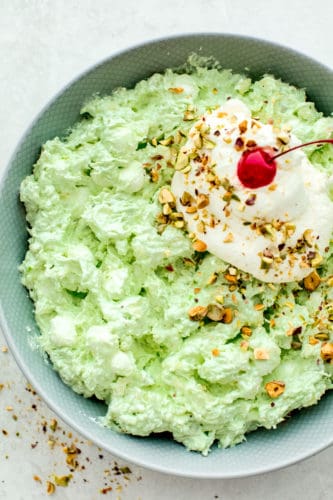
This dessert salad is a delicious side that is so easy to make and fall in love with!  It is a simple combination of 5 tasty ingredients.  The classic recipe calls for pistachio pudding, canned pineapple, whipped topping, crushed pecans, and marshmallows. It Is also known as a Watergate Salad.  There are actually many nicknames for this creamy dessert such as: Pistachio Delight, Shut the Gate Salad, Green Goop, and Green Fluff to name just a few.   Although the origin of the name is debated, one thing is for sure, this is a very popular and highly favored dessert!  It is very similar to an Ambrosia Salad with the fruit and marshmallow combination.

What’s in Pistachio Pudding Salad?

This pudding salad is made of only 5 simple ingredients…Wow!  I love it when I don’t have a long list of ingredients where I am digging around my pantry for 5 minutes before I can even begin a recipe.  That is definitely not the case here.  Five things, most of which I have on hand a great majority of the time or I can find easily in the store.  I love it!

  • Crushed pineapple: Use canned and do not drain the liquid.
  • Instant pistachio pudding: Do not make the pudding, sprinkle the mix in until combined with the pineapple juice.
  • Whipped topping: Thawed to room temperature until it can be easily folded in to pudding mixture.
  • Mini marshmallows: Fold in to pudding mix with whipped topping for instant sweetness.
  • Pistachios: Chop up some salty pistachios (or pecans) for garnish (optional, but amazing!)

How to Make Pudding Salad Recipe:

Making this Pistachio pudding is fun for the whole family.  My kids love it when I make it because it is so easy for them to help! They pour in the can of pineapple and sprinkle the pudding mix in.  Then they help me fold in the whipped topping and marshmallows (some may get eaten in the process..it happens!).  Finally, we sprinkle on the crushed pistachio (sometimes we leave this out if we are in a hurry or don’t have any on hand).  The hardest part is letting it set for a few hours before eating.

  1. Combine fruit and pudding mix: In a large mixing bowl combine the crushed pineapple and pistachio pudding mix.
  2. Gradually mix in other ingredients: Fold in the whipped topping and marshmallows.
  3. Garnish: Sprinkle with crushed pistachios.
  4. Chill: Allow to chill in the refrigerator at least 4 hours before serving, then enjoy!

Pistachio pudding salad ingredients in a glass bowl being stirred with a white spatula.

Storing Watergate Salad a.k.a. Pistachio Cream Pudding:

This pudding salad is best served chilled 1 hour to 1 day after preparing.  However, it can be stored as follows:

  • Refrigerator: Tightly wrap and store in the refrigerator for 1-2 days.
  • Freezer: Freeze for up to 3 months.  Then, serve frozen (Think of it as an ice cream of sorts).  For best results do not thaw.

Up close photo of pistachio pudding in a bowl with a silver spoon on the side.

More Cool and Creamy Pudding Recipes:

Print

Pistachio Pudding Salad

A cool and delicious pistachio dessert that will be a hit at any gathering!
Course Dessert
Cuisine American
Keyword pistachio pudding, pistachio pudding salad, pudding salad
Prep Time 10 minutes
Total Time 10 minutes
Servings 8 Servings
Calories 214kcal
Author Alyssa Rivers

Ingredients

  • 1 can crushed pineapple 20 oz., drained
  • 1 package instant pistachio pudding 3 oz.
  • 1 container whipped topping 8 oz., thawed
  • 2 cups mini marshmallows
  • 1/4 cup pistachios chopped for garnish (optional)

Instructions

  • In a large mixing bowl combine the crushed pineapple and pistachio pudding mix. Fold in the whipped topping and marshmallows.
  • Garnish with crushed pistachios and enjoy!

Notes

Updated on June 17, 2020
Originally Posted on May 22, 2014

Nutrition

Calories: 214kcal | Carbohydrates: 40g | Protein: 2g | Fat: 6g | Saturated Fat: 3g | Cholesterol: 1mg | Sodium: 209mg | Potassium: 156mg | Fiber: 1g | Sugar: 36g | Vitamin A: 72IU | Vitamin C: 7mg | Calcium: 37mg | Iron: 1mg


from The Recipe Critic https://ift.tt/3fLKraH
https://ift.tt/3hCupkR

बुधवार, 17 जून 2020

Traditional Soda Bread

Traditional Irish Soda Bread sliced

This traditional no yeast bread recipe is a crumbly dense bread with a slightly sweet taste. With only a few pantry and refrigerator, staples required this delicious Traditional Soda Bread can be made easily and is one everyone will enjoy.

Bread is a perfect pairing for just about any meal and sometimes it tastes even better if it’s easy to prepare like this buttery beer bread, no-knead bread, or even this southern cornbread.

Irish soda bread slices with loaf in background

Irish Soda Bread

Traditional Irish soda bread recipe is one of my very favorite bread recipes to prepare because of its simplicity and it’s also one my children enjoy making with me. It’s Aimee here, from Aimee Mars Living, and soda bread is common in our households.

This dense and unleavened bread is not only truly Irish it’s also made with simple pantry ingredients. Known as a table bread it’s one that can be eaten toasted with butter for breakfast, at lunch with cheese, or with dinner as a side to your main dish.

How to Make Traditional Soda Bread

  1. Start by preheating your oven to 400ºF and prepping the baking sheet or pan you wish to use. If using a baking sheet line it with parchment or lightly coat a 9-10 inch cake pan or a cast-iron skillet with cooking spray.
  2. In a small bowl beat the egg and buttermilk together until combined.
  3. Place the flour, sugar, baking soda, and salt in a large bowl and whisk together.
  4. Using a pastry cutter cut the cold butter into the flour mixture until it becomes crumbly.
  5. Pour the wet ingredients into the dry ingredients and mix until it forms into a dough. Stir in any add-ins.
  6. Flour hands and a flat surface then lightly knead the dough for 1 minute before forming into a ball and placing onto the prepared pan or baking sheet.
  7. Bake for 45 minutes until the crust becomes a golden brown. Let cool for 10 minutes before slicing.

Ingredients in Soda Bread

Most of the ingredients in soda bread are standard pantry staples, which is one of the reasons this bread is so easy to make. You can also add in many different extras for added flavor such as raisins or currants.

  • Buttermilk
  • Eggs
  • Flour
  • Sugar
  • Baking Soda
  • Salt
  • Butter
  • Raisins or Currants (optional)

Other Add-ins for soda bread

  • Dried Fruits such as pineapple, cranberries, or cherries.
  • Shaved Coconut or Coconut Flakes
  • Chocolate Chips
  • Diced Bacon
  • Shredded Cheese such as cheddar

soda bread slice with loaf behind

What does traditional soda bread taste like?

Similar to biscuits, the flavor is subtle with slight hints of sweetness. This bread is not meant to be served alone, but with butter or jam. To add additional flavor to soda bread you can mix in some dried fruits such as currants, or even something sweet like chocolate chips.

Why is my soda bread crumbly?

Using too much flour and too little buttermilk can cause your bread to turn our more crumbly than it should be. Make sure to spoon and level the flour when measuring it to avoid this mixture mess up.

Why is my soda bread raw in the center?

There are a few reasons that cause soda bread to not fully cook leaving a raw center. The fixes are simple though.

  • First, check your oven temperature. Chances are it could be too high. If you don’t have a thermometer to check the internal temperature of your oven then try lowering it. Place a loose tent of foil over the bread to avoid it from overcooking the outer later and continue cooking on the lower temperature so the middle can fully bake.
  • Second, make sure you’re using the correct pan size. If your pan is too small and the dough ball too high it will take longer to cook.

traditional soda bread in cast iron skillet

How to store soda bread

Wrap the bread in plastic wrap, foil, or store in an air-tight container for up to 4 days. It does not need to be refrigerated. This bread can also be stored in the freezer by covering it with plastic wrap and then a layer of foil. It will keep the freezer for up to 2 to 3 months.

Try some of these other bread recipes:

Traditional Irish Soda Bread sliced
Print

Traditional Soda Bread

This traditional no yeast bread recipe is a crumbly dense bread with a slightly sweet taste. With only a few pantry and refrigerator, staples required this delicious Traditional Soda Bread can be made easily and is one everyone will enjoy.
Course Bread, Side Dish
Cuisine Irish
Keyword soda bread
Prep Time 15 minutes
Cook Time 45 minutes
Resting Time 10 minutes
Total Time 1 hour 10 minutes
Servings 12 Slices
Calories 276kcal
Author Aimee Mars

Ingredients

  • cups Buttermilk
  • 1 large Egg
  • cups Flour spooned and leveled
  • 3 tablespoons Sugar
  • 1 teaspoon Baking Soda
  • 1 teaspoon Salt
  • 5 tablespoons Unsalted Butter cubed
  • 1 cup Currants optional

Instructions

  • Preheat the oven to 400ºF. If using a seasoned 10 to 12-inch seasoned cast iron skillet no other steps are needed, but if using a baking sheet line it with parchment paper. A 9-10 inch cake pan can also be used by lightly greasing it.
  • In a small bowl beat the buttermilk and egg together until combined and set aside.
  • Using a large bowl whisk the flour, sugar, baking soda, and salt together until well mixed. Cut the cubed butter into the flour mixture using a pastry cutter or a fork. Work the butter into the mixture until it becomes crumbly. Stir in currants or any other add-ins.
  • Pour the buttermilk mixture into the flour mixture and fold using a spatula until the dough become thick. Using floured hands remove the dough from the bowl and place it on a floured surface. Knead the dough for about 1 minute until all the flour is mixed in.
  • Place the dough into the cast iron skillet or prepared pan and with a very sharp knife cut an X on the top of the dough.
  • Bake the bread for 45 minutes until it begins to turn a golden brown. If the bread appears to be browning too quickly loosely place a tent of foil on top.
  • Remove from the oven and let cool for 10 minutes before slicing.

Nutrition

Serving: 1slice | Calories: 276kcal | Carbohydrates: 47g | Protein: 7g | Fat: 7g | Saturated Fat: 4g | Cholesterol: 32mg | Sodium: 330mg | Potassium: 207mg | Fiber: 2g | Sugar: 13g | Vitamin A: 235IU | Vitamin C: 1mg | Calcium: 61mg | Iron: 3mg


from The Recipe Critic https://ift.tt/2Y7oPzq
https://ift.tt/3hAzjyN

मंगलवार, 16 जून 2020

Grilled Citrus Salmon with Pineapple Salsa

We’re excited to partner with Reynolds Wrap® for this sponsored recipe

This grilled citrus salmon is tender and flaky with a sweet and savory pineapple salsa garnished on top. Grilled to perfection in a delicious marinade that make this salmon tender and juicy with every bite!

Using Reynolds Wrap® helped me keep the salmon juicy, tender and from sticking to the pan with hardly any cleanup. With the help of their Reynolds Wrap® Non-Stick Aluminum Foil, I have also made this easy grilled pizza, Monte Cristo croissant sandwich, or these easy mini burritos where cleanup was a breeze and the flavor was all wrapped together.

Grilled salmon in Reynolds wrap foil with mango salsa over top with oranges and lime slices.


Grilled Citrus Salmon with Pineapple Salsa

Enhance your taste buds with this perfect salmon and pineapple salsa combination. Grilled salmon is bright, flavorful, and full of citrus tang. This is a tried and true favorite dinner recipe! It helps to use Reynolds Wrap® Non-Stick Foil to keep salmon from sticking to the pan as well as an easy cleanup at the end. It is my go-to for any kind of grilling or baking because it is high-quality.

This grilled citrus salmon recipe is one dinner to impress your family with. It is healthy, full of fresh ingredients, and so delicious. I love making this during the warmer months and having a light and tasty meal. My family loves how easy it is to make and then cleanup is a breeze when using Reynolds Wrap® Non-Stick Foil. Grilling the citrus salmon perfectly and creating the pineapple salsa couldn’t be better. It is the perfect combination! 

Salmon Ingredients:

Simple ingredients that are quick to find and some are already on hand. I do recommend always having Reynolds Wrap® Non-Stick Foil ready to go when cooking, grilling, or baking. This makes life in the kitchen much easier and better! 

  • Orange Juice, Lemon Juice, and Lime Juice: The Acidity helps to balance out the flavors.
  • Orange Marmalade: A thick fruit preserve that adds more depth to the sauce. 
  • Garlic Cloves:  Finely minced and added into the marinade. 
  • Soy Sauce: Brings a strong flavor that lasts on the salmon. 
  • Brown Sugar: Adds a sweet taste to the sauce. 
  • Cornstarch and Water: Combined these two ingredients combine a thicker sauce. 
  • Reynolds Wrap® Non-Stick Aluminum Foil: Used to help wrap the salmon and dressing in. 
  • Salmon Filet: Already cut and ready to grill. 
  • Sliced Oranges: Great for garnish and looking delicious!

Ingredients for Pineapple Salsa:

This salsa is to die for! Filled with fresh fruit and vegetables chopped small to make a delicious salsa that adds so much to this salmon. Follow my pineapple salsa recipe and see how this garnish is a MUST! 

  • Pineapple: Cut up a fresh pineapple. 
  • Red Onion: Adds a bit of crisp spiciness to the salsa as well as color. 
  • Red and Green Bell Pepper: Chop up into small squares. 
  • Jalapeño: Slice in half and remove the seeds then slice into smaller pieces. 
  • Cilantro: Garnish with some more green and fresh herbs. 
  • Lime: A squeeze of lime juice. 
  • Salt: Sprinkled over for taste! 

Let’s Get Grilling!

A few steps to making one amazing citrus salmon. Impress your family with this sweet and savory salmon recipe that is one of the best out there. Sweet, savory, and delicious in every bite. Full of fresh ingredients from the start to the grill! 

  1. Whisking together: In a medium-sized saucepan whisk together orange juice, lemon juice, lime juice, orange marmalade, garlic, soy sauce, and brown sugar.  
  2. Create a Thickener: In a small bowl combine cornstarch and water and whisk into the sauce.  Heat to medium-high heat and let simmer until it starts to thicken.  Remove from heat.
  3. Prepare Salmon: Heat grill to medium-high heat. On a sheet of Reynolds Wrap® Non-Stick Foil place the salmon on top. Fold up the edges of the foil. Spread on half of the marinade. 
  4. Grill Salmon: Place the foil on the grill and let the salmon cook for 10-12 minutes or until salmon is opaque and cooked throughout. Spread remaining marinade on top and serve.

The Recipe Critic Pro Tip:

When using Reynolds Wrap® Non-Stick Foil, make sure the dull side is always facing up, because that is the non-stick side that will keep your food from sticking.

The process of wrapping the salmon in Reynolds wrap aluminum foil.

All About Reynolds Wrap:

Foil makes prepping, cooking, and cleaning much easier. I have loved using Reynolds Wrap® in our home helping make things easier in the kitchen. It is the only foil I trust on the grill! 

  • No Cooking Spray Needed: Because of how easy it is to lift away from the grill the non-stick coating does not need cooking spray added. 
  • Use Tongs: When removing the foil from the grill be sure to use tongs, gloves, or slide it from the grill to the plate to avoid touching it when it is hot. 
  • Food Lifting: Watch how quick and easy it is to lift the foil off of the grill. Less mess, helps with cooking and cooks evenly in the foil. 

Grilled citrus salmon on Reynolds wrap aluminum foil being garnished with pineapple salsa using a silver spoon to add it to the salmon.

Grilling Salmon the Right Way:

The ideal cooking temperature for grilled salmon is about 145 degrees Fahrenheit. It is best to use a meat thermometer to ensure the correct doneness. 

A 2 to 3 pound salmon filet will cook at:

  • 425 degrees Fahrenheit 7 to 10 minutes
  • 400 degrees Fahrenheit 12 to 15 minutes
  • 375 degrees Fahrenheit 16 to 20 minutes
  • 350 degrees Fahrenheit 21 to 24 minutes

Overhead photo of the grilled citrus salmon filet with pineapple salsa on top with the Reynolds wrap box in the upper lefthand side.

 Storing Salmon and Salsa:

It is best to store the grilled citrus salmon and the pineapple salsa separately. Combined may ruin each other’s tastes. The grilled salmon is best stored in a Tupperware when the salsa can be stored in a jar or airtight container. Both need to be stored in the refrigerator until ready to eat. 

  • Storing Salmon: Grilled salmon is best kept in the refrigerator for 3 to 4 days long. You can freeze salmon in freezer bags for 1 month long, thawing overnight in the refrigerator. When ready to warm up, simply reheat in the microwave, on the grill or in the oven. 
  • Storing Pineapple Salsa: This salsa is so delicious and can be stored in an airtight container for 2 to 3 days long. The fruit will stay a little longer because of the citrus juices but not much longer. This salsa is not the best frozen. 

Grilled citrus salmon on a plate with pineapple salsa over top and being cut into with a silver fork.

More Savory Salmon Recipes:

Print

Grilled Citrus Salmon with Pineapple Salsa

This grilled citrus salmon is tender and flaky with a sweet and savory pineapple salsa garnished on top. Grilled to perfection in a delicious marinade that make this salmon tender and juicy with every bite! 
Course Dinner, Main Course
Cuisine Mediterranean
Keyword grilled citrus salmon, grilled citrus salmon with pineapple salsa, grilled salmon, pineapple salsa
Prep Time 15 minutes
Cook Time 15 minutes
Total Time 30 minutes
Servings 4 Salmon
Calories 456kcal
Author Alyssa Rivers

Ingredients

  • 1/4 cup orange juice
  • 1/4 cup lemon juice
  • 1/4 cup lime juice
  • 1/4 cup orange marmalade
  • 2 garlic cloves minced
  • 3 Tablespoons Soy Sauce
  • 1/4 cup brown sugar
  • 1 Tablespoon Cornstarch
  • 1 Tablespoon Water
  • Reynolds Wrap® Aluminum Foil
  • 2 pounds salmon filet
  • Recipe for Pineapple Salsa

Optional Garnish:

  • Sliced orange lemon, and lime

Instructions

  • In a medium sized saucepan whisk together orange juice, lemon juice, lime juice, orange marmalade, garlic, soy sauce, and brown sugar. In a small bowl combine cornstarch and water and whisk into the sauce. Heat to medium high heat and let simmer until it starts to thicken. Remove from heat.
  • Heat grill to medium high heat. On a sheet of Reynolds Wrap® Aluminum Foil place the salmon on top. Fold up the edges of the aluminum foil. Spread on half of the marinade. Place the foil on the grill and let the salmon cook for 10-12 minutes or until salmon is opaque and cooked throughout. Spread remaining marinade on top and serve.

Nutrition

Calories: 456kcal | Carbohydrates: 34g | Protein: 47g | Fat: 14g | Saturated Fat: 2g | Cholesterol: 125mg | Sodium: 870mg | Potassium: 1223mg | Fiber: 1g | Sugar: 28g | Vitamin A: 122IU | Vitamin C: 20mg | Calcium: 52mg | Iron: 2mg


from The Recipe Critic https://ift.tt/3hy6Zx5
https://ift.tt/2YGqtqQ

Oreo Fluff Dessert Salad

Oreo fluff dessert salad has the perfect sweet cream and marshmallow fluff with pops of crunchy Oreo cookies throughout.  This soft and sweet mixture is a hugely popular dessert you will love at first bite!

The unmistakable cookies and cream flavor is one of my favorites in a dessert.  Try Skinny Cookies and Cream Shake or Cookies and Cream Muddy Buddies for more of the perfect Oreo flavor!

Oreo fluff dessert in a bowl.

The Best Oreo Fluff Dessert Salad

Warning: This oreo fluff dessert salad is so easy to make and so delicious that my willpower for healthy eating is in real danger!!  The vanilla pudding and marshmallow flavors are so perfectly creamy and the Oreo bites are just heaven!  We have been moving, and it has been so hot!  We have all been working so hard and I wanted a no bake cold dessert that I could reward everyone with.  This was a huge hit with everyone!  The entire thing was gone in minutes! Everyone was scraping their plates to enjoy the last little bit!

You are going to be amazed how easy it is to throw together this awesome recipe!  I usually whip together the pudding while my kids are crushing the ores.  And let me tell you, they love to crush the Oreos!! Then I gradually fold in all the ingredients together, pop it in the fridge to cool, and my work is done! It doesn’t get any easier than that! And the payoff for such little effort is huge!!

What’s in Oreo Fluff Salad?

These ingredients belong together! The textures complement each other so perfectly! The dense pudding is so creamy and rich and then you bite into crushed Oreo and it is so amazing! I will definitely be coming back to this recipe again and again for more of this cookies and cream dessert salad!

  • Instant vanilla pudding: The vanilla pudding adds rich vanilla flavor and thick, smooth texture.
  • Milk: Used to make the pudding. Follow recipe to make pudding, not the box directions.
  • Cool Whip: Thaw in the refrigerator overnight. It needs to be able to fold into the pudding mixture easily.
  • Oreo cookies: Place in a sealed bag and crush with a rolling pin, or use a food processor.
  • Small Marshmallows: Great little pockets of fluffy texture and sweetness.

Quick and Easy Oreo Fluff:

Now, I was sold when I read the ingredients for this Oreo fluff dessert salad I knew it would taste good, but what I didn’t realize was how quick and easy it would be to put together!  In less than 5 minutes the salad was made! So simple! The only hard part was letting it chill for an hour! But, man it was worth the wait!  When the flavors have time to settle in together it is out of this world awesome!

  1. Whisk: In a medium sized bowl add the pudding and milk and whisk for 2 minutes until it is thickened.
  2. Mix: Add in the cool whip, Oreos and marshmallows.
  3. Chill: Cover and refrigerate for at least an hour.
  4. Add Toppings: Top with crushed Oreos if desired.

Steps to make oreo fluff salad

Pro Tips and Variations for Dessert Salad:

This oreo fluff dessert is the absolute perfect summer treat! It is cold and refreshing and not overly rich.  It is no bake and easy to transport to whatever park or campsite you are traveling to.  Best of all, it is cheap to make and won’t take away from that summer travel budget.  Here are some tips and tricks to consider when making this yourself…

  • Double it: I do recommend doubling this recipe if you are preparing for a large crowd.  There is nothing worse than running out before everyone has had a chance to try it!
  • Oreo Crush: Be careful not to over crush your oreos.  I like to Crush some oreos completely and leave some in bigger pieces for more dynamic texture.
  • Garnish: Personally, I love strawberry and chocolate flavors together.  So, I like to garnish with slices of strawberry. The black and white of the fluff with a pop of red on top looks gorgeous!
  • Flavor tweaks: Vanilla pudding can be swapped out for any flavor of pudding you love.  Some I think would be fantastic are white chocolate, cheesecake, or even half white chocolate and the other half strawberry or chocolate.

Storing Oreo Salad:

After making this delicious fluff, let it chill as long as you can stand it.  The longer it chills in the refrigerator, the better it tastes.  Allow it to chill for at least 1 hour, but overnight is even better!  It will last 3-5 days in the refrigerator if properly stored in an airtight container.


Oreo fluff on a black plate.

More Delicious Salad Recipes:

Print

Oreo Fluff Dessert Salad

Oreo fluff dessert salad has the perfect sweet cream and marshmallow fluff with pops of crunchy Oreo cookies throughout.  This soft and sweet mixture is a hugely popular dessert you will love at first bite!
Course Appetizer, Dessert, Salad, Side Dish
Cuisine American
Keyword dessert salad, oreo dessert salad, oreo fluff dessert, oreo fluff dessert salad, oreo fluff salad, oreo salad
Prep Time 15 minutes
Cover and refrigerate for at least an hour. 1 hour
Total Time 1 hour 15 minutes
Servings 8 People
Calories 372kcal
Author Alyssa Rivers

Ingredients

  • 3.4 ounce instant vanilla pudding
  • 1 1/2 cups milk
  • 1 8 ounce container cool whip thawed
  • 30 Oreo cookies crushed
  • 2 cups small marshmallows

Instructions

  • In a medium sized bowl add the pudding and milk and whisk for 2 minutes until it is thickened.
  • Mix in the cool whip, Oreos and marshmallows.
  • Cover and refrigerate for at least an hour. Top with crushed Oreos if desired.

Nutrition

Calories: 372kcal | Carbohydrates: 63g | Protein: 5g | Fat: 12g | Saturated Fat: 5g | Cholesterol: 10mg | Sodium: 336mg | Potassium: 192mg | Fiber: 1g | Sugar: 43g | Vitamin A: 130IU | Calcium: 96mg | Iron: 4mg


from The Recipe Critic https://ift.tt/30Kj4cH
https://ift.tt/30Rdmpz