शनिवार, 20 जून 2020

Grilled Honey Buffalo Chicken Wings

Grilled Honey Buffalo Chicken Wings are perfectly tender and juicy on the inside with a crispy skin on the outside that is drenched in a sweet and spicy honey buffalo sauce.  The flavors are so irresistible you will not be able to stop eating them!

Buffalo chicken is so easy to turn into a perfect appetizer, too!  Try The Best Buffalo Chicken Dip or Skinny Buffalo Chicken Dip if you want to have a huge hit at your next gathering.
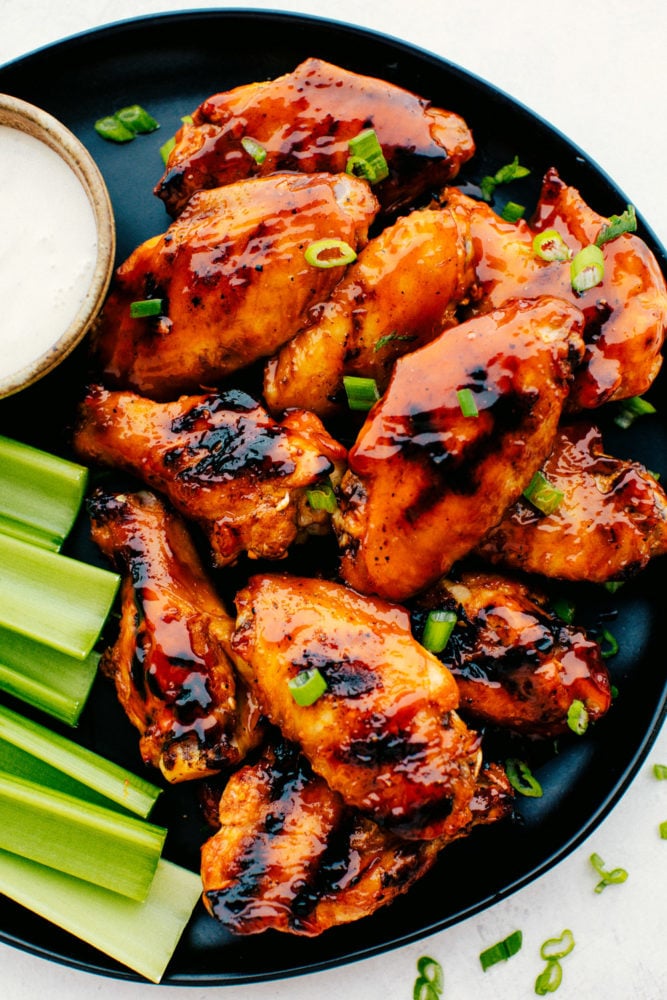
Grilled Honey Buffalo Wings on a black plate with celery and white dip.

Grilled Honey Buffalo Chicken Wings

Grilling is always my favorite during the summertime. I knew I needed something that was light but good for my teenagers and their friends while hanging out together. These buffalo chicken wings came to mind when I was at the grocery store. Buying a large bag of chicken wings and simple ingredients that I always have on hand was the perfect combination for these wings. It is easy to double the recipe and even my boys love to start the marinade when they know their friends are on their way.

The sticky honey buffalo sauce is so good, it is even better than Buffalo Wild Wings. The grilled honey buffalo marinade was just the right amount of sticky and sweet with some heat in the background. If you love extra heat, simply add just what you like to customize your wings the way to like them. The chicken turned out perfectly and was so tender and juicy.  I highly recommend these if you are looking for a quick and easy chicken wings recipe!

Grilled Chicken Wing Ingredients:

The marinade on these wings is everything!  Simply whisk up some hot sauce, honey, brown sugar, and Worcestershire sauce.  The result is so completely sweet and spicy at the same time. Customize these powerful flavors by choosing a hotter buffalo sauce or adding more or less honey to adjust the heat/sweet levels.

  • Wings: Marinate your wings for a minimum of 30 minutes.  Then grill on medium-high.
  • Salt and Pepper: To taste.  Remember to season chicken before marinating it.
  • Buffalo Sauce: I like Franks Red Hot Sauce because it is so perfectly spicy and tangy.  Its a tried and true for sure!
  • Honey: Adds a strong sweet flavor.
  • Brown Sugar: Adds rich sweetness.
  • Worcestershire sauce: Sweet and tangy flavors in the marinade.

Let’s Get Grilling:

Season and marinate the chicken first, then place the wings on your grill and let it do all the work.  Baste it often with the reserved marinade to keep it moist while it cooks. It is that simple!

  1. Prep: Salt and pepper the wings.
  2. Whisk: In a medium sized bowl combine buffalo sauce, honey, brown sugar, and Worcestershire sauce. Reserve 1 cup of the sauce.
  3. Toss: Add the wings to the sauce and toss to coat. Marinate for 30 minutes.
  4. Grill: Heat the grill to medium high heat. Place the wings on the grill and turn occasionally until crispy.  Baste with marinade every time you turn the chicken.
  5. Baste and Serve: Remove wings from the grill and baste with marinade. Serve with ranch or favorite dipping sauce.
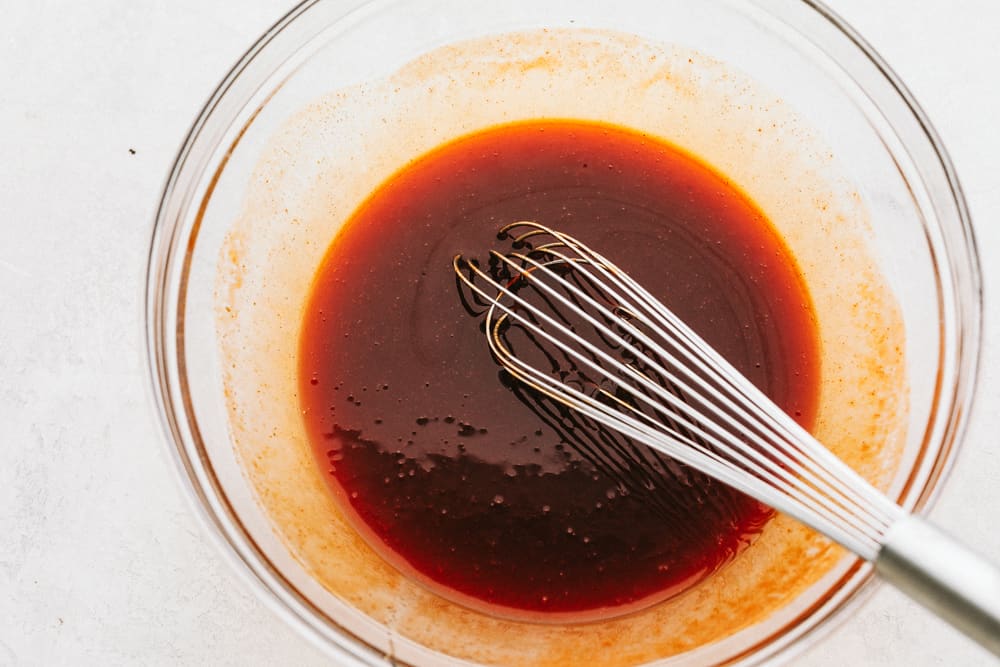
Whisking chicken marinade.

What to Serve with Honey Buffalo Wings:

I love to serve these honey buffalo chicken wings with raw veggies on the side, like celery, carrots or broccoli. The cool and clean flavors are the perfect match for the spice in the buffalo sauce.  Chips or fries also stand up well to this chicken.  Add a cup of ranch or blue cheese dressing on the side to dip them in, and you have one amazing meal!

Grilled Wing Tips:

Here are some tips to help you look like the pro when making this recipe.  Read through these before you get started to prevent burning, get great flavor, and achieve crispy skin on these delicious buffalo wings.

  • Spice it up!  Add cayenne pepper to the chicken with the salt and pepper before marinating for even more spice.
  • Garnish: Add blue cheese crumbles as garnish on your finished bowl of chicken wings for more flavor and texture the crowd will love!
  • Reserved Sauce: To thicken the part of the marinade you reserved, heat it over the stove top with a bit of corn starch.  This will create an even thicker sauce to dip or toss in after it has been grilled!
  • Dry Chicken: Pat your chicken dry before adding salt and pepper to keep the skin crispy as it cooks.
  • Crispy chicken: For an even crispier chicken skin, rub on a bit of baking powder when you add salt and pepper.
  • Don’t burn it: The best way to make sure your chicken doesn’t burn is to make sure it doesn’t stick to your grill.  Make sure to rub oil on the grill pan or grates before you begin.  Also, baste each piece during cooking and turn them as they cook.
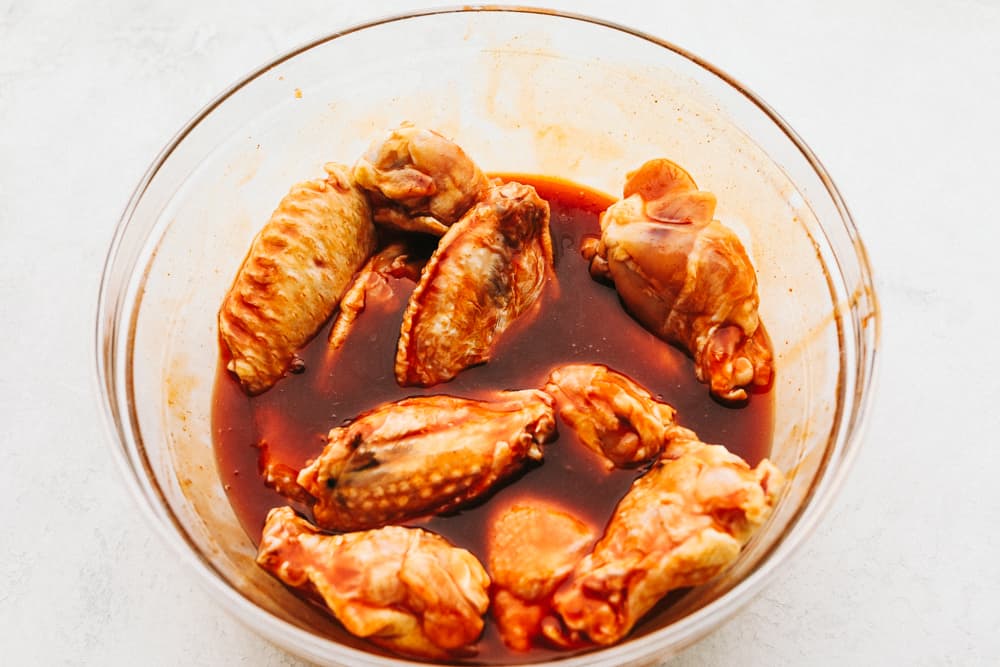
Marinating chicken wings in a clear bowl.

Storing Buffalo Wings:

Allow to cool completely before storing.  It is best to use a shallow airtight container or wrap tightly in aluminum foil.  Discard if the chicken has been sitting out at room temperature for more than 2 hours. If properly stored follow these guidelines:

  • Refrigerate for 3-4 days.
  • Freeze for up to 4 months.

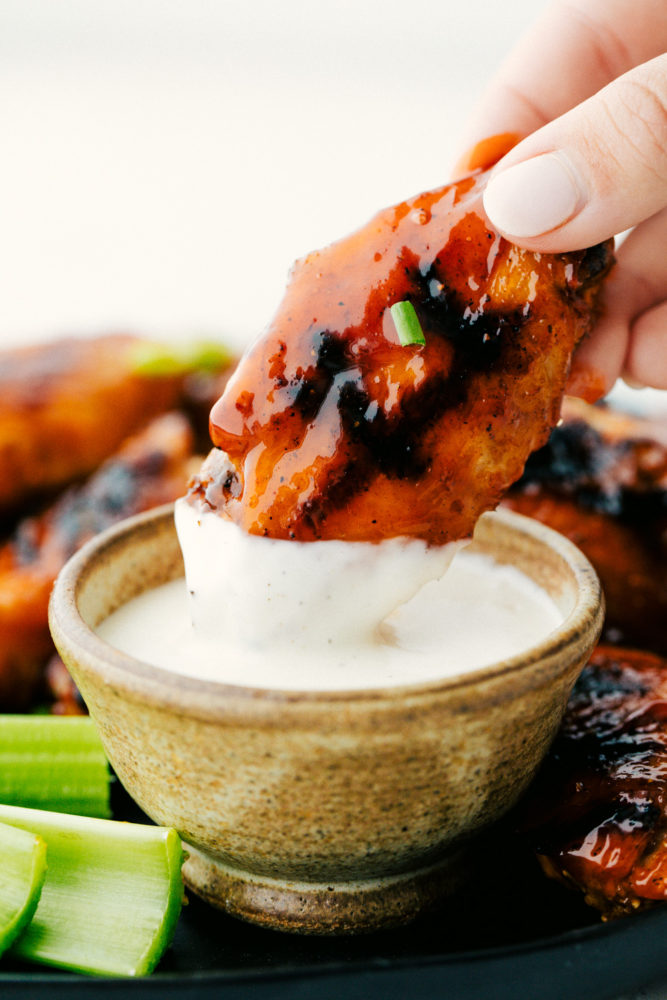
Dipping a chicken wing into white sauce.

More Wings and Buffalo Recipes:

Print

Grilled Honey Buffalo Chicken Wings

Grilled Honey Buffalo Chicken Wings are perfectly tender and juicy on the inside with a crispy skin on the outside that is drenched in a sweet and spicy honey buffalo sauce.  The flavors are so irresistible you will not be able to stop eating them!
Course Appetizer, Dinner, Main Course, Side Dish, Snack
Cuisine American
Keyword Baked buffalo wings, buffalo chicken wings, chicken wings, grilled honey buffalo wings
Prep Time 10 minutes
Cook Time 15 minutes
Total Time 25 minutes
Servings 6 People
Calories 528kcal
Author Alyssa Rivers

Ingredients

  • 4 pounds wings
  • salt and pepper

Honey Buffalo Sauce:

  • 1 cup buffalo sauce like Franks Red Hot Sauce
  • 3/4 cup honey
  • 1/4 cup brown sugar
  • 1 Tablespoon Worcestershire sauce

Instructions

  • Salt and pepper the wings. In a medium sized bowl combine buffalo sauce, honey, brown sugar, and Worcestershire sauce. Reserve 1 cup of the sauce. Add the wings to the sauce and toss to coat. Marinate for 30 minutes.
  • Heat the grill to medium high heat. Place the wings on the grill and turn occasionally until crispy. Baste with marinade every time you turn the chicken.
  • Remove wings from the grill and baste with marinade. Serve with ranch or favorite dipping sauce.

Nutrition

Calories: 528kcal | Carbohydrates: 44g | Protein: 30g | Fat: 26g | Saturated Fat: 7g | Cholesterol: 126mg | Sodium: 1378mg | Potassium: 312mg | Fiber: 1g | Sugar: 44g | Vitamin A: 240IU | Vitamin C: 2mg | Calcium: 33mg | Iron: 2mg


from The Recipe Critic https://ift.tt/2YOjf42
https://ift.tt/3fGxeQb

Grilled Honey Balsamic Portobello Mushrooms

Grilled Honey Balsamic Portobello Mushrooms have deep sweet and savory flavors and a substantial hearty texture that stands up perfectly to your grill!  Amazing as a grilled dinner or an appetizer, you will love the way this unique ingredient livens up your summer menu!

I have been loving my grill this summer! If you have missed my recent posts make sure to check out Grilled Lobster Tail  and Hobo Dinner Foil Packets for other amazingly easy and delicious grill recipes I’ve shared.

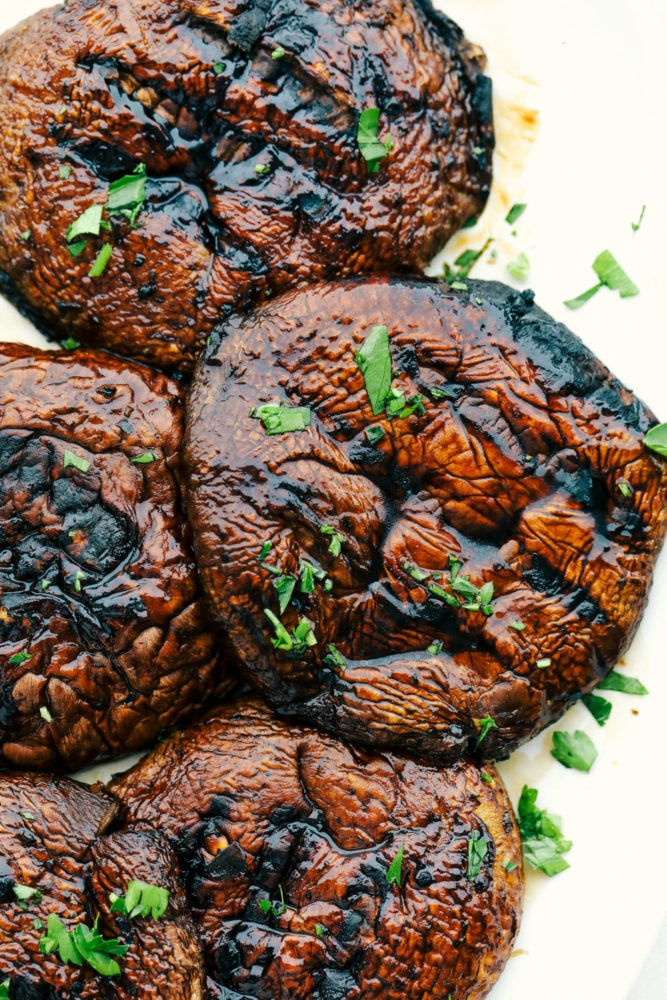
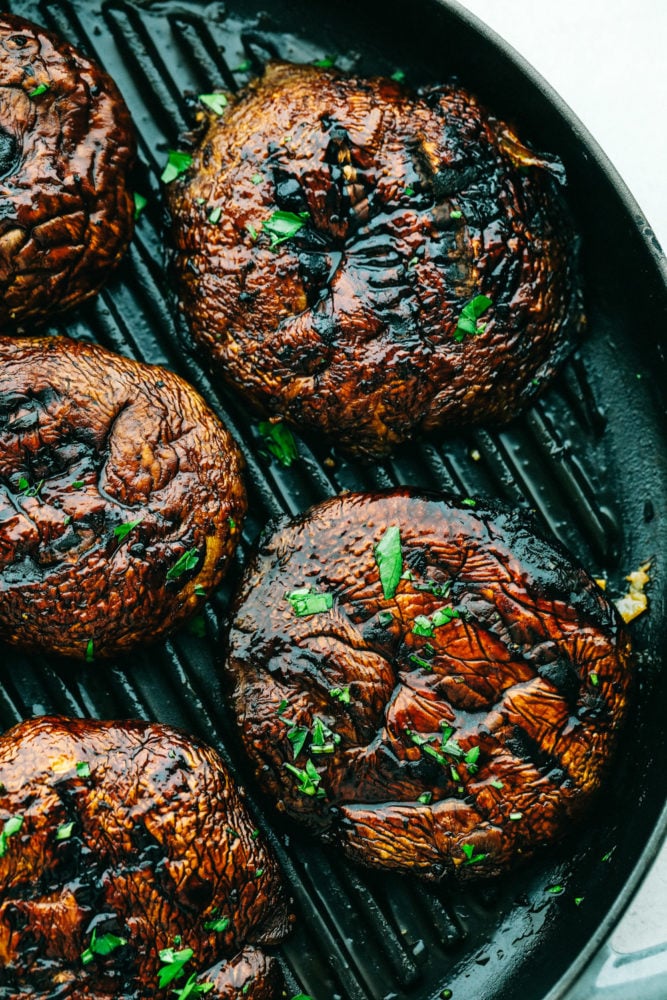
Finished portobello mushrooms with grill marks.

Easy Honey Balsamic Portobello Mushrooms

With Father’s Day coming up I knew I needed to make something hearty for him to add on hamburgers, slice up for steak or add it to any kabobs that we grill. Grilling is my hubby’s favorite and I know we need to keep things outside during the warmer months. Portobello mushrooms are an ingredient I have loved for a long time.  Mixing things up with unique ingredients is a MUST when entertaining friends, feeding your family, or yourself!  Try this delicious add on to any grilling recipes this summer!

That’s why serving this amazing grilled honey balsalmic portobello mushroom is a must for any grill party!  The earthy notes and hearty texture is so satisfying!  Everyone will be so amazed!  Just know you are going to be asked how you made it and raving about the flavor, so be prepared!   I love how quick and easy they are to grill and that I don’t have to make a mess in my kitchen!  I am all about porch life this time of year and this recipe is the perfect thing for a meal outdoors!

Preparing Honey Balsamic Portobello Mushrooms:

When getting ready to grill your portobello mushrooms, all you will need to do is whisk together a simple marinade.  The ingredients are very popular to most marinades, so you may already have many of them on hand!  The marinade creates an amazing texture as it tenderizes, and intensifies the flavor of your mushroom too!

  • Olive oil: Penetrates the skin and brings the flavors of the marinade throughout the mushroom.
  • Butter: Melted to mix easily in marinade.
  • Garlic cloves: Minced garlic adds rich flavor!
  • Balsamic vinegar: Acts as a tenderizer because of its acidity.
  • Soy sauce: Adds saltiness to the marinade
  • Honey: Adds sweetness!
  • Salt and Pepper: To taste
  • Portobello Mushrooms: Be sure to clean them with a damp paper towel and remove the stem and gills before grilling.

How to Grill Portobello Mushrooms:

To grill portobello mushrooms, you will need to remove the stem, scrape out the gills and marinate them for 10 minutes in the refrigerator.  Then just place on the hot grill and flip halfway through cooking.  It is pretty simple and easy to do!  The grill will bring out the earthy flavors of the mushroom

  1. Whisk Marinade: In a small bowl whisk together olive oil, butter, garlic, soy sauce, sugar, and salt and pepper.
  2. Prepare portobello mushrooms: Gently remove the stem from the mushrooms.  Using a spoon scrape out the gills. Set the mushrooms in a 9×13 inch pan.  Add the marinade and soak for 10 minutes.
  3. Grill Mushrooms: Preheat the grill to medium high heat. Place the mushrooms on the grill and grill 5 minutes on each side for a total of 10 minutes.

The Recipe Critic Pro Tip:

For criss-cross grill marks on the outside, simply spin the portobello mushroom on the grill slightly around the 2 to 3 minute mark. This gives you a fun grill mark on the outside of the mushroom.

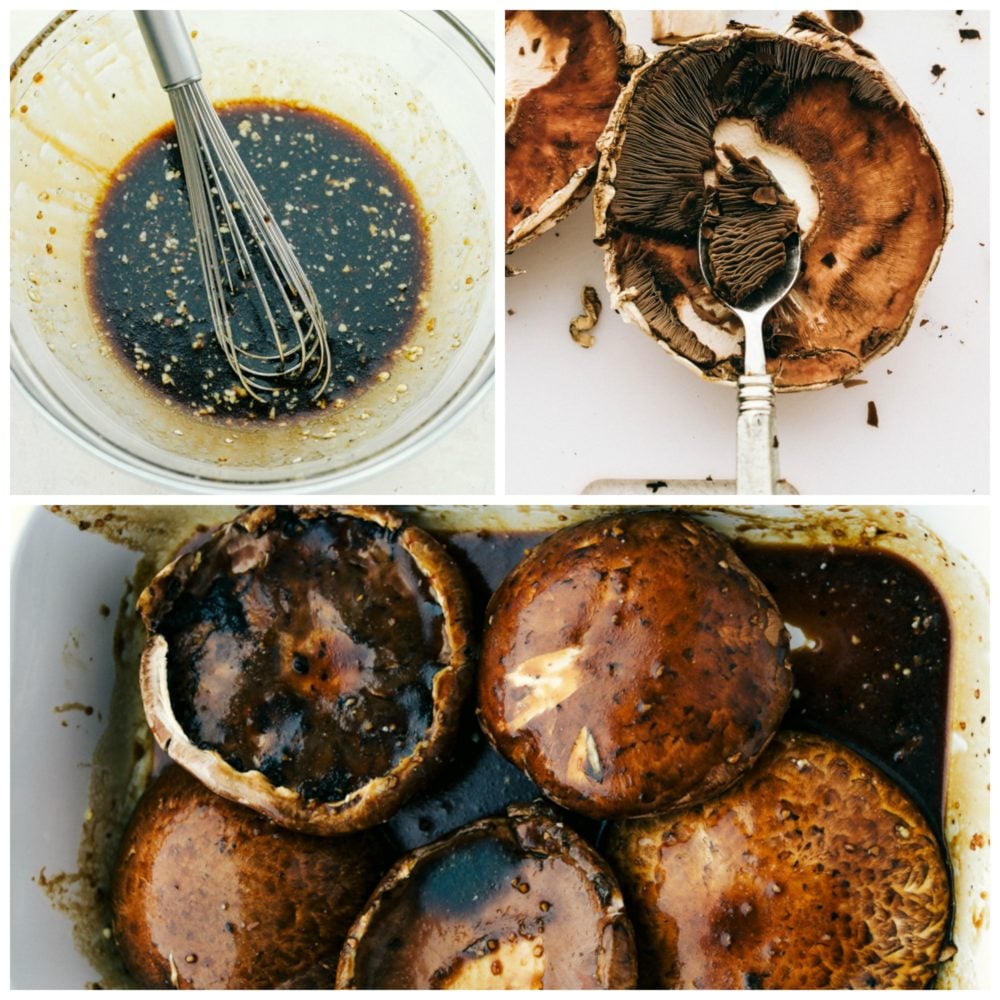
Steps to make grilled honey balsamic portobello mushrooms.

What to Serve with Mushrooms:

Portobello mushrooms are so versatile!  Paired with this amazing honey balsamic marinade, this mushroom will be the star of any menu!  Fresh off the grill they make a great main dish or appetizer to share.  Their intense flavor pairs well with more mild sides like rice, couscous, or pasta.  Balance the dark color with bright veggies or a colorful salad.  You could even treat this as a vegetarian option for a hamburger replacement and serve with fresh corn or fries.

FAQ About Grilling Mushrooms:

Portobello mushrooms are in the vegetable food group despite the fact that they are not plants.  They are actually a fungi. So, that leaves lots of questions about how to care for them and prepare them well.  Here are some answers to the questions that you may have about properly preparing this delicious..ummm…vegetable?

  • Can you marinate too long? Since mushrooms are by nature very porous, it is possible to marinate them too long. They will soak up too much and may become too mushy if they sit too long in the marinate.  So, stick with 30 minutes of marinade before grilling.
  • How do you clean portobello mushrooms? Since the mushrooms grow in the ground it is necessary to clean them as the first step of preparing them. To clean the mushrooms, you need a damp paper towel.  Wipe the cap and stem of the mushroom to remove any dirt.
  • How do I choose a good portobello mushroom? A fresh mushroom should be firm and have a pleasant smell. Inspect them carefully before purchasing.  If they are slimy, have dark spots, or the gills are wrinkled, stay away!

How to Properly Store Portobello Mushrooms:

To store your fresh mushrooms until you are ready to grill them, start by removing any packaging from the mushrooms.  Then, place them either in a paper bag or on a tray and cover with a paper towel.  If storing in a ziploc bag, leave the bag open.  The key is you want to avoid the mushrooms getting too much moisture in a sealed container. Do not freeze fresh mushrooms, and use within a week of purchasing.

Once marinated and grilled, the mushrooms will need to be stored in an airtight container.  They will last in a refrigerator for 3-5 days or in the freezer for 10-12 months.

Honey Balsalmic Portobello Mushrooms on a grill pan.

More Grill Favorites:

Print

Grilled Honey Balsamic Portobello Mushrooms

Grilled Honey Balsamic Portobello Mushrooms have deep sweet and savory flavors and a substantial hearty texture that stands up perfectly to your grill!  Amazing as a grilled dinner or an appetizer, you will love the way this unique ingredient livens up your summer menu!
Course Appetizer, Dinner, Side Dish
Cuisine American
Keyword grilled mushrooms, grilled portobello mushrooms, Mushrooms, portobello mushrooms
Prep Time 5 minutes
Cook Time 5 minutes
Total Time 10 minutes
Servings 4 Mushrooms
Calories 109kcal
Author Alyssa Rivers

Ingredients

  • 1 Tablespoon Olive oil
  • 1 Tablespoon Melted Butter
  • 2 Garlic Cloves minced
  • 1/4 cup balsamic vinegar
  • 1 Tablespoon soy sauce
  • 1 Tablespoon honey
  • salt and pepper
  • 4 portobello mushrooms

Instructions

  • In a small bowl whisk together olive oil, butter, garlic, soy sauce, sugar, and salt and pepper.
  • Prepare portobello mushrooms by gently removing stem from the mushrooms. Using a spoon scrape out the gills. Set the mushrooms in a 9x13 inch pan. Add the marinade and soak for 10 minutes.
  • Preheat the grill to medium high heat. Place the mushrooms on the grill and grill each side for 5 minutes.

Nutrition

Calories: 109kcal | Carbohydrates: 11g | Protein: 2g | Fat: 7g | Saturated Fat: 2g | Cholesterol: 8mg | Sodium: 288mg | Potassium: 333mg | Fiber: 1g | Sugar: 9g | Vitamin A: 87IU | Vitamin C: 1mg | Calcium: 10mg | Iron: 1mg


from The Recipe Critic https://ift.tt/2Z65WMH
https://ift.tt/2BqO86p

शुक्रवार, 19 जून 2020

Stuffed Poblano Peppers

Stuffed Poblano Peppers are loaded with southwest seasoned ground beef, rice, veggies, and cheese for a satisfying dinner with just a little bit of a kick! Everybody raves about this twist on classic stuffed peppers!

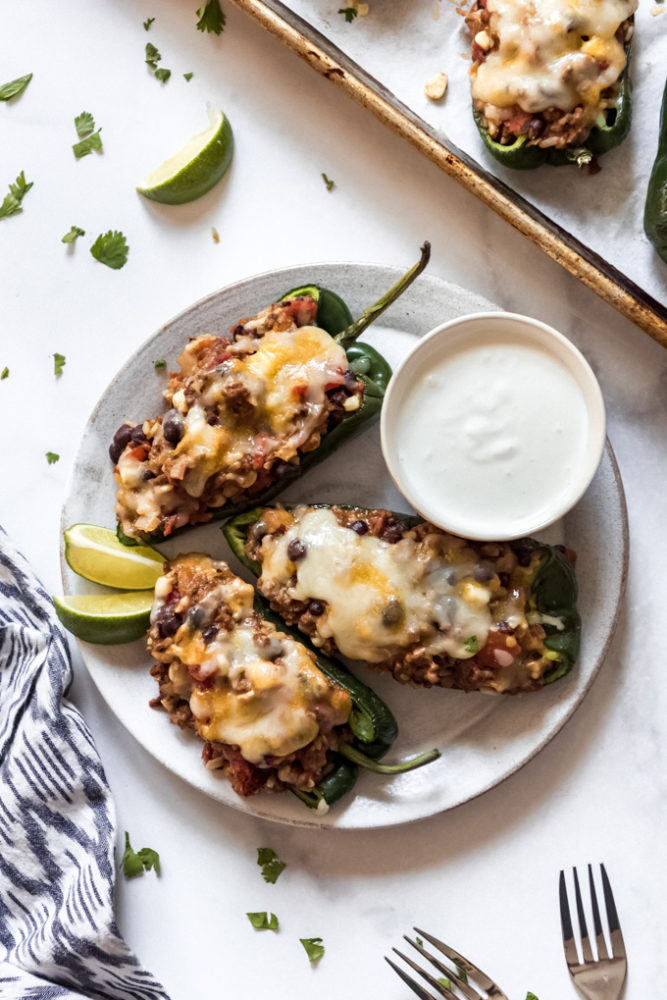
Stuffed peppers are one of our favorite weeknight meals! They are lower in carbs and a great way to get kids to eat more vegetables. Some of our other favorite versions are Turkey Stuffed PeppersMexican Quinoa Stuffed Peppers and Chicken Enchilada Stuffed Peppers!Stuffed poblano peppers on a plate next to a bowl of crema.

Easy Stuffed Poblano Peppers

We love these stuffed poblano peppers because the fun presentation always means perfect portion sizes and empty plates. Serve them up with a pitcher of creamy, ice cold horchata for a laid-back meal that is great for relaxed entertaining since all of it can easily be made in advance.

The southwest flavors of the smoky, mildly spicy poblanos and pepper jack cheese go really well with the hearty filling of ground beef, rice, and spices. Ground turkey, chicken, or pork can also be used in place of the ground beef. You can even make a vegetarian version of this dish! Simply use a can of drained and rinsed pinto beans or cooked quinoa in place of the ground beef!

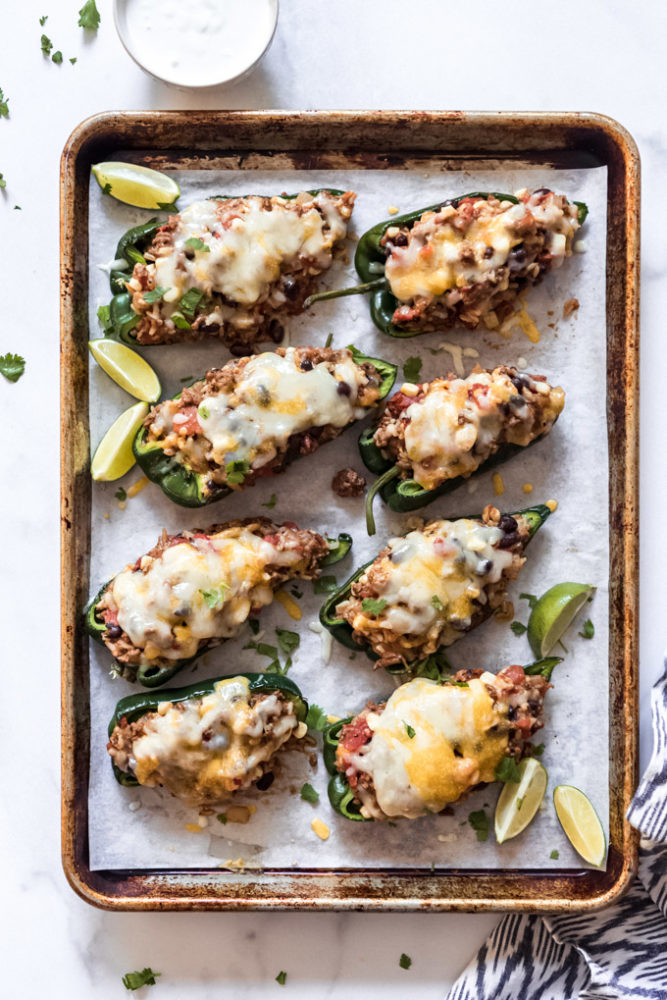
Eight stuffed poblano peppers topped with melted cheese on a baking sheet with lime wedges.

Are Poblano Peppers Spicy?

Poblano peppers are actually quite mild, with much less heat than jalapenos. Compared to red and green bell peppers, which aren’t spicy at all, poblano peppers have more of a kick, but it’s nothing in the realm of “mouth-on-fire” kind of spicy. Even our picky eaters can handle the level of heat in these stuffed poblano peppers.

How to Make Stuffed Peppers:

It’s a cinch to throw these stuffed peppers together, especially if you already have some leftover rice on hand. Roasting the peppers before filling them is important because they won’t have enough time to soften otherwise. While poblano peppers can be eaten without roasting, we think these are much better when the peppers are roasted first while the filling is being made.

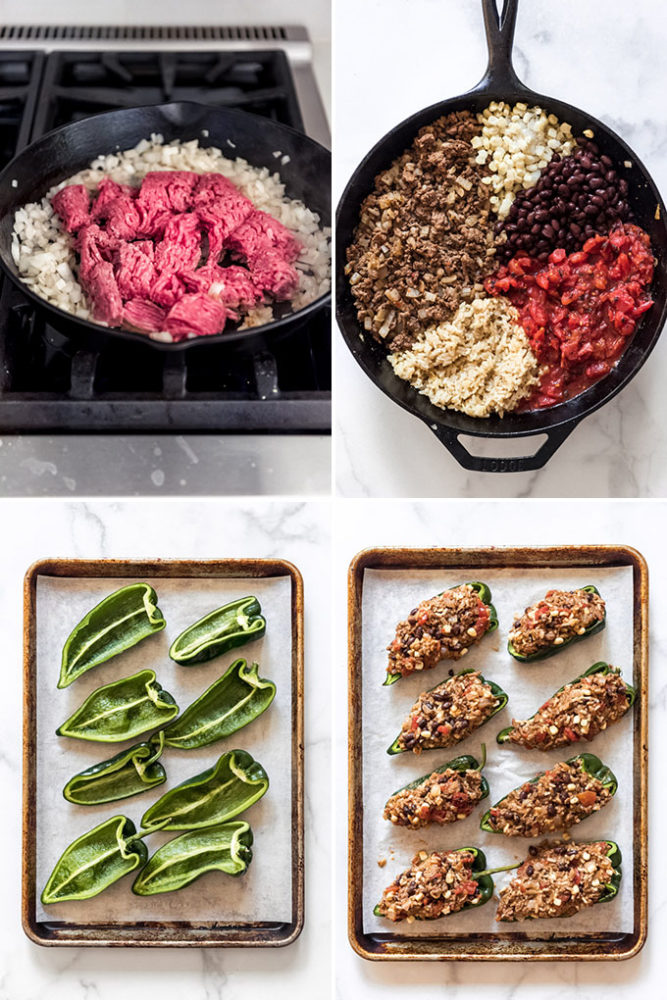
  1. Roast the peppers: Slice the peppers in half down the middle and remove seeds and membrane. Rub the peppers with a little olive oil, then bake for 12 minutes in a 350 degree F oven to soften.
  2. Brown the meat: While the peppers cook, heat a little olive oil n a large skillet over medium-high heat. Add the onions and garlic, sauteing until softened, about 5 minutes. Add the ground beef and spices, cooking and stirring until the meat is browned and cooked through.
  3. Make the filling: Add cooked rice, fire roasted tomatoes, beans, corn, and half of the cheese. Stir to combine.
  4. Stuff peppers: Divide the filling between the roasted poblano peppers, mounding in the center, then sprinkling with the remaining cheese.
  5. Bake: Heat the stuffed poblano peppers for 10 minutes until heated through and the cheese is melted on top. Sprinkle with a little chopped fresh cilantro and serve with crema or sour cream drizzled over the top.

A collage of images showing how to make stuffed poblano peppers.

Can Stuffed Poblano Peppers Be Made Ahead?

Sure! You can assemble the stuffed poblano peppers up to 1 day in advance. Store them in the fridge, then bake when you are ready. Or if you have already baked them, store the leftovers in the fridge for up to 3 days. They reheat really well in the microwave for a minute or two, or in the oven at 350 degrees for 20-25 minutes.

You can even make these stuffed peppers are a freezer meal. Once completely frozen, the peppers can be wrapped in two layers or plastic wrap and stored in a large zip tight bag or container in the freezer for up to 3 months. Bake from frozen by adding 10 additional minutes or so to the bake time, or thaw first in the fridge overnight. You may want to cover them with foil though so the cheese doesn’t burn on top before the filling in the middle is hot all the way through.

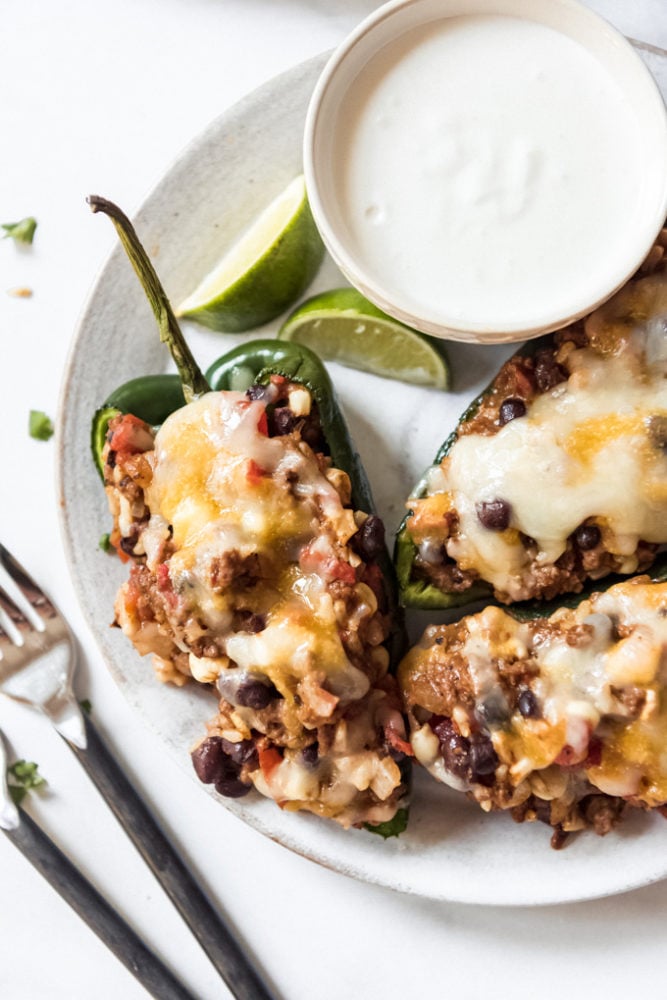
Three stuffed poblano peppers on a plate with a bowl of crema and lime wedges.

More Great Dinner Recipes:


Print

Stuffed Poblano Peppers

Stuffed Poblano Peppers are loaded with southwest seasoned ground beef, rice, veggies, and cheese for a satisfying dinner with just a little bit of a kick! Everybody raves about this twist on classic stuffed peppers!
Course Dinner
Cuisine Mexican
Keyword mexican quinoa stuffed peppers, poblano peppers, stuffed poblano peppers
Prep Time 15 minutes
Cook Time 22 minutes
Total Time 37 minutes
Servings 4 servings
Calories 567kcal
Author Amy Nash

Ingredients

  • 4-6 poblano peppers
  • 2 tablespoons olive oil, divided
  • 1 medium onion, chopped
  • 1 pound lean ground beef
  • 1 teaspoon kosher salt
  • 1 teaspoon ground cumin
  • 1 teaspoon chili powder
  • 1 teaspoon garlic powder
  • 1/2 teaspoon chipotle chili powder
  • 1/2 teaspoon ground coriander
  • 1/2 teaspoon black pepper
  • 1 cup cooked rice
  • 1 cup black beans, rinsed and drained
  • 1 cup frozen corn
  • 1 (15-ounce) can fire roasted tomatoes
  • 1 1/2 cups grated Mexican cheese blend
  • 1/4 cup fresh cilantro, chopped

Instructions

  • Preheat oven to 350 degrees F.
  • Slice the poblano peppers in half and remove the seeds and membrane. Rub with 1 tablespoon of the olive oil. Arrange on a baking sheet and roast for 10-12 minutes until softened.
  • While the peppers are baking, heat the remaining olive oil in a large skillet and saute the onion and garlic until soft, about 5 minutes.
  • Add the ground beef and spices, cooking and breaking up with a spoon until the meat is cooked through and browned.
  • Add the cooked rice, beans, corn and half of the cheese. Stir well, then divide evenly between the roasted poblano pepper halves. Sprinkle with the remaining cheese.
  • Bake for 10 minutes until heated all the way through and the cheese is melted on top. Sprinkle with chopped cilantro and serve.

Nutrition

Serving: 4g | Calories: 567kcal | Carbohydrates: 41g | Protein: 43g | Fat: 27g | Saturated Fat: 12g | Cholesterol: 108mg | Sodium: 906mg | Potassium: 990mg | Fiber: 8g | Sugar: 4g | Vitamin A: 1056IU | Vitamin C: 101mg | Calcium: 365mg | Iron: 5mg


from The Recipe Critic https://ift.tt/2Yfj8PR
https://ift.tt/2YSGZDZ

गुरुवार, 18 जून 2020

Easy Bean and Cheese Pupusas Recipe

This easy bean and cheese pupusas are handmade griddle cakes filled with savory beans and cheese.  They are inexpensive and easy to make, but just beware because they are addicting!

There is something about handheld street foods made in the comfort of my home that is so fun! Try some of my other favorites like Homemade Empanadas or Grilled Mexican Street Corn too!

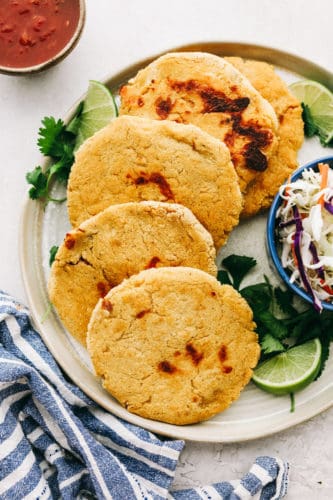
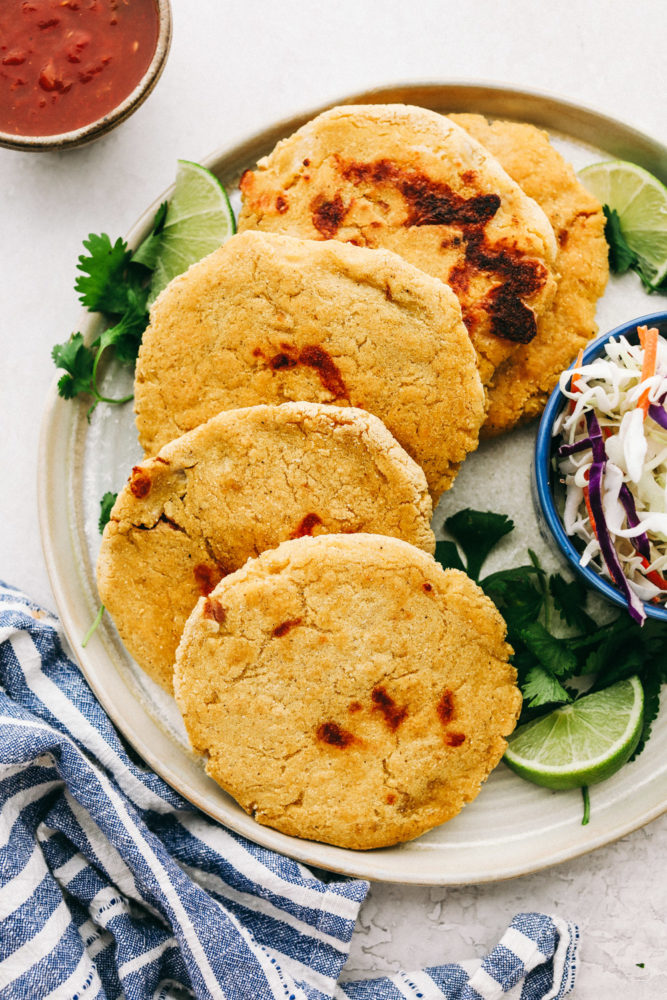
Easy Bean and Cheese Pupusas on a plate served with slaw and salsa.

Easy Bean and Cheese Pupusas

So, just so you know, I am totally in on the food truck craze.  My family and I love to walk around street fairs and check out the handmade items.  Mostly though, I am checking out the food!  I go really crazy for authentic ethnic foods!  Recently, I discovered pupusas and I was so fascinated!! I went straight into researching them and figuring out how I could bring this amazing recipe to my kitchen, and yours!

After getting home and trying this out myself I was amazed how easy it was.  Really, I couldn’t mess it up.  After making a few, I even let my kids help! The key is to keep the dough moist.  If it starts cracking add more water.  I actually made a bowl of 2 parts water and 1 part oil, and I kept dipping my hands in it as I was forming the dough.  This kept the dough from sticking to my hands and it made my dough moist.  The finished product was unbelievable! When you bite into the soft, corn cake exterior then cut to the filling with its savory cheesy goodness.  Wow!  You just have to try it!

What are Pupusas?

The national dish of El Slavador, this dish is so delicious that it has warranted its own day of celebration there!  I’m looking at you second Sunday of November…  It is a thicker version of a corn tortilla a.k.a. griddle cake, corn cake, or flatbread. The base is made from masa dough, which is the same ingredient that is found in tortillas and many other Latin dishes by the way.

They are stuffed with many different kinds of ingredients.  Meats, cheeses and beans are the most popular filling choices.  They are made to be picked up and eaten with your hands and are commonly eaten as a breakfast food.  They are traditionally served with tomato salsa and Curtito, which is a tangy and sometimes spicy cabbage slaw.

What is in a Pupusas?

These ingredients are inexpensive and there is not a long list at all! This short list allows you to concentrate on execution of the recipe instead of a long prep time.  Just 3 ingredients will deliver the perfect dough that’s ready to be flattened into a nice thin shell for your delicious bean and cheese filling.

  • Masa Harina Corn Flour: Not to be confused with corn meal, corn flour is much finer and will create the perfect texture.
  • Warm water: Add water to the dough a little at a time and it should be the consistency of play dough and not sticky.
  • Salt: To taste!
  • Refried Beans: Classic filling ingredient that adds earthy, sweet flavor.
  • Mozzarella Cheese: Mild cheese is perfect and a very close match to the traditional quesillo cheese!

Easy Steps to Make Bean and Cheese Pupusas:

Mix together the corn flour, water, and salt to form the dough, then add in your bean and cheese filling.  It is so much easier than I thought it would be! I love how versatile this dish is and I can tell I will be experimenting with all different kinds of fillings!

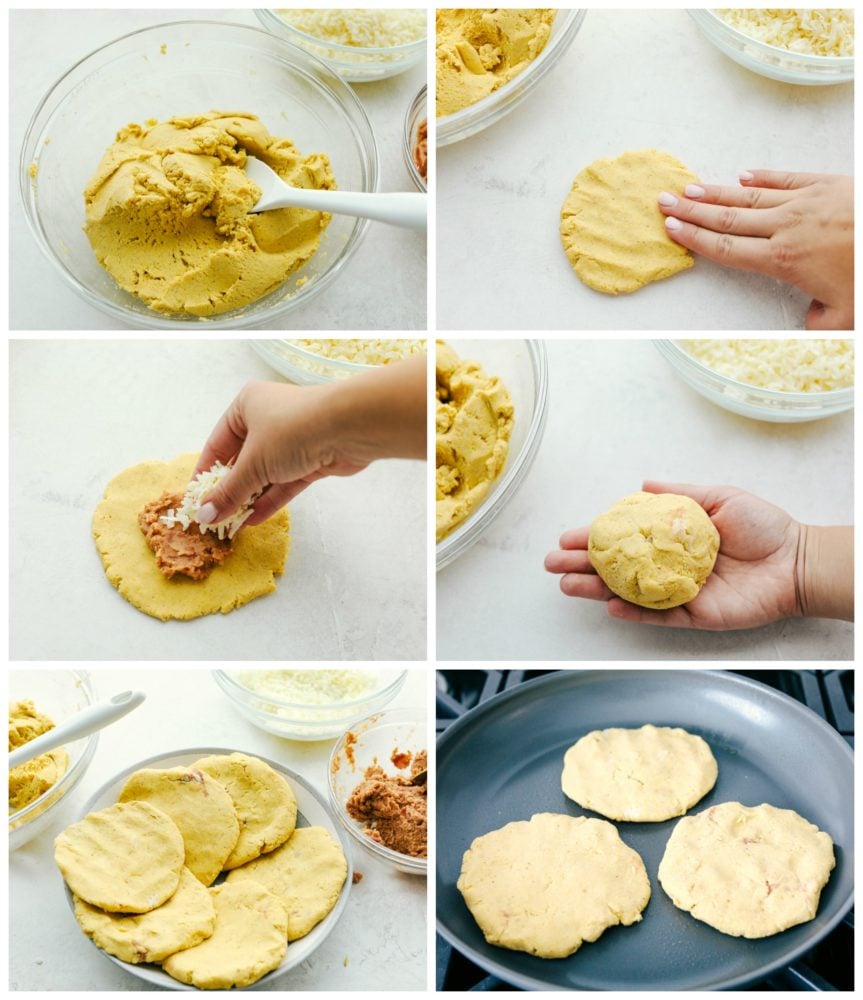
  1. Prep: Preheat a non-stick skillet to medium high heat.
  2. Form Dough: In a medium sized bowl combine corn flour, water, and salt to form a dough.  Scoop out a large 3 inch ball of dough.
  3. Layer and Enclose Pupusas: Flatten the dough and put 1 tablespoon refried beans and sprinkle with cheese. Fold the ends up together to enclose the beans and cheese.  Flatten to 1/4 inch thick.
  4. Cook: Place in a skillet and cook each side until golden brown 3-5 minutes. Serve with coleslaw, salsa, or desired side dish.

Steps to make bean and cheese pupusas.

More Variations to Try:

This recipe includes a filling of beans and cheese.  However, the possibilities of fillings in this delicious corn cake are endless.  In fact, it is the perfect vessel to turn leftover meats into treasures!  Here are a few filling ideas that are traditional to the pupusas of El Salvador, but don’t be scared to get creative.  Add in the ingredients that you love, and be sure to share your favorites and what worked well for you!

  • Pulled pork
  • Chicken
  • Queso
  • Bell peppers
  • Fried Pork Skin

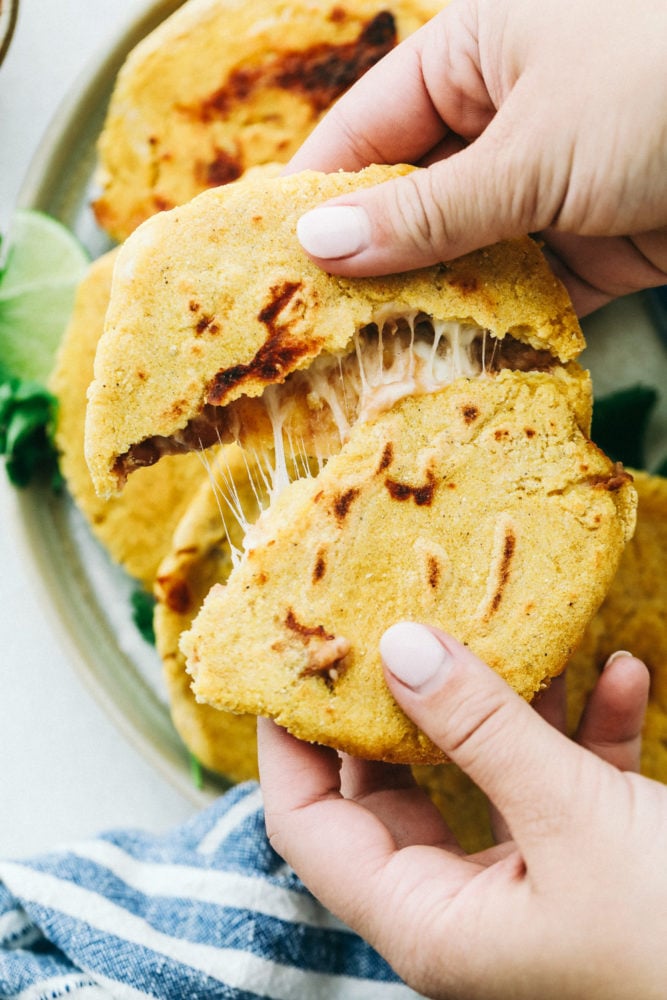
Easy Bean and Cheese Pupusas being ripped into two pieces to reveal gooey cheese inside.

The Best way to Store Bean and Cheese Pupusas:

It is best to serve cooked pupusas fresh . Although, if you store them tightly they will last in the refrigerator overnight or in the freezer for 2 weeks.  In addition, if you are not able to use all the dough at once store the leftover masa dough in an airtight container for up to 2 days in the refrigerator.

  • How to freeze pupusas:  It is best to freeze them before cooking if possible.  They can also be frozen after they have been cooked.  First, allow them to cool completely, then store in an airtight container. I recommend freezing each in separate bags.
  • Re-heating after frozen: Its best to re-heat these on a stovetop pan.  Start by thawing them overnight in the refrigerator.  Then heat a little bit of oil (about 1-2 teaspoons) in a pan.  Cook 3-4 minutes per side on medium-high until heated throughout.  Use a food thermometer to make sure the internal temperature reaches 165 degrees.
  • Re-heating from refrigerator: Microwave 1-2 minutes, heat in a toaster oven, or cook on the stovetop with a bit of oil and a medium-hot pan for a few minutes on each side.

Close up on the inside of bean and cheese pupusas

More Amazing Recipes You’ll Love:

Print

Easy Bean and Cheese Pupusas

Easy Bean and Cheese Pupusas are handmade griddle cakes filled with savory beans and cheese.  They are cheap and easy to make, but just beware because they are addicting!
Course Dinner, Main Course
Cuisine Argentina, Mexican
Keyword bean and cheese pupusas, easy pupusas, pupusas
Prep Time 10 minutes
Cook Time 10 minutes
Total Time 20 minutes
Servings 12 Pupusas
Calories 175kcal
Author Alyssa Rivers

Ingredients

  • 3 cups Masa Harina Corn Flour
  • 2 3/4 cups warm water
  • 1 teaspoon salt
  • 1 cup refried beans
  • 2 cups mozzarella cheese shredded

Instructions

  • Preheat a non stick skillet to medium high heat. In a medium sized bowl combine corn flour, water, and salt to form a dough. Scoop out a large 3 inch ball of dough. Flatten the dough and put 1 tablespoon refried beans and sprinkle with cheese. Fold the ends up together to enclose the beans and cheese. Flatten to 1/4 inch thick.
  • Place in a skillet and cook each side until golden brown 3-5 minutes. Serve with coleslaw, salsa, or desired side dish.

Nutrition

Calories: 175kcal | Carbohydrates: 25g | Protein: 8g | Fat: 5g | Saturated Fat: 3g | Cholesterol: 15mg | Sodium: 430mg | Potassium: 90mg | Fiber: 3g | Sugar: 1g | Vitamin A: 143IU | Calcium: 142mg | Iron: 1mg


from The Recipe Critic https://ift.tt/2N9ZgY4
https://ift.tt/2ADIcY3