शुक्रवार, 10 जुलाई 2020

Tzatziki Sauce Recipe

Tzatziki Sauce is a Greek inspired, yogurt-based sauce you and your family will go crazy over.  It is creamy and bursting with light and refreshing cucumber, dill, and garlic flavors that will make this a Mediterranean inspired favorite this summer!

Homemade dips and sauces that are loaded with fresh ingredients you love are a must in any great kitchen.  So, also try my recipes for The Best Hummus I Have Ever Had and Basil Pesto.

Dipping a chip in Tzatziki sauce.

Tzatziki Sauce Recipe

Tzatziki Sauce is an amazing Mediterranean recipe that is super versatile and delicious!  It is pronounced “tsah-see-key.”  Although it may be hard to say, it is not hard at all to make or to devour!  It is a perfect creamy sauce that livens up a sandwich or veggie tray and adds a cool, fresh, and tangy zing to any grilled meat or fish.

When trying to eat healthy, adding an intense and inspired sauce like this Tzatziki sauce to the healthy fresh foods your body needs makes every meal so much more satisfying!  Dip your raw veggies in this sauce for a perfect afternoon snack, or smother your grilled chicken in it.  This sauce will take any healthy meal and liven it up to one you look forward to eating.  It is a must memorize recipe, especially for those who are looking for clean and healthy eating options, so bookmark this page because you will be coming back to it many times!

What’s in Tzatziki Sauce?

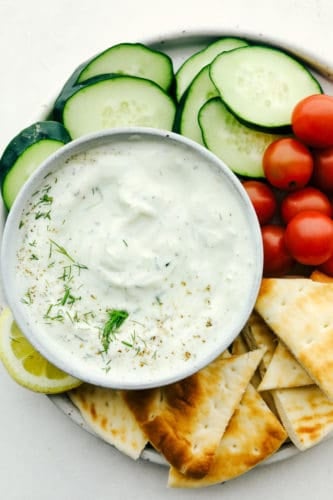
Tzatziki sauce is made of perfectly balanced mild and bold flavors that compliment any dish.  Made from a tangy Greek yogurt base, this creamy sauce has acidic vinegar and bitter oregano, but also has bright flavors from fresh cucumber and lemon juice.  The garlic and dill add in earthy spice to round out the ingredients.  Tzatziki sauce is one you will find yourself craving often!

  • Greek yogurt: Use plain Greek yogurt to add creamy texture.
  • Cucumber: Finely grated and dried.
  • Garlic: 2-3 cloves minced is what I recommend, but it is a pretty strong amount, so start with a little less if you aren’t a garlic lover.
  • White wine vinegar: This acidic ingredient is slightly more mild than other vinegar varieties.
  • Dried dill weed: Mild fresh herb taste.
  • Dried oregano leaves: Earthy, slightly bitter flavor.
  • Salt and pepper: To taste.
  • Lemon Juice: Squeeze on top of the mixed dip.
  • Extra-virgin olive oil: Drizzle on top.

How to Make Tzatziki Sauce:

This dip comes together so quickly and easily. Once you have made it a couple of times, you will have it mostly memorized! It is a must make recipe that you will find yourself making more and more because it is so versatile and complements anything you pair it with.

  1. Combine ingredients: In a medium bowl combine greek yogurt, cucumber, garlic, white wine vinegar, dried dill week, dried oregano.
  2. Salt and pepper: Add salt and pepper to taste, squeeze lemon juice, and drizzle olive oil on top.
  3. Refrigerate: Chill for 30 minutes in the refrigerator to let the flavors blend.
  4. Serve!

Ingredients for Tzatziki sauce in a clear bowl.

Tips for the Best Sauce:

Preparing great homemade sauces is the secret to making family favorite meals again and again. Here are a few pro tips to make this one of the best sauces you have served.

  • Properly drain the cucumber: To best remove excess moisture from the cucumber, shred it first, then squeeze out the water in a paper towel.
  • Mint: Add a bit of mint for an even more fresh and dynamic flavor.
  • Chill: Allow this dip to chill for at least 30 minutes before serving to enhance the blend of flavors.

What to Serve with Tzatziki Sauce:

This sauce is so delicious by itself and when added to any appetizer, snack or meal, it is even more perfect!  These are some tried and true ways to serve this super easy sauce.

  • Raw vegetables: Carrots, celery, broccoli, and grape tomatoes are fantastic, but really this sauce will brighten up any veggie you have.
  • Pita or Naan Bread: If you are using Tzatziki as a dip try dunking pita bread in it for a chewy and satisfying snack.
  • Grilled Meat: The cool, dill flavors really cool down a spicy meat or liven up a more mildly flavored meat.  Either way it is the perfect balancing sauce to bring harmony to your meal. Try my Grilled Steak recipe for a great meal!
  • Gyros or any sandwich or wrap: The creamy texture of this sauce is perfect to add moisture and tangy flavor to any sandwich or wrap.

How Long does Homemade Tzatziki Sauce Last?

Store your made from scratch favorite sauce in an air-tight container in the refrigerator.  If tightly sealed and kept cool consistently, this amazing sauce will last for up to 4 days.  You can also freeze it, but the texture may change a bit due to the yogurt base, making it less creamy.

Close up on tzatziki sauce in a bowl on a veggie platter with pita.

More Made from Scratch Dip Recipes:

Print

Tzatziki Sauce

Tzatziki Sauce is a Greek inspired, yogurt-based sauce you and your family will go crazy over.  It is creamy and bursting with light and refreshing cucumber, dill, and garlic flavors that will make this a Mediterranean inspired favorite this summer!
Course Appetizer, Dressing, Sauce, Side Dish, Snack
Cuisine Greek, Mediterranean
Keyword tzatziki, tzatziki sauce
Prep Time 15 minutes
Total Time 15 minutes
Servings 2 Tablespoons
Calories 190kcal
Author Alyssa Rivers

Ingredients

  • 2 cups plain greek yogurt
  • 1 cucumber finely grated
  • 2 to 3 cloves garlic minced
  • 1 tablespoon white wine vinegar
  • 1 teaspoon dried dill weed
  • 1 teaspoon dried oregano leaves
  • Salt and pepper to taste
  • Juice of 1/2 medium lemon
  • 1 tablespoon extra-virgin olive oil

Instructions

  • In a medium bowl combine greek yogurt, cucumber, garlic, white wine vinegar, dried dill week, dried oregano. Salt and pepper to taste and add lemon juice and drizzle olive oil on top. Refrigerate for 30 minutes to let the flavors blend. Serve with fresh vegetables and pita bread.

Nutrition

Calories: 190kcal | Carbohydrates: 9g | Protein: 21g | Fat: 8g | Saturated Fat: 1g | Cholesterol: 10mg | Sodium: 75mg | Potassium: 282mg | Fiber: 1g | Sugar: 7g | Vitamin A: 29IU | Vitamin C: 1mg | Calcium: 250mg | Iron: 1mg


from The Recipe Critic https://ift.tt/2O7gGVM
https://ift.tt/2ZeLD0P

गुरुवार, 9 जुलाई 2020

Crispy Onion Rings (Baked or Fried!)

Crispy Onion Rings, whether baked or fried, will be a huge hit appetizer that you will want to make again and again.  The sweet onion wrapped in a crunch of perfectly crispy panko breading is just as delicious as any restaurant version, and surprisingly easy to make at home!

For more delicious appetizers that are warm and crispy try Baked Buffalo Cauliflower, Crispy Parmesan Fried Zucchini, or Mozzarella Sticks.  They will start any meal off right with vibrant flavors your family and friends will rave about!

Finished onion rings on a plate with dipping sauce.

Crispy Onion Rings (Baked or Fried!)

Crispy onion rings that you crave from your favorite restaurant or fast food chain can be made easily at home!  They are great as a side dish with hamburgers and hot dogs on the grill, or served as a crowd-pleasing appetizer.  Everyone will be so impressed at the crispy breading you are able to make from scratch at home.  You will never have to go out to enjoy these delicious onion rings again!

These homemade onion rings are can be fried or baked in the oven and either way you will end up with the best onion ring you have ever had.  It so crispy on the outside and tender on the inside.  Each bite gives the perfect crunch.  The sweet onion flavor is perfectly balanced by the warm paprika and garlic spices and the nutty parmesan cheese.  Pair these onion rings with a favorite dipping sauce and you will be amazed how quickly they are eaten and enjoyed!

What is Onion Ring Batter Made of?

These onions are so irresistible at any restaurant, and now they can be made from scratch in your kitchen using just a few common ingredients.  Most of these are staples in any pantry and are very easy to work with.  You will be shocked how fast these come together and how delicious they are!

  • Oil for frying: Canola, peanut, or vegetable oil are best for deep frying.
  • Onions: White or yellow onions work well. In the summer months Walla Walla or Vidalia are in season and are a great option for a sweeter onion.
  • Flour: Holds the crispy coating on to the onion.  Shake off any excess before dipping in the egg.
  • Baking powder: Adds a little more crispiness to the batter and helps hold the batter to the onion.
  • Eggs: Whisk eggs lightly before dredging onion rings through them.
  • Panko: Extra crispy Japanese breadcrumb that is light and airy.
  • Grated parmesan cheese: Adds a great nutty flavor to the batter.
  • Paprika: Adds great color and a very mild spice.
  • Garlic powder: Garlic flavor makes everything better and these onion rings are no exception!

How do You Make Onion Rings From Scratch?

Whether you are frying or baking your onion rings, this recipe is an easy way to create a delicious and crispy appetizer.  Simply follow the directions through step 4, then depending on your preferred cooking method you will complete step 5 accordingly.  Your family will go crazy over these delicious onion rings no matter which way you choose!

  1. Heat oil: In a medium sized skillet add oil 1/2 inch up the pan and preheat to medium high or 375 degrees.
  2. Slice onions: The onions should be about 1/4 inch thick.
  3. Prepare batter: In a small bowl add the flour and baking powder. In another bowl add the eggs and whisk. And in the last shallow dish add Panko, parmesan cheese, paprika and garlic powder.
  4. Dip: First dip onion slice in the flour, then the egg, and lastly in the Panko mixture. Repeat with all of the onion rings.
  5. To Fry: Add the onion rings to the oil and fry until they are golden brown. To Bake: Preheat oven to 450 degrees. After coating the onion rings line a baking sheet with parchment paper. Bake for 10-15 minutes or until crispy and golden brown.
  6. Serve: Plate these up with your favorite dipping sauce.

Steps to make onion rings.

Tips for Crispy Onion Rings:

When it comes to making the perfect batter for a fried (or baked) onion ring, there may be a few questions that come to mind.  Here is my advice on making the BEST onion rings you have ever had.  Follow these tips to master the art of a crispy onion ring your family will go crazy over!

  • How to get the best onion flavor: When biting into an onion ring, you want to get a sweet and bright onion flavor.  To achieve this unique flavor, you will need to start by soaking the onion slices in cold water.  Allow them to chill in the water for at least 10 minutes.  Dry them off completely before beginning to batter them.
  • How to keep batter from falling off onion rings: In order to keep that tasty and crispy breading on your onion you will want to use cold batter and hot oil.  Also, make sure you shake off any excess flour before dipping the onion in the egg mixture.  You need thin layers as you go.
  • How to cut the onion: Cut the stem end off and remove the peel. Then trim off the root end. Now cut a thin slice off the end of the onion to keep the onion from rolling while you slice it.  Finally, place the onion flat side down and cut cross wise into thick slices for the perfect onion rings.
  • How to get extra crispy onion rings: For an extra crispy coating, double dip the onion rings in the egg and panko mixture. Also, when cooling the onion rings, place them on a wire cooling rack with paper towels below it so that the crispy rings are not laying directly on the oil soaked paper towel as they cool.

Can I Freeze Battered Onion Rings?

Yes!  Place your onion rings in an airtight container and store in the refrigerator for up to 5 days or in the freezer for up to a year.  To reheat, place in a 375 degree oven until heated through.

Dipping onion rings in sauce.

More Crispy Appetizer Recipes:

Print

Crispy Onion Rings

Crispy Onion Rings, whether baked or fried, will be a huge hit appetizer that you will want to make again and again.  The sweet onion wrapped in a crunch of perfectly crispy panko breading is just as delicious as any restaurant version, and surprisingly easy to make at home!
Course Appetizer, Side Dish, Snack
Cuisine American
Keyword crispy onion rings, fried onion rings, onion rings
Prep Time 15 minutes
Cook Time 15 minutes
Total Time 30 minutes
Servings 6 People
Calories 264kcal
Author Alyssa Rivers

Ingredients

  • oil for frying
  • 2 large onions
  • 1 1/4 cup flour
  • 1 teaspoon baking powder
  • 3 eggs
  • 2 cups panko
  • 1/2 cup grated parmesan cheese
  • 1 teaspoon paprika
  • 1/2 teaspoon garlic powder

Instructions

  • In a medium sized skillet add oil 1/2 inch up the pan and preheat to medium high or 375 degrees. Slice the onions 1/4 inch thickness into rings.
  • In a small bowl add the flour and baking powder. In another bowl add the eggs and whisk. And in the last shallow dish add Panko, parmesan cheese, paprika and garlic powder.
  • Dip one onion ring in the flour, then the egg, and lastly in the Panko mixture. Repeat with all of the onion rings.
  • Add the onion rings to the oil and fry until they are golden brown. Serve with favorite dipping sauce.

To Bake:

  • Preheat oven to 450 degrees. After coating the onion rings line a baking sheet with parchment paper. Bake for 10-15 minutes or until crispy and golden brown.

Nutrition

Calories: 264kcal | Carbohydrates: 40g | Protein: 12g | Fat: 6g | Saturated Fat: 2g | Cholesterol: 89mg | Sodium: 309mg | Potassium: 256mg | Fiber: 3g | Sugar: 4g | Vitamin A: 355IU | Vitamin C: 4mg | Calcium: 186mg | Iron: 3mg


from The Recipe Critic https://ift.tt/31ZALFz
https://ift.tt/3iVgXtg

2 Ingredient Cheesecake Dip

2 Ingredient Cheesecake Dip is a super easy to make, sweet and tangy dip.  It is so creamy and perfect for dipping fruit as a cool summer snack or dessert!

Also try Fluffy Marshmallow Cream Cheese Dip or Strawberry Cream Cheese Fruit Dip.  They are quick and easy to whip up, but taste like they took all day!

Dipping a graham cracker into cheesecake dip.

2 Ingredient Cheesecake Dip

This light and tasty cheesecake dip is the perfect way to liven up any of your favorite fruit.  With its refreshing tangy sweetness, this dip will become an instant favorite! The combination of the cream cheese with the sticky sweet condensed milk, create the most balanced flavor and the creamy but fluffy texture is unbelievably delicious!

Cheesecake dip is a great choice for any time of day because it is sweet and satisfying. The simple and well-balanced flavors keep you coming back for one more dip. Drench a graham cracker in it for a bite that is inspired by a vanilla cheesecake with a buttery crust. Or use it as a fruit dip for a family barbecue. However you decide to serve it, you will see it is a huge hit with anyone who tries it! Stop now and add this recipe to your list of must try summer recipes!

What is Cheesecake Dip Made of?

This is one of the best versions of cheesecake dip and it’s amazing that the delicious cheesecake flavor is made of just 2 ingredients!  Not only is this a super short ingredients list, but you may find you already have both on hand!  With these 2 simple and delicious ingredients, how could you do wrong?

  • Cream Cheese: Softened cream cheese will add a mild sweet and tangy flavor.
  • Sweetened condensed milk: Adds sweetness and creamy texture.

It’s Easy to Make Cheesecake Dip!

Making the most perfect cheesecake dip is simple and no-fuss.  Just beat the cream cheese until it is nice and smooth then add in the condensed milk until you get your desired thick and fluffy consistency.  It doesn’t get any easier than that! Just remember it will also disappear just as quickly as it is made!

  1. Beat cream cheese: In a stand mixer or using a handheld mixer beat the cream cheese until smooth.
  2. Add in condensed milk: Add in the sweetened condensed milk and continue to beat until smooth or creamy.
  3. Serve: This dip is delicious when served with fruit, graham crackers, or whatever you would like.

Tips for the Most Amazing Dip:

This 2 ingredient dip is seriously the best and easiest dip ever!  If you are looking to modify this recipe at all here are some tips to keep in mind.

  • Healthy version: To make this cheesecake dip a little healthier you can use low-fat cream cheese and instead of sweetened condensed milk use yogurt.
  • Flavors: To quickly add a little extra flavor add a tiny bit of vanilla extract or the zest of citrus fruits like orange, lemon, or lime.
  • Tip: Make sure the cream cheese is soft, not melted.  Cut the cream cheese into pieces, then microwave it for 15-20 seconds.
  • Skewers: Smaller fruit may be difficult to dip into this heavenly cheesecake dip.  So serve them on toothpicks or make fruit skewers to add to the fun of this treat.

What to Serve with Cheesecake Dip:

Its amazing how addicting 2 ingredients can be!  The list of things to serve with this cheesecake dip is so long, because it is truly amazing with anything!  Here are some family favorites to consider.

  • Crackers/Cookies: Graham Crackers, Chocolate Graham Crackers, Cinnamon Graham Crackers, Nilla Wafers, Chessman cookies, Oreo’s, Vanilla Oreo’s
  • Fruit: Strawberries, grapes, and raspberries tend to be the most popular, but any fruit will taste amazing in this dip!

Can I Make Fruit Dip in Advance?

This cheesecake dip is such a huge hit you will not have to worry with leftovers.  However, you may want to prepare this ahead of time for a quick afternoon snack or after dinner treat.  To make it ahead of time, place in an sealed container and store it in the refrigerator up to 4 days.  Freezing is not recommended.

Graham cracker crumbles and strawberries garnishing cheesecake dip.

More Cheesecake Inspired Recipes:

Print

2 Ingredient Cheesecake Dip

2 Ingredient Cheesecake Dip is a super easy to make, sweet and tangy dip.  It is so creamy and perfect for dipping fruit as a cool summer snack or dessert!
Course Appetizer, Dessert, Side Dish, Snack
Cuisine American
Keyword 2 ingredient cheesecake dip, cheesecake dip
Prep Time 10 minutes
Total Time 10 minutes
Servings 8 People
Calories 22kcal
Author Alyssa Rivers

Ingredients

  • 2 8 ounce Cream Cheese, softened
  • 1 14 ounce Sweetened condensed milk

Instructions

  • In a stand mixer or using a handheld mixer beat the cream cheese until smooth.
  • Add in the sweetened condensed milk and continue to beat until smooth or creamy.
  • Serve with fruit, graham crackers, or whatever you would like.

Nutrition

Calories: 22kcal | Carbohydrates: 1g | Protein: 1g | Fat: 1g | Saturated Fat: 1g | Cholesterol: 1mg | Sodium: 1mg | Sugar: 1g


from The Recipe Critic https://ift.tt/3eiJgOQ
https://ift.tt/2ObgjJG

बुधवार, 8 जुलाई 2020

Chocolate Zucchini Cake

whole chocolate zucchini cake with a piece cut out

This Chocolate Zucchini Cake is a deep, dark chocolate cake that is topped with light and fluffy chocolate whipped cream! With 3 cups of zucchini, it is incredibly moist and you won’t even notice all the vegetables!

If you’ve got an abundance of zucchini and you’re looking for more ways to use it, try these Zucchini Chips, these Cheesy Zucchini Fritters, or this Cinnamon Zucchini Walnut Cake with Cream Cheese Frosting.

whole chocolate zucchini cake on parchment paper with chocolate whipped cream

Chocolate Zucchini Cake

If you are a gardener and you’ve planted zucchini this year, you may be searching for about 500 different ways to use it!

Zucchini plants are the gift that keeps on giving, and giving, and giving.

This Chocolate Zucchini Cake is one of my favorite ways to use zucchini, because it uses a good amount (a whopping 3 cups), and it is so rich, so moist, and has this incredibly deep dark chocolate flavor.

I love to top it off with a light and fluffy chocolate whipped cream — it’s sweet and chocolatey but light enough that it really lets the cake shine.

If you want something a little sweeter, the chocolate cream cheese frosting from these Chocolate Zucchini Cupcakes would be a wonderful addition!

whole chocolate zucchini cake with a piece cut out

How to make Chocolate Zucchini Cake:

  1. We start by mixing most of our wet ingredients and sugar together — just a whisk is good enough for this simple batter!
  2. Add the dry ingredients, and stir just until combined — we don’t want to overmix.
  3. Add the zucchini and stir just until coated, then spread into a lightly greased pan.
  4. Bake until a toothpick comes out clean or with moist crumbs.
  5. Let cool to room temperature before topping with chocolate whipped cream.

Variations on this Chocolate Zucchini Cake:

  1. If you want to go a little healthier with this recipe, you can swap one cup of the flour for whole wheat flour and no one will notice 😉
  2. Add a teaspoon of cinnamon to the cake batter with the cocoa for a more traditional zucchini cake flavor
  3. Add a cup of chocolate chips to the batter before baking for extra melty little pockets of chocolate
  4. Cut into cubes and use a base for an easy trifle, with chocolate whipped cream and fresh fruit

piece of chocolate zucchini cake with fork

How to store this Chocolate Zucchini Cake:

This Chocolate Zucchini Cake can be store at room temperature without whipped cream for one day.

Because this cake is very moist, I find any longer than that and it’s not at its best.

This cake can be topped with whipped cream and refrigerated up to 5-6 days, but it’s unlikely it will last that long!

You can also bake and freeze without whipped cream up to 3 months.

More zucchini recipes you’ll love!

whole chocolate zucchini cake with a piece cut out
Print

Chocolate Zucchini Cake

This Chocolate Zucchini Cake is a deep, dark chocolate cake that is topped with light and fluffy chocolate whipped cream! With 3 cups of zucchini, it is incredibly moist and you won't even notice all the vegetables!
Course Dessert
Cuisine American
Keyword chocolate zucchini cake
Prep Time 15 minutes
Cook Time 30 minutes
Total Time 45 minutes
Servings 12 servings
Calories 371kcal
Author Ashley Fehr

Ingredients

  • 2 cups sugar
  • 1 cup buttermilk
  • 2 eggs
  • 1 teaspoon vanilla
  • 2 cups flour (fluffed and levelled)
  • 3/4 cup cocoa powder
  • 2 teaspoons baking soda
  • 1 teaspoon salt
  • 1 teaspoon baking powder
  • 3 cups shredded zucchini (about 2 small or 1 large)

Whipped Cream

  • 1 1/2 cups heavy whipping cream
  • 1/2-3/4 cup powdered sugar (more or less depending on your tastes)
  • 2 tablespoons cocoa powder
  • 1 teaspoon vanilla

Instructions

  • Preheat oven to 350 degrees and lightly grease a 9x13" pan (line with parchment paper if desired)
  • In a large bowl, whisk together sugar, buttermilk, eggs and vanilla until smooth.
  • Add flour, cocoa powder, baking soda, salt and baking powder and stir until combined.
  • Stir in zucchini, just until combined.
  • Spread into prepared pan and bake for 30-34 minutes, until a toothpick inserted in the center comes out clean or with moist crumbs. Set aside to cool to room temperature.

Whipped Cream:

  • In a medium bowl, combine cream, sugar, cocoa and vanilla.
  • Beat with an electric mixer on low until incorporated, then beat on high until stiff peaks form.
  • Spread over cooled cake and serve.

Nutrition

Calories: 371kcal | Carbohydrates: 61g | Protein: 6g | Fat: 14g | Saturated Fat: 8g | Cholesterol: 70mg | Sodium: 424mg | Potassium: 291mg | Fiber: 3g | Sugar: 40g | Vitamin A: 572IU | Vitamin C: 6mg | Calcium: 77mg | Iron: 2mg


from The Recipe Critic https://ift.tt/3iGOuaq
https://ift.tt/2CdHT6w