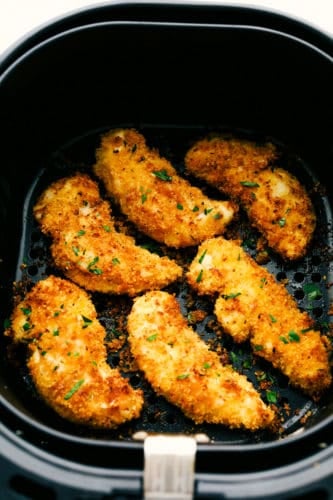
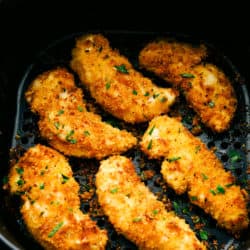
Crispy Parmesan Air Fryer Chicken Tenders are crispy golden outside and tender juicy inside with hint of garlic and tons of flavor. They are perfect for a quick dinner, lunch or even snack.
These are so easy, and so good, you’re family is going to love these! Serve these scrumptious tenders with a Caesar Salad, Honey Lime Poppy Seed Fruit Salad, and Homemade Air Fryer French Fries for a well rounded satisfying dinner.

Air Fryer Chicken Tenders
Air Fryer Parmesan Chicken Tenders are one of the best ways to cook chicken. It’s juicy, tasty, crunchy and healthy. It’s the best of all things! The other winner about this dish is it’s super fast. I love things that are quick and heathy.
These are so good you will reach for them over and over. Serve these tasty vittles with your favorite dipping sauce. I’ve given you some inspiration below. Try something new, try two or three, or just experiment. They’re so easy and so good, you’ll make them again and again.
Chicken Tender In an Air Fryer
- Chicken Tenders: Boneless and Skinless for less work.
- White Flour: White flour will adhere best to the chicken
- Salt and Pepper: Add to taste
- Olive oil or Butter: Either one will produce a nice crisp and wonderful flavor
- Garlic: Use fresh garlic for the best zing.
- Basil: Dried basil will add flavor without burning the fresh basil
- Paprika: Creates flavor and a bit of color
- Panko: Panko creates a great crunch, but you can use bread crumbs too.
- Parmesan Cheese: Finely fresh for the best seasoning
How Long to Cook Chicken Tenders in an Air Fryer
- Trim: If there is any excess fat on the tenders, trim it.
- Bowls: Set out 3 bowls. In the first one fill with the flour and salt and pepper. Second bowl fill with either the olive oil or butter and garlic. In the third bowl place the basil, paprika, panko and parmesan cheese. Stir all of the bowls to mix.
- Coat: Dip the chicken first in the flour mixture, then the garlic butter, then the panko mixture. Make sure to evenly and thoroughly coat each piece.
- Air Fry: Place the tenders in the air fryer and cook 400 for 9 min. Flip and cook for another 8-9 min or till the internal temp is 165 degrees F.

Tips and Tricks for the Best Chicken Tenders
- Panko: You really want to use panko breadcrumbs instead of regular breadcrumbs. They are lighter and airier and because of that will absorb less oil and end up crispier. Breadcrumbs will work but they’ll be heavier.
- Shake: A fun way to involve your kids in the baking is to put the panko and seasoning in a large ziploc bag. Place the chicken tenders in and let the kids shake it up.
- Spices: You can definitely mix this up and add in different spices to your panko mixture. Italian, Mexican, Cajun, or whatever you want to mix up the spices.
- Dry: Pat the Chicken dry before you dredge it. It’ll help all the goodness stick together.
- Press: To help your coating stick press the crumbs on to the chicken strips.
- Crowding: You don’t want to overcrowd the air fryer. They shouldn’t touch to allow for maximum air flow and they’ll cook nice and even.
- Do not overcook the tenders. Otherwise, they become dry.
- Over Cooking: This is a no no. Use a meat thermometer and test them before you think they are done to make sure you don’t over cook them. You are looking for a temp of 165 degrees.

Storing and Reheating
- Fridge: Store leftover tenders in an airtight container or large resealable bag in the fridge for 3-4 days.
- Freeze: Freeze these after they have cooled completely. To keep from sticking line them on a baking sheet for 2 hours then transfer for them to a freezer safe bag or container. Freeze for up to 3 months.
- Reheat: To keep them crispy reheat in the air fryer. Heat at 375 for 5-10 minutes, flipping half way through, till hot.

Dipping Sauce Recipes
These will go with any sauce you desire, but try a homemade sauce for good measure!
- Easy Homemade BBQ Sauce
- Tzatziki Sauce
- Homemade Cheese Sauce
- Authentic Yum Yum Sauce
- Famous Fry Sauce
Crispy Parmesan Air Fryer Chicken Tenders
Ingredients
- 1 1/4 pounds chicken tenders boneless skinless
- 1/2 cup white flour
- Salt and Pepper
- 6 tablespoons olive oil or melted butter
- 3 teaspoons minced garlic
- 1 teaspoon dried basil
- 1/4 teaspoon paprika
- 1 cup Panko
- 2/3 cup Parmesan cheese freshly grated
Instructions
-
Trim the fat from the tenders. Set out three bowls. Fill one with the white flour, about 1/4 teaspoon pepper, & about 1/2 teaspoon salt. Stir. Fill the next bowl with the olive oil or butter and minced garlic. Stir. Place the basil, paprika, Panko, and parmesan cheese in the last. Stir.
-
Place the tenders in the flour mixture, then the garlic oil, then the panko mixture making sure to evenly and thoroughly coat each piece.
-
Place the tenders in the basket of the air fryer.
-
Cook at 400 degrees for 9 minutes and then flip the tenders and cook for another 8-9 minutes or until the internal temperature of the chicken reaches 165 degrees F.
-
Remove and enjoy immediately with the dipping sauce!
Nutrition
from The Recipe Critic https://ift.tt/3jS5WrQ
https://ift.tt/383MF4i