गुरुवार, 5 नवंबर 2020

Firecracker Chicken

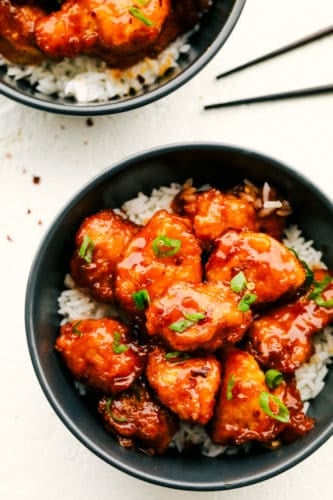
This Firecracker Chicken is sweet, spicy and adds a nice kick to your meal. The chicken is super tender and juicy!

Serve this restaurant worthy dish with a side of Easy Fried Rice, Vegetable Egg Rolls and Cream Cheese Wontons for a meal you’ll have on repeat.

Sweet and Spicy perfect homemade Firecracker Chicken.

Firecracker Chicken Recipe

This is a perfect marriage of sweet and spicy. It’s not too hot and it’s not too sweet. The chicken is flash fried so the outside browns beautifully. Then it finishes cooking as it marinates in the sauce. The sauce will thicken beautifully as it cooks. It is just so GOOD!

This is such an easy recipe as well. It takes time, but it’s so worth it. It comes together quickly then finishes in the oven while you get the rest of what you need to done. You will not regret trying this. You’ll give up take out and it’s better for you too. Give it a try tonight!

Baked Firecracker Chicken Ingredients

The sauce is a perfect balance of heat and sweet and that will knock your taste buds off, but not burn them off.  Your family and loved ones are going to love this!

  • Canola oil: Just enough to flash fry the chicken in.
  • Chicken Breasts: Boneless skinless make prepping a breeze.
  • Salt and Pepper: Add to taste
  • Cornstarch: Cannot sub for flour, this is the secret to amazing coating
  • Eggs: Well beaten

Making the Sauce! 

  • Buffalo Sauce: Use your favorite brand, if you want it really spicy use a hot sauce like Frank’s brand
  • Brown Sugar:This brings the sweet to the fire.
  • Water: Helps dissolve the sugar
  • Apple Cider Vinegar: Needed for that tang
  • Salt:Creates a balance in the sauce
  • Red pepper Flakes: These add extra heat, leave out if you want to

How to Make Easy Firecracker Chicken

It’s so easy and tastes so much better than take out. Now take out begins at home!

  1. Prepare: Preheat oven to 325 and cut the chicken into bite sized pieces. Season with salt and pepper.
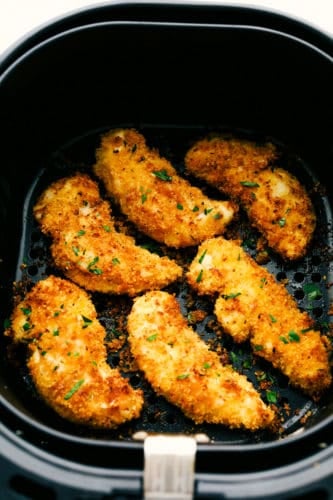
  2. Bowls: In two separate bowls place the cornstarch, the beaten eggs. dip chicken into cornstarch then coat in egg mixture.
  3. Flash-Fry: Heat the oil in a large skillet on medium high heat. Cook the chicken till just the outside is browned. Place in a greased 9×13 pan.
  4. Sauce: In a separate bowl mix the ingredients for the sauce, pour over the chicken.
  5. Bake: Bake for 1 hour. Stirring every 15 minutes.


Cutting and dredging Firecracker Chicken.

Trust Me on these Tips!

This is the same method as my Baked Sweet and Sour Chicken so it shares my same tips.

  1. Method to the Madness: Make sure you first coat your chicken in the cornstarch and then the egg. This method makes the perfect breading for the chicken.
  2. Fast: Do not cook the chicken all the way through before baking.  You just want to get the chicken lightly brown on the outside, and then it bakes to perfection.
  3. Low and Slow: Baking the chicken at a low temperature will not over cook the chicken. This helps to cook the chicken all the way through and thicken up the sauce.

Flash frying and pouring sauce over Firecracker Chicken.

More Hints and Helps for a Perfect Firecracker Chicken Dish

  • Spice: You can take the heat up or down depending on your tastes. Use hot sauce or sriracha for a hotter dish. Use a buffalo sauce for a milder heat.
  • Vegetables: Add peppers, broccoli or other vegetables to the baking for variety.
  • Fruit: Add some pineapple chunks to help with the heat and give it a bit more sweetness
  • Chicken: Cut the Chicken into even bite sized pieces so it’ll cook evenly. Using thighs might result in uneven cooking as light and dark meat cook differently.
  • Pork: This recipe would also work perfectly with pork.
  • Saucey:  If you like your dish saucey, double the sauce recipe and place half on the chicken and another half on the stove in a pot at a simmer for 8-10 min till thickened.
  • Serve:  This dish is perfect on a bed of rice, stir fried veggies, quinoa or over a bed of lettuce for an Asian inspired salad.

Sweet and Spicy perfect homemade Firecracker Chicken.

Storing Firecracker Chicken Leftovers

  • Fridge: Place leftovers in an airtight container in the fridge for up to 3-4 days.
  • Freezer: This can be frozen too. Just place in a freezer safe container or bag and freeze for up to 3 months.
  • Reheat: Sweet and Sour Chicken is best reheated on the stove. Reheating it in the microwave can make the chicken rubbery and overcooked. Place leftovers in pan on the stove top and heat on medium heat, stirring often, till heated through

Sweet and Spicy perfect homemade Firecracker Chicken over rice.


More Easy Homemade Asian Inspiration

Print

Firecracker Chicken

Amazing restaurant quality chicken that has just the right amount of sweet and the right amount of spice!
Course Dinner, Main Course
Cuisine Asian American
Keyword asian chicken, chicken recipes, firecraker chicken
Prep Time 30 minutes
Cook Time 1 hour
Total Time 1 hour 30 minutes
Servings 6 Servings
Calories 531kcal
Author Alyssa Rivers

Ingredients

  • 1/4 cup canola oil
  • 4 chicken breasts boneless skinless
  • Salt
  • pepper
  • 1 cup cornstarch
  • 2 large eggs beaten

Sauce:

  • 1/3 cup buffalo sauce if you like more heat use hot sauce, like Frank's brand
  • 1 1/4 cup light brown sugar packed
  • 1 tablespoon water
  • 2 teaspoons apple cider vinegar
  • 1/2 teaspoon salt
  • 1/4 teaspoon red pepper flakes

Instructions

  • Preheat oven to 325 degrees. Cut chicken breasts into bite-sized pieces and season with salt and pepper.
  • In separate bowls, place cornstarch and slightly beaten eggs. Dip chicken into cornstarch then coat in egg mixture. I have also found that you can put the cornstarch in a gallon sized bag and shake the chicken to coat.
  • Heat canola oil in a large skillet over medium-high heat and cook chicken until browned. Place the chicken in a 9 x 13 greased baking dish.
  • In a medium sized mixing bowl, buffalo sauce, brown sugar, apple cider vinegar, water, salt and red pepper flakes. Pour over chicken and bake for 1 hour.
  • I stirred the chicken every 15 minutes so that it coated them in the sauce.

Notes

Updated on November 4, 2020
Originally Posted on August 6, 2013

Nutrition

Calories: 531kcal | Carbohydrates: 65g | Protein: 34g | Fat: 15g | Saturated Fat: 2g | Cholesterol: 151mg | Sodium: 815mg | Potassium: 639mg | Fiber: 1g | Sugar: 45g | Vitamin A: 149IU | Vitamin C: 2mg | Calcium: 54mg | Iron: 1mg


Save


from The Recipe Critic https://ift.tt/2JspeaD
https://ift.tt/34ZBacl

बुधवार, 4 नवंबर 2020

Amazing Cranberry Relish

This is the easiest, most zingy, colorful and flavorful Cranberry Relish. Make your next turkey sing with this fresh relish. It’s super easy, full of fresh flavors and tops just about anything!

Add some color to your Thanksgiving this year! This will go with so many dishes but I do love it with Juicy Butter Herb Turkey or Cast Iron Skillet Pork Chops.

Sweet and zingy Cranberry Relish.

Cranberry Orange Recipe

Cranberry relish is absolutely divine. It’s fresh and uncooked, giving the cranberry an entirely different flavor. It’s so easy to make that you don’t have to stress. Because you throw it all in the food processor you don’t have to worry about it taking up space on the stove on a busy holiday baking day.

The zing, sweet and tart flavors are a match made in heaven and liven up any meal you serve it with. It will transform your holidays or your every day meal. You’ll want to put this on your to do list this holiday season!

Fresh Cranberry Relish Ingredients

  • Fresh Cranberries: These are usually found in the produce section of your local store when in season.
  • Orange: Cut it up but leave the peel on
  • Green Apple: Chop for best results
  • Pecans: Adds crunch and flavor
  • Sugar: You need the sugar to combat the bitter and tartness of the cranberries
  • Orange Juice:  Adds enough flavor and a bit of liquid to create the right consistency.

Making the Relish!

Place all of the ingredients in a food processor and pulse till coarsely ground. It is simple and will make a sweet and tangy relish that is to die for!

Making easy sweet and zingy Cranberry Relish.

Tips for the Best Cranberry Relish

  • Difference: This is called a relish because it uses fresh cranberries and fresh ingredients. Cranberry sauce is cooked.
  • Pick your Cranberries: Wash and pick through your cranberries and take out any bad ones. You can do this easily by putting them in a bowl of water. The good cranberries will float, any bad ones will sink. Just skim off the top and through the bad ones out.
  • Make A-Head: This is a great recipe to make ahead, up to 3 days in advance actually. I recommend allowing the relish to sit in the fridge for at least an hour or more to let the sugar break down the bitterness of the cranberries. And let the flavors meld together.
  • Customize: Make this to your liking. Add pear or pineapple instead of apple, cinnamon or ginger for extra spice.  For extra crunch add in celery or more nuts.
  • Fridge: You can keep this relish in an air tight container for up to 2 weeks.
  • Freezer: It can also be frozen for up to 2 months. Let thaw in the fridge before use.

Blended Cranberry Relish.

Uses for Homemade Relish

Besides eating it straight from the jar, there are lots of uses for this cranberry relish.

  • Meat: Cranberry is a shoe-in for Turkey but you can use it with chicken, pork or even beef with success
  • Dip: Pour over cream cheese and serve with crackers or chips.
  • Brie: Serve over baked brie
  • Dessert: Serve on top of cake, ice cream, or cheese cake. Divine!
  • Top it: This is yummy as a topping for waffles, pancakes, yogurt or toast.
  • Spread it: Use instead of mayo on your next sandwich.

Sweet, zingy, colorful Cranberry Relish.

More Amazing Cranberry Dishes

Print

Cranberry Relish

This is the easiest, most zingy, colorful and flavorful Cranberry Relish. Make your next Turkey sing with this fresh relish. It's super easy, full of fresh flavors and tops just about anything.
Course Side Dish
Cuisine American
Keyword cranberry relish, cranberry relish recipe
Prep Time 10 minutes
Total Time 10 minutes
Servings 8 People
Calories 164kcal
Author Alyssa Rivers

Ingredients

  • 1 pound fresh cranberries
  • 1 orange sliced with peel on
  • 1 small green apple chopped
  • 1/4 cup pecans
  • 1 cup sugar
  • 2 Tablespoons orange juice

Instructions

  • In a food processor add cranberries, orange, green apple, pecans, sugar and orange juice. Pulse until coarsely chopped and serve!

Nutrition

Calories: 164kcal | Carbohydrates: 37g | Protein: 1g | Fat: 2g | Saturated Fat: 1g | Sodium: 2mg | Potassium: 119mg | Fiber: 4g | Sugar: 31g | Vitamin A: 89IU | Vitamin C: 19mg | Calcium: 13mg | Iron: 1mg


from The Recipe Critic https://ift.tt/2Jsqg6u
https://ift.tt/34WGdKt

मंगलवार, 3 नवंबर 2020

White Chicken Chili

White Chicken Chili is loaded with beans, chicken, green chilies and the most luscious creamy broth. A twist on a classic that’s perfect for a cold day. Serve it up with corn bread and a salad and your set for a satisfying comfort meal.

When someone says they’re having Chili they think of recipes like The Best Chili Ever or Instant Pot Chili, but this Chicken White Chili is going to surprise and wow your friends and family.

Creamy, savory, hearty White Chicken Chili.

White Chicken Chili Recipe

There’s nothing better than a bowl of hearty soup on a cold day. This white chicken chili is loaded with flavor and texture, and it’s ready in just 30 minutes! Serve this white chili with a variety of toppings or a side of cornbread for a meal the whole family is sure to love.

It’s such a different kind of chili and perfect for those who aren’t fond of beef or can’t tolerate the acid of tomatoes, but love that chili flavor. The creamy broth is deceptively spicy and mild at the same time. It’s a satisfying Mexican zesty soup that will warm you from the inside out.

White Bean Chicken Chili Ingredients

Nothing super fancy here combine for a fantastic flavor!

  • Olive Oil: To sauté the chicken onion and garlic
  • Onion: Chop the onion
  • Garlic: Minced garlic is best for flavor distribution
  • Chicken: You can use skinless boneless chicken breasts or thighs
  • Cumin: Classic Mexican seasoning
  • Coriander: Adds a wonderful flavor
  • Salt and Pepper: add more or less to taste
  • Chicken Broth: Can substitute vegetable broth
  • Green chilies: Canned chopped green chilies drained
  • White Beans: White beans are often called Great Northern beans
  • Sour Cream: This adds a deep richness and creaminess

Making Easy White Chicken Chili

Super easy for such a marvelous soup!

  1. Sauté: Heat the olive oil in a large pot over medium heat. Add the onion and cook for 3-4 minutes until translucent.
  2. Add: Put the chicken in the pot along with the cumin, coriander, salt and pepper.
  3. Cook:, stirring occasionally, until chicken is cooked through, approximately 5 minutes.
  4. Add: the chicken broth, green chiles and beans to the pot; bring to a simmer.
  5. Cook: for 10 minutes. Remove the pot from the heat and whisk in the sour cream.
  6. Serve: immediately with toppings of your choice.

Making creamy, savory, hearty White Chicken Chili.

Tips and Variations for the Best Chili

  • Dice: Keep your chicken the same bite sized pieces to cook evenly.
  • To Drain or not to Drain: This recipe calls to drain your green chilies but I often don’t. I like the extra kick of spice it adds to the broth. There isn’t that much to drain off either, so it’s easier to just dump it all in.
  • Heat: If you really want to spice it up you can use medium or hot chilies or even canned diced jalapenos
  • Toppings: Cheese, sour cream, avocado, cilantro, tomatoes, corn and tortilla strips are all favorite toppings.
  • Beans: I like to use the smaller great northern beans but you can also use white kidney or cannellini beans if you prefer.
  • Slow Cooker: To use a slow cooker, add everything to the slow cooker except the sour cream and cook on high for 4-6 or low 8-10. When done turn it off and add the sour cream, let it sit for about 10 min till heated through.
  • Instant Pot: Cook in the instant pot add everything but the sour cream and beans. Cook on manual for 20 min. Natural release for 10 min. Remove the chicken and shred. Return to the pot and add beans and sour cream. Allow to heat through for about 15 min and serve.

Storing Leftovers

  • Fridge: The soup keeps fantastically in the fridge for up to 5 days.
  • Freeze: You can freeze this soup. Cook as recipe instructs except do not add the sour cream. Freeze for up to 2 months. Thaw overnight in the fridge. Heat on the stove top on medium till hot. Add the sour cream, stir till heated and serve.

Creamy, savory, hearty White Chicken Chili.

More Chili Recipes to Love

Print

White Chicken Chili

This easy white chicken chili is loaded with beans, chicken and green chiles, all in the most delicious creamy broth. A dinner option that's perfect for a cold day!
Course Dinner
Cuisine American
Keyword chicken chili, creamy white chicken chili, white chicken chili
Prep Time 10 minutes
Cook Time 20 minutes
Total Time 30 minutes
Servings 4 People
Calories 306kcal
Author Alyssa Rivers

Ingredients

  • 1 tablespoon olive oil
  • 1 onion finely chopped
  • 2 teaspoons minced garlic
  • 2 cups chicken, cooked rotisserie works great
  • 1 1/2 teaspoons ground cumin
  • 1 teaspoon ground coriander
  • 1 teaspoon salt
  • 1/2 teaspoon pepper
  • 4 cups chicken broth
  • 1 4 ounce can green chiles drained
  • 2 15 ounce cans white beans such as great northern beans drained and rinsed
  • 1 cup sour cream
  • Assorted toppings such as cheese tortilla strips, chopped cilantro and avocado.

Instructions

  • Heat the olive oil in a large pot over medium heat. Add the onion and cook for 3-4 minutes until translucent.
  • Add the chicken to the pot along with the cumin, coriander, salt and pepper.
  • Add the chicken broth, green chiles and beans to the pot; bring to a simmer.
  • Cook for 10 minutes. Remove the pot from the heat and whisk in the sour cream.
  • Serve immediately with toppings of your choice.

Notes

Updated on November 3, 2020
Originally Posted on December 9, 2017

Nutrition

Calories: 306kcal | Carbohydrates: 8g | Protein: 27g | Fat: 19g | Saturated Fat: 8g | Cholesterol: 102mg | Sodium: 1762mg | Potassium: 782mg | Fiber: 1g | Sugar: 3g | Vitamin A: 435IU | Vitamin C: 32.5mg | Calcium: 113mg | Iron: 2.1mg


from The Recipe Critic https://ift.tt/3ekzZqW
https://ift.tt/328yzuC

Crispy Parmesan Air Fryer Chicken Tenders

Crispy Parmesan Air Fryer Chicken Tenders are crispy golden outside and tender juicy inside with hint of garlic and tons of flavor. They are perfect for a quick dinner, lunch or even snack.

These are so easy, and so good, you’re family is going to love these! Serve these scrumptious tenders with a Caesar Salad, Honey Lime Poppy Seed Fruit Salad, and Homemade Air Fryer French Fries for a well rounded satisfying dinner.

Crispy golden crust, juicy tender inside. Air Fryer Chicken Tenders

Air Fryer Chicken Tenders

Air Fryer Parmesan Chicken Tenders are one of the best ways to cook chicken. It’s juicy, tasty, crunchy and healthy. It’s the best of all things! The other winner about this dish is it’s super fast. I love things that are quick and heathy.

These are so good you will reach for them over and over. Serve these tasty vittles with your favorite dipping sauce. I’ve given you some inspiration below. Try something new, try two or three, or just experiment. They’re so easy and so good, you’ll make them again and again.

Chicken Tender In an Air Fryer

  • Chicken Tenders: Boneless and Skinless for less work.
  • White Flour: White flour will adhere best to the chicken
  • Salt and Pepper: Add to taste
  • Olive oil or Butter: Either one will produce a nice crisp and wonderful flavor
  • Garlic: Use fresh garlic for the best zing.
  • Basil: Dried basil will add flavor without burning the fresh basil
  • Paprika: Creates flavor and a bit of color
  • Panko: Panko creates a great crunch, but you can use bread crumbs too.
  • Parmesan Cheese: Finely fresh for the best seasoning

How Long to Cook Chicken Tenders in an Air Fryer

  1. Trim: If there is any excess fat on the tenders, trim it.
  2. Bowls: Set out 3 bowls. In the first one fill with the flour and salt and pepper. Second bowl fill with either the olive oil or butter and garlic. In the third bowl place the basil, paprika, panko and parmesan cheese. Stir all of the bowls to mix.
  3. Coat: Dip the chicken first in the flour mixture, then the garlic butter, then the panko mixture. Make sure to evenly and thoroughly coat each piece.
  4. Air Fry: Place the tenders in the air fryer and cook 400 for 9 min. Flip and cook for another 8-9 min or till the internal temp is 165 degrees F.

Dipping, dredging and coating of Air Fryer chicken tenders.

Tips and Tricks for the Best Chicken Tenders

  • Panko: You really want to use panko breadcrumbs instead of regular breadcrumbs. They are lighter and airier and because of that will absorb less oil and end up crispier. Breadcrumbs will work but they’ll be heavier.
  • Shake: A fun way to involve your kids in the baking is to put the panko and seasoning in a large ziploc bag. Place the chicken tenders in and let the kids shake it up.
  • Spices: You can definitely mix this up and add in different spices to your panko mixture. Italian, Mexican, Cajun, or whatever you want to mix up the spices.
  • Dry: Pat the Chicken dry before you dredge it. It’ll help all the goodness stick together.
  • Press: To help your coating stick press the crumbs on to the chicken strips.
  • Crowding: You don’t want to overcrowd the air fryer. They shouldn’t touch to allow for maximum air flow and they’ll cook nice and even.
  • Do not overcook the tenders. Otherwise, they become dry.
  • Over Cooking:  This is a no no. Use a meat thermometer and test them before you think they are done to make sure you don’t over cook them. You are looking for a temp of 165 degrees.

Crispy golden outside, juicy tender inside, Air Fryer Chicken Tenders.

Storing and Reheating

  • Fridge: Store leftover tenders in an airtight container or large resealable bag in the fridge for 3-4 days.
  • Freeze: Freeze these after they have cooled completely. To keep from sticking line them on a baking sheet for 2 hours then transfer for them to a freezer safe bag or container. Freeze for up to 3 months.
  • Reheat: To keep them crispy reheat in the air fryer. Heat at 375 for 5-10 minutes, flipping half way through, till hot.

Crispy golden Air Fryer Chicken Tenders being dipped in honey mustard sauce.

Dipping Sauce Recipes

These will go with any sauce you desire, but try a homemade sauce for good measure!

Print

Crispy Parmesan Air Fryer Chicken Tenders

Crispy Parmesan Air Fryer Chicken Tenders are crispy golden outside and tender juicy inside with hint of garlic and tons of flavor. They are perfect for a quick dinner, lunch or even snack.
Course Dinner
Cuisine American
Keyword air fryer chicken tenders, chicken tenders
Prep Time 5 minutes
Cook Time 18 minutes
Total Time 23 minutes
Servings 4 People
Calories 284kcal
Author Alyssa Rivers

Ingredients

  • 1 1/4 pounds chicken tenders boneless skinless
  • 1/2 cup white flour
  • Salt and Pepper
  • 6 tablespoons olive oil or melted butter
  • 3 teaspoons minced garlic
  • 1 teaspoon dried basil
  • 1/4 teaspoon paprika
  • 1 cup Panko
  • 2/3 cup Parmesan cheese freshly grated

Instructions

  • Trim the fat from the tenders. Set out three bowls. Fill one with the white flour, about 1/4 teaspoon pepper, & about 1/2 teaspoon salt. Stir. Fill the next bowl with the olive oil or butter and minced garlic. Stir. Place the basil, paprika, Panko, and parmesan cheese in the last. Stir.
  • Place the tenders in the flour mixture, then the garlic oil, then the panko mixture making sure to evenly and thoroughly coat each piece.
  • Place the tenders in the basket of the air fryer.
  • Cook at 400 degrees for 9 minutes and then flip the tenders and cook for another 8-9 minutes or until the internal temperature of the chicken reaches 165 degrees F.
  • Remove and enjoy immediately with the dipping sauce!

Nutrition

Calories: 284kcal | Carbohydrates: 24g | Protein: 34g | Fat: 5g | Saturated Fat: 1g | Cholesterol: 91mg | Sodium: 275mg | Potassium: 586mg | Fiber: 1g | Sugar: 1g | Vitamin A: 104IU | Vitamin C: 3mg | Calcium: 47mg | Iron: 2mg


from The Recipe Critic https://ift.tt/3jS5WrQ
https://ift.tt/383MF4i